2013 BMW 335IS COUPE steering
[x] Cancel search: steeringPage 106 of 308
105
Technology for driving comfort and safety
Controls
the airbag retention system from the vehicle. Do
not modify the individual components of the
system or its wiring in any way. This includes
the upholstered covers on the steering wheel,
instrument panel, seats and roof posts, as well
as the sides of the roof lining. Do not attempt to
remove or dismantle the steering wheel.
Do not touch the individual components imme-
diately after the system has been triggered,
because there is a danger of burns.
In the event of faults, immobilization, or after the
airbag system has been triggered, have the
testing, repair, or disassembly and scrapping of
gas generators performed only by your BMW
center or a workshop that has the required
explosives licenses. Unprofessional attempts to
work on the system could lead to failure in an
emergency or to undesired airbag activation,
either of which could result in personal injury.
<
Warning notices and information about the air-
bags can also be found on the sun visors.
Automatic deactivation of the front
passenger airbags
An analysis of the impression in the front pas-
senger seat cushion determines whether and
how the seat is occupied. The front and side air-
bags for the front passenger are activated or
deactivated by the system accordingly. The indicator lamp above the interior
rearview mirror shows the current status
of the front passenger airbags, deactivated or
activated, refer to Status of front passenger air-
bags below. <
Before transporting a child on the front
passenger seat, read the safety precau-
tions and handling instructions under Trans-
porting children safely, refer to page 56.
The front and side airbags can also be deacti-
vated by adolescents and adults sitting in cer-
tain positions; the indicator lamp for the front
passenger airbags lights up. In such cases, the
passenger should change his or her sitting
position so that the front passenger airbags are
activated and the indicator lamp goes out. If the
desired airbag status cannot be achieved by changing the sitting posi
tion, transport the rele-
vant passenger on a rear seat. Do not attach
seat covers, seat cushion padding, ball mats or
other items to the front passenger seat unless
they are specifically recommended by BMW.
Do not place any items under the seat which
could press against the seat from below. Other-
wise, a correct analysis of the seat cushion is
not ensured. <
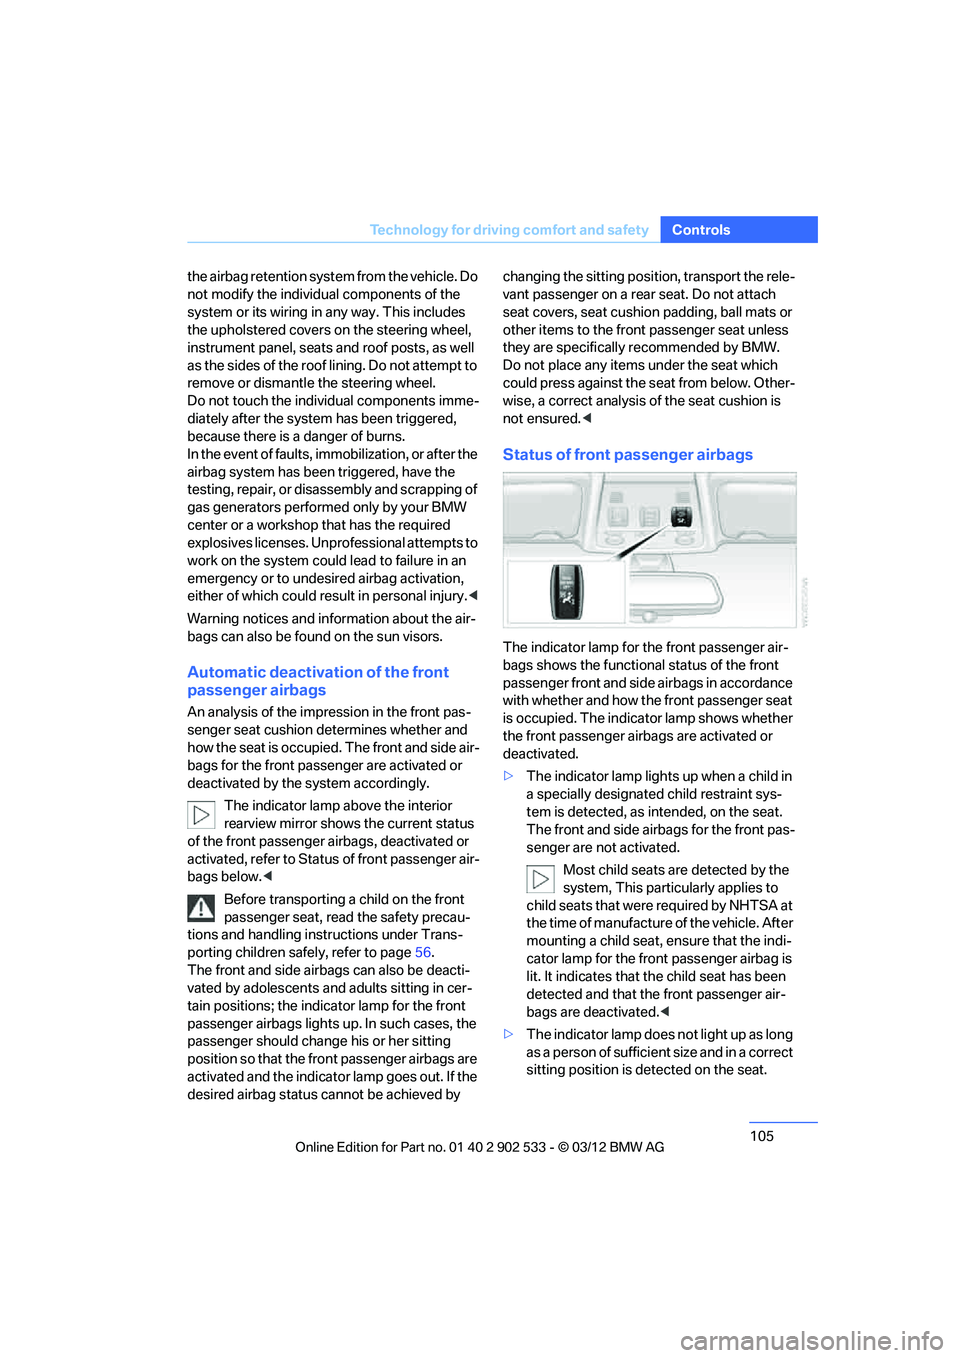
Status of front passenger airbags
The indicator lamp for the front passenger air-
bags shows the functional status of the front
passenger front and side airbags in accordance
with whether and how the front passenger seat
is occupied. The indicator lamp shows whether
the front passenger airbags are activated or
deactivated.
>The indicator lamp lights up when a child in
a specially designated child restraint sys-
tem is detected, as intended, on the seat.
The front and side airbags for the front pas-
senger are not activated.
Most child seats are detected by the
system, This particularly applies to
child seats that were required by NHTSA at
the time of manufacture of the vehicle. After
mounting a child seat, ensure that the indi-
cator lamp for the front passenger airbag is
lit. It indicates that the child seat has been
detected and that the front passenger air-
bags are deactivated. <
> The indicator lamp does not light up as long
as a person of sufficient size and in a correct
sitting position is detected on the seat.
00320051004F004C00510048000300280047004C0057004C005200510003
Page 110 of 308
109
Lamps
Controls
low-beam headlamps manually under these
conditions.
<
Welcome lamps
If you leave the light switch in position 2 or3
when you park the car, the parking lamps and
the interior lamps light up briefly when you
unlock the vehicle.
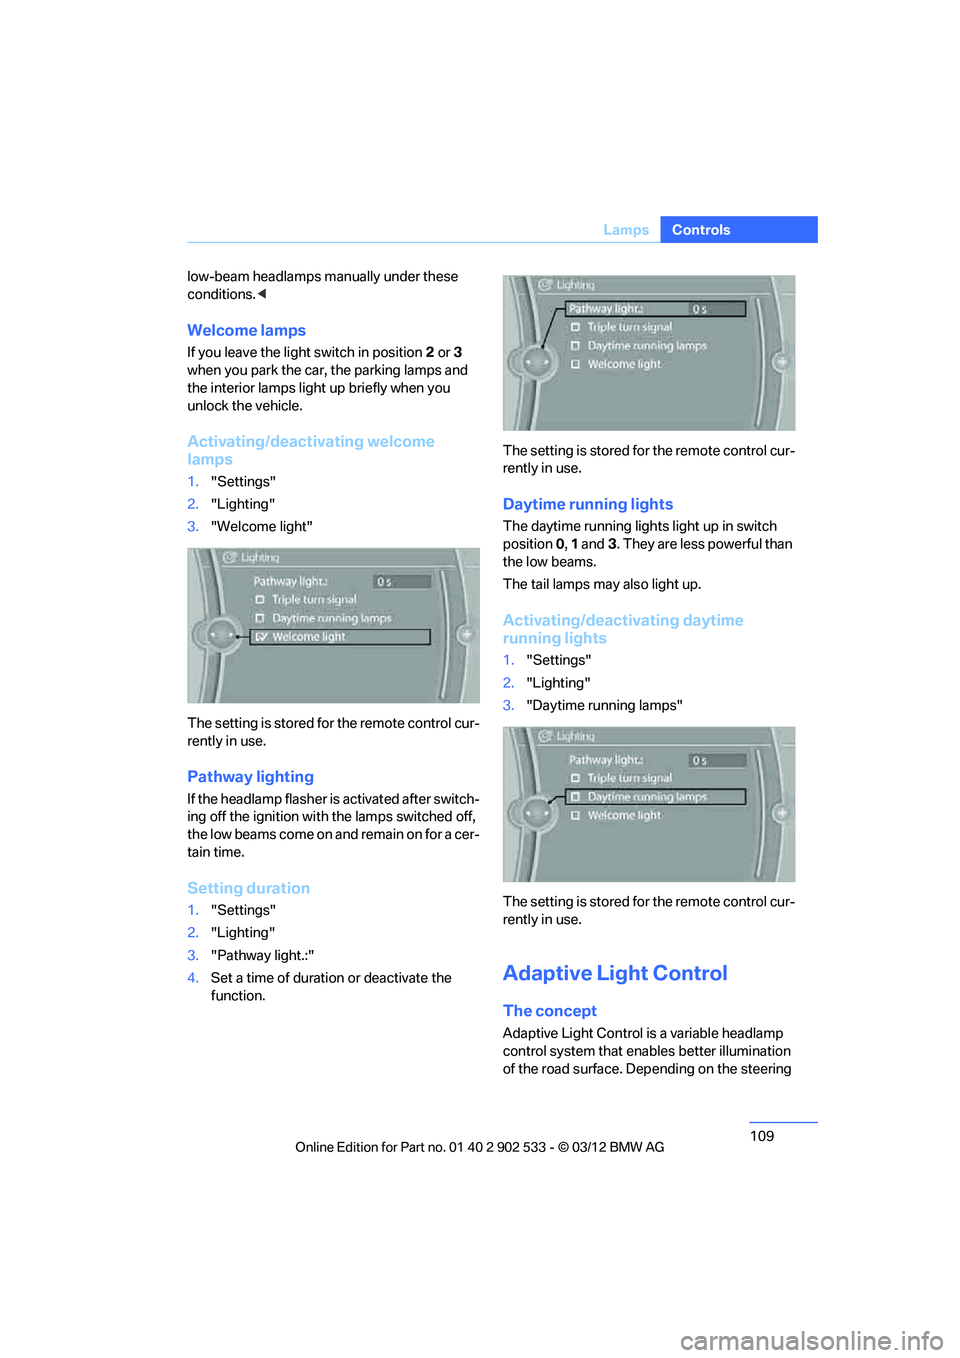
Activating/deactivating welcome
lamps
1. "Settings"
2. "Lighting"
3. "Welcome light"
The setting is stored for the remote control cur-
rently in use.
Pathway lighting
If the headlamp flasher is activated after switch-
ing off the ignition with the lamps switched off,
the low beams come on and remain on for a cer-
tain time.
Setting duration
1. "Settings"
2. "Lighting"
3. "Pathway light.:"
4. Set a time of duration or deactivate the
function. The setting is stored for the remote control cur-
rently in use.
Daytime running lights
The daytime running lights light up in switch
position
0, 1 and 3. They are less powerful than
the low beams.
The tail lamps may also light up.
Activating/deactivating daytime
running lights
1. "Settings"
2. "Lighting"
3. "Daytime running lamps"
The setting is stored for the remote control cur-
rently in use.
Adaptive Light Control
The concept
Adaptive Light Control is a variable headlamp
control system that enables better illumination
of the road surface. Depending on the steering
00320051004F004C00510048000300280047004C0057004C005200510003
Page 111 of 308
110
ControlsLamps
angle and other parameters, the light from the
headlamp follows the course of the road.
In tight curves at speeds up to 40 mph/70 km/h,
e.g. on mountainous roads or when turning, an
additional, corner-illuminating lamp is switched
on that lights up the inside area of the curve.
Activating Adaptive Light Control
With the ignition switched on, turn the light
switch to position 3, refer to page 108.
The corner-illuminating lamp is switched on
automatically, depending on the steering wheel
angle or turn signal indicator.
Standstill function: to avoid blinding oncoming
traffic, the Adaptive Light Control does not
direct light toward the driver's side when the
vehicle is at a standstill.
When you are reversing, only the corner-illumi-
nating lamps are switched on and active on
both sides.
Malfunction
The warning lamp lights up. A mes-
sage appears on the Control Dis-
play.The Adaptive Light Control is
malfunctioning or failed. Have the system
checked as soon as possible.
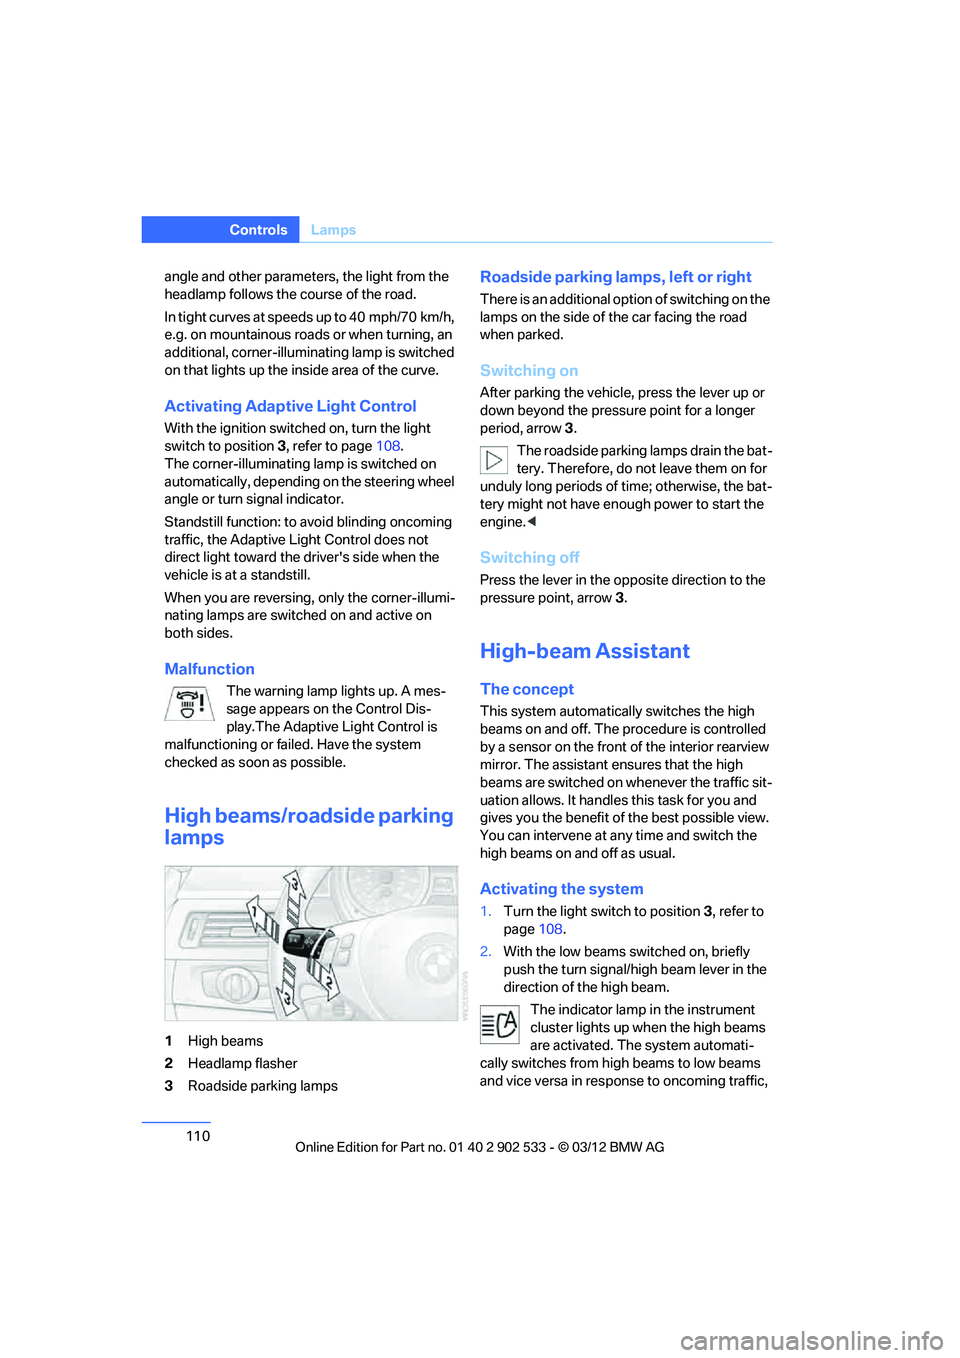
High beams/roadside parking
lamps
1 High beams
2 Headlamp flasher
3 Roadside parking lamps
Roadside parking lamps, left or right
There is an additional option of switching on the
lamps on the side of the car facing the road
when parked.
Switching on
After parking the vehicle, press the lever up or
down beyond the pressure point for a longer
period, arrow 3 .
The roadside parking lamps drain the bat-
tery. Therefore, do not leave them on for
unduly long periods of time; otherwise, the bat-
tery might not have enough power to start the
engine. <
Switching off
Press the lever in the opposite direction to the
pressure point, arrow 3.
High-beam Assistant
The concept
This system automatically switches the high
beams on and off. The procedure is controlled
by a sensor on the front of the interior rearview
mirror. The assistant ensures that the high
beams are switched on whenever the traffic sit-
uation allows. It handles this task for you and
gives you the benefit of the best possible view.
You can intervene at any time and switch the
high beams on and off as usual.
Activating the system
1. Turn the light switch to position 3, refer to
page 108.
2. With the low beams switched on, briefly
push the turn signal/high beam lever in the
direction of the high beam.
The indicator lamp in the instrument
cluster lights up when the high beams
are activated. The system automati-
cally switches from high beams to low beams
and vice versa in response to oncoming traffic,
00320051004F004C00510048000300280047004C0057004C005200510003
Page 117 of 308
116
ControlsClimate
directed toward the windshield, the side win-
dows, the upper body and the footwell.
Pressing the AUTO button automatically
switches on the cooling function.
At the same time, a condensation sensor con-
trols the program so as to prevent window con-
densation as much as possible.
The program is switched off when the air distri-
bution is set manually or the button is pressed
again.
Intensity of the AUTO program
With the AUTO program switched on, auto-
matic control of the air volume and air distribu-
tion can be adjusted:
Press the left side of the button to
reduce the intensity. Press the
right side of the button to increase
it.
The selected intensity is shown on the display
of the automatic climate control.
Convertible program
The Convertible program is active when the
hardtop is open and the AUTO program is
switched on. In the Convertible program, the
automatic climate control is optimized for driv-
ing with the hardtop open. In addition, the air
volume is increased as vehicle speed increases.
The effectiveness of the Convertible pro-
gram can be enhanced considerably by
installing the wind deflector. <
Adjusting air volume manually
To be able to manually adjust the air volume,
switch off the AUTO program first.
Press the left side of the button to
reduce the air volume. Press the
right side of the button to increase
it.
The air flow rate is lowered or switched off
entirely to reduce the drain on the battery. The
display remains the same.
Automatic recirculated air control
AUC/Recirculated air mode
You can respond to unpleasant odors or pollut-
ants in the immediate environment by tempo-
rarily suspending the supply of outside air. The
system then recirculates the air currently within
the vehicle.
Press the button repeatedly to
select an operating mode:
> LED off: outside air flows in continuously.
> Left-hand LED on, AUC mode: a sensor
detects pollutants in the outside air and
controls the shut-off automatically.
> Right-hand LED on, recirculated air mode:
the supply of outside air is permanently
shut off. If the windows fog over, switch off
recirculated air mode and increase the air
volume, if necessary. Make sure that air can
flow onto the windshield.
The recirculated air mode should not be
used over an extended period of time;
otherwise, the air quality inside the car will dete-
riorate continuously. <
Via the button on the steering wheel
You can switch quickly between the recircu-
lated air mode and the previous mode using a
button on the steering wheel, refer to page 11.
ALL program
Press the button.
The current temperature setting
on the driver's side is transferred to
the front passenger side.
If the temperature setting on the driver's side is
changed, the temperature on the front passen-
ger side is changed as well.
The program is switched off when the setting is
adjusted on the front passenger side or the but-
ton is pressed again.
00320051004F004C00510048000300280047004C0057004C005200510003
Page 123 of 308
122
ControlsPractical interior accessories
by means of the hand-held transmitter was
interrupted, hold down the button on the
inside mirror and then press and release the
button on the hand-held transmitter several
times, holding it down for 2 seconds each
time.
Operation
To prevent possible damage or injury,
before programming or using the inte-
grated universal remote control to operate a
device, always inspect the immediate area to
make certain that no people, animals or objects
are within the pivoting or travel range of the
device being operated.
Also follow the safety instructions supplied with
the hand-held transmitter.
door, if the engine is running or the ignition is
switched on. To do so, within the reception
range of the device, press the button of the
device until the function is triggered. The LED
on the inside mirror remains lit during transmis-
sion of the radio signal.Deleting stored functions
Simultaneously hold down the right and left
buttons on the inside mirror for approx. 20 sec-
onds until the LED on the inside mirror flashes
rapidly. All stored functions are deleted. The
functions cannot be deleted individually.
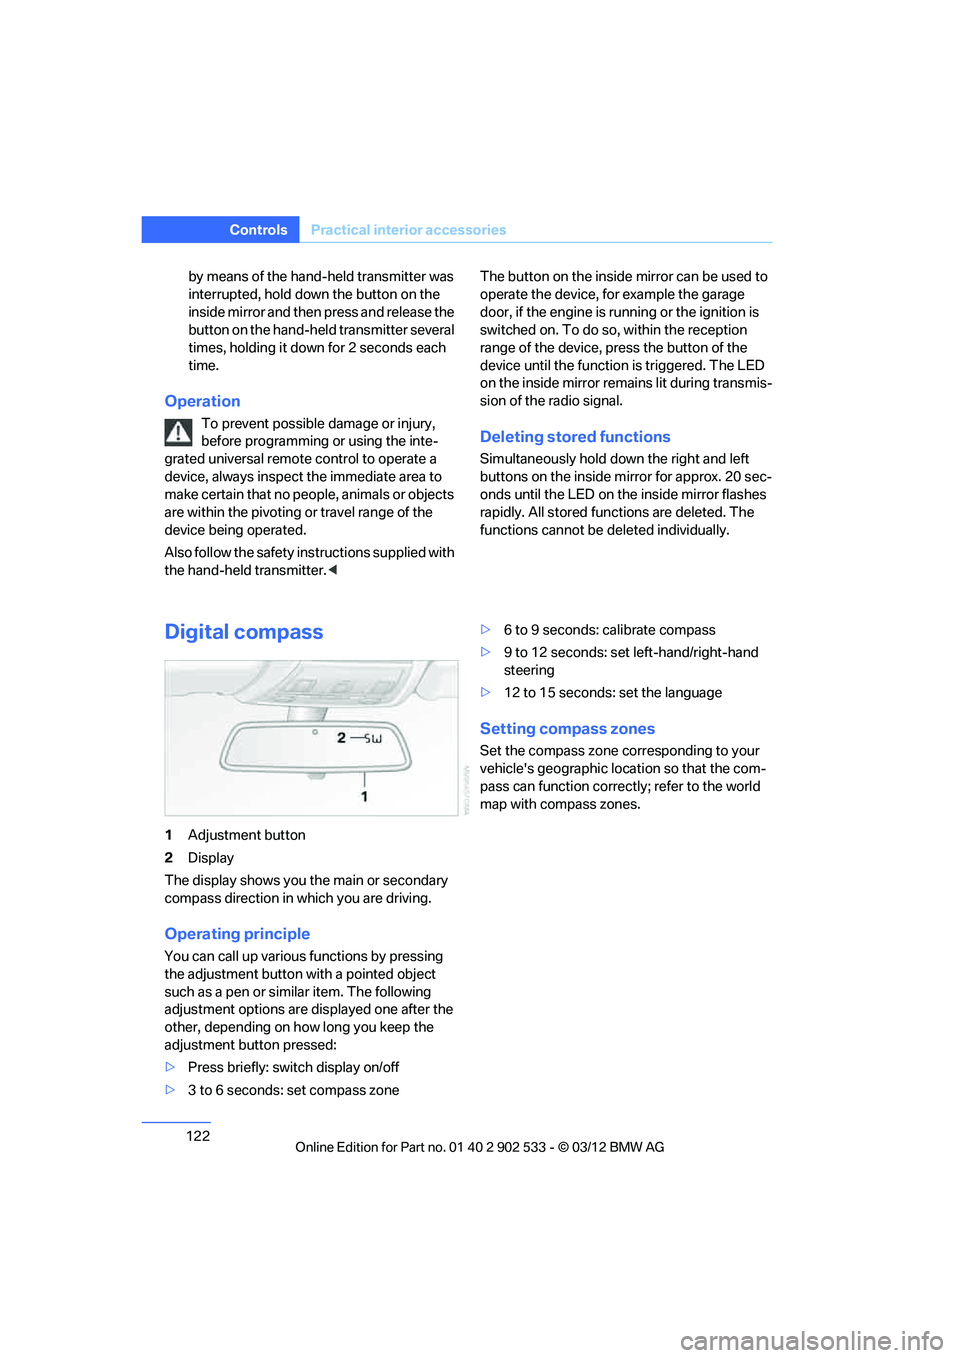
Digital compass
1
Adjustment button
2 Display
The display shows you the main or secondary
compass direction in which you are driving.
Operating principle
You can call up various functions by pressing
the adjustment button with a pointed object
such as a pen or similar item. The following
adjustment options are displayed one after the
other, depending on how long you keep the
adjustment button pressed:
> Press briefly: switch display on/off
> 3 to 6 seconds: set compass zone >
6 to 9 seconds: calibrate compass
> 9 to 12 seconds: set left-hand/right-hand
steering
> 12 to 15 seconds: set the language
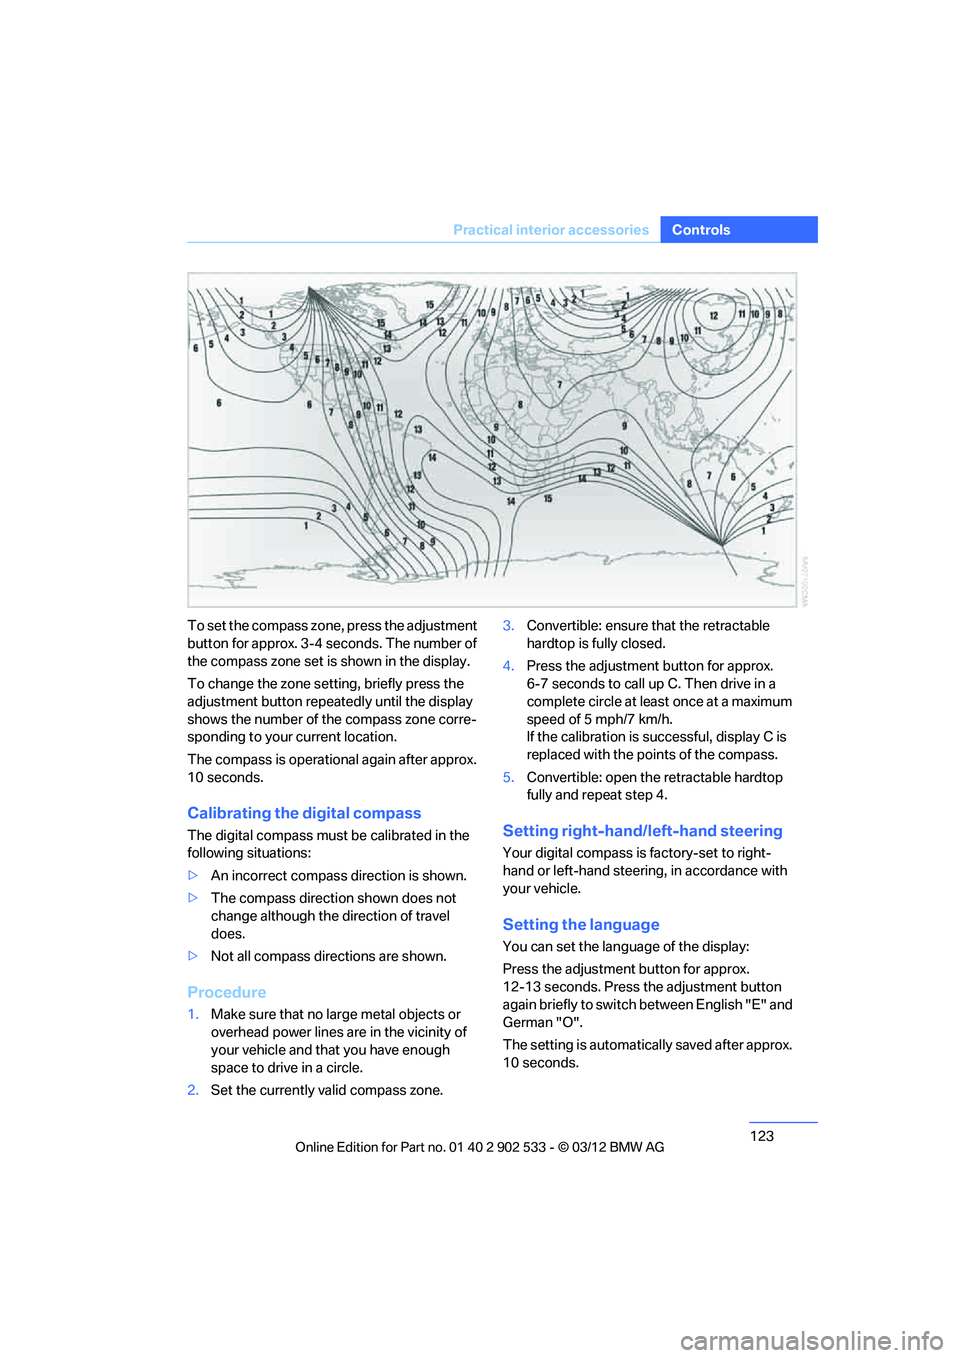
Setting compass zones
Set the compass zone corresponding to your
vehicle's geographic location so that the com-
pass can function correctly; refer to the world
map with compass zones.
00320051004F004C00510048000300280047004C0057004C005200510003
Page 124 of 308
123
Practical interior accessories
Controls
To set the compass zone, press the adjustment
button for approx. 3-4 seconds. The number of
the compass zone set is shown in the display.
To change the zone setting, briefly press the
adjustment button repeatedly until the display
shows the number of the compass zone corre-
sponding to your current location.
The compass is operational again after approx.
10 seconds.
Calibrating the digital compass
The digital compass must be calibrated in the
following situations:
>
An incorrect compass direction is shown.
> The compass direction shown does not
change although the direction of travel
does.
> Not all compass directions are shown.
Procedure
1.Make sure that no large metal objects or
overhead power lines are in the vicinity of
your vehicle and that you have enough
space to drive in a circle.
2. Set the currently valid compass zone. 3.
Convertible: ensure that the retractable
hardtop is fully closed.
4. Press the adjustment button for approx.
6-7 seconds to call up C. Then drive in a
complete circle at least once at a maximum
speed of 5 mph/7 km/h.
If the calibration is successful, display C is
replaced with the points of the compass.
5. Convertible: open the retractable hardtop
fully and repeat step 4.
Setting right-hand/left-hand steering
Your digital compass is factory-set to right-
hand or left-hand steering, in accordance with
your vehicle.
Setting the language
You can set the language of the display:
Press the adjustment button for approx.
12-13 seconds. Press the adjustment button
again briefly to switch between English "E" and
German "O".
The setting is automatically saved after approx.
10 seconds.
00320051004F004C00510048000300280047004C0057004C005200510003
Page 126 of 308
125
Practical interior accessories
Controls
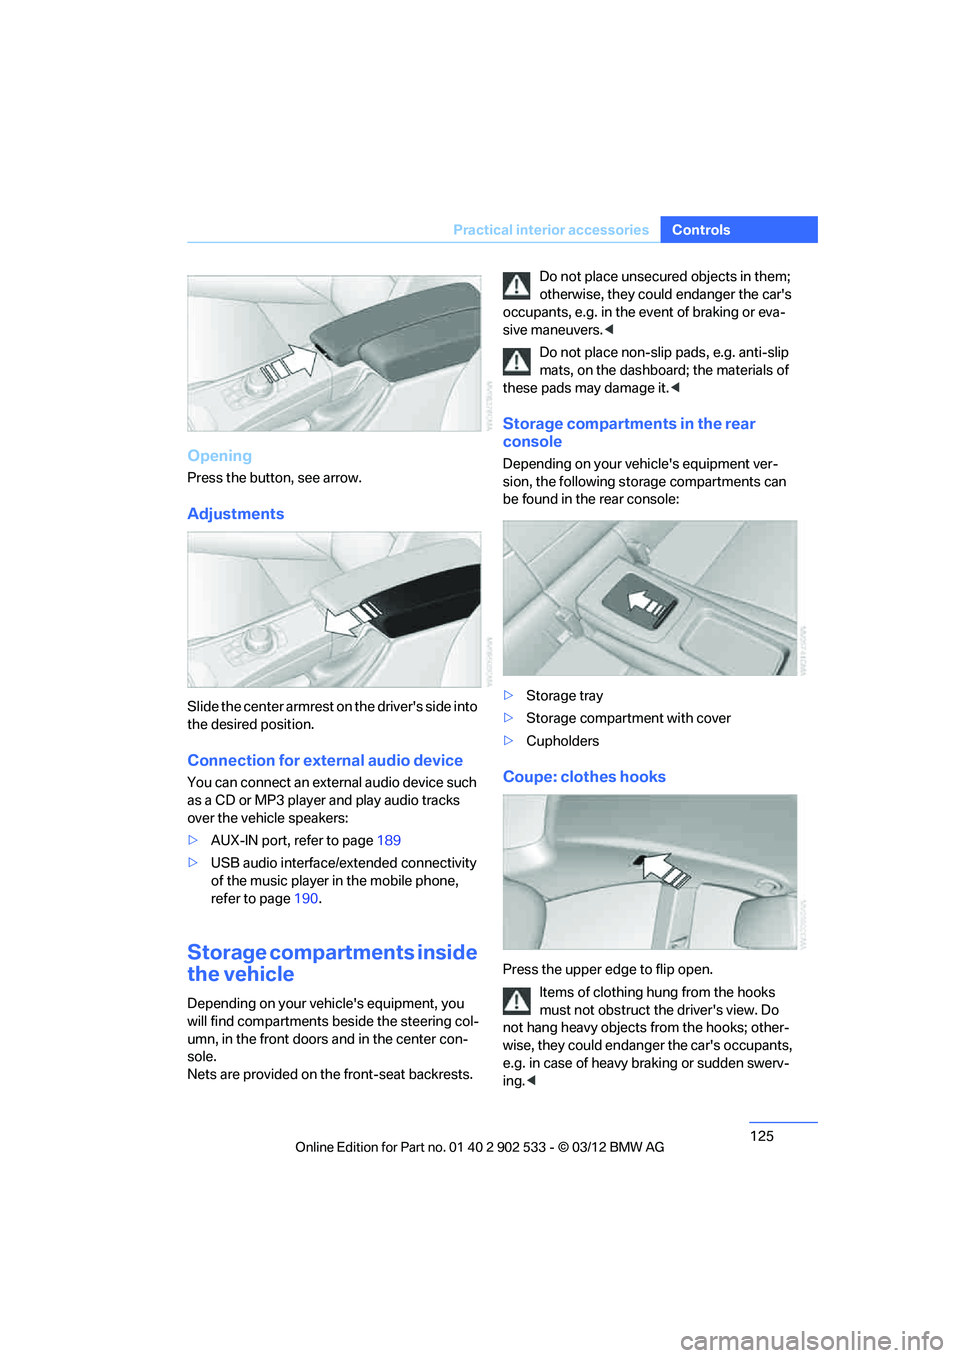
Opening
Press the button, see arrow.
Adjustments
Slide the center armrest on the driver's side into
the desired position.
Connection for external audio device
You can connect an external audio device such
as a CD or MP3 player and play audio tracks
over the vehicle speakers:
>
AUX-IN port, refer to page 189
> USB audio interface/extended connectivity
of the music player in the mobile phone,
refer to page 190.
Storage compartments inside
the vehicle
Depending on your vehicle's equipment, you
will find compartments beside the steering col-
umn, in the front doors and in the center con-
sole.
Nets are provided on the front-seat backrests. Do not place unsecured objects in them;
otherwise, they could endanger the car's
occupants, e.g. in the event of braking or eva-
sive maneuvers. <
Do not place non-slip pads, e.g. anti-slip
mats, on the dashboard; the materials of
these pads may damage it. <
Storage compartments in the rear
console
Depending on your vehicle's equipment ver-
sion, the following storage compartments can
be found in the rear console:
>Storage tray
> Storage compartment with cover
> Cupholders
Coupe: clothes hooks
Press the upper edge to flip open.
Items of clothing hung from the hooks
must not obstruct the driver's view. Do
not hang heavy objects from the hooks; other-
wise, they could endanger the car's occupants,
e.g. in case of heavy braking or sudden swerv-
ing. <
00320051004F004C00510048000300280047004C0057004C005200510003
Page 139 of 308
138
Driving tipsThings to remember when driving
tem. Do not remove the heat shields installed
adjacent to various sections of the exhaust sys-
tem, and never apply undercoating to them.
When driving, standing at idle and while park-
ing, take care to avoid possible contact
between the hot exhaust system and any highly
flammable materials such as hay, leaves, grass,
etc. Such contact could lead to a fire, with the
risk of serious personal injuries and property
damage. Do not touch hot exhaust tail pipes.
Otherwise, there is a risk of burns. <
Mobile phones in the vehicle
It is not advisable to use wireless devices
such as mobile phones inside the vehicle
without a direct connection to an external aerial.
Otherwise, it is not possible to exclude the pos-
sibility of a reciprocal interference occurring
between the vehicle electronics and the wire-
less device. Otherwise, there is no assurance
that the radiation generated by the radio trans-
mission will be conveyed out of the passenger
compartment. <
Hydroplaning
When driving on wet or slushy roads,
reduce road speed. If you do not, a wedge
of water can form between tires and road sur-
face. This situation, known as hydroplaning,
means that the tire can completely lose contact
with the road surface, so that neither the car can
be steered nor the brake be properly applied. <
The risk of hydroplaning increases with declin-
ing tread depth on the tires, refer also to Mini-
mum tread depth on page 252.
Driving through water
Drive through water on the road only if it is
not deeper than 1 ft/30 cm, and then only
at walking speed at the most. Otherwise, the
vehicle's engine, the electrical systems and the
transmission may be damaged.<
Use the parking brake on inclines
On inclines, do not hold the vehicle for a
lengthy period using the clutch; use the
parking brake instead. Otherwise, greater
clutch wear will result. <
For more information about the drive-off assis-
tant, refer to page 98.
Braking safely
Your BMW is equipped with ABS as a standard
feature. Applying the brakes fully is the most
effective way of braking in situations in which
this is necessary. Since the vehicle maintains
steering responsiveness, you can still avoid
possible obstacles with a minimum of steering
effort.
Pulsation of the brake pedal, combined with
sounds from the hydraulic circuits, indicate that
ABS is in its active mode.
Objects in the movement range of the
pedals
Keep floor mats, carpet, and other objects
out of the movement range of the pedals;
otherwise, they may inhibit the function of the
pedals during driving.
Do not place additional floor mats onto an exist-
ing one or onto other objects.
Only use floor mats that have been approved for
the vehicle and can be appropriately fastened.
Make sure that the floor mats are securely fas-
tened again after they have been removed, e.g.
for cleaning. <
Driving in wet conditions
When roads are wet or there is heavy rain,
briefly exert gentle pressure on the brake pedal
every few miles. Monitor traffic conditions to
ensure that this maneuver does not endanger
other road users. The heat generated in this
process helps dry the pads and rotors to ensure
that full braking efficiency will then be available
when you need it.
00320051004F004C00510048000300280047004C0057004C005200510003