2013 BMW 335IS CONVERTIBLE light
[x] Cancel search: lightPage 114 of 308

113
Lamps
Controls
To switch off the interior lamps, footwell lamps,
entry lamps, and courtesy lamps permanently,
press the button for the front interior lamps for
about 3 seconds.
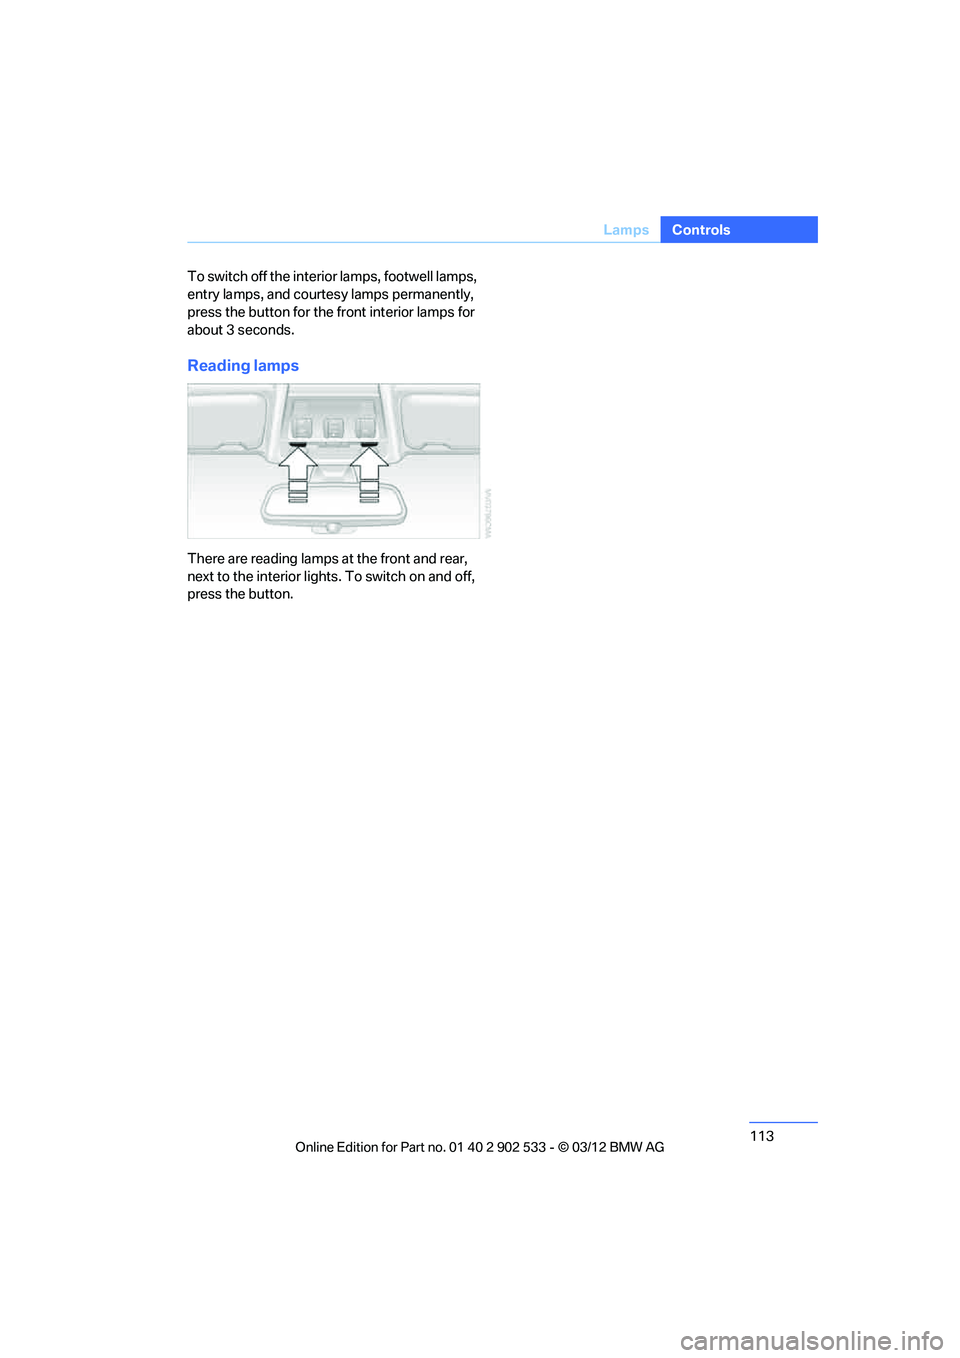
Reading lamps
There are reading lamps at the front and rear,
next to the interior lights. To switch on and off,
press the button.
00320051004F004C00510048000300280047004C0057004C005200510003
Page 120 of 308

119
Climate
Controls
8.
Press the controller: the setting is
accepted.
The symbol on the automatic climate Control
Display lights up.
The symbol on the automatic climate Control
Display flashes when the system has switched
on.
The respective system is switched on
within the next 24 hours only. After these
have elapsed, it must be reactivated. <
00320051004F004C00510048000300280047004C0057004C005200510003
Page 121 of 308

120
ControlsPractical interior accessories
Practical interior accessories
Vehicle equipment
In this chapter, all production, country, and
optional equipment that is offered in the model
range is described. For this reason, descrip-
tions will be given of some equipment that may
not be available in a vehicle, for example due to
the special options or national-market version
selected. This also applies to safety related
functions and systems.
Integrated universal remote
control
The concept
The Integrated universal remote control can be
used to operate up to 3 functions of remote-
controlled devices such as garage door open-
ers or lighting systems. The Integrated univer-
sal remote control thus replaces as many as
three different hand-held transmitters. To oper-
ate them, the buttons on the interior rearview
mirror must be programmed with the desired
functions. Programming requires the hand-held
transmitter for the respective device.
To prevent possible damage or injury,
before programming or using the inte-
grated universal remote control to operate a
device, always inspect the immediate area to
make certain that no people, animals or objects
are within the pivoting or travel range of the
device being operated.
Also follow the safety instructions supplied with
the hand-held transmitter. <
For security reasons, make sure to delete the
stored functions before selling the vehicle, refer
to page 122.
Compatibility
If this symbol appears on the package
or in the instructions supplied with the
device to be operated, you can gener-
ally assume that the device is compatible with
the Integrated universal remote control.
For additional questions, please consult:
> your BMW center.
> www.homelink.com on the Internet.
HomeLink is a registered trademark of Johnson
Controls, Inc.
Controls on the interior rearview mirror
1 LED
2 Buttons
3 Hand-held transmitter, required for pro-
gramming.
Programming
General information
1.Switch on the ignition.
2. Initial operation:
Simultaneously hold down the right and left
buttons on the inside mirror for approx. 20
seconds until the LED on the inside mirror
flashes.
All programs of the buttons on the rearview
mirror are deleted.
00320051004F004C00510048000300280047004C0057004C005200510003
Page 122 of 308

121
Practical interior accessories
Controls
3.
Hold the hand-held transmitter of the
device to be controlled approx. 1 in/2.5 cm
to 3 in/8 cm away from the buttons on the
inside mirror.
The required distance depends on the
hand-held transmitter.
4. Simultaneously press and hold the button
of the desired function on the hand-held
transmitter and the button to be pro-
grammed on the inside mirror.
The LED on the inside mirror will flash
slowly at first.
5. As soon as the LED flashes rapidly, release
both buttons. The rapid flashing indicates
that the button on the inside mirror has
been programmed.
If the LED does not flash rapidly within
60 seconds, change the distance between
the inside mirror and the hand-held trans-
mitter and repeat this step. This may
require several attempts. Allow at least
15 seconds between attempts.
6. To program additional functions on the
other buttons of the inside mirror, repeat
steps 3 through 5.
The buttons on the inside mirro r can be used to
operate the devices if the ignition is switched
on.
Special procedure with alternating-
code systems
If the device fails to function even after repeated
programming, check whether the device to be
controlled uses an alternating-code system.
To do so, either read the instructions for the
device or hold down the programmed button on
the inside mirror. If the LED on the inside mirror
flashes quickly at first and then remains lit for
2 seconds, the device uses an alternating-code
system. The LED flashes and lights up repeat-
edly for approx. 20 seconds.
In devices with an alternating-code system, the
Integrated universal remote control and the
device must also be synchronized. For information about synchronizing can also
be found in the operating instructions for the
device to be set.
Programming will be easier with the aid of a
second person.
Synchronizing:
1.
Park your vehicle within the range of the
remote-controlled device.
2. Program the Integrated universal remote
control as described above.
3. Locate and press the synchronization but-
ton on the device to be set. You have
approx. 30 seconds to perform the next
step.
4. Hold down the programmed button on the
inside mirror for approx. 3 seconds and then
release it. Repeat this operation, up to three
times if necessary, to complete the syn-
chronization. If the synchronization has
succeeded, the programmed function is
performed.
Reprogramming individual buttons
1.Switch on the ignition.
2. Hold the hand-held transmitter of the
device to be controlled approx. 1 in/2.5 cm
to 3 in/8 cm away from the buttons on the
inside mirror.
The required distance depends on the
hand-held transmitter.
3. Press the desired button on the inside mir-
ror.
4. If the LED on the inside mirror flashes
slowly after approx. 20 seconds, press the
transmit key of the hand-held transmitter.
5. As soon as the LED flashes rapidly, release
both buttons.
If the LED does not flash rapidly after
approx. 60 seconds, alter the distance and
repeat the step.
Canada: if the LED does not flash rapidly
after approx. 60 seconds, alter the distance
and repeat this step or, if the programming
00320051004F004C00510048000300280047004C0057004C005200510003
Page 125 of 308

124
ControlsPractical interior accessories
Coupe:
Roller sunblinds
Briefly press the button in the center console to
raise or lower the roller sunblind.
Glove compartment
Opening
Pull the handle.
The light in the glove compartment comes on.
To prevent injury in the event of an acci-
dent while the vehicle is being driven,
close the glove compartment immediately after
use. <
Closing
Fold the cover up.
Locking
To lock the glove compartment, use the inte-
grated key of the remote control, refer to
page 30. Convertible: when you lock the vehicle from the
outside, the glove compartment is locked as
well.
USB interface for data transmission
Port for importing and exporting data on USB
devices, e.g. music collections, refer to
page
185.
Observe the following when connecting:
> Do not use force when plugging the con-
nector into the USB audio interface.
> Do not connect devices such as fans or
lamps to the USB audio interface.
> Do not connect USB hard discs.
> Do not use the USB interface to recharge
external devices.
Center armrest
Storage compartment
The center armrest between the front seats
contains either a compartment or the cover for
the snap-in adapter, depending on the equip-
ment version.
00320051004F004C00510048000300280047004C0057004C005200510003
Page 127 of 308

126
ControlsPractical interior accessories
Cupholders
Use lightweight and shatterproof contain-
ers and do not transport hot beverages;
otherwise, there is an increased risk of injury in
the event of the accident. Do not force contain-
ers that are too large into the cupholders; other-
wise, damage could result. <
Front
Opening
Briefly press the center of the cover.
Closing
Briefly press the cover in the center and push in
the cupholder.
Coupe: rear
There are two additional cupholders in the rear
center armrest.
Press the front of the armrest.
Convertible: rear
There are two additional cupholders in the rear
console.
Press the button to open.
Before folding down the rear seat back-
rest or using the transport bag, remove all
containers from the cupholder and close it. Do
not place objects into the cupholder and use
force to close it. Do not use the cupholder as a
grab handle. <
Ashtray
Opening
Push the ridge on the cover.
00320051004F004C00510048000300280047004C0057004C005200510003
Page 128 of 308

127
Practical interior accessories
Controls
Emptying
Lift out the insert.
Lighter
With the engine running or the ignition switched
on, press in the cigarette lighter.
The lighter can be pulled out as soon as it pops
back out.
Hold or touch the hot cigarette lighter by
the knob only. Holding or touching it in
other areas could result in burns.
When leaving the car, always remove the
remote control so that children cannot operate
the cigarette lighter and burn themselves.<
Connecting electrical
appliances
In yo ur BMW, when the engine is running o r the
ignition is switched on, you can use electrical
devices such as a hand lamp, car vacuum
cleaner, etc. if at least one of the following sock-
ets is available.
The total load of all sockets should not exceed
140 watts at 12 volts.
Avoid damaging the sockets by attempting to
insert plugs of unsuitable shape or size.
Do not connect battery chargers to the
sockets built into the vehicle at the plant;
doing so may damage the vehicle. <
Cigarette lighter socket
To access the socket: take the cigarette lighter
out of the socket.
Socket in the front passenger footwell
A socket is located under the glove compart-
ment on the left.
Socket in the center armrest
External audio device, refer to page 125.
Coupe: socket in trunk
Open the cap.
00320051004F004C00510048000300280047004C0057004C005200510003
Page 129 of 308

128
ControlsPractical interior accessories
Coupe:
Through-loading system
Opening
1.To release the rear seat backrest, pull the
corresponding lever in the trunk.
2. The unlocked rear seat backrest moves for-
ward slightly. Fold the backrest forward by
the head restraint.
Closing
Return the rear seat backrest to its upright posi-
tion and engage it.
When returning the backrest to its seating
position, make sure that the seat's lock-
ing mechanism engages properly. Otherwise,
cargo could be thrown around in the event of
sharp braking or swerving and endanger the
occupants. <
The lashing eyes in the trunk provide you with a
way to attach trunk nets or draw straps for
securing suitcases and luggage, refer to
page 140.
Convertible:
Cargo loading
Enlarging the trunk
When the hardtop is closed you can enlarge the
trunk:
To do so, push the trunk partition upward.
Before opening the hardtop, push the trunk par-
tition down until it engages on both sides.
Before moving the hardtop, ensure that
there are no objects on or next to the
trunk partition; otherwise, parts of the hardtop
may be damaged. Do not exceed the maximum
loading height; refer to the sticker in the trunk
showing a line indicating the maximum height.
Do not use force to push down the trunk parti-
tion. <
The retractable hardtop can only be
opened if the trunk partition is in its lower-
most position and engaged on both sides. <
Folding down the rear seat backrest
Opening
You can fold down the rear seat backrest to
transport light objects in the rear without dam-
00320051004F004C00510048000300280047004C0057004C005200510003