2013 BMW 335I power steering
[x] Cancel search: power steeringPage 12 of 242

CockpitVehicle equipment
All standard, country-specific and optional
equipment that is offered in the model series is
described in this chapter. Therefore, equipmentis also described that is not available in a vehicle,
e. g., because of the selected optional equip‐
ment or country variant. This also applies for
safety-related functions and systems.
All around the steering wheel
1Roller sunblinds 432Rear window safety switch 423Power windows 414Exterior mirror operation 525Glove compartment on the driver's
side 152
Driver assistance systemsActive Blind Spot Detec‐
tion 105Collision warning 102
Collision warning with braking
function 100Lane departure warning 1046LampsSeite 12At a glanceCockpit12
Online Edition for Part no. 01 40 2 917 801 - II/13
Page 52 of 242

3. Press the button. The LED in the
button lights up.4.Press the desired button 1 or 2. The LED
goes out.
If the M button is pressed accidentally:
Press the button again.
The LED goes out.
Calling up settings Do not retrieve the memory while driving
Do not retrieve the memory setting while
driving, as an unexpected movement of the seat
or steering wheel could result in an accident.◀
Comfort function
1.Open the driver's door.2.Switch off the ignition.3.Briefly press the desired button 1 or 2.
The corresponding seat position is performed
automatically.
The procedure stops when a switch for adjust‐
ing the seat or one of the buttons is pressed.
Safety mode
1.Close the driver's door or switch on the ig‐
nition.2.Press and hold the desired button 1 or 2 until
the adjustment procedure is completed.
Calling up of a seat position
deactivated
After a brief period, the calling up of stored seat
positions is deactivated to save battery power.
To reactivate calling up of a seat position:
▷Open and close the door or trunk lid.▷Press a button on the remote control.▷Press the Start/Stop button.Mirrors
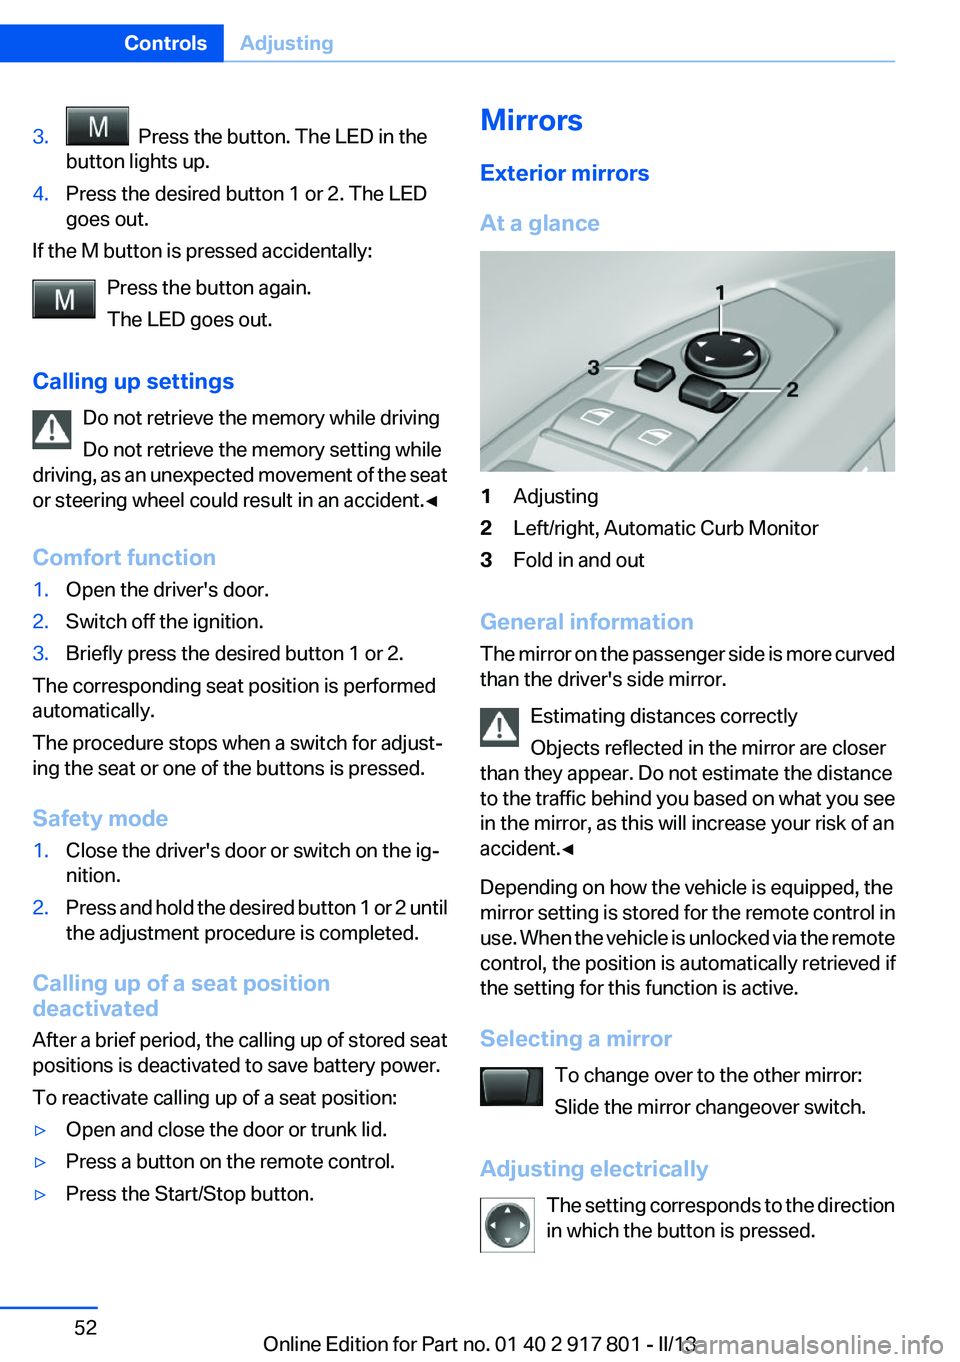
Exterior mirrors
At a glance1Adjusting2Left/right, Automatic Curb Monitor3Fold in and out
General information
The mirror on the passenger side is more curved
than the driver's side mirror.
Estimating distances correctly
Objects reflected in the mirror are closer
than they appear. Do not estimate the distance
to the traffic behind you based on what you see
in the mirror, as this will increase your risk of an
accident.◀
Depending on how the vehicle is equipped, the
mirror setting is stored for the remote control in
use. When the vehicle is unlocked via the remote
control, the position is automatically retrieved if
the setting for this function is active.
Selecting a mirror To change over to the other mirror:
Slide the mirror changeover switch.
Adjusting electrically The setting corresponds to the direction
in which the button is pressed.
Seite 52ControlsAdjusting52
Online Edition for Part no. 01 40 2 917 801 - II/13
Page 108 of 242

After travel has begun, the system is trained
about the driver, so that increasing lack of alert‐
ness or fatigue can be detected.
This procedure takes the following criteria into
account:▷Personal driving style, for example, steering
behavior.▷Driving conditions, for example, length of
trip.
Starting at approximately 43 mph/70 km/h, the
system is active and can display a recommen‐
dation to take a break.
Break recommendation
If the driver becomes increasingly less alert or
fatigued, a message is displayed in the Control
Display with the recommendation to take a
break.
A recommendation to take a break is displayed
only once during an uninterrupted trip.
After a break, another recommendation to take
a break cannot be displayed until after approxi‐
mately 45 minutes.
System limits
The function may be limited in the following sit‐
uations, for instance, and will either output an
incorrect warning or no warning at all:
▷When the clock is set incorrectly.▷When the vehicle speed is mainly below
about 43 mph/70 km/h.▷With a sporty driving style, such as during
rapid acceleration or when cornering
quickly.▷In active driving situations, such as when
changing lanes frequently.▷When the road surface is poor.▷In the event of strong side winds.PreCrash
The concept
The system is used to detect critical driving sit‐
uations that might lead to an accident. In these
situations, preventative protection measures
are automatically undertaken to minimize the
risk in the event of an accident as much as pos‐
sible.
Critical driving situations may include:▷Full brake applications.▷Severe understeering.▷Severe oversteering.
If the vehicle includes the collision warning or
collision warning with braking feature, impend‐
ing collisions with vehicles driving ahead or
stopped in front of you can also be detected
within the system's range.
Personal responsibility
The system cannot serve as a substitute
for the driver's personal judgment of the traffic
situation. The system may not always detect
critical situations reliably and in a timely manner.
Adapt speed to traffic situation and drive alertly;
otherwise, a risk to safety may result.◀
Function
After the safety belt is buckled, the front belts
are automatically pretensioned once after the
vehicle is driven is away.
In critical driving situations, the following indi‐
vidual functions become active as needed:
▷The front belts are automatically preten‐
sioned.▷Automatic closing of the windows.▷Automatic closing of the glass sunroof.▷For vehicles equipped with power seat ad‐
justment: automatic positioning of the back‐
rest for the front passenger seat.
After a critical driving situation without an acci‐
dent, the front belts are loosened again. All other
systems can be restored to the desired setting.
Seite 108ControlsSafety108
Online Edition for Part no. 01 40 2 917 801 - II/13
Page 115 of 242

Driving comfortVehicle equipment
All standard, country-specific and optional
equipment that is offered in the model series is
described in this chapter. Therefore, equipment
is also described that is not available in a vehicle,
e. g., because of the selected optional equip‐
ment or country variant. This also applies for
safety-related functions and systems.
Active Cruise Control with
Stop & Go function, ACC
The concept
This system can be used to select a desired
speed that the vehicle will maintain automati‐
cally on clear roads.
To the extent possible, the system automatically
adjusts the speed to a slower vehicle ahead of
you.
The distance that the vehicle maintains to the
vehicle ahead of you can be varied.
For safety reasons, it depends on the speed.
To maintain a certain distance, the system au‐
tomatically decelerates, applies the brakes
lightly, or accelerates again if the vehicle ahead
begins moving faster.
If the vehicle ahead of you brakes to a halt, the
system is able to detect this within the given
system limits. If the vehicle ahead of your drives
away again from a halt, your vehicle is able to
accelerate if operated accordingly.
Even if some time passes before the vehicle
drives away again, the BMW can still be accel‐
erated automatically and simply.
As soon as the road is clear, it accelerates to the
desired speed.
The speed is also maintained on downhill gra‐
dients, but may not be maintained on uphill
slopes if engine power is insufficient.Notes
Personal responsibility
The system does not relieve the driver of
the responsibility to adapt his or her speed, dis‐
tance and driving style to the traffic conditions.
You should drive attentively and intervene ac‐
tively when necessary, e.g. by braking or making
an evasive maneuver, otherwise, there is danger
of an accident.◀
At a glance
Buttons on the steering wheel1System on/off, interrupt2Resume speed3Store speed4Reduce distance5Store, maintain/change speed6Increase distance
Radar sensor
A radar sensor is located in the front bumper for
detecting vehicles on the road ahead of the ve‐
hicle.
Seite 115Driving comfortControls115
Online Edition for Part no. 01 40 2 917 801 - II/13
Page 147 of 242

World map with magnetic zonesProcedure1.Press and hold the control button for approx.
3 to 4 seconds. The number of the set com‐
pass zone appears in the mirror.2.To change the zone setting, press the con‐
trol button quickly and repeatedly until the
number of the compass zone corresponding
to your location appears in the mirror.
The set zone is stored automatically. The com‐
pass is ready for use again after approximately
10 seconds.
Calibrating the digital compass
The digital compass must be calibrated in the
event of the following:
▷The wrong point of the compass is dis‐
played.▷The point of the compass displayed does
not change despite changing the direction
of travel.▷Not all points of the compass are displayed.Procedure1.Make sure that there are no large metallic
objects or overhead power lines near the ve‐
hicle and that there is sufficient room to drive
around in a circle.2.Set the currently applicable compass zone.3.Press and hold the control button for approx.
6 to 7 seconds so that "C" appears on the
display. Next, drive in a complete circle at
least once at a speed of no more than
4 mph/7 km/h. If calibration is successful, the
"C" is replaced by the points of the com‐
pass.
Left/right-hand steering
The digital compass is already set for right or
left-hand steering at the factory.
Setting the language
Press and hold the control button for approx. 12
to 13 seconds. Briefly press the control button
again to switch between English "E" and Ger‐
man "O".
Seite 147Interior equipmentControls147
Online Edition for Part no. 01 40 2 917 801 - II/13
Page 216 of 242

If the first starting attempt is not successful,
wait a few minutes before making another
attempt in order to allow the discharged bat‐
tery to recharge.3.Let both engines run for several minutes.4.Disconnect the jumper cables in the reverse
order.
Check the battery and recharge if necessary.
Tow-starting and towing
Automatic transmission: transporting
your vehicle
Note
Your vehicle is not permitted to be towed.
Therefore, contact a service center in the event
of a breakdown.
Do not have the vehicle towed
Have your vehicle transported on a loading
platform only; otherwise, damage may occur.◀
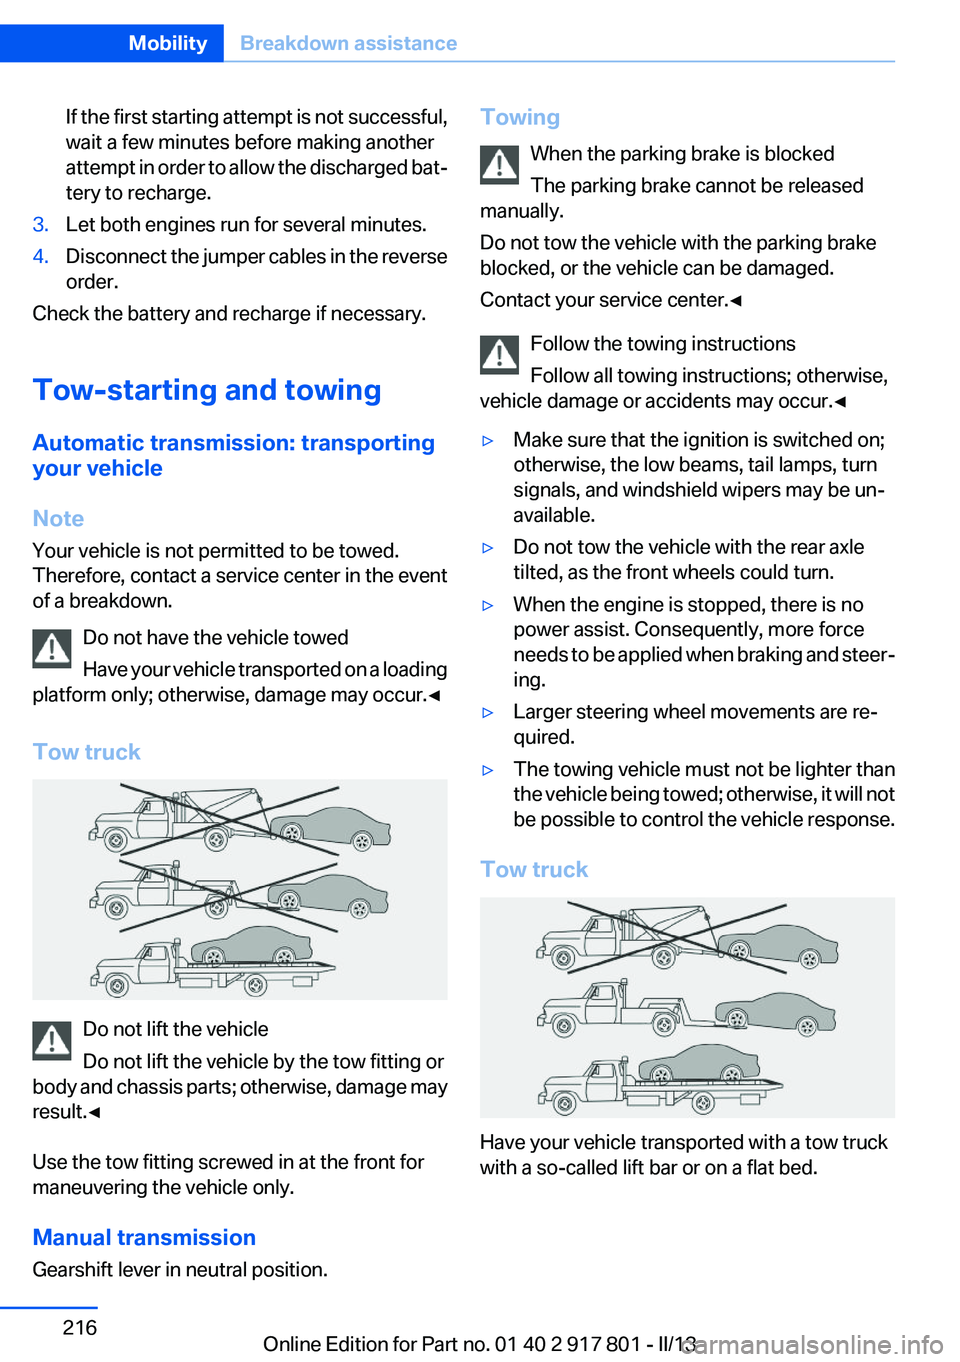
Tow truck
Do not lift the vehicle
Do not lift the vehicle by the tow fitting or
body and chassis parts; otherwise, damage may
result.◀
Use the tow fitting screwed in at the front for
maneuvering the vehicle only.
Manual transmission
Gearshift lever in neutral position.
Towing
When the parking brake is blocked
The parking brake cannot be released
manually.
Do not tow the vehicle with the parking brake
blocked, or the vehicle can be damaged.
Contact your service center.◀
Follow the towing instructions
Follow all towing instructions; otherwise,
vehicle damage or accidents may occur.◀▷Make sure that the ignition is switched on;
otherwise, the low beams, tail lamps, turn
signals, and windshield wipers may be un‐
available.▷Do not tow the vehicle with the rear axle
tilted, as the front wheels could turn.▷When the engine is stopped, there is no
power assist. Consequently, more force
needs to be applied when braking and steer‐
ing.▷Larger steering wheel movements are re‐
quired.▷The towing vehicle must not be lighter than
the vehicle being towed; otherwise, it will not
be possible to control the vehicle response.
Tow truck
Have your vehicle transported with a tow truck
with a so-called lift bar or on a flat bed.
Seite 216MobilityBreakdown assistance216
Online Edition for Part no. 01 40 2 917 801 - II/13
Page 237 of 242

Master key, refer to Remotecontrol 30
Maximum cooling 140
Maximum speed, display 79
Maximum speed, winter tires 192
Measure, units of 85
Medical kit 214
Memory, seat, mirror 51
Menu, EfficientDynamics 167
Menu in instrument cluster 81
Menus, operating, iDrive 16
Menus, refer to iDrive operat‐ ing concept 18
Messages, refer to Check Control 73
Microfilter 139, 142
Minimum tread, tires 190
Mirror 52
Mirror memory 51
Mobile communication devi‐ ces in the vehicle 159
Modifications, technical, refer to Safety 7
Moisture in headlamp 203
Monitor, refer to Control Dis‐ play 16
Mounting of child restraint fix‐ ing systems 55
Multifunction steering wheel, buttons 12
N
Navigation, see user's manual for Navigation, Entertain‐
ment and Communication
Neck restraints, front, refer to Head restraints 49
Neck restraints, rear, refer to Head restraints 50
New wheels and tires 191
No Passing Information 79
Nylon rope for tow-starting/ towing 217 O
OBD Onboard Diagnos‐ tics 201
Obstacle marking, backup camera 127
Octane rating, refer to Gaso‐ line quality 174
Odometer 76
Office, see user's manual for Navigation, Entertainment
and Communication
Oil 196
Oil, adding 197
Oil additives 197
Oil change 198
Oil change interval, service re‐ quirements 77
Oil filler neck 197
Oil types, alternative 197
Oil types, approved 197
Old batteries, disposal 211
Onboard Diagnostics OBD 201
Onboard monitor, refer to Control Display 16
Onboard vehicle tool kit 202
Opening/closing from in‐ side 36
Opening/closing via door lock 36
Opening/closing with remote control 34
Opening the trunk lid with no- touch activation 39
Operating concept, iDrive 16
Optional equipment, standard equipment 6
Outside air, refer to Automatic recirculated-air control 141
Overheating of engine, refer to Coolant temperature 76
Overtaking prohibitions 79 P
Paint, vehicle 220
Parallel parking assistant 132
Park Distance Control PDC 123
Parked-car ventilation 142
Parked vehicle, condensa‐ tion 160
Parking aid, refer to PDC 123
Parking assistant 132
Parking brake 63
Parking lamps 87
Particulate filter 159
Passenger side mirror, tilting downward 53
Pathway lines, backup cam‐ era 127
PDC Park Distance Con‐ trol 123
Personal Profile 31
Pinch protection system, glass sunroof 44
Pinch protection system, win‐ dows 42
Plastic, care 221
Power failure 211
Power sunroof, glass 43
Power windows 41
Pressure, tire air pres‐ sure 178
Pressure warning FTM, tires 98
Profile, refer to Personal Pro‐ file 31
Programmable memory but‐ tons, iDrive 21
Protective function, glass sun‐ roof 44
Protective function, win‐ dows 42
Push-and-turn switch, refer to Controller 16, 17 Seite 237Everything from A to ZReference237
Online Edition for Part no. 01 40 2 917 801 - II/13
Page 240 of 242

V
Variable sport steering 112
Vehicle battery 210
Vehicle battery, replacing 210
Vehicle, breaking in 158
Vehicle care 220
Vehicle equipment 6
Vehicle identification number, refer to Identification number
in the engine compart‐
ment 194
Vehicle jack 210
Vehicle paint 220
Vehicle storage 222
Vehicle wash 219
Ventilation 142
Ventilation, refer to Parked-car ventilation 142
Voice activation system 23
W
Warning messages, refer to Check Control 73
Warning triangle 214
Washer fluid 66
Washer fluid reservoir, ca‐ pacity 230
Washer nozzles, wind‐ shield 66
Washer system 64
Washing, vehicle 219
Water on roads 159
Weights 227
Welcome lamps 87
Wheel base, vehicle 227
Wheels, changing 191
Wheels, everything on wheels and tires 178
Wheels, Flat Tire Monitor FTM 98
Wheels, Tire Pressure Monitor TPM 95
Width, vehicle 226 Window defroster,
rear 138, 141
Windows, powered 41
Windshield washer fluid 66
Windshield washer noz‐ zles 66
Windshield washer system 64
Windshield wiper 64
Windshield wipers, fold-out position 66
Winter diesel 175
Winter storage, care 222
Winter tires, suitable tires 192
Winter tires, tread 190
Wiper blades, replacing 202
Wiper fluid 66
Wiper system 64
Wood, care 221
Word match concept, naviga‐ tion 22
Wrench 202
X
xDrive 111
Xenon headlamps, bulb re‐ placement 206 Seite 240ReferenceEverything from A to Z240
Online Edition for Part no. 01 40 2 917 801 - II/13