2013 BMW 328I XDRIVE COUPE turn signal
[x] Cancel search: turn signalPage 171 of 308
170
EntertainmentRadio
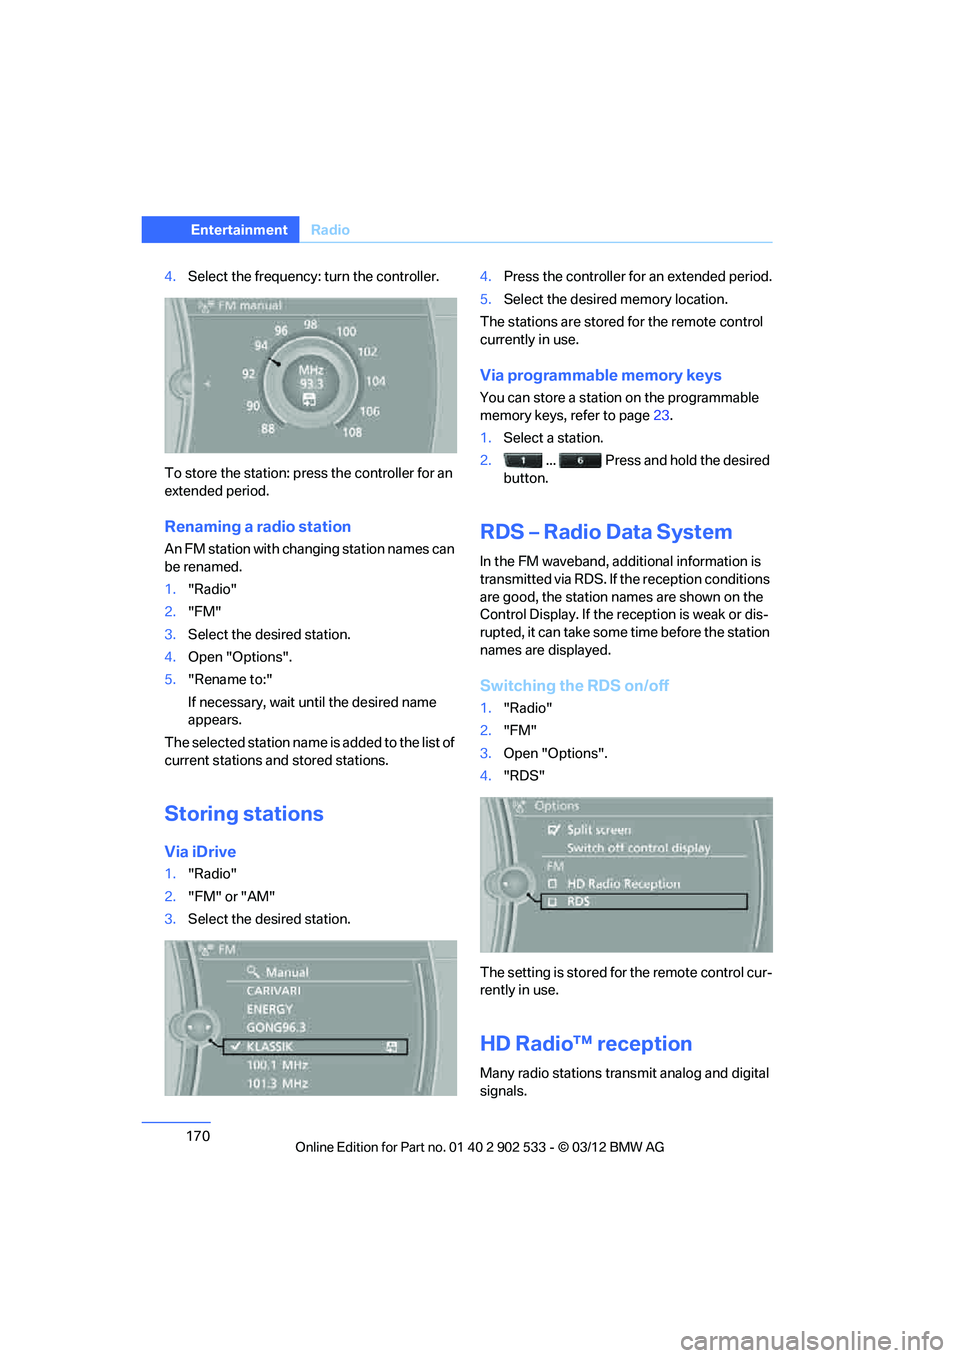
4.Select the frequency: turn the controller.
To store the station: press the controller for an
extended period.
Renaming a radio station
An FM station with changing station names can
be renamed.
1. "Radio"
2. "FM"
3. Select the desired station.
4. Open "Options".
5. "Rename to:"
If necessary, wait until the desired name
appears.
The selected station name is added to the list of
current stations and stored stations.
Storing stations
Via iDrive
1. "Radio"
2. "FM" or "AM"
3. Select the desired station. 4.
Press the controller for an extended period.
5. Select the desired memory location.
The stations are stored for the remote control
currently in use.
Via programmable memory keys
You can store a station on the programmable
memory keys, refer to page 23.
1. Select a station.
2. ... Press and hold the desired
button.
RDS – Radio Data System
In the FM waveband, additional information is
transmitted via RDS. If the reception conditions
are good, the station names are shown on the
Control Display. If the reception is weak or dis-
rupted, it can take some time before the station
names are displayed.
Switching the RDS on/off
1. "Radio"
2. "FM"
3. Open "Options".
4. "RDS"
The setting is stored for the remote control cur-
rently in use.
HD Radio™ reception
Many radio stations transmit analog and digital
signals.
00320051004F004C00510048000300280047004C0057004C005200510003
Page 207 of 308
206
CommunicationsTe l e p h o n e
Entering phone numbers
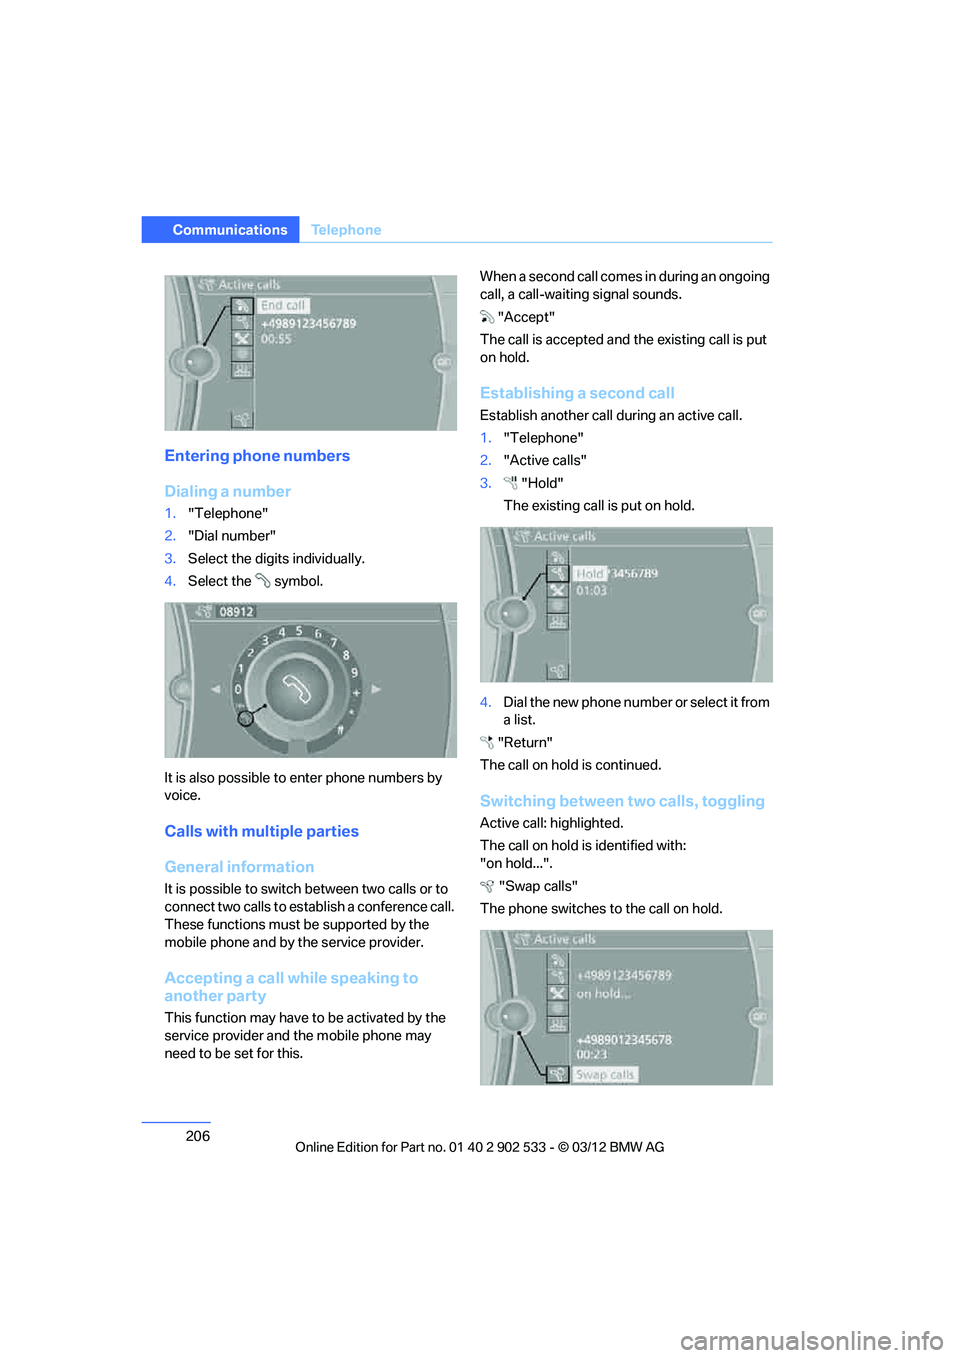
Dialing a number
1."Telephone"
2. "Dial number"
3. Select the digits individually.
4. Select the symbol.
It is also possible to enter phone numbers by
voice.
Calls with multiple parties
General information
It is possible to switch between two calls or to
connect two calls to establish a conference call.
These functions must be supported by the
mobile phone and by the service provider.
Accepting a call while speaking to
another party
This function may have to be activated by the
service provider and the mobile phone may
need to be set for this. When a second call comes in during an ongoing
call, a call-waiting signal sounds.
"Accept"
The call is accepted and the existing call is put
on hold.
Establishing a second call
Establish another call during an active call.
1. "Telephone"
2. "Active calls"
3. "Hold"
The existing call is put on hold.
4. Dial the new phone number or select it from
a list.
"Return"
The call on hold is continued.
Switching between two calls, toggling
Active call: highlighted.
The call on hold is identified with:
"on hold...". "Swap calls"
The phone switches to the call on hold.
00320051004F004C00510048000300280047004C0057004C005200510003
Page 258 of 308
257
Engine compartment
Mobility
Display in the instrument cluster
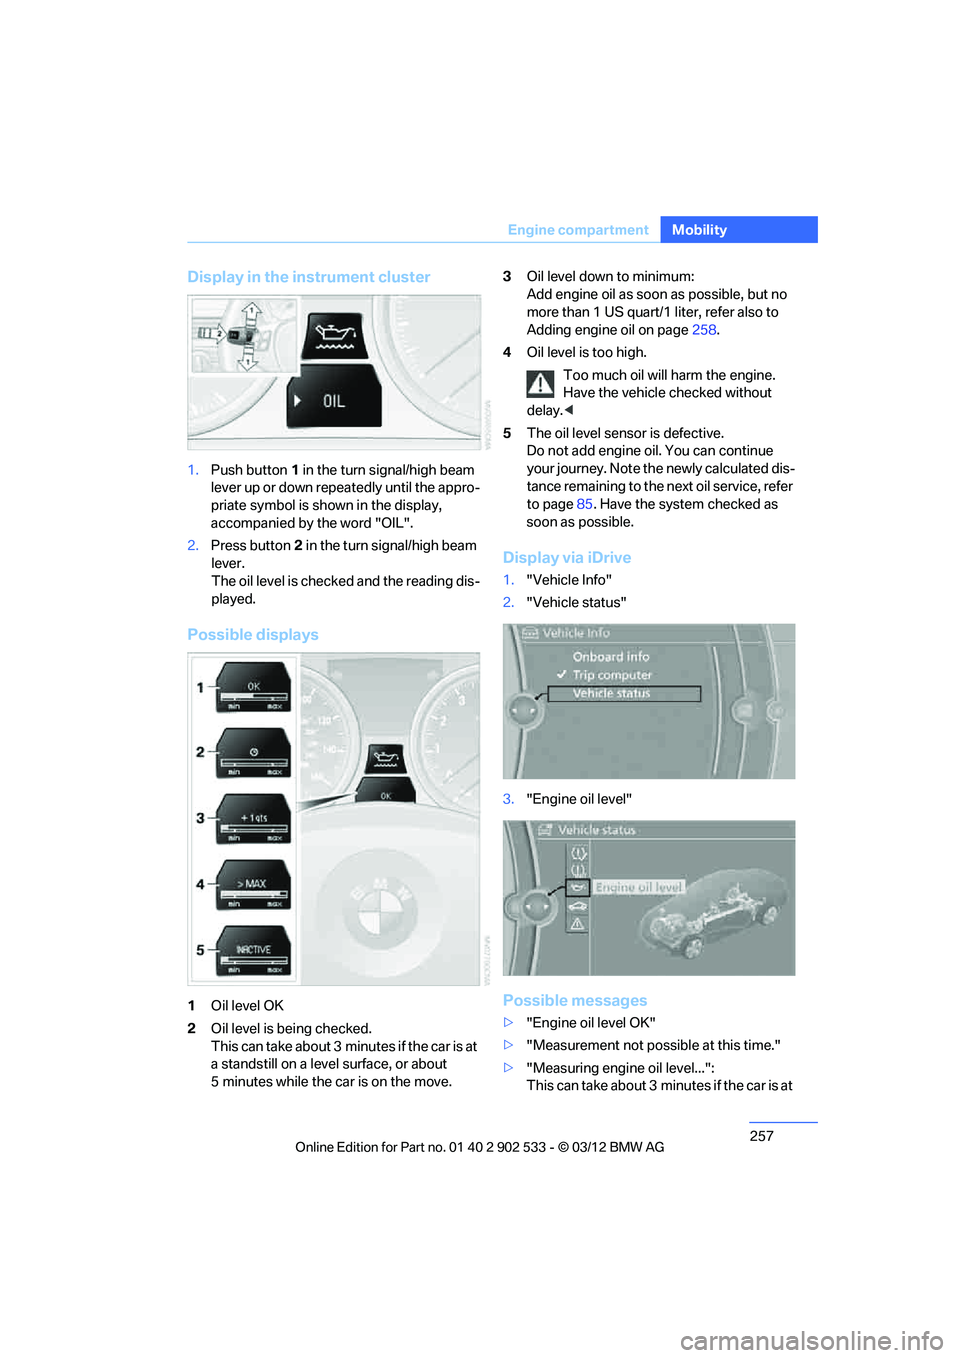
1.
Push button 1 in the turn signal/high beam
lever up or down repeatedly until the appro-
priate symbol is shown in the display,
accompanied by the word "OIL".
2. Press button 2 in the turn signal/high beam
lever.
The oil level is checked and the reading dis-
played.
Possible displays
1 Oil level OK
2 Oil level is being checked.
This can take about 3 minutes if the car is at
a standstill on a level surface, or about
5 minutes while the car is on the move. 3
Oil level down to minimum:
Add engine oil as soon as possible, but no
more than 1 US quart/1 liter, refer also to
Adding engine oil on page 258.
4 Oil level is too high.
Too much oil will harm the engine.
Have the vehicle checked without
delay. <
5 The oil level sensor is defective.
Do not add engine oi l. You can continue
your journey. Note the newly calculated dis-
tance remaining to the next oil service, refer
to page 85. Have the system checked as
soon as possible.
Display via iDrive
1. "Vehicle Info"
2. "Vehicle status"
3. "Engine oil level"
Possible messages
>"Engine oil level OK"
> "Measurement not possible at this time."
> "Measuring engine oil level...":
This can take about 3 minutes if the car is at
00320051004F004C00510048000300280047004C0057004C005200510003
Page 269 of 308
268
MobilityReplacin g compon ents
3.Push the wire bracket out of the anchor
towards the right and fold it up.
4. Disconnect the plug, change the bulb and
reconnect the plug.
5. Insert the bulb.
6. Fold the wire bracket down and engage it.
7. Reattach the cover.
Turn signals, front
These lamps use LED technology for operation.
If they malfunction, please contact your BMW
center.
Side turn signals
W5W bulb, 5 watts
1.Press the front edge of the lamp toward the
rear with your fingertip, arrow 1 and pivot it
out, arrow 2.
2. While simultaneously lifting the retaining
tab, rotate bulb holder to the left and
remove.
3. Remove lamp and replace it.
To install, insert rear end of the lamp and press
into place at the front.
Tail lamps
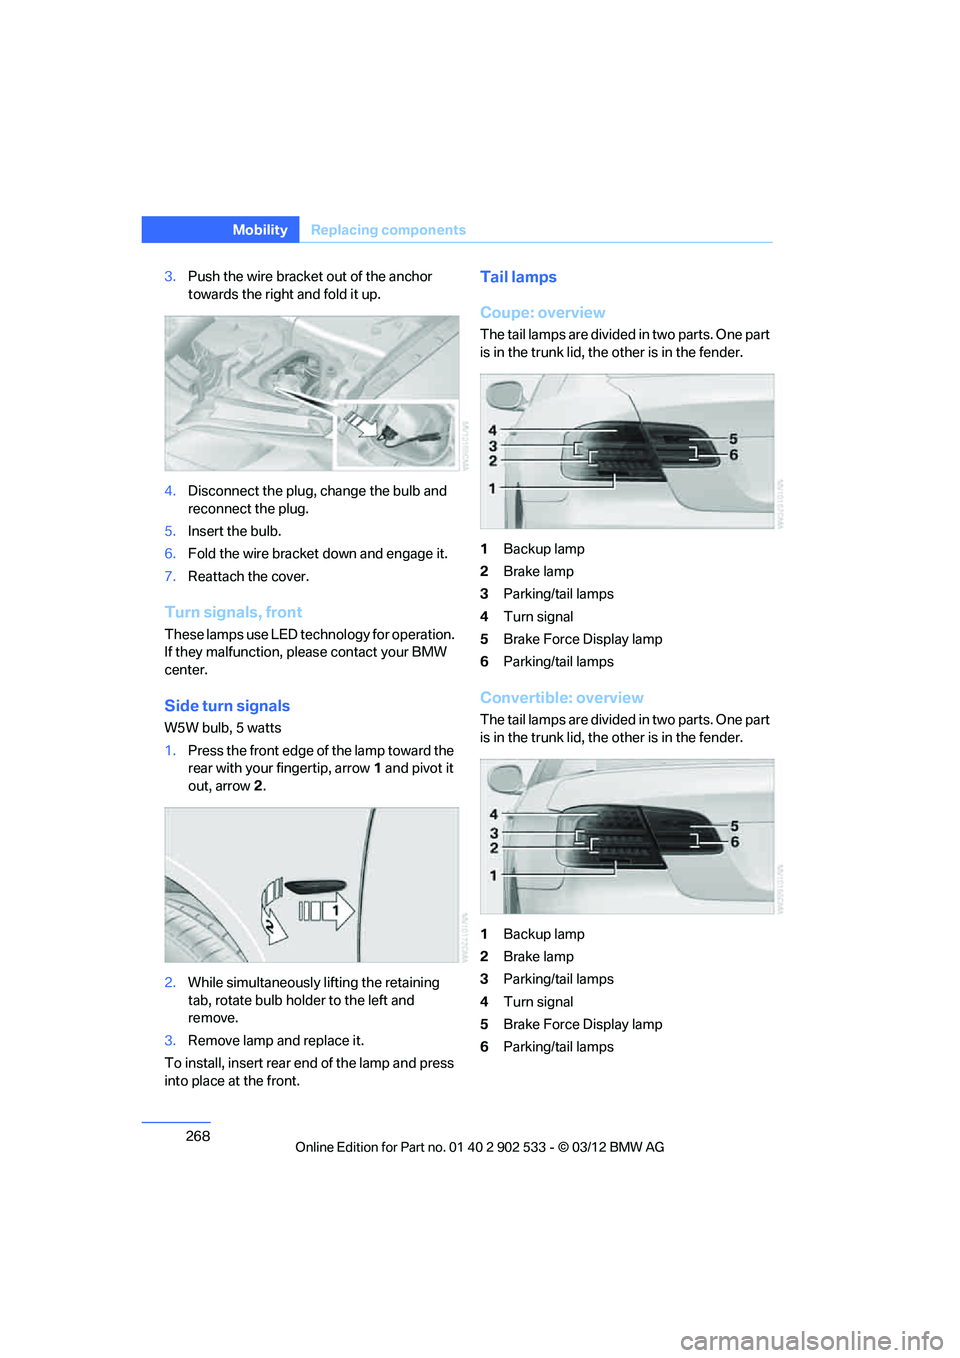
Coupe: overview
The tail lamps are divided in two parts. One part
is in the trunk lid, the other is in the fender.
1 Backup lamp
2 Brake lamp
3 Parking/tail lamps
4 Turn signal
5 Brake Force Display lamp
6 Parking/tail lamps
Convertible: overview
The tail lamps are divided in two parts. One part
is in the trunk lid, the other is in the fender.
1Backup lamp
2 Brake lamp
3 Parking/tail lamps
4 Turn signal
5 Brake Force Display lamp
6 Parking/tail lamps
00320051004F004C00510048000300280047004C0057004C005200510003
Page 270 of 308
269
Replacin g components
Mobility
Backup lamp
If these lamps malfunction, please contact your
BMW center.
Turn signal, brake, license plate,
parking, and tail lamps
These lamps use LED technology for operation.
If they malfunction, please contact your BMW
center.
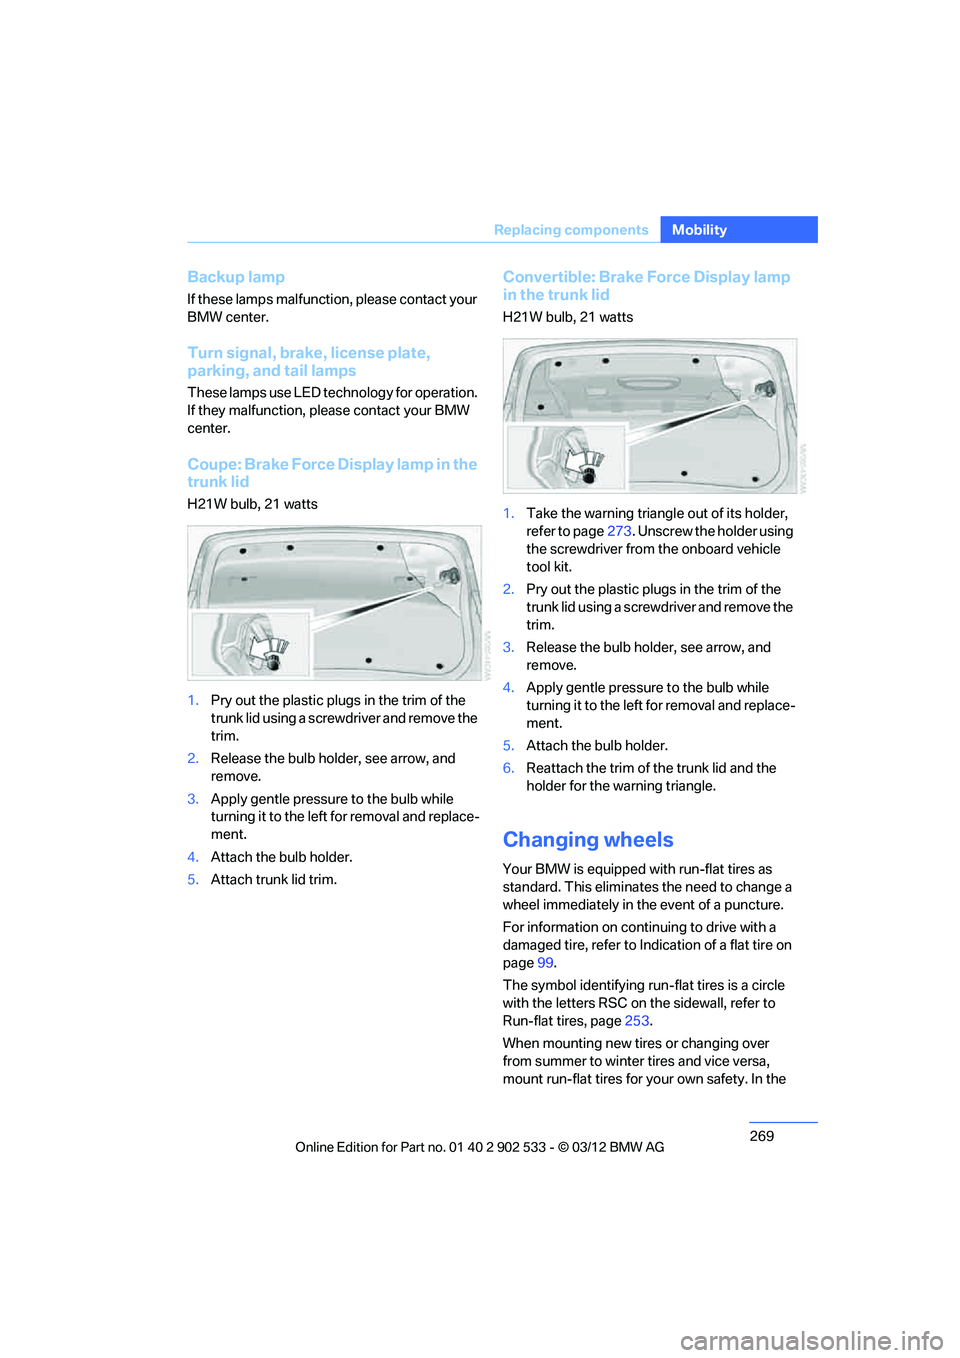
Coupe: Brake Force Display lamp in the
trunk lid
H21W bulb, 21 watts
1.
Pry out the plastic plugs in the trim of the
trunk lid using a screwdriver and remove the
trim.
2. Release the bulb holder, see arrow, and
remove.
3. Apply gentle pressure to the bulb while
turning it to the left for removal and replace-
ment.
4. Attach the bulb holder.
5. Attach trunk lid trim.
Convertible: Brake Force Display lamp
in the trunk lid
H21W bulb, 21 watts
1.Take the warning triangle out of its holder,
refer to page 273. Unscrew the holder using
the screwdriver from the onboard vehicle
tool kit.
2. Pry out the plastic plugs in the trim of the
trunk lid using a screwdriver and remove the
trim.
3. Release the bulb holder, see arrow, and
remove.
4. Apply gentle pressure to the bulb while
turning it to the left for removal and replace-
ment.
5. Attach the bulb holder.
6. Reattach the trim of the trunk lid and the
holder for the warning triangle.
Changing wheels
Your BMW is equipped with run-flat tires as
standard. This eliminates the need to change a
wheel immediately in the event of a puncture.
For information on continuing to drive with a
damaged tire, refer to Indication of a flat tire on
page 99.
The symbol identifying run-flat tires is a circle
with the letters RSC on the sidewall, refer to
Run-flat tires, page 253.
When mounting new tires or changing over
from summer to winter tires and vice versa,
mount run-flat tires for your own safety. In the
00320051004F004C00510048000300280047004C0057004C005200510003
Page 276 of 308
275
Giving and receiving assistance
Mobility
5.
Attach the second terminal clamp of the
minus/– jumper cable to the negative termi-
nal of the battery or to the engine or body
ground of the vehicle to be started.
Starting the engine
1.Start the engine of the donor vehicle and
allow it to run for a few minutes at slightly
increased idle speed.
2. Start the engine on the other vehicle in the
usual way.
If the first start attempt is not successful,
wait a few minutes before another attempt
in order to allow the discharged battery to
recharge.
3. Let the engines run for a few minutes.
4. Disconnect the jumper cables by reversing
the above connecting sequence.
If necessary, have the battery checked and
recharged.
Never use spray fluids to start the
engine. <
Tow-starting, towing away
Observe the applicable laws and regula-
tions for tow-starting and towing vehi-
cles. <
Do not transport any passengers other
than the driver in a vehicle that is being
towed. <
Using a tow fitting
The screw-in tow fitting must always be carried
in the car. It can be screwed in at the front or
rear of the BMW.
Coupe: it is stored in the onboard vehicle tool kit
underneath the cover on the right-hand side of
the trunk, refer to page 266.
Convertible: it is stored in the onboard vehicle
tool kit underneath the trunk floor, refer to
page 266. Use only the tow fitting provided with the
vehicle and screw it all the way in. Use the
tow fitting for towing on paved roads only. Avoid
lateral loading of the tow fitting, e.g. do not lift
the vehicle by the tow fitting. Otherwise, the
tow fitting and the vehicle could be damaged. <
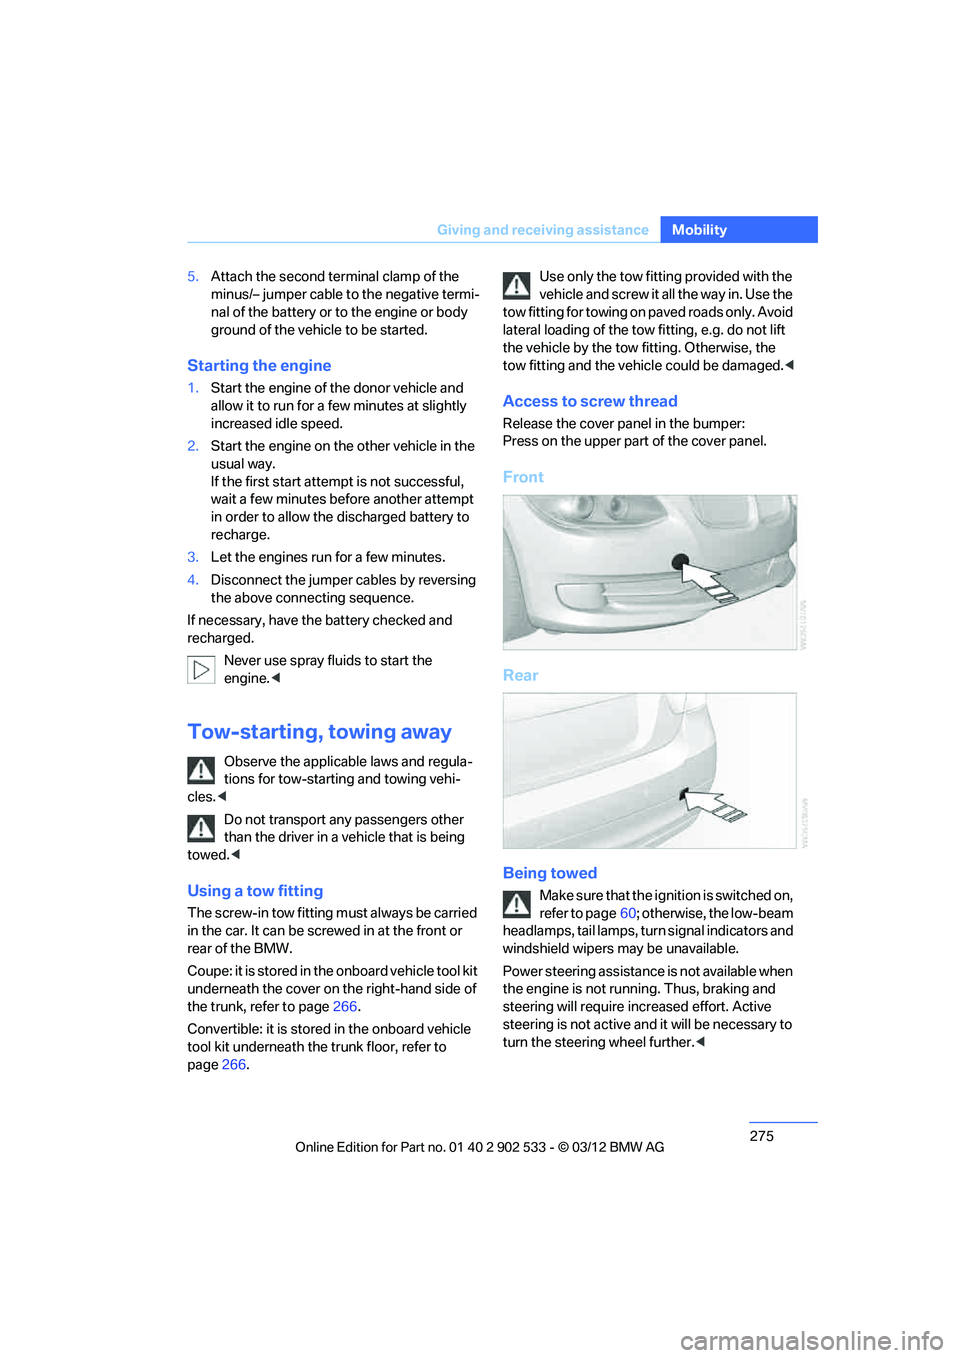
Access to screw thread
Release the cover panel in the bumper:
Press on the upper part of the cover panel.
Front
Rear
Being towed
Make sure that the ignition is switched on,
refer to page60; otherwise, the low-beam
headlamps, tail lamps, turn signal indicators and
windshield wipers may be unavailable.
Power steering assistance is not available when
the engine is not running. Thus, braking and
steering will require increased effort. Active
steering is not active and it will be necessary to
turn the steering wheel further. <
00320051004F004C00510048000300280047004C0057004C005200510003
Page 296 of 308
295
Everything from A to Z
Reference
Control Center, refer to
iDrive 18
Control Display 19
– switching off 19
Control Display, refer to iDrive 18
– adjusting brightness 92
Controller, refer to iDrive 18
Controls and displays 10
Control unit, refer to iDrive 18
Convenient loading in Convertible 33
Convenient opening and
closing
– glass roof 32
– glass roof with Comfort
Access 39
– retractable hardtop 32
– windows 32
– windows with Comfort Access 39
– with Comfort Access 39
Convertible
– bag holder 129
– convenient loading 33
– enlarging trunk 128
– folding down rear backrest 128
– retractable hardtop 42
– rollover protection system 106
– securing cargo 140
– stowing cargo 140
Coolant 259
– checking level 259
Coolant temperature 259
Cooling, maximum 115
Cooling fluid, refer to Coolant 259
Cooling system, refer to
Coolant 259
Copyright 2
Corner-illuminating lamps
– replacing bulbs 267
Cornering light, refer to Adaptive Light Control 109
Correct tires 253 Courtesy lamps, refer to
Interior lamps 112
Criteria for route 155
Cross-hairs in navigation 151
Cruise control 72
– active 74
– malfunction 74
Cruise control, refer to Active Cruise Control 74
Cruising range 82
Cupholders 126
Curb weight, refer to Weights 283
Custom er
Relations 227
D
Dashboard, refer to
Cockpit 10
Dashboard, refer to Instrument cluster 12
Dashboard lighting, refer to
Instrument lighting 112
Data, technical
– capacities 284
– dimensions 281
– weights 283
Data memory 261
Data transfer 228
Date
– date format 89
– setting 89
Daytime running lights 109
– replacing bulbs 267
DBC Dynamic Brake Control 95
Deactivating front passenger
airbags 105
Deadlocking, refer to Locking 32
Defect
– door lock 34
– fuel filler flap 232
Defining a home address 215
Destination, entering by town/ city name 147 Destination address
– entering
146,152
Destination entry via BMW Assist 151
Destination for navigation
– entering by voice 152
– entering via map 151
– entry 146
– home address 149
– manual entry 146
Destination guidance 155
– bypassing a route section 156
– changing specified route 155
– continuing 155
– starting 155
– voice instructions 157
– volume of voice
instructions 157
Digital clock 80
Digital compass 122
Dimensions 281
Directional indicators, refer to Turn signals 70
Direction instructions, refer to Voice instructions 157
Directory for navigation, refer
to Address book 148
Display, refer to iDrive controls 18
Displaying contact pictures 21
5
Dis p
lay lighting, refer to
Instrument lighting 112
Displays
– on the Control Display 18
Displays, refer to Instrument cluster 12
Displays and controls 10
Disposal
– coolant 259
– remote control battery 40
– vehicle battery 271
Distance remaining to service, refer to Service
requirements 85
00320051004F004C00510048000300280047004C0057004C005200510003
Page 301 of 308

300
Referen ceEverything from A to Z
Mirrors53
– automatic curb monitor 54
– exterior mirrors 53
– heating 54
– interior rearview mirror 54
– memory, refer to Seat and mirror memory 52
Mirrors, folding in before entering a car wash 54
Mobile phone
– adjusting volume 205
– connecting, refer to Mobile phone, pairing 201
– installation location, refer to Center armrest 124
– operation 205
– pairing 201
– refer to separate Owner's Manual
– suitable mobile phones 200
– unpairing 203
– What to do if…. 204
Mobile phone, installation location, refer to Center
armrest 124
Mobile phone, refer to Telephone 200
Mobile phone, refer to the
separate Owner's Manual
Modifications, technical, refer to For your own safety 5
Monitor, refer to iDrive controls 18
Monitoring system for tire
pressures, refer to Flat Tire
Monitor 98
Multifunctional steering
wheel, refer to Buttons on
the steering wheel 11
Multifunction switch
– refer to Turn signals/
headlamp flasher 70
– refer to Wiper system 70
Multimedia screen, refer to iDrive 18
My Info 217N
Navigation
– starting destination
guidance after entering a
destination 148
– storing current position 149
– voice activation 152
Navigation announcements, refer to Switching voice
instructions on/off 157
Navigation data 144
Navigation system 144
– address book 148
– bypassing a route section 156
– continuing destination guidance 155
– destination entry 146
– dynamic destination guidance 162
– entering a destination by
voice 152
– entering a destination manually 146
– frequently asked questions 163
– gas station
recommendations 157
– planning a trip 153
– route list 156
– selecting destination via map 151
– selecting route criteria 155
– special destinations 150
– starting destination guidance 155
– terminating destination guidance 155
– traffic bulletins 159
– voice instructions 157
– volume adjustment 157
Neck support, refer to Head
restraints 49
Nets, refer to Storage compartments 125
Neutral 66 New tires
253
Next Service indicator, refer to Condition Based Service
CBS 260
North-facing map 157
Notes 220
Nozzles 114
Nylon rope, refer to Tow rope 276
O
OBD socket, refer to Socket
for Onboard Diagnosis 261
Octane ratings, refer to Fuel specifications 233
Odometer 80
Office 213
– current office 213
– What to do if…. 221
Oil, refer to Engine oil 256
Oil consumption 256
Oil level 256
Old batteries, refer to Disposal 271
Onboard vehicle tool kit 266
Opening and closing
– Comfort Access 38
– from inside 34
– from outside 32
– retractable hardtop 43
– using the door lock 34
– using the remote control 32
Options, selecting for
navigation 155
Orientation menu, refer to Start menu 19
Outlets
– refer to Ventilation 117
Outside-air mode
– automatic climate
control 116
Outside temperature
display 80
– changing unit of measure 85
– in computer 85
00320051004F004C00510048000300280047004C0057004C005200510003