2013 BMW 328I mirror
[x] Cancel search: mirrorPage 147 of 242
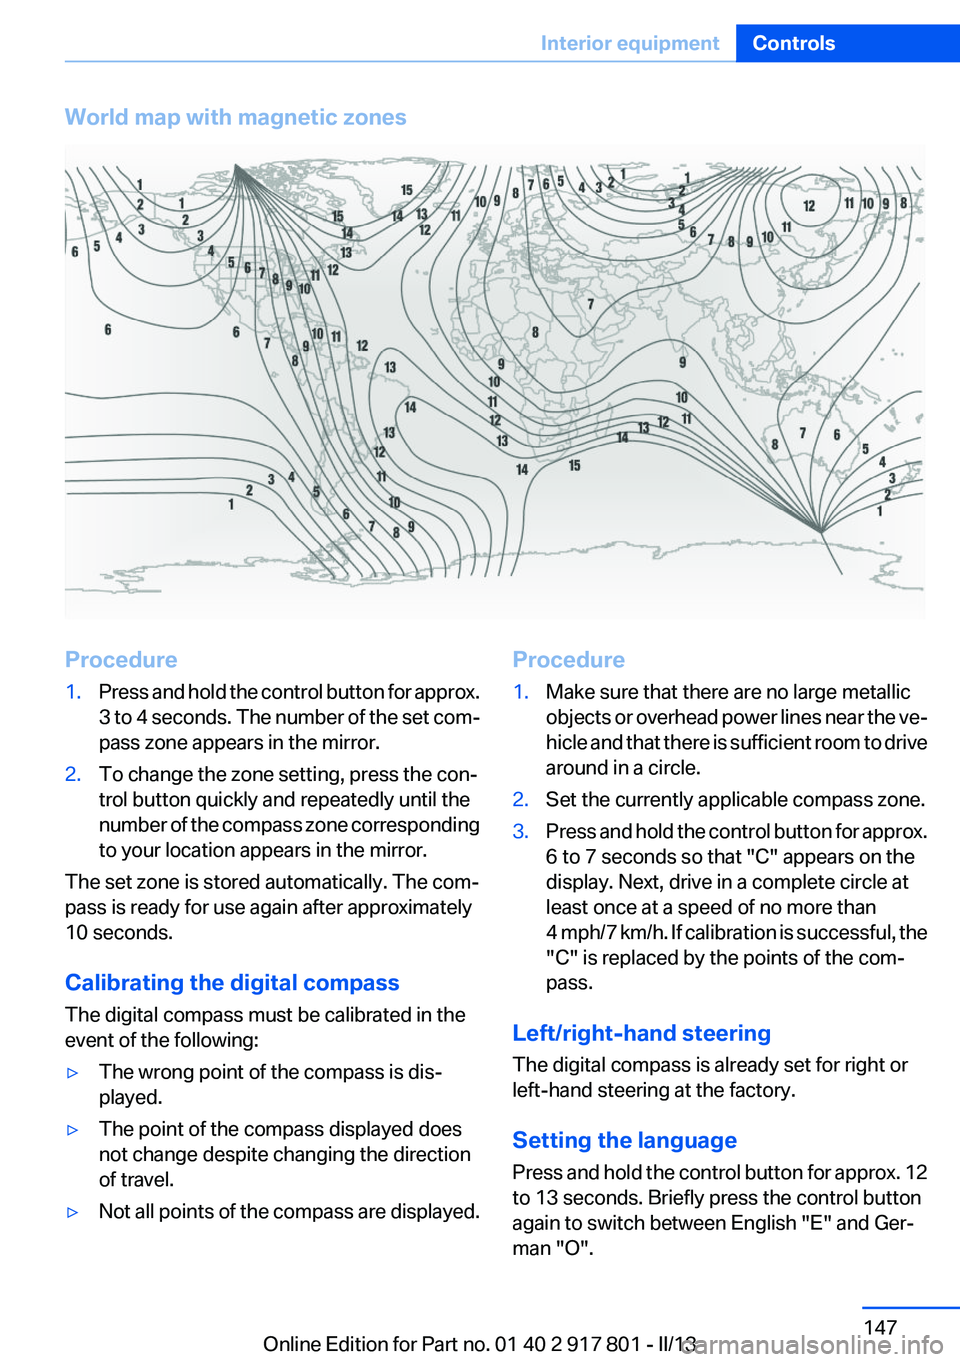
World map with magnetic zonesProcedure1.Press and hold the control button for approx.
3 to 4 seconds. The number of the set com‐
pass zone appears in the mirror.2.To change the zone setting, press the con‐
trol button quickly and repeatedly until the
number of the compass zone corresponding
to your location appears in the mirror.
The set zone is stored automatically. The com‐
pass is ready for use again after approximately
10 seconds.
Calibrating the digital compass
The digital compass must be calibrated in the
event of the following:
▷The wrong point of the compass is dis‐
played.▷The point of the compass displayed does
not change despite changing the direction
of travel.▷Not all points of the compass are displayed.Procedure1.Make sure that there are no large metallic
objects or overhead power lines near the ve‐
hicle and that there is sufficient room to drive
around in a circle.2.Set the currently applicable compass zone.3.Press and hold the control button for approx.
6 to 7 seconds so that "C" appears on the
display. Next, drive in a complete circle at
least once at a speed of no more than
4 mph/7 km/h. If calibration is successful, the
"C" is replaced by the points of the com‐
pass.
Left/right-hand steering
The digital compass is already set for right or
left-hand steering at the factory.
Setting the language
Press and hold the control button for approx. 12
to 13 seconds. Briefly press the control button
again to switch between English "E" and Ger‐
man "O".
Seite 147Interior equipmentControls147
Online Edition for Part no. 01 40 2 917 801 - II/13
Page 164 of 242
Saving fuelVehicle equipment
All standard, country-specific and optional
equipment that is offered in the model series is
described in this chapter. Therefore, equipment
is also described that is not available in a vehicle,
e. g., because of the selected optional equip‐
ment or country variant. This also applies for
safety-related functions and systems.
General information
Your vehicle contains advanced technology for
the reduction of fuel consumption and emis‐
sions.
Fuel consumption depends on a number of dif‐
ferent factors.
The implementation of certain measures, driv‐
ing style and regular maintenance can have an
influence on fuel consumption and on the envi‐
ronmental impact.
Remove unnecessary cargo
Additional weight increases fuel consumption.
Remove attached parts
following use
Remove auxiliary mirrors, roof or rear luggage
racks which are no longer required following
use.
Attached parts on the vehicle impair the aero‐
dynamics and increase the fuel consumption.Close the windows and glass
sunroof
Driving with the glass sunroof and windows
open results in increased air resistance and
raises fuel consumption.
Tires
General information
Tires can affect consumption values in various
ways, for instance consumption can be influ‐
enced by the size of the tires.
Check the tire inflation pressure
regularly
Check and, if necessary, correct the tire inflation
pressure at least twice a month and before start‐
ing on a long trip.
Low tire inflation pressure increases rolling re‐
sistance and thus raises fuel consumption and
tire wear.
Drive away without delay
Do not wait for the engine to warm up while the
vehicle remains stationary. Start driving right
away, but at moderate engine speeds.
This is the fastest way for the cold engine to
reach its operating temperature.
Look well ahead when driving
Avoid unnecessary acceleration and braking.
By maintaining a suitable distance to the vehicle
driving ahead of you.
Driving smoothly and looking ahead reduces
fuel consumption.Seite 164Driving tipsSaving fuel164
Online Edition for Part no. 01 40 2 917 801 - II/13
Page 166 of 242
▷ECO PRO tips driving instruction, refer to
page 167▷ECO PRO climate control, refer to
page 166
Activating ECO PRO
Press button repeatedly until ECO PRO
is displayed in the instrument cluster.
Configuring ECO PRO
Via the Driving Dynamics Control
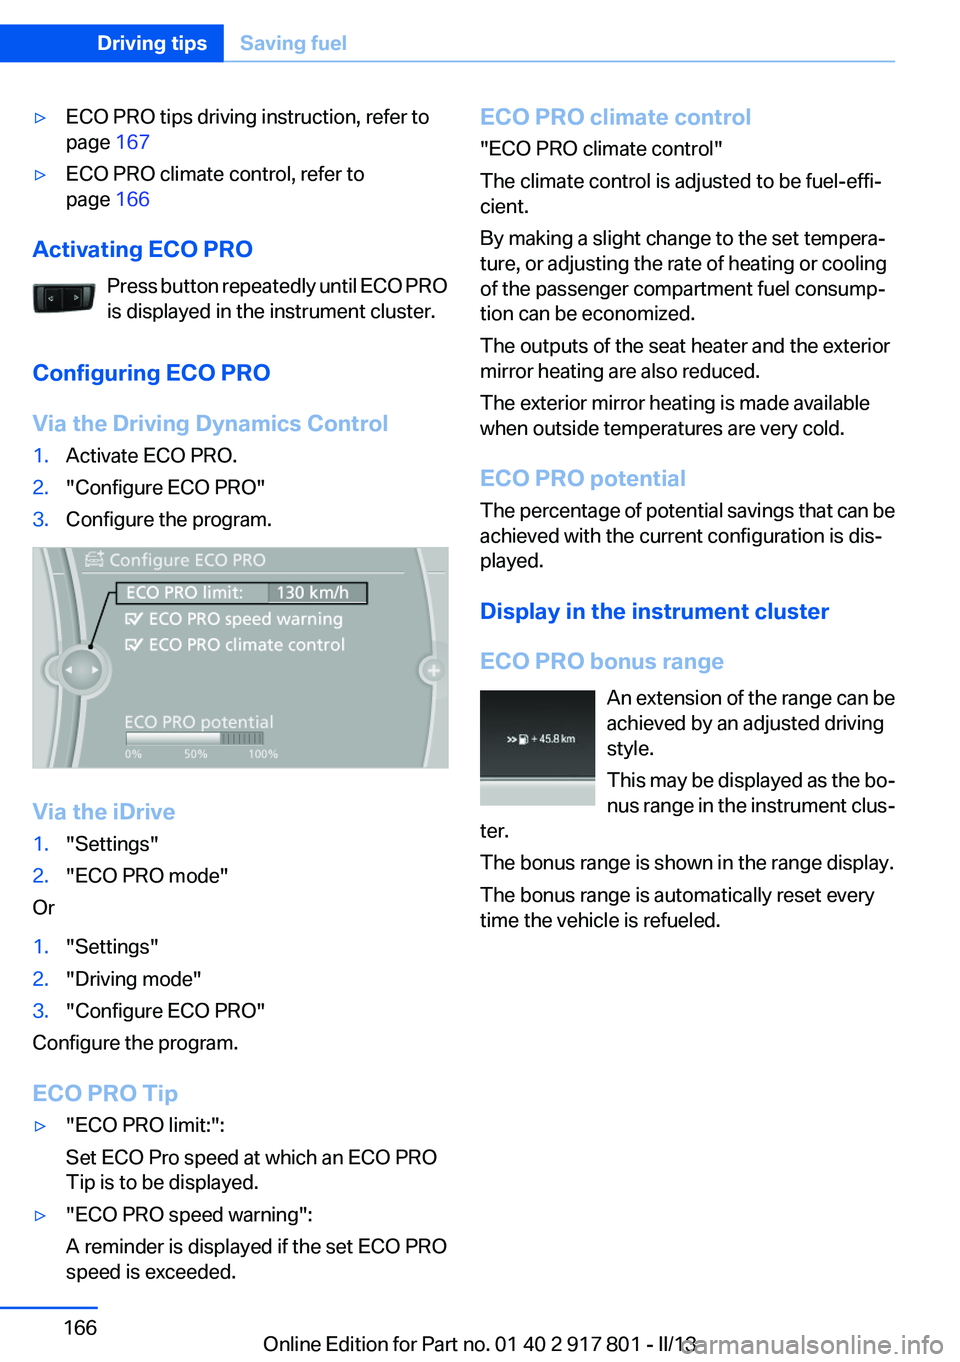
1.Activate ECO PRO.2."Configure ECO PRO"3.Configure the program.
Via the iDrive
1."Settings"2."ECO PRO mode"
Or
1."Settings"2."Driving mode"3."Configure ECO PRO"
Configure the program.
ECO PRO Tip
▷"ECO PRO limit:":
Set ECO Pro speed at which an ECO PRO
Tip is to be displayed.▷"ECO PRO speed warning":
A reminder is displayed if the set ECO PRO
speed is exceeded.ECO PRO climate control
"ECO PRO climate control"
The climate control is adjusted to be fuel-effi‐
cient.
By making a slight change to the set tempera‐
ture, or adjusting the rate of heating or cooling
of the passenger compartment fuel consump‐
tion can be economized.
The outputs of the seat heater and the exterior
mirror heating are also reduced.
The exterior mirror heating is made available
when outside temperatures are very cold.
ECO PRO potential
The percentage of potential savings that can be
achieved with the current configuration is dis‐
played.
Display in the instrument cluster
ECO PRO bonus range An extension of the range can be
achieved by an adjusted driving
style.
This may be displayed as the bo‐
nus range in the instrument clus‐
ter.
The bonus range is shown in the range display.
The bonus range is automatically reset every
time the vehicle is refueled.Seite 166Driving tipsSaving fuel166
Online Edition for Part no. 01 40 2 917 801 - II/13
Page 207 of 242
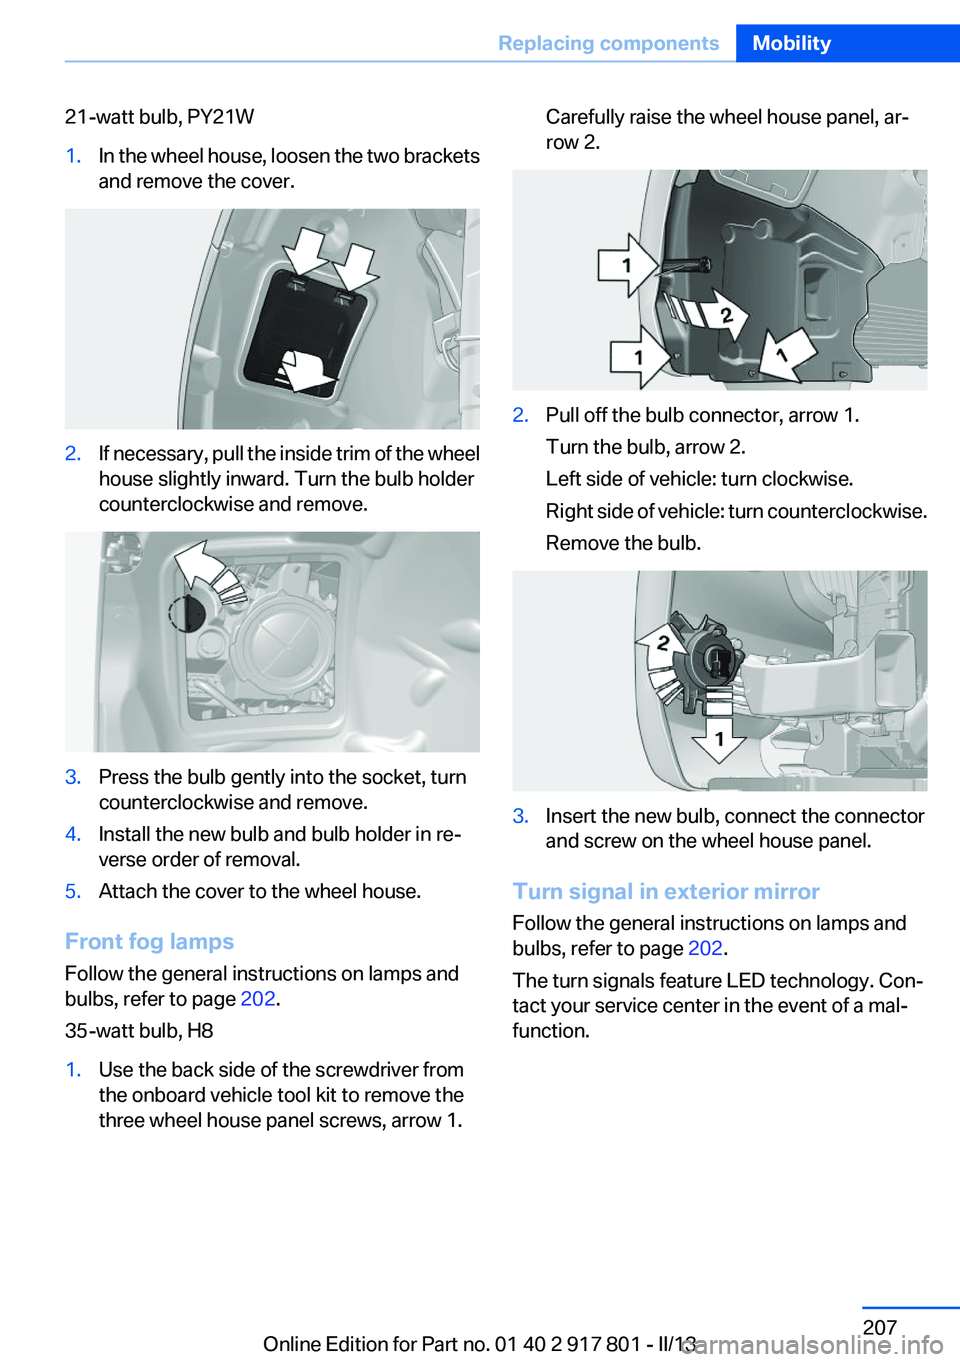
21-watt bulb, PY21W1.In the wheel house, loosen the two brackets
and remove the cover.2.If necessary, pull the inside trim of the wheel
house slightly inward. Turn the bulb holder
counterclockwise and remove.3.Press the bulb gently into the socket, turn
counterclockwise and remove.4.Install the new bulb and bulb holder in re‐
verse order of removal.5.Attach the cover to the wheel house.
Front fog lamps
Follow the general instructions on lamps and
bulbs, refer to page 202.
35-watt bulb, H8
1.Use the back side of the screwdriver from
the onboard vehicle tool kit to remove the
three wheel house panel screws, arrow 1.Carefully raise the wheel house panel, ar‐
row 2.2.Pull off the bulb connector, arrow 1.
Turn the bulb, arrow 2.
Left side of vehicle: turn clockwise.
Right side of vehicle: turn counterclockwise.
Remove the bulb.3.Insert the new bulb, connect the connector
and screw on the wheel house panel.
Turn signal in exterior mirror
Follow the general instructions on lamps and
bulbs, refer to page 202.
The turn signals feature LED technology. Con‐
tact your service center in the event of a mal‐
function.
Seite 207Replacing componentsMobility207
Online Edition for Part no. 01 40 2 917 801 - II/13
Page 211 of 242
to ensure that all comfort functions are fully
available and that any Check Control messages
are no longer displayed.
Charging the battery
Note Do not plug chargers into the socket
Do not connect battery chargers to the
factory-installed sockets in the vehicle as this
may damage the battery.◀
General information
Make sure that the battery is always sufficiently
charged to guarantee that the battery remains
usable for its full service life.
The battery may need to be charged in the fol‐
lowing cases:▷When making frequent short-distance
drives.▷If the vehicle is not used for prolonged peri‐
ods, longer than a month.
Starting aid terminals
In the vehicle, only charge the battery via the
starting aid terminals, refer to page 215, in the
engine compartment with the engine off.
Power failure
After a temporary power loss, some equipment
needs to be reinitialized.
Individual settings need to be reprogrammed:
▷Seat and mirror memory: store the positions
again.▷Time: update.▷Date: update.▷Radio station: save again.▷Navigation system: wait for the operability of
the navigation.Disposing of old batteries
Have old batteries disposed of by your
service center or bring them to a recy‐
cling center.
Maintain the battery in an upright position for
transport and storage. Secure the battery so
that it does not tip over during transport.
Fuses
Notes Replacing fuses
Never attempt to repair a blown fuse and
do not replace a defective fuse with a substitute
of another color or amperage rating; this could
lead to a circuit overload, ultimately resulting in
a fire in the vehicle.◀
Plastic tweezers and information on the fuse
types and locations are stored in the fuse box in
the cargo area.
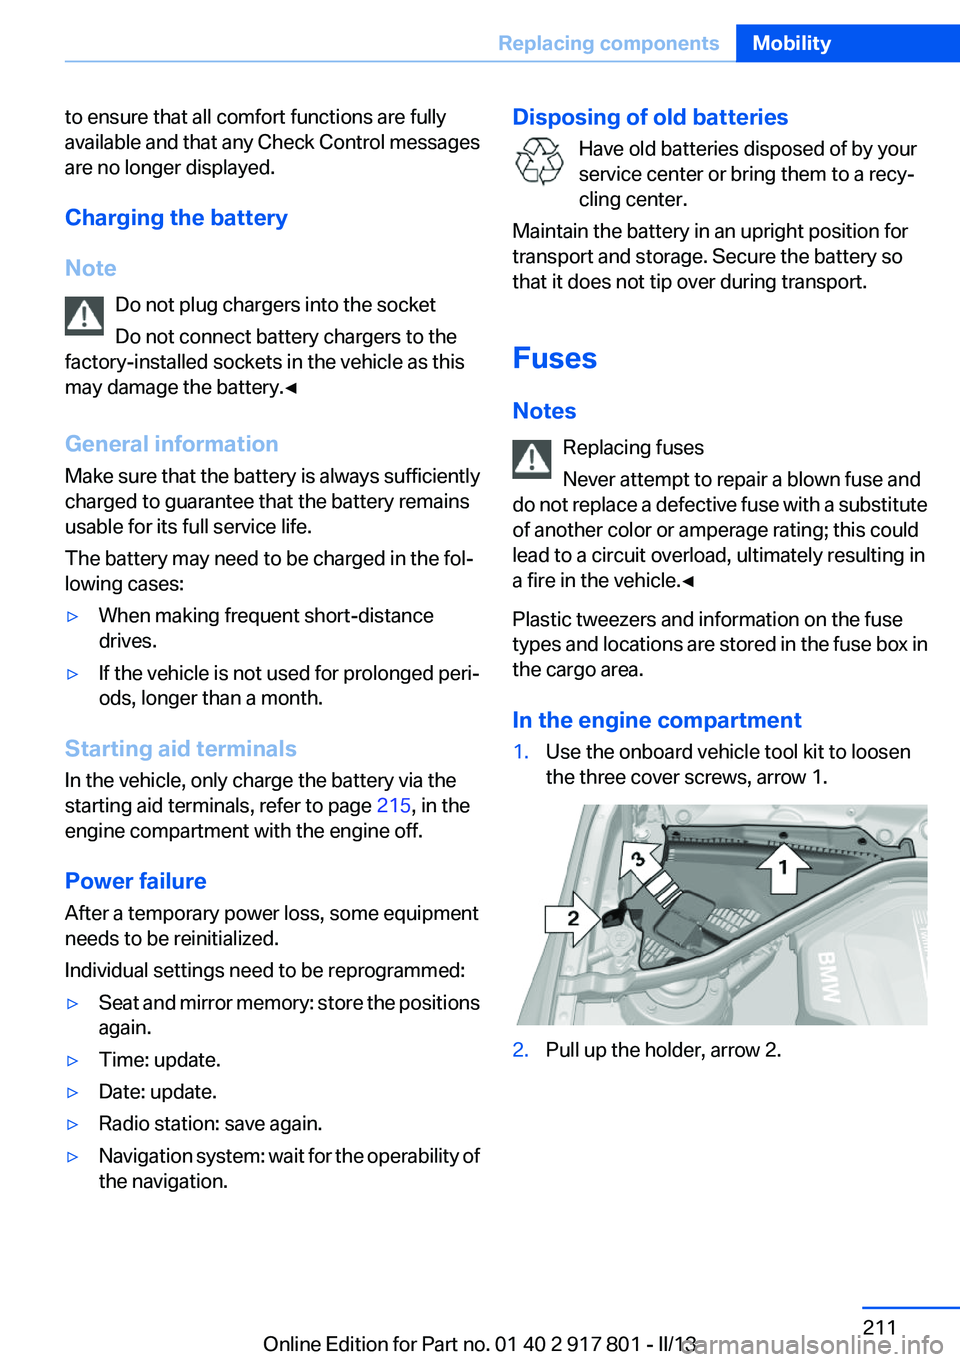
In the engine compartment1.Use the onboard vehicle tool kit to loosen
the three cover screws, arrow 1.2.Pull up the holder, arrow 2.Seite 211Replacing componentsMobility211
Online Edition for Part no. 01 40 2 917 801 - II/13
Page 219 of 242

CareVehicle equipment
All standard, country-specific and optional
equipment that is offered in the model series is
described in this chapter. Therefore, equipment
is also described that is not available in a vehicle,
e. g., because of the selected optional equip‐
ment or country variant. This also applies for
safety-related functions and systems.
Car washes
Hints Steam jets or high-pressure washers
When using steam jets or high-pressure
washers, hold them a sufficient distance away
and use a maximum temperature of
140 ℉/60 ℃.
Ensure that a distance of at least 31.5 in‐
ches/80 cm from the glass sunroof is maintained
at all times. Holding them too close or using ex‐
cessively high pressures or temperatures can
cause damage or preliminary damage that may
then lead to long-term damage.
Follow the user's manual for the high-pressure
washer.◀
Cleaning sensors/cameras with high-
pressure washers
When using high-pressure washers, do not
spray the exterior sensors and cameras, e.g.,
Park Distance Control, for extended periods of
time and only from a distance of at least
12 in/30 cm.◀
Regularly remove foreign items such as leaves
in the area below the windshield when the hood
is raised.
Wash your vehicle frequently, particularly in win‐
ter.Intense soiling and road salt can damage the ve‐
hicle.
Automatic car washes
Hints
Note the following:▷Give preference to cloth car washes or those
that use soft brushes in order to avoid paint
damage.▷Make sure that the wheels and tires are not
damaged by the transport mechanisms.▷Fold in the exterior mirrors; otherwise, they
may be damaged, depending on the width of
the vehicle.▷Deactivate the rain sensor, refer to page 65,
to avoid unintentional wiper activation.▷In some cases, an unintentional alarm can be
triggered by the interior motion sensor of the
alarm system. Follow the instructions on
avoiding an unintentional alarm, refer to
page 41.
Guide rails in car washes
Avoid car washes with guide rails higher
than 4 in/10 cm; otherwise, the vehicle body
could be damaged.◀
Before driving into a car wash
In order to ensure that the vehicle can roll in a car
wash, take the following steps:
Manual transmission:
1.Release the parking brake.2.Drive into the car wash.3.Shift to neutral.4.Switch the engine off.5.Switch on the ignition.Seite 219CareMobility219
Online Edition for Part no. 01 40 2 917 801 - II/13
Page 226 of 242
Technical dataVehicle equipment
All standard, country-specific and optional
equipment that is offered in the model series is
described in this chapter. Therefore, equipmentis also described that is not available in a vehicle,
e. g., because of the selected optional equip‐
ment or country variant. This also applies for
safety-related functions and systems.
Dimensions
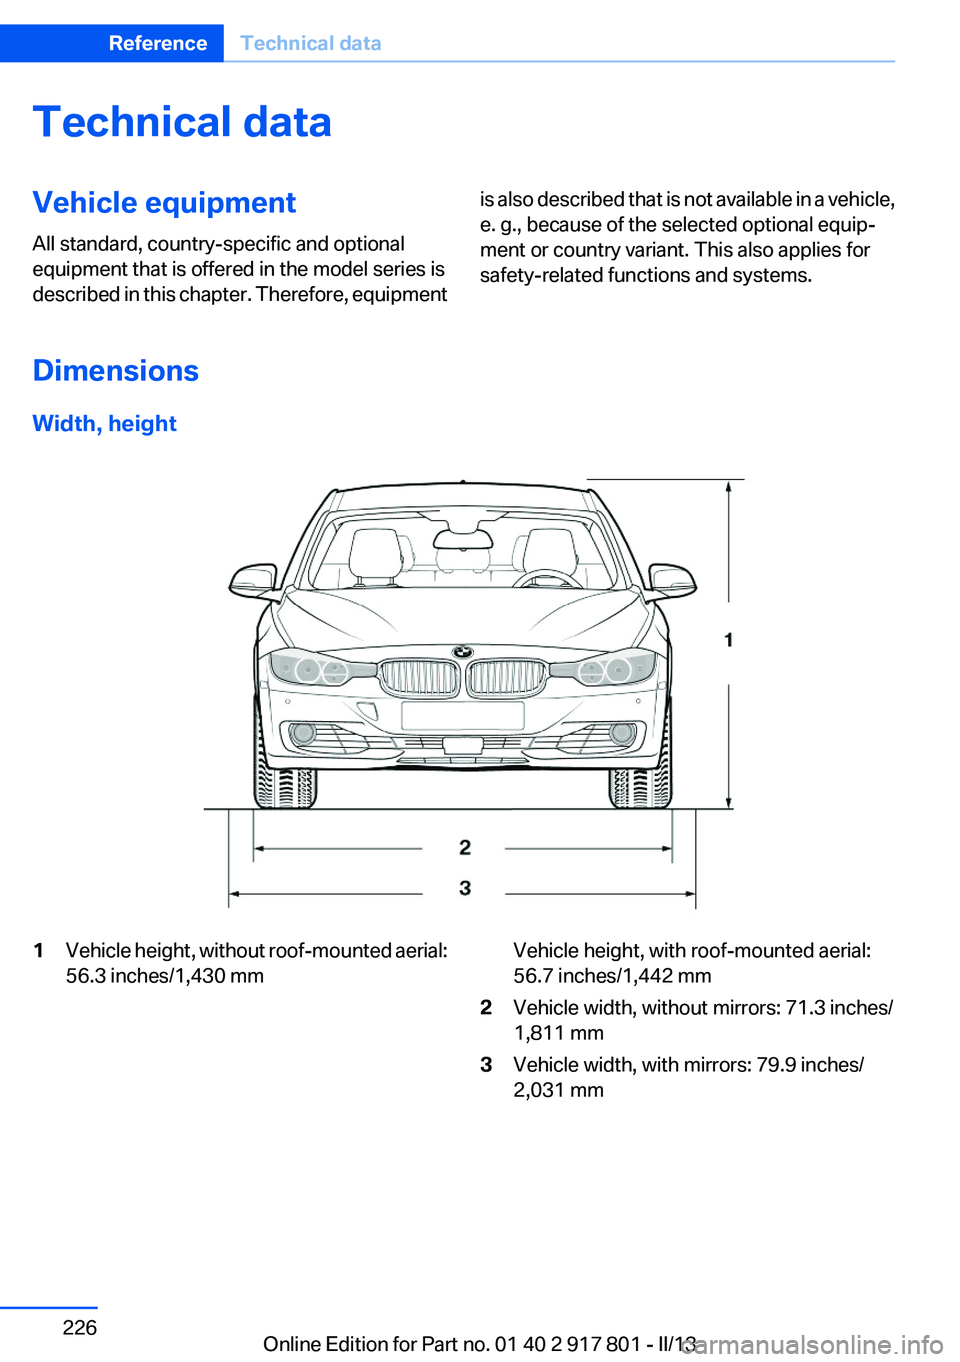
Width, height
1Vehicle height, without roof-mounted aerial:
56.3 inches/1,430 mmVehicle height, with roof-mounted aerial:
56.7 inches/1,442 mm2Vehicle width, without mirrors: 71.3 inches/
1,811 mm3Vehicle width, with mirrors: 79.9 inches/
2,031 mmSeite 226ReferenceTechnical data226
Online Edition for Part no. 01 40 2 917 801 - II/13
Page 234 of 242
Current fuel consumption 77
D
Damage, tires 190
Damping control, dy‐ namic 111
Data, technical 226
Date 77
Daytime running lights 88
Defrosting, refer to defrosting the windows 138
Defrosting, refer to Windows, defrosting 141
Defrosting the windows 138
Dehumidifying, air 138, 140
Destination distance 82
Diesel exhaust fluid, at low temperatures 176
Diesel exhaust fluid, having re‐ filled 176
Diesel exhaust fluid, on mini‐ mum 175
Diesel exhaust fluid, replenish‐ ing yourself 176
Diesel particulate filter 159
Digital clock 76
Digital compass 146
Dimensions 226
Dimmable exterior mirrors 53
Dimmable interior rearview mirror 53
Direction indicator, refer to Turn signals 64
Display, electronic, instrument cluster 72
Display in windshield 131
Display lighting, refer to Instru‐ ment lighting 90
Displays 70
Displays, cleaning 222
Disposal, coolant 199
Disposal, vehicle battery 211
Distance control, refer to PDC 123 Distance, selecting for
ACC 117
Distance to destination 82
Divided screen view, split screen 20
Door lock, refer to Remote control 30
Drive-off assistant 114
Drive-off assistant, refer to DSC 110
Driving experience switch 112
Driving instructions, breaking in 158
Driving mode 112
Driving notes, general 158
Driving stability control sys‐ tems 110
Driving tips 158
DSC Dynamic Stability Con‐ trol 110
DTC Dynamic Traction Con‐ trol 111
Dynamic Damping Con‐ trol 111
Dynamic Stability Control DSC 110
Dynamic Traction Control DTC 111
E
ECO PRO 165
ECO PRO, bonus range 166
ECO PRO display 165
ECO PRO driving mode 165
ECO PRO mode 165
ECO PRO Tip - driving instruc‐ tion 167
EfficientDynamics 167
Electronic displays, instru‐ ment cluster 72
Electronic Stability Program ESP, refer to DSC 110
Emergency detection, remote control 31 Emergency release, door
lock 36
Emergency release, fuel filler flap 172
Emergency Request 213
Emergency service, refer to Roadside Assistance 214
Emergency start function, en‐ gine start 31
Emergency unlocking, trunk lid 38
Energy Control 77
Energy recovery 77
Engine, automatic Start/Stop function 61
Engine, automatic switch- off 61
Engine compartment 194
Engine compartment, working in 195
Engine coolant 199
Engine oil 196
Engine oil, adding 197
Engine oil additives 197
Engine oil change 198
Engine oil filler neck 197
Engine oil temperature 76
Engine oil types, alterna‐ tive 197
Engine oil types, ap‐ proved 197
Engine start during malfunc‐ tion 31
Engine start, jump-start‐ ing 214
Engine start, refer to Starting the engine 60
Engine stop 61
Engine temperature 76
Entering a car wash 219
Equipment, interior 144
ESP Electronic Stability Pro‐ gram, refer to DSC 110
Exchanging wheels/tires 191
Exhaust system 159 Seite 234ReferenceEverything from A to Z234
Online Edition for Part no. 01 40 2 917 801 - II/13