2013 BMW 328I number
[x] Cancel search: numberPage 21 of 242

Switching the split screen on and off1. Press the button.2."Split screen"
Selecting the display
1. Press the button.2."Split screen"3.Move the controller until the split screen is
selected.4.Press the controller or select "Split screen
content".5.Select the desired menu item.
Programmable memory
buttons
General information
The iDrive functions can be stored on the pro‐
grammable memory buttons and called up di‐
rectly, e.g., radio stations, navigation destina‐
tions, phone numbers and entry points into the
menu.
The settings are stored for the remote control
currently in use.
Without navigation system and
telephone
Only radio stations can be stored on the buttons,
refer to user's manual for Navigation, Entertain‐
ment and Communication.
Saving a function1.Highlight the function via the iDrive.2. Press the desired button for more
than 2 seconds.
Running a function
Press the button.
The function will run immediately. This
means, for example, that the number is dialed
when a phone number is selected.
Displaying the button assignment
Use a finger to touch the buttons. Do not wear
gloves or use objects.
The key assignment is displayed at the top edge
of the screen.
▷To display short information: touch the but‐
ton.▷To display detailed information: touch the
button for an extended period.
Deleting the button assignments
1.Press buttons 1 and 8 simultaneously for
approx. five seconds.2."OK"
Entering letters and numbers
General information
1.Turn the controller: select letters or num‐
bers.Seite 21iDriveAt a glance21
Online Edition for Part no. 01 40 2 917 801 - II/13
Page 22 of 242
2.Select additional letters or numbers if
needed.3."OK": confirm the entry.
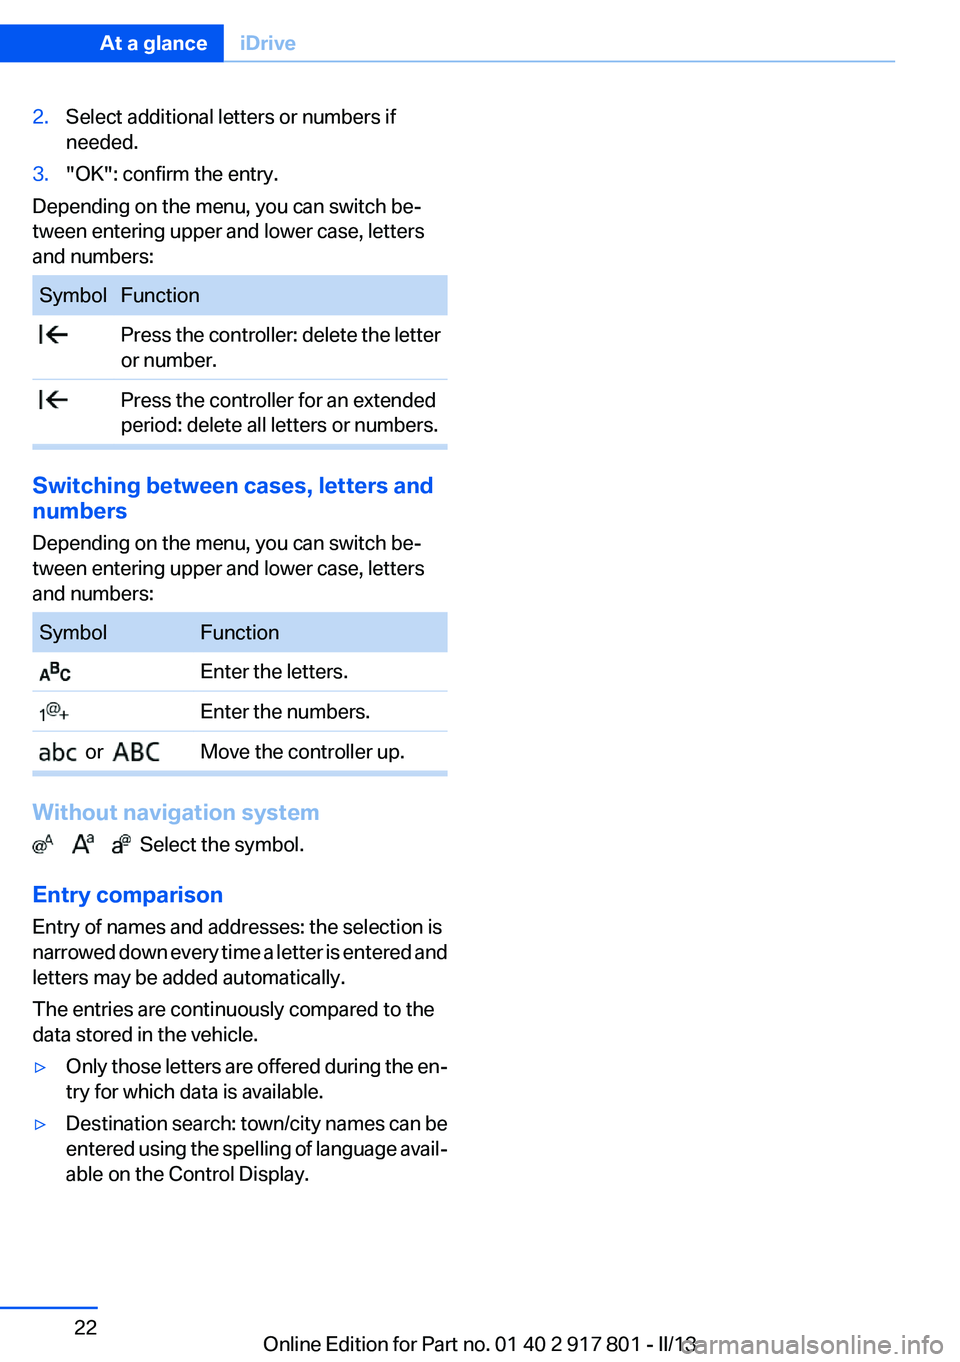
Depending on the menu, you can switch be‐
tween entering upper and lower case, letters
and numbers:
SymbolFunction Press the controller: delete the letter
or number. Press the controller for an extended
period: delete all letters or numbers.
Switching between cases, letters and
numbers
Depending on the menu, you can switch be‐
tween entering upper and lower case, letters
and numbers:
SymbolFunction Enter the letters. Enter the numbers. or Move the controller up.
Without navigation system
Select the symbol.
Entry comparison
Entry of names and addresses: the selection is
narrowed down every time a letter is entered and
letters may be added automatically.
The entries are continuously compared to the
data stored in the vehicle.
▷Only those letters are offered during the en‐
try for which data is available.▷Destination search: town/city names can be
entered using the spelling of language avail‐
able on the Control Display.Seite 22At a glanceiDrive22
Online Edition for Part no. 01 40 2 917 801 - II/13
Page 25 of 242
Environmental conditions▷Say the commands, numbers, and letters
smoothly and with normal volume, empha‐
sis, and speed.▷Always say commands in the language of
the voice activation system.▷Keep the doors, windows, and glass sunroof
closed to prevent noise interference.▷Avoid making other noise in the vehicle
while speaking.Seite 25Voice activation systemAt a glance25
Online Edition for Part no. 01 40 2 917 801 - II/13
Page 43 of 242
Roller sunblinds
Roller sunblind for rear window
General information
If you are no longer able to move the roller sun‐
blind for the rear window after having activated
it a number of times in a row, the system is
blocked for a limited time to prevent overheat‐
ing. Let the system cool.
The roller sunblind for the rear window cannot
be moved at low interior temperatures.
Extending or retracting roller blind for
rear window
Press the button.
Roller sunblinds for the rear side
windows
Pull out the roller sunblind at the loop and hook
it onto the bracket.
Do not open the window while the roller
sunblind is raised.
Do not open the window while the roller sunblind
is raised; otherwise, there is a risk of damage at
high speeds that may result in personal injury. ◀
Glass sunroof, powered
General information
The glass sunroof is operational when the igni‐
tion is switched on.
Keep the closing path clear
Monitor the closing process and make
sure that the closing path of the glass sunroof is
clear; otherwise, injuries may result.◀
Take the remote control with you
Take the remote control with you when
leaving the vehicle so that children, for example,
cannot operate the roof and injure themselves. ◀
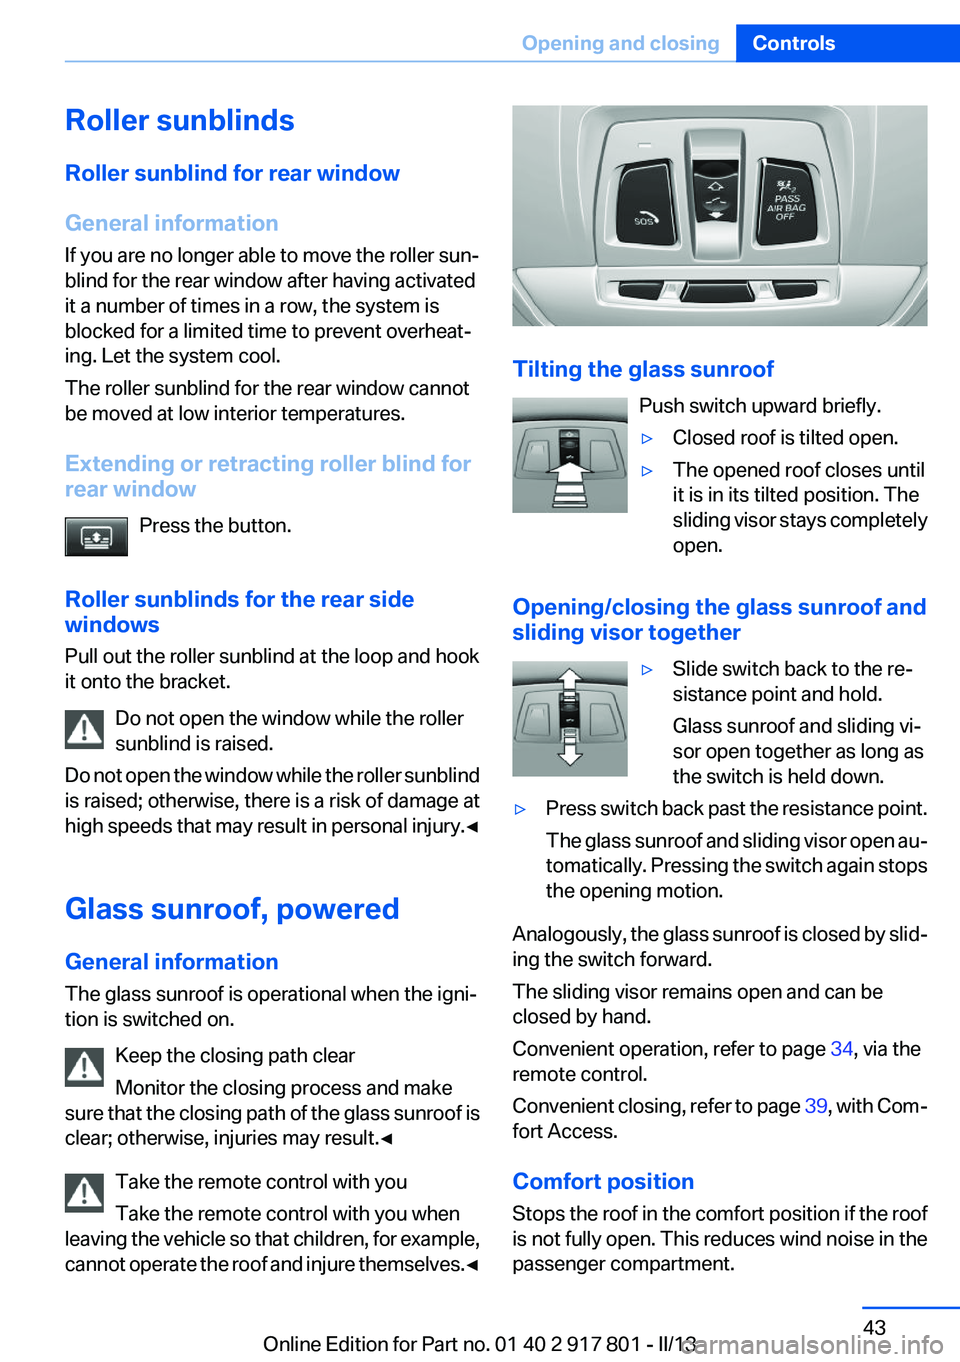
Tilting the glass sunroof
Push switch upward briefly.
▷Closed roof is tilted open.▷The opened roof closes until
it is in its tilted position. The
sliding visor stays completely
open.
Opening/closing the glass sunroof and
sliding visor together
▷Slide switch back to the re‐
sistance point and hold.
Glass sunroof and sliding vi‐
sor open together as long as
the switch is held down.▷Press switch back past the resistance point.
The glass sunroof and sliding visor open au‐
tomatically. Pressing the switch again stops
the opening motion.
Analogously, the glass sunroof is closed by slid‐
ing the switch forward.
The sliding visor remains open and can be
closed by hand.
Convenient operation, refer to page 34, via the
remote control.
Convenient closing, refer to page 39, with Com‐
fort Access.
Comfort position
Stops the roof in the comfort position if the roof
is not fully open. This reduces wind noise in the
passenger compartment.
Seite 43Opening and closingControls43
Online Edition for Part no. 01 40 2 917 801 - II/13
Page 48 of 242
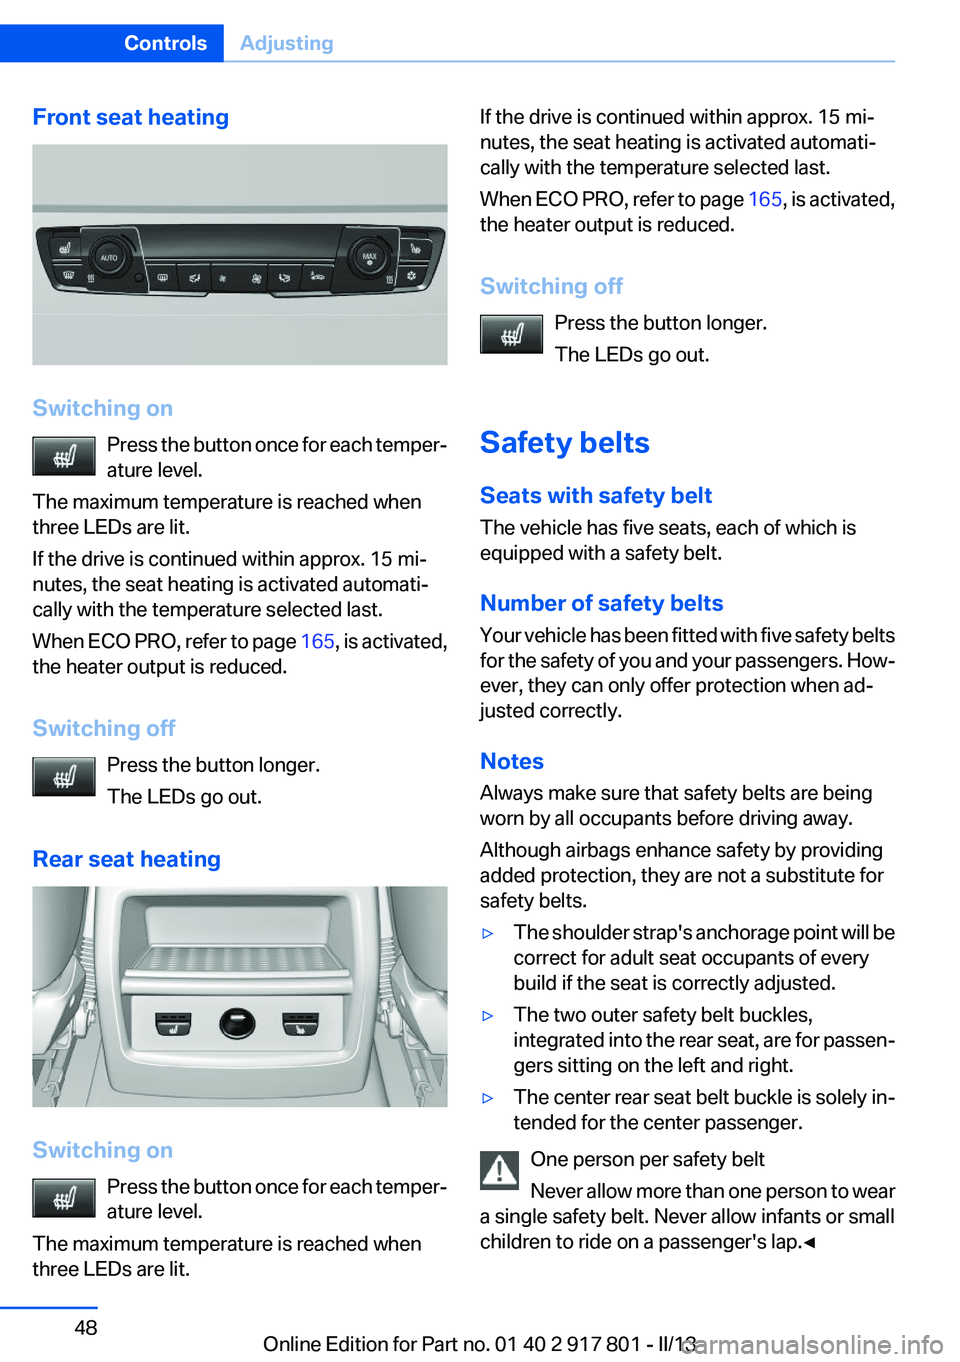
Front seat heating
Switching onPress the button once for each temper‐
ature level.
The maximum temperature is reached when
three LEDs are lit.
If the drive is continued within approx. 15 mi‐
nutes, the seat heating is activated automati‐
cally with the temperature selected last.
When ECO PRO, refer to page 165, is activated,
the heater output is reduced.
Switching off Press the button longer.
The LEDs go out.
Rear seat heating
Switching on Press the button once for each temper‐
ature level.
The maximum temperature is reached when
three LEDs are lit.
If the drive is continued within approx. 15 mi‐
nutes, the seat heating is activated automati‐
cally with the temperature selected last.
When ECO PRO, refer to page 165, is activated,
the heater output is reduced.
Switching off Press the button longer.
The LEDs go out.
Safety belts
Seats with safety belt
The vehicle has five seats, each of which is
equipped with a safety belt.
Number of safety belts
Your vehicle has been fitted with five safety belts
for the safety of you and your passengers. How‐
ever, they can only offer protection when ad‐
justed correctly.
Notes
Always make sure that safety belts are being
worn by all occupants before driving away.
Although airbags enhance safety by providing
added protection, they are not a substitute for
safety belts.▷The shoulder strap's anchorage point will be
correct for adult seat occupants of every
build if the seat is correctly adjusted.▷The two outer safety belt buckles,
integrated into the rear seat, are for passen‐
gers sitting on the left and right.▷The center rear seat belt buckle is solely in‐
tended for the center passenger.
One person per safety belt
Never allow more than one person to wear
a single safety belt. Never allow infants or small
children to ride on a passenger's lap.◀
Seite 48ControlsAdjusting48
Online Edition for Part no. 01 40 2 917 801 - II/13
Page 62 of 242

The display indicates that the
conditions for an automatic en‐
gine stop have not been satisfied.
Note
The engine is not switched off automatically in
the following situations:▷External temperature too low.▷The external temperature is high and auto‐
matic climate control is running.▷The passenger compartment has not yet
been heated or cooled to the required level.▷The engine is not yet at operating tempera‐
ture.▷The wheels are at a sharp angle or the steer‐
ing wheel is being turned.▷After driving in reverse.▷Fogging of the windows when the automatic
climate control is switched on.▷The vehicle battery charge is very low.▷The engine compartment lid is unlocked.▷The parking assistant is activated.▷Stop-and-go traffic.▷The transmission selector lever is in position
N or M/S.
Starting the engine
The engine starts automatically under the fol‐
lowing conditions:
▷Manual transmission:
The clutch pedal is pressed.▷Automatic transmission:
By releasing the brake pedal.
After the engine starts, accelerate as usual.
Safety mode
After the engine switches off automatically, it
will not start again automatically if any one of the
following conditions are met.
▷The driver's safety belt is unbuckled and the
driver's door is open.▷The hood was unlocked.
Some indicator lamps light up for varying
lengths of time.
The engine can only be started via the Start/
Stop button.
Note
Even if driving away was not intended, the de‐
activated engine starts up automatically in the
following situations:
▷Excessive warming of the passenger com‐
partment when the cooling function is
switched on.▷The steering wheel is turned.▷Automatic transmission: the transmission
position is changed from D to N, R, or M/S.▷Automatic transmission: the transmission
position is changed from P to N, D, R, or M/
S.▷The vehicle begins rolling.▷Fogging of the windows when the automatic
climate control is switched on.▷The vehicle battery charge is very low.▷Excessive cooling of the passenger com‐
partment when the heating is switched on.▷Low brake vacuum pressure; this can occur,
for example, if the brake pedal is depressed
a number of times in succession.Seite 62ControlsDriving62
Online Edition for Part no. 01 40 2 917 801 - II/13
Page 135 of 242

Parking using the parking assistantCheck the traffic situation as well
Loud sounds outside and within the vehi‐
cle can drown out the signal tones of the parking
assistant and PDC.
Check the traffic situation around the vehicle
with your own eyes; otherwise, there is the dan‐
ger of an accident.◀1.Switch on the parking assistant and activate
it if necessary.
The status of the parking space search is in‐
dicated on the Control Display.2.Follow the instructions on the Control Dis‐
play.
To achieve the best possible parking posi‐
tion, wait for the automatic steering wheel
movement after the gear change when the
vehicle is stationary.
The end of the parking procedure is indi‐
cated on the Control Display.3.Adjust the parking position yourself if nec‐
essary.
Interrupting manually
The parking assistant can be interrupted at any
time:
▷ " Parking Assistant" Select the symbol on
the Control Display.▷Press the button.
Interrupting automatically
The system is interrupted automatically in the
following situations:
▷If the driver grasps the steering wheel or if
he takes over steering.▷If a gear is selected that does not match the
instruction on the Control Display.▷If a turn signal is activated in the opposite
direction to the desired side for parking.▷If the vehicle speed exceeds approx.
6 mph/10 km/h.▷On snow-covered or slippery road surfaces
if necessary.▷If doors are open.▷If the trunk lid is open.▷If a maximum number of parking attempts or
the time taken for parking is exceeded.
A Check Control message is displayed.
Resume
An interrupted parking procedure can be con‐
tinued if necessary.
Follow the instructions on the Control Display to
do this.
System limits
No parking assistance
The parking assistant does not offer assistance
in the following situations:
▷In tight curves.▷When towing a trailer.
Functional limitations
The system may not be fully functional in the
following situations:
▷When sensors are dirty or iced over.▷In heavy fog, rain or snowfall.▷On bumpy road surfaces such as gravel
roads.▷When leaves or snow has collected in the
parking space.
Limits of ultrasonic measurement
The detection of objects can reach the physical
limits of ultrasonic measurement, e.g., in the fol‐
lowing circumstances:
▷With tow bars and trailer hitches.▷With thin or wedge-shaped objects.Seite 135Driving comfortControls135
Online Edition for Part no. 01 40 2 917 801 - II/13
Page 147 of 242
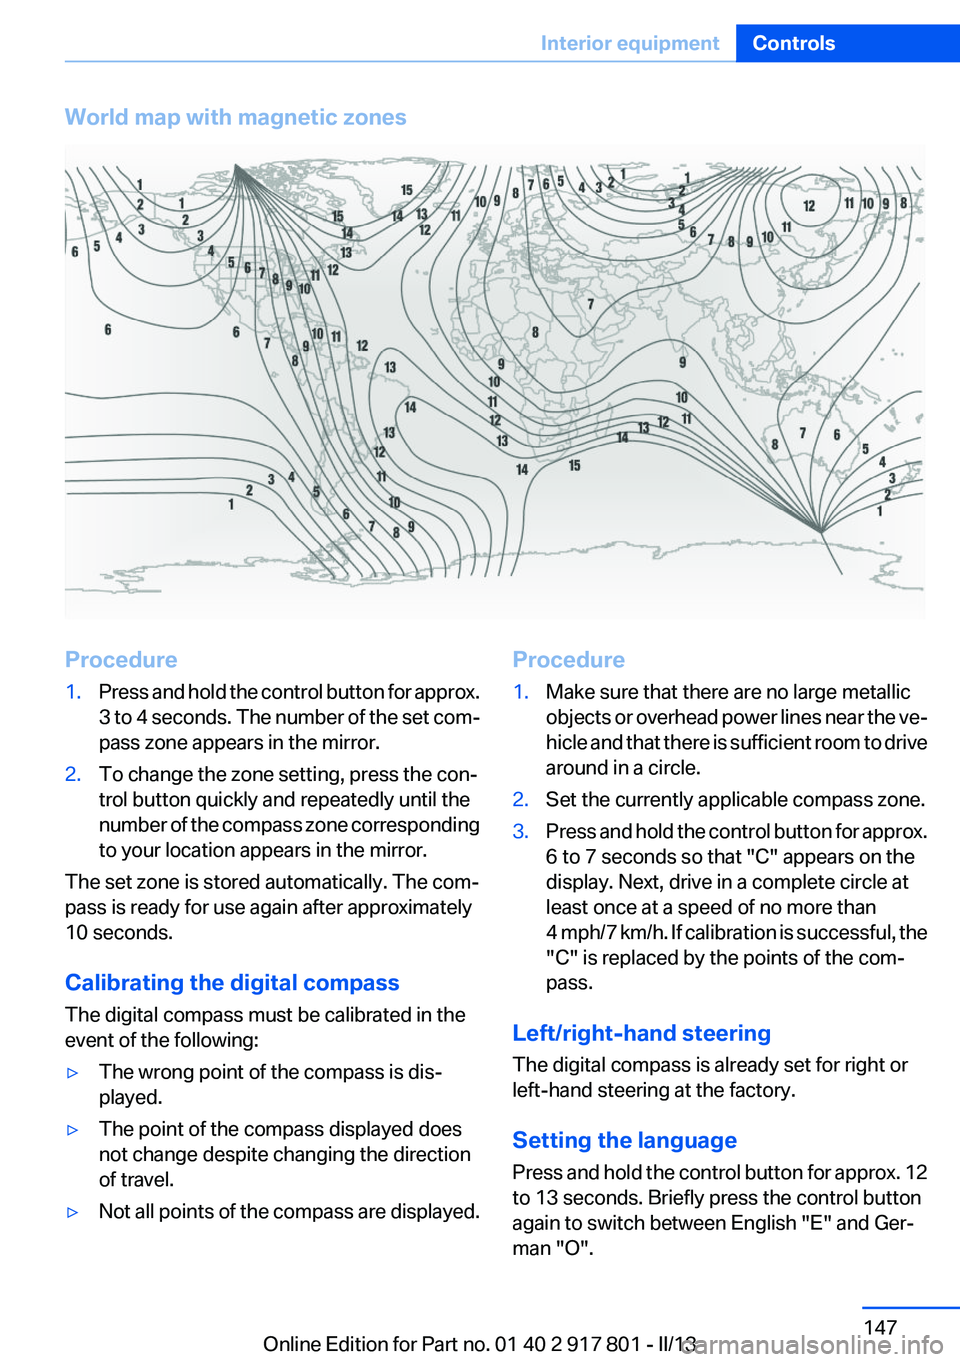
World map with magnetic zonesProcedure1.Press and hold the control button for approx.
3 to 4 seconds. The number of the set com‐
pass zone appears in the mirror.2.To change the zone setting, press the con‐
trol button quickly and repeatedly until the
number of the compass zone corresponding
to your location appears in the mirror.
The set zone is stored automatically. The com‐
pass is ready for use again after approximately
10 seconds.
Calibrating the digital compass
The digital compass must be calibrated in the
event of the following:
▷The wrong point of the compass is dis‐
played.▷The point of the compass displayed does
not change despite changing the direction
of travel.▷Not all points of the compass are displayed.Procedure1.Make sure that there are no large metallic
objects or overhead power lines near the ve‐
hicle and that there is sufficient room to drive
around in a circle.2.Set the currently applicable compass zone.3.Press and hold the control button for approx.
6 to 7 seconds so that "C" appears on the
display. Next, drive in a complete circle at
least once at a speed of no more than
4 mph/7 km/h. If calibration is successful, the
"C" is replaced by the points of the com‐
pass.
Left/right-hand steering
The digital compass is already set for right or
left-hand steering at the factory.
Setting the language
Press and hold the control button for approx. 12
to 13 seconds. Briefly press the control button
again to switch between English "E" and Ger‐
man "O".
Seite 147Interior equipmentControls147
Online Edition for Part no. 01 40 2 917 801 - II/13