2013 BMW 3 SERIES SEDAN brake bulb
[x] Cancel search: brake bulbPage 72 of 248

periodically while coasting, if traffic conditions
permit.
The brake lamps will not light up if the parking
brake is engaged.
Turn signal, high beams, headlamp flasher
Turn signal Do not fold in the exterior mirrors
Do not fold in the exterior mirror while
driving and when the turn signals/warning
flashers are working, or else the additional
flasher lights in the exterior mirror will no lon‐
ger be in the prescribed position and will be
difficult to see.◀
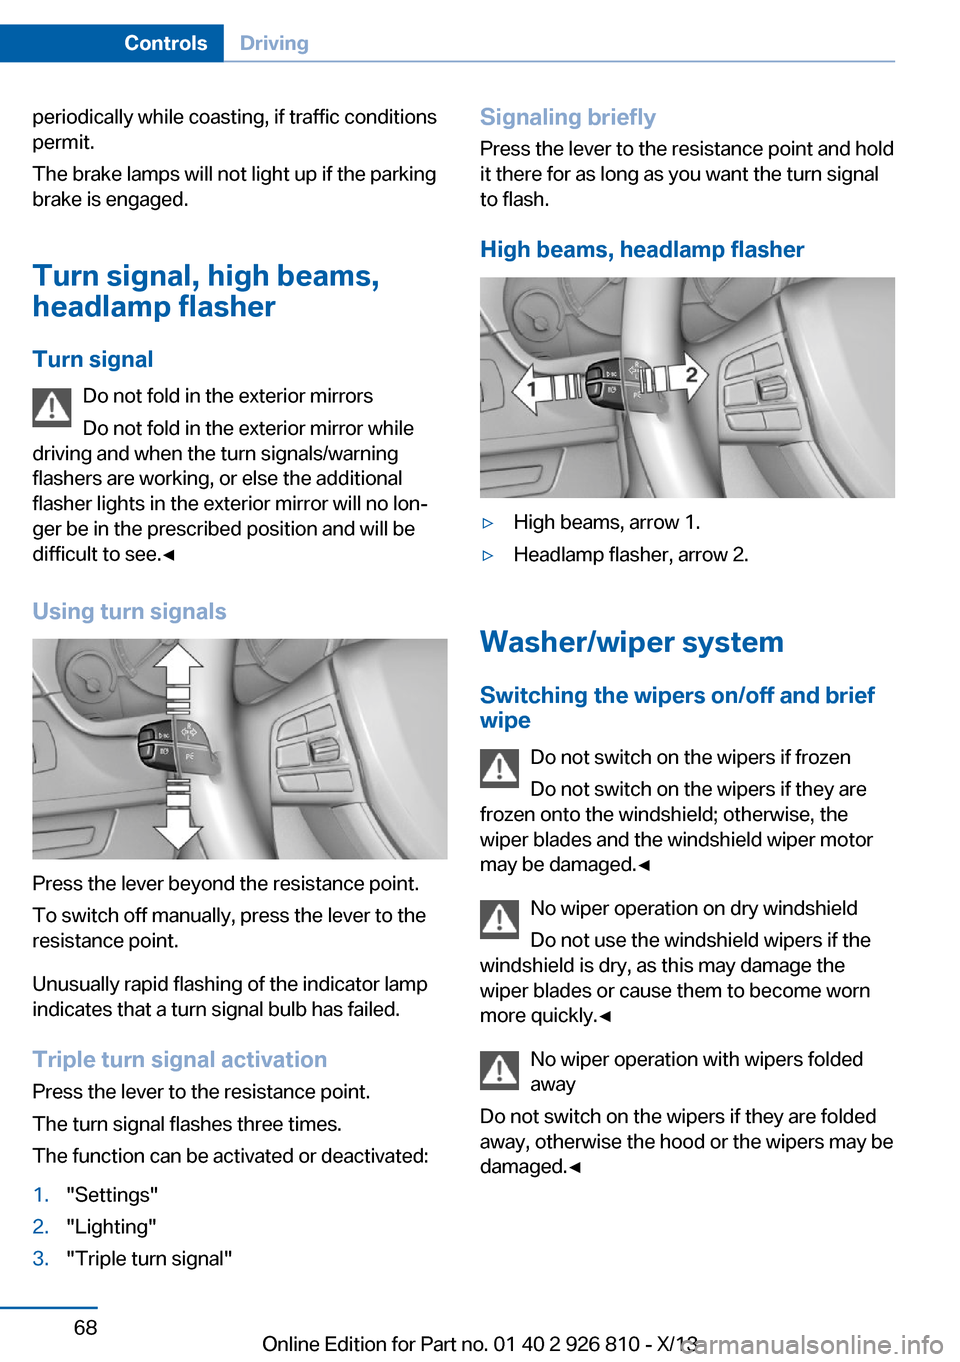
Using turn signals
Press the lever beyond the resistance point.
To switch off manually, press the lever to the
resistance point.
Unusually rapid flashing of the indicator lamp
indicates that a turn signal bulb has failed.
Triple turn signal activation Press the lever to the resistance point.
The turn signal flashes three times.
The function can be activated or deactivated:
1."Settings"2."Lighting"3."Triple turn signal"Signaling briefly
Press the lever to the resistance point and hold
it there for as long as you want the turn signal
to flash.
High beams, headlamp flasher▷High beams, arrow 1.▷Headlamp flasher, arrow 2.
Washer/wiper system Switching the wipers on/off and brief
wipe
Do not switch on the wipers if frozen
Do not switch on the wipers if they are
frozen onto the windshield; otherwise, the wiper blades and the windshield wiper motor
may be damaged.◀
No wiper operation on dry windshield
Do not use the windshield wipers if the
windshield is dry, as this may damage the
wiper blades or cause them to become worn
more quickly.◀
No wiper operation with wipers folded
away
Do not switch on the wipers if they are folded
away, otherwise the hood or the wipers may be
damaged.◀
Seite 68ControlsDriving68
Online Edition for Part no. 01 40 2 926 810 - X/13
Page 216 of 248

Tail lamps, bulb replacement
At a glance1Turn signal2Reversing lamp3Inside brake lamp4Tail lamps5Outside brake lamp
Bulb replacement, exterior tail lamps General information
Follow the general instructions on Lamps and
bulbs, refer to page 206.
Turn signal: 21-watt bulb, P21WLL.
Outer brake lamp: 21-watt bulb, H21W.
The tail lamps feature LED technology. Con‐
tact your service center in the event of a mal‐
function.
Use caution when replacing the bulb
Use caution and proceed one step at a
time when replacing the bulbs to prevent dam‐
age to the tail lamps or vehicle.◀
Removing the exterior tail lamp1.Open trunk lid.2.Use the screwdriver from the onboard ve‐
hicle tool kit to loosen the screw, arrow 1,
and remove the cover, arrow 2.3.Use the screwdriver handle to loosen the
two nuts, arrows 1 and 2, and remove. The
tail lamp is still attached to a rubber mount
on the outside.4.Grasp the inner edge of the tail lamp and
carefully swing it back and out of the rub‐
ber mount, arrow 1. Use your free hand to
hold it in place in order to prevent the tail
lamp from coming loose suddenly. Make
sure that the foam rubber sealing ring is on
the centering pin, arrow 2.Seite 212MobilityReplacing components212
Online Edition for Part no. 01 40 2 926 810 - X/13
Page 217 of 248

5.Remove the connecting line from the clip
on the bulb holder.6.Release the catch at the top on the con‐
nector of the connecting line and remove
the connector from the bulb holder.
Replacing the bulbs
1.Loosen the four fasteners, arrow 1, on the
bulb holder and remove the bulb holder
from the tail lamp, arrow 2.2.Press the defective bulb gently into the
socket, turn counterclockwise and remove.3.Proceed in the reverse order to insert the
new bulb and attach the bulb holder. Make
sure that the bulb holder engages in all fas‐
teners.
Installing the tail lamp
1.Connect the connecting line to the tail
lamp and secure the bulb holder in the clip.2.Make sure that the foam rubber sealing
ring is on the centering pin, arrow 2, and is
not damaged.3.Position and firmly press the outer part of
the tail lamp onto the rubber mount, ar‐
row 1 and the inner part onto the centeringcomponent, arrow 2. Make sure that the
tail lamp engages in the rubber mount.4.Screw the tail lamp on with the two nuts.5.Fit the cover in place and screw onto the
fastener. Make sure that the tubular seal is
not pinched.
Lamps in the trunk lid
General information
Follow the general instructions on Lamps and
bulbs, refer to page 206.
Reversing lamps: 16-watt bulb, PW16W.
Inner brake lamps: 21-watt bulb, H21W
Accessing the lamps
1.Use the screwdriver from the onboard ve‐
hicle tool kit to loosen and completely re‐
move the six screws on the trim.2.Carefully loosen the trim from the trunk lid,
starting at the edge and working toward
the area around the recessed grips. Make
sure that the trim does not become stuck.3.Carefully swing out the trim.Seite 213Replacing componentsMobility213
Online Edition for Part no. 01 40 2 926 810 - X/13
Page 218 of 248

Replacing the reversing lamp and inner
brake lamp1.Loosen the two holders, arrow 1 and pull
down on the lamp holder to remove, ar‐
row 2.2.Unscrew the defective bulb from the
socket counterclockwise for reversing or
rear fog lamps.3.Insert the new bulb.
Installing the bulb holder
1.Slide the bulb holder onto the two guide
pins, arrow 1. Insert the two contacts, ar‐
row 2, into the connections, arrow 3.2.Press on the bulb holder. Make sure that
the two exterior holders latch into place.3.Swing the trim back onto the trunk lid and
secure.
Tail lamp, license plate lamp and
central brake lamp
Follow the general instructions on Lamps and
bulbs, refer to page 206.
These lamps are made using LED technology.
Contact your service center in the event of a
malfunction.
Changing wheels
Hints The vehicle equipment does not include a
spare tire.
When using run-flat tires or tire sealants, a tire
does not need to be changed immediately in
the event of pressure loss due to a flat tire.
The tools for changing wheels are available as
accessories from your service center.
Jacking points for the vehicle jack
The jacking points for the vehicle jack are lo‐
cated at the positions shown.
Vehicle battery Maintenance
The battery is maintenance-free. The added
amount of acid is sufficient for the service life
of the battery.
Your service center will be glad to advise you
on questions regarding the battery.
Seite 214MobilityReplacing components214
Online Edition for Part no. 01 40 2 926 810 - X/13
Page 239 of 248

Brake discs, breaking in 166
Brake force display 115
Brake lamps, brake force dis‐ play 115
Brake lights, adaptive 115
Brake pads, breaking in 166
Braking, hints 167
Breakdown assis‐ tance 217, 218
Breaking in 166
Brightness of Control Dis‐ play 89
Bulb replacement 206
Bulb replacement, front 207
Bulb replacement, halogen headlamps 207
Bulb replacement, rear 212
Bulb replacement, xenon headlamps 210
Bulbs and lamps 206
Button, RES 124
Button, Start/Stop 63
Bypassing, refer to Jump- starting 218
C
California Proposition 65 Warning 7
Camera, care 226
Camera, rearview cam‐ era 133
Camera, Side View 136
Camera, Top View 137
Can holder, refer to Cu‐ pholder 161
Car battery 214
Car care products 224
Care, displays 226
Care, vehicle 224
Cargo 169
Cargo area, enlarging 157
Cargo area lid 40
Cargo area, storage compart‐ ments 162
Cargo, securing 170 Cargo straps, securing
cargo 170
Car key, refer to Remote con‐ trol 34
Carpet, care 226
Car wash 223
Catalytic converter, refer to Hot exhaust system 167
CBS Condition Based Serv‐ ice 204
CD/Multimedia, see user's manual for Navigation, En‐
tertainment and Communi‐
cation
Center armrest 160
Center console 16
Center-Lock, see button for central locking 37
Central locking system 37
Central screen, refer to Con‐ trol Display 18
Changes, technical, refer to Safety 7
Changing parts 206
Changing wheels 214
Changing wheels/tires 195
Check Control 78
Checking the oil level elec‐ tronically 200
Children, seating position 59
Children, transporting safely 59
Child restraint fixing sys‐ tem 59
Child restraint fixing system LATCH 60
Child restraint fixing systems, mounting 59
Child safety locks 62
Child seat, mounting 59
Child seats 59
Chrome parts, care 225
Cigarette lighter 155
Cleaning, displays 226
Climate control 144, 146
Clock 81 Closing/opening from in‐
side 40
Closing/opening via door lock 39
Closing/opening with remote control 38
Clothes hooks 161
Coasting 176
Coasting with engine decou‐ pled, coasting 176
Coasting with idling en‐ gine 176
Cockpit 14
Cold starting, refer to Starting the engine 64
Collision warning with braking function 108
Collision warning with City Braking function 105
Combination switch, refer to Turn signals 68
Combination switch, refer to Wiper system 68
Comfort Access 41
COMFORT program, Dy‐ namic Driving Control 119
Compartments in the doors 160
Compass 153
Computer 86
Condensation on win‐ dows 148
Condensation under the vehi‐ cle 168
Condition Based Service CBS 204
Configuring drive pro‐ gram 119
Confirmation signal 43
ConnectedDrive, see user's manual for Navigation, En‐
tertainment and Communi‐
cation
ConnectedDrive Services
Connecting electrical devi‐ ces 155 Seite 235Everything from A to ZReference235
Online Edition for Part no. 01 40 2 926 810 - X/13
Page 241 of 248

Engine oil additives 201
Engine oil change 202
Engine oil filler neck 201
Engine oil temperature 80
Engine oil types, alterna‐ tive 202
Engine oil types, ap‐ proved 202
Engine start during malfunc‐ tion 35
Engine start, jump-start‐ ing 218
Engine start, refer to Starting the engine 64
Engine stop 65
Engine temperature 80
Entering a car wash 223
Equipment, interior 151
ESP Electronic Stability Pro‐ gram, refer to DSC 116
Exchanging wheels/tires 195
Exhaust system 167
Exterior mirror, automatic dimming feature 57
Exterior mirrors 56
External start 218
External temperature dis‐ play 81
External temperature warn‐ ing 81
Eyes for securing cargo 170
F
Failure message, refer to Check Control 78
False alarm, refer to Uninten‐ tional alarm 45
Fan, refer to Air flow 145, 148
Fault displays, refer to Check Control 78
Filler neck for engine oil 201
Fine wood, care 225
First aid kit 218 Fitting for towing, refer to
Tow fitting 221
Flat tire, changing wheels 214
Flat Tire Monitor FTM 102
Flat tire, Tire Pressure Moni‐ tor TPM 99
Flat tire, warning lamp 100, 103
Flooding 167
Floor carpet, care 226
Floor mats, care 226
Fogged up windows 145
Fold down the rear seat back‐ rest, see Though-loading
system 157
Fold-out position, windshield wipers 70
Foot brake 167
Front airbags 96
Front fog lamps 94
Front fog lamps, front, bulb replacement 211
Front lamps 207
Front passenger airbags, au‐ tomatic deactivation 98
Front passenger airbags, indi‐ cator lamp 98
FTM Flat Tire Monitor 102
Fuel 182
Fuel cap 180
Fuel consumption, current 82
Fuel consumption, refer to Average fuel consump‐
tion 86
Fuel filler flap 180
Fuel gauge 80
Fuel quality 182
Fuel recommendation 182
Fuel, tank capacity 233
Fuse 215 G
Garage door opener, refer to Universal garage door
opener 151
Gasoline 182
Gasoline quality 182
Gear change, automatic transmission 72
Gear shift indicator 83
General driving notes 166
Glass sunroof, powered 47
Glove compartment 159
Gross vehicle weight, ap‐ proved 230
H
Handbrake, refer to parking brake 67
Hand-held transmitter, alter‐ nating code 152
Hazard warning flashers 217
Head airbags 96
Headlamp control, auto‐ matic 92
Headlamp courtesy delay fea‐ ture 91
Headlamp flasher 68
Headlamp glass 207
Headlamps 207
Headlamps, care 224
Headlamp washer system 68
Headliner 17
Head restraints 49
Head restraints, front 53
Head restraints, rear 54
Head-up Display 89
Head-up Display, care 226
Heavy cargo, stowing 170
High-beam Assistant 93
High beams 68
High beams/low beams, refer to High-beam Assistant 93
Hills 168 Seite 237Everything from A to ZReference237
Online Edition for Part no. 01 40 2 926 810 - X/13