2013 BMW 3 SERIES CONVERTIBLE open top
[x] Cancel search: open topPage 60 of 311

55
Adjustments
Controls
Even if you have not yet fastened your safety
belt, the belt hand-over will retract if you:
>
Wait for more than approx. one minute
> Open the corresponding door
> Start driving.
Closing the respective do or reactivates the belt
hand-over if the ignition or radio readiness is on.
Front passenger seat
The belt hand-over will exte nd only if the seat is
occupied and after the front passenger door is
closed.
Pinch protection system
If the belt hand-over en counters resistance on
moving in or out, it moves back slightly in the
opposite direction and stops in this position. To
reactivate the belt hand -over: open and close
the door or switch the ignition off and on.
Although there is a pinch protection sys-
tem, always check that the maneuvering
area of the belt hand-ove r is clear. Otherwise it
cannot be ensured that the system will stop
moving in certain extreme situations. <
Mirrors
Exterior mirrors
The front passenger's mirror is more con-
vex than the driver's mirror. The objects
seen in the mirror are closer than they appear.
Do not gauge your distan ce from traffic behind you on the basis of what you see in the mirror;
otherwise, there is an increased risk of an
accident.
<
1 Adjustments
2 Switching to the other mirror or to the
automatic curb monitor
3 Folding mirrors in and out
The setting for the exterior mirrors is stored for
the remote control currently in use. The stored
position is called up automatically when the
vehicle is unlocked.
Manual adjustment
The mirrors can also be adjusted manually:
press the edge of the glass.
Folding mirrors in and out
By pressing button 3, you can fold the mirrors in
and out at driving speeds up to approx. 12 mph
or 20 km/h. This can be beneficial in narrow
streets, for example, or for moving mirrors that
were folded in by hand back out into their cor-
rect positions. Mirrors th at have been folded in
will fold out automatically at a speed of approx.
25 mph or 40 km/h.
Before entering an automatic car wash,
fold in the exterior mirrors manually or
with button 3 to prevent them from being dam-
aged, depending on the width of the vehicle. <
Automatic heating
Depending on the outside temperature, both
exterior mirrors are heated automatically when
the engine is running or the ignition is switched
on.
00320051004F004C00510048000300280047004C0057004C005200510003
Page 63 of 311
58
ControlsTransporting children safely
Transporting children safely
Vehicle equipment
In this chapter, all pr oduction, country, and
optional equipment that is offered in the model
range is described. As a result, some equip-
ment described may not be available in a partic-
ular vehicle, for example due to the options or
national-market version selected. This also
applies to safety related functions and systems.
The right place for children
Do not leave children unattended in the
vehicle; otherwise, they could endanger
themselves and/or other persons by opening
the doors, for example. <
Children should always sit in the rear
Accident research has shown that the safest
place for children is on the rear seat.
Children under the age of 13 or smaller
than 5 ft/150 cm may be transported only
in the rear in suitable child restraint systems
appropriate for their age, weight and size. Oth-
erwise, there is an increase d risk of injury in the
event of an accident. <
Children 13 years of age or older must be buck-
led in with a safety belt as soon as there no
longer is any child rest raint system that is
appropriate for their age, size and weight.
Children in the front passenger seat
Should it be necessa ry to use a child
restraint system on the front passenger
seat, the front and side airbags for the front pas-
senger must be deactivated. Otherwise, a child
traveling on that seat will face a significant risk
of injury if the airbags are triggered off, even
with a child restraint system.
of the front passenger airbags refer to
page 107.
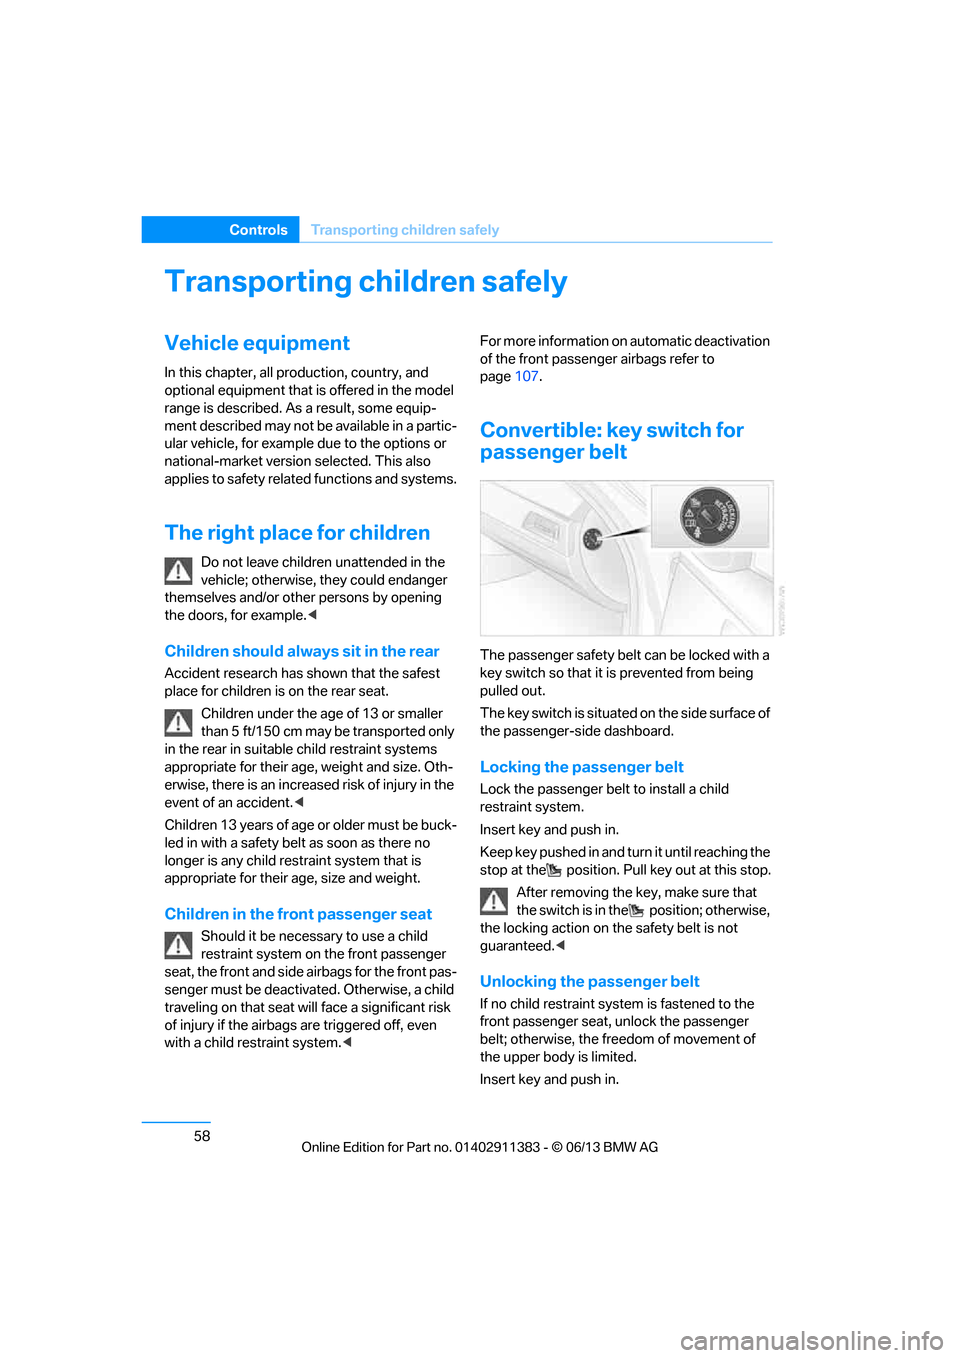
Convertible: key switch for
passenger belt
The passenger safety belt can be locked with a
key switch so that it is prevented from being
pulled out.
The key switch is situated on the side surface of
the passenger-side dashboard.
Locking the passenger belt
Lock the passenger belt to install a child
restraint system.
Insert key and push in.
Keep key pushed in and turn it until reaching the
stop at the position. Pull key out at this stop.
After removing the key, make sure that
the switch is in the position; otherwise,
the locking action on th e safety belt is not
guaranteed. <
Unlocking the passenger belt
If no child restraint syst em is fastened to the
front passenger seat, unlock the passenger
belt; otherwise, the freedom of movement of
the upper body is limited.
Insert key and push in.
00320051004F004C00510048000300280047004C0057004C005200510003
Page 64 of 311

59
Transporting children safely
Controls
Keep key pushed in and tu
rn it until reaching the
stop at the position. Pull key out at this stop.
Make sure that the passenger belt is
unlocked; otherwise, the front passenger
may become trapped by the safety belt.<
Installing child restraint
systems
Observe the child restraint system manu-
facturer's instructions when selecting,
installing and using child restraint systems.
Otherwise, the protective effect may be
diminished. <
Standard child restraint systems are designed
to be secured with a lap be lt or with the lap-belt
section of a lap-and-shoulder belt. Incorrectly
or improperly installed child restraint systems
can increase the risk of injury to children.
Always follow the installation instructions for
the system with the greatest care.
On the front passenger seat
After installing a child restraint system on
the front passenger seat, make sure that
the front and side airbags for the front passen-
ger are deactivated; otherwise, there is an
increased risk of injury if the airbags deploy. <
Seat position
Before installing a child restraint system, move
the front passenger seat as far back and up as
possible to obtain the be st possible position for
the belt. Do not change the seat position after
this.
Backrest width
The backrest width of the front passenger
seat must be at its widest possible set-
ting. Do not change the setting after installing
the child seat; otherwise, the child seat's stabil-
ity on the front passenger seat is limited. <1.
Adjust the backrest width to its widest
setting, refer to page 50.
2. Install the child seat.
Child seat security
The rear safety belts and the front passenger
safety belt can be prevented from being pulled
out in order to fasten child restraint systems.
To lock the safety belt
1.Secure the child restra int system with the
belt.
2. Pull the belt stra p all the way out.
3. Allow the belt strap to retract and pull it taut
against the child restraint system.
The safety belt is locked.
To unlock the safety belt
1. Open the belt buckle.
2. Remove the child restraint system.
3. Allow the safety belt st rap to retract all the
way.
LATCH child restraint fixing
system
LATCH: lower Anchors and Tethers for
CHildren.
To install and use the LATCH child
restraint system, follo w the operating and
safety instructions pr ovided by the manufac-
turer of the system; othe rwise, the protective
function of the seat may be compromised. <
00320051004F004C00510048000300280047004C0057004C005200510003
Page 76 of 311

71
Driving
Controls
Releasing
1.
Unclip the sleeve of the selector lever.
2. Pull the sleeve up over the selector lever
until the sleeve is inside out.
3. Using the allen wrench from the tool kit,
refer to page 266, rotate the cover until it
reaches the stop, arrow 1, and remove,
arrow 2.
4. Insert allen wrench into the opening,
arrow 1.
5. Rotate allen wrench until it reaches the
stop, arrow 2. The parking lock is unlocked.
Do not turn allen wrench in the oppo-
site direction; otherwise, you may
damage the mechanism. <6.
Remove allen wrench from the opening.
After parking the vehicle, lock the parking
lock again. Otherwise, there is a danger
that the vehicle will roll.<
Locking
1. Press the button, see arrow.
The parking lock is locked again.
2. Replace cover again.
3. Clip the selector lever sleeve back into
place.
4. Forcefully apply the parking brake.
Jump starting and towing, starting on
page 275.
Launch Control
Launch Control enables an optimum accelera-
tion when starting off on a road surface with
good traction.
Do not use Launch Control too often; oth-
erwise, the powerful stresses on the vehi-
cle will lead to premature component wear.<
Launch Control is availa ble when the engine is
at operating temperature, i.e. after driving
continuously for a pprox. 6.2 miles/10 km.
1. With the engine running, step on the brake
with your left foot.
2. Activate Dynamic Trac tion Control (DTC),
refer to page 98.
3. Activate Driving dynami cs control, refer to
page 70.
4. With the vehicle stationary, activate the
manual mode and select 1
stgear.
00320051004F004C00510048000300280047004C0057004C005200510003
Page 122 of 311

117
Climate
Controls
Pressing the AUTO
button automatically
switches on the air conditioning.
At the same time, a condensation sensor
controls the program so as to prevent window
condensation as much as possible.
The program is switched off when the air distri-
bution is set manually or the button is pressed
again.
Intensity of the AUTO program
With the AUTO program switched on, auto-
matic control of the air volume and air distribu-
tion can be adjusted:
Press the left side of the button to
reduce the intensity. Press the
right side of the button to
increase it.
The selected intensity is shown on the display
of the automatic climate control.
Convertible program
The Convertible program is active when the
hardtop is open and the AUTO program is
switched on. In the Convertible program, the
automatic climate control is optimized for driv-
ing with the hardtop open . In addition, the air
volume is increased as vehicle speed increases.
The effectiveness of the Convertible pro-
gram can be enhanced considerably by
installing the wind deflector. <
Adjusting air volume manually
To be able to manually adjust the air volume,
switch off the AUTO program first.
Press the left side of the button to
reduce the air volume. Press the
right side of the button to
increase it.
The air flow rate is lowered or switched off
entirely to reduce the drain on the battery. The
display remains the same.
Automatic recirculated air control
AUC/Recirculated air mode
You can respond to unpl easant odors or pollut-
ants in the immediate environment by tempo-
rarily suspending the supply of outside air. The
system then recirculates the air currently within
the vehicle.
Press the button repeatedly to
select an operating mode:
> LED off: outside air flows in continuously.
> Left-hand LED on, AUC mode: a sensor
detects pollutants in the outside air and
controls the shut-off automatically.
> Right-hand LED on, re circulated air mode:
the supply of outside air is permanently
shut off. If the windows fog over, switch off
recirculated air mode and increase the air
volume, if necessary. Make sure that air can
flow onto the windshield.
The recirculated air mode should not be
used over an extended period of time;
otherwise, the air quality inside the car will
deteriorate continuously. <
Via the button on the steering wheel
You can switch quickly between the recircu-
lated air mode and the previous mode using a
button on the steering wheel, refer to page 13.
ALL program
Press the button.
The current temperature setting
on the driver's side is transferred to
the front passenger side.
If the temperature setting on the driver's side is
changed, the temperature on the front passen-
ger side is changed as well.
The program is switched off when the setting
is adjusted on the front passenger side or the
button is pressed again.
00320051004F004C00510048000300280047004C0057004C005200510003
Page 128 of 311

123
Practical interior accessories
Controls
To set the compass zone, press the adjustment
button for approx. 3-4 seconds. The number of
the compass zone set is shown in the display.
To change the zone se
tting, briefly press the
adjustment button repeat edly until the display
shows the number of the compass zone corre-
sponding to your current location.
The compass is operational again after approx.
10 seconds.
Calibrating the digital compass
The digital compass must be calibrated in the
following situations:
> An incorrect compass direction is shown.
> The compass direction shown does not
change although the direction of travel
does.
> Not all compass directions are shown.
Procedure
1.Make sure that no large metal objects or
overhead power lines are in the vicinity of
your vehicle and that you have enough
space to drive in a circle.
2. Set the currently va lid compass zone. 3.
Convertible: ensure that the retractable
hardtop is fully closed.
4. Press the adjustment button for approx.
6-7 seconds to call up C. Then drive in a
complete circle at a maximum speed of
5mph/7km/h.
If the calibration is successful, the C will be
replaced by the directions.
5. Convertible: open the retractable hardtop
fully and repeat step 4.
Setting right-hand/left-hand steering
Your digital compass is factory-set to right-
hand or left-hand steering, in accordance with
your vehicle.
Setting the language
You can set the language of the display:
Press the adjustment button for approx.
12-13 seconds. Press the adjustment button
again briefly to switch between English "E" and
German "O".
The setting is automatica lly saved after approx.
10 seconds.
00320051004F004C00510048000300280047004C0057004C005200510003
Page 133 of 311

128
ControlsPractical interior accessories
Closing
Return the rear seat backrest to its upright
position and engage it.
When returning the backrest to its seating
position, make sure th at the seat's lock-
ing mechanism engages properly. Otherwise,
cargo could be thrown around in the event of
sharp braking or swervi ng and endanger the
occupants. <
The lashing eyes in the trunk provide you with a
way to attach trunk nets or draw straps for
securing suitcases an d luggage, refer to
page 140.
Convertible:
Cargo loading
Hardtop closed
When the hardtop is closed, objects can be
placed in the area below and near the cargo
area cover.
Enlarging the trunk
When the hardtop is closed you can enlarge the
trunk:
To do so, push the trunk partition upward.
Hardtop opened
Before opening the hard top, push the trunk
partition down until it engages on both sides.
When the hardtop is open, objects can be
placed under the cargo area cover. Do not place
objects in those areas on the figure that are
marked with an X.
Before moving the ha rdtop, ensure that
there are no objects on or next to the
trunk partition; otherwise, parts of the hardtop
may be damaged. Do not use force to push
down the trunk partition. <
The retractable hard top can only be
opened if the trunk partition is in its lower-
most position and engaged on both sides. <
Folding down the rear seat backrest
Opening
You can fold down the rear seat backrest to
transport light objects in the rear without dam-
aging the seats. Depending on the vehicle
equipment, the mounting points for the trunk
net are found on the rear panel of the backrest.
To unlock the rear seat backrest: press the
button on the driver's or the opposite side.
00320051004F004C00510048000300280047004C0057004C005200510003
Page 142 of 311

137
Things to remember when driving
Driving tips
Check tire inflation pressure regularly
Check the tire inflation pr
essure at least twice a
month and before embarking on a long journey,
and correct it if necessary.
Low tire inflation pressure causes higher rolling
resistance and thus increases fuel consumption
and tire wear.
Set off immediately
Do not let the engine wa rm up while the car is
still standing, but set off immediately at moder-
ate engine speed. This is the fastest way for the
cold engine to reach its operating temperature.
Drive defensively
Avoid unnecessary acceleration and braking
maneuvers. To do so, keep an adequate dis-
tance between you and th e vehicle in front of
you. A defensive and smooth driving style
keeps fuel consumption down.
Avoid high engine speeds
Only use first gear when setting off. In second
and higher gears, accele rate without hesitation
or pauses. When accelera ting, shift up before
reaching high engine speeds.
When you reach the desi red speed, shift into
the highest applicable ge ar and drive with the
engine speed as low as possible and at a
constant speed.
As a rule: driving at low engine speeds lowers
fuel consumption and reduces wear.
Coasting
When approaching a red lig ht, take your foot off
the accelerator and coast to a stop in the high-
est applicable gear.
On a downhill slope, take your foot off the
accelerator and coast in a suitable gear.
The fuel supply is interrupted when coasting.
Switch off the engine during lengthy
stops
Switch off the engine when stopping for lengthy
periods, e.g. at traffic lights, railroad crossings
or in traffic congestions.
Switch off functions you do not need at
the moment
Functions such as the air conditioner, seat
heating or rear window defroster draw large
amounts of power and consume additional fuel.
Especially in city traffic and in stop-and-go driv-
ing they have a considerable impact. Therefore,
switch these functions off when they are not
really needed.
Have the vehicle serviced
Have the vehicle serviced regularly to achieve
good economy and a long vehicle life. BMW
recommends having the vehicle serviced at
your BMW center. Also note the BMW Mainte-
nance System, refer to page 260.
General driving notes
Close the trunk lid
Only drive with the trunk closed. Failure to
do so may endanger passengers or other
road users or may damage the vehicle in the
event of an accident or a braking and evasive
maneuver. In addition, exhaust gas may flow
into the passenger compartment. <
If special circumstance s make it absolutely
necessary to drive wi th the trunk open:
1. Close all windows and the glass roof.
2. Greatly increase the air volume of the
automatic climate cont rol system, refer to
page 117.
3. Drive cautiously.
00320051004F004C00510048000300280047004C0057004C005200510003