2013 BMW 128I COUPE trunk
[x] Cancel search: trunkPage 120 of 284

119
Practical interior accessories
Controls
Securing cargo
After loading, secure the ski bag and its
contents. Tighten the retaining strap on the
tensioning buckle for this purpose.
Secure the ski bag in the manner
described; otherwise, it could endanger
the car's occupants, e.g. in case of heavy brak-
ing or sudden swerving. <
To store the ski bag, perform the steps
described for loadin g in reverse order.
Removing the ski bag
The ski bag can be comple tely removed, e.g. for
faster drying or to allow you to use other inserts.
1. Fold down the center panel in the rear seat
backrest.
2. Pull the handle, arrow 1.
3. Pull out the insert, arrow 2.
For more information on the various
inserts available, contact your BMW
center. <
Convertible: through-loading
opening with integrated
transport bag
The transport bag is designed for safe, clean
transport of up to 4 pairs of standard skis or up
to 2 snowboards.
With the transport bag you can stow skis up to a
length of 6.6 ft/2.0 m. When skis of 6.6 ft/2.0 m
length are loaded, the over all capacity of the ski
bag is reduced due to its tapered design.
When using the transport bag, it is not
permissible to transport passengers in
the rear seats. <
Loading
1.Pull the grip in the f iller piece of the rear
backrest up and take out the filler piece.
2. Place the filler piece on to the seat cushion
with the backrest side facing up.
3. In the trunk: press the two recesses
together and fold down the cover.
00320051004F004C00510048000300280047004C0057004C005200510003
Page 126 of 284

125
Things to remember when driving
Driving tips
Check tire inflation pressure regularly
Check the tire inflation pr
essure at least twice a
month and before embarking on a long journey,
and correct it if necessary.
Low tire inflation pressure causes higher rolling
resistance and thus increases fuel consumption
and tire wear.
Set off immediately
Do not let the engine wa rm up while the car is
still standing, but set off immediately at moder-
ate engine speed. This is the fastest way for the
cold engine to reach its operating temperature.
Drive defensively
Avoid unnecessary acceleration and braking
maneuvers. To do so, keep an adequate dis-
tance between you and th e vehicle in front of
you. A defensive and smooth driving style
keeps fuel consumption down.
Avoid high engine speeds
Use first gear only for dr iving off. In second and
higher gears, accelerate without hesitation or
pauses. When accelerati ng, shift up before
reaching high engine speeds.
When you reach the desi red speed, shift into
the highest applicable ge ar and drive with the
engine speed as low as possible and at a con-
stant speed.
As a rule: driving at low engine speeds lowers
fuel consumption and reduces wear.
Coasting
When approaching a red lig ht, take your foot off
the accelerator and coast to a stop in the high-
est applicable gear.
On a downhill slope, take your foot off the accel-
erator and coast in a suitable gear.
The fuel supply is interrupted when coasting.
Switch off the engine during lengthy
stops
Switch off the engine when stopping for lengthy
periods, e.g. at traffic lights, railroad crossings
or in traffic congestions.
Switch off functions you do not need at
the moment
Functions such as the air conditioner, seat
heating or rear window defroster draw large
amounts of power and consume additional fuel.
Especially in city traffic and in stop-and-go driv-
ing they have a considerable impact. Therefore,
switch these functions off when they are not
really needed.
Have the vehicle serviced
Have the vehicle serviced regularly to achieve
good economy and a long vehicle life. BMW
recommends having the vehicle serviced at
your BMW center. Also note the BMW Mainte-
nance System, refer to page 237.
General driving notes
Close the trunk lid
Only drive with the trunk closed. Failure to
do so may endanger passengers or other
road users or may damage the vehicle in the
event of an accident or a braking and evasive
maneuver. In addition, exhaust gas may flow
into the passenger compartment. <
If special circumstance s make it absolutely
necessary to drive wi th the trunk open:
1. Close all windows and the glass roof.
2. Greatly increase the air volume of the
automatic climate cont rol system, refer to
page 108.
3. Drive cautiously.
00320051004F004C00510048000300280047004C0057004C005200510003
Page 128 of 284

127
Things to remember when driving
Driving tips
Hills
To prevent overheating and the resulting
reduced efficiency of the brake system,
drive long or steep downhill gradients in the
gear in which the least br aking is required. Even
light but consistent brak e pressure can lead to
high temperatures, brake wear and possibly
even brake failure. <
You can increase the engine's braking effect
by shifting down, all the way to first gear if nec-
essary. This strategy helps you avoid placing
excessive loads on the brake system. Down-
shifting in manual mo de of the automatic
transmission, refer to page 65.
Sport automatic transm ission with double
clutch: never drive with the transmission
in neutral or with the en gine switched off; other-
wise, there will be no en gine braking action and
no power assistance to the brakes and steering.
Manual transmission: never drive with the
clutch held down, with the transmission in neu-
tral or with the engine switched off; otherwise,
there will be no engine braking action and no
power assistance to the brakes and steering.
Never allow floor mats, carpets or any other
objects to protrude into the area around the
pedals; otherwise, pedal function could be
impaired. <
Corrosion on brake rotors
When the vehicle is driv en only occasionally,
during extended periods when the vehicle is not
used at all, and in operating conditions where
brake applications are le ss frequent, there is an
increased tendency for corrosion to form on
rotors, while contaminan ts accumulate on the
brake pads. This occurs because the minimum
pressure which must be exerted by the pads
during brake applications to clean the rotors is
not reached.
Should corrosion form on the brake rotors, the
brakes will tend to respond with a pulsating
effect that even extended application will fail to
cure.
When the vehicle is parked
Condensation forms while the automatic
climate control is in operation, and then exits
under the vehicle. Traces of condensed water
under the vehicle are therefore normal.
Cargo loading
To avoid loading the tires beyond their
approved carrying ca pacity, never over-
load the vehicle. Overlo ading can lead to over-
heating and increases the rate at which damage
develops inside the tires. In some situations,
this can result in sudden loss of tire pressure. <
Avoid fluid spills in the trunk as they could
damage the vehicle. <
Determining loading limit
1.Locate the following statement on your
vehicle's placard:
The combined weight of occupants
and cargo should never exceed
XXX kg or YYY lbs. Otherwise damage to
the vehicle may occur and unstable driving
conditions may result.<
2. Determine the combined weight of the
driver and passengers that will be riding in
your vehicle.
3. Subtract the combined weight of the driver
and passengers from XXX kilograms or YYY
pounds.
4. The resulting figure equals the available
amount of cargo and luggage load capacity.
For example, if the YYY amount equals
00320051004F004C00510048000300280047004C0057004C005200510003
Page 129 of 284

128
Driving tipsThings to remember when driving
1,400 lbs and there will be five 150-lb
passengers in your vehicle, the amount of
available cargo and lugga ge load capacity is
650 lbs:
1,400 lbs minus 750 lbs = 650 lbs.
5. Determine the combined weight of luggage
and cargo being loaded on the vehicle. That
weight may not safely exceed the available
cargo and luggage load capacity calculated
in step 4.
6. If your vehicle will be towing a trailer, part of
the load from your tra iler will be transferred
to your vehicle. Co nsult the manual for
transporting a trailer to determine how this
may reduce the available cargo and luggage
load capacity of your vehicle.
Load
The permissible load is the sum of the occu-
pants' weights and the weight of the cargo. The
greater the weight of the occupants, the less
cargo/luggage can be transported.
Stowing cargo
Coupe Convertible
Storing cargo
>
Position heavy objects as low and as far
forward as possible, ideally directly behind
the respective seat backrests.
> Cover sharp edges and corners.
> For very heavy cargo when the rear seat is
not occupied, secure each safety belt in the
opposite buckle.
Securing cargo
> Secure smaller and lighter items using draw
straps.
> Heavy-duty cargo straps for securing larger
and heavier objects are available at your
BMW center. To attach the cargo straps,
there are two lashing eyes on the inside wall
of the trunk.
Comply with the information enclosed with
the load-securing devices.
Always position and secure the cargo as
described above, so that it cannot endan-
ger the car's occupants, for example if sudden
braking or swerving is necessary.
Never exceed either the approved gross vehicle
weight or either of the a pproved axle loads, refer
to page 259, as excessive loads can pose a
safety hazard, and may al so place you in viola-
tion of traffi c safety laws.
Heavy or hard objects should not be carried
loose inside the car, since they could be thrown
around, for example as a result of heavy braking,
sudden swerves, etc., and endanger the
occupants.
00320051004F004C00510048000300280047004C0057004C005200510003
Page 130 of 284

129
Things to remember when driving
Driving tips
Only attach the cargo st
raps using the lashing
eyes shown in the illust ration. Do not secure
cargo with the anchors for tether straps, refer to
page 60, otherwise, these could be damaged. <
Coupe: roof-mounted
luggage rack
A special rack system is available as an option
f o r y o u r B M W . C o m p l y w i t h t h e d i r e c t i o n s g i v e n
in the installation instructions.
Mounting points
Fold open the cover.
Loading roof-mounted luggage rack
Because roof racks raise the vehicle's center of
gravity when loaded, they have a major effect on
vehicle handling and steering response.
You should therefore always remember not to
exceed the approved roof load capacity, the
approved gross vehicle weight or the axle loads
when loading the rack.
You can find the applicable data under Weights
on page 259.
The roof load must be distributed uniformly and
should not be too larg e in area. Heavy items
should always be placed at the bottom. Be sure
that adequate clearance is maintained for tilting
the glass roof, and that objects do not project
into the opening path of the trunk lid. Fasten roof-mounted cargo correctly and
securely to prevent it fr
om shifting or falling off
during the trip.
Drive smoothly. Avoid sudden acceleration and
braking maneuvers. Take corners gently.
00320051004F004C00510048000300280047004C0057004C005200510003
Page 222 of 284

221
Refueling
Mobility
Manually releasing the fuel filler flap
In the event of a malfunction, you can release
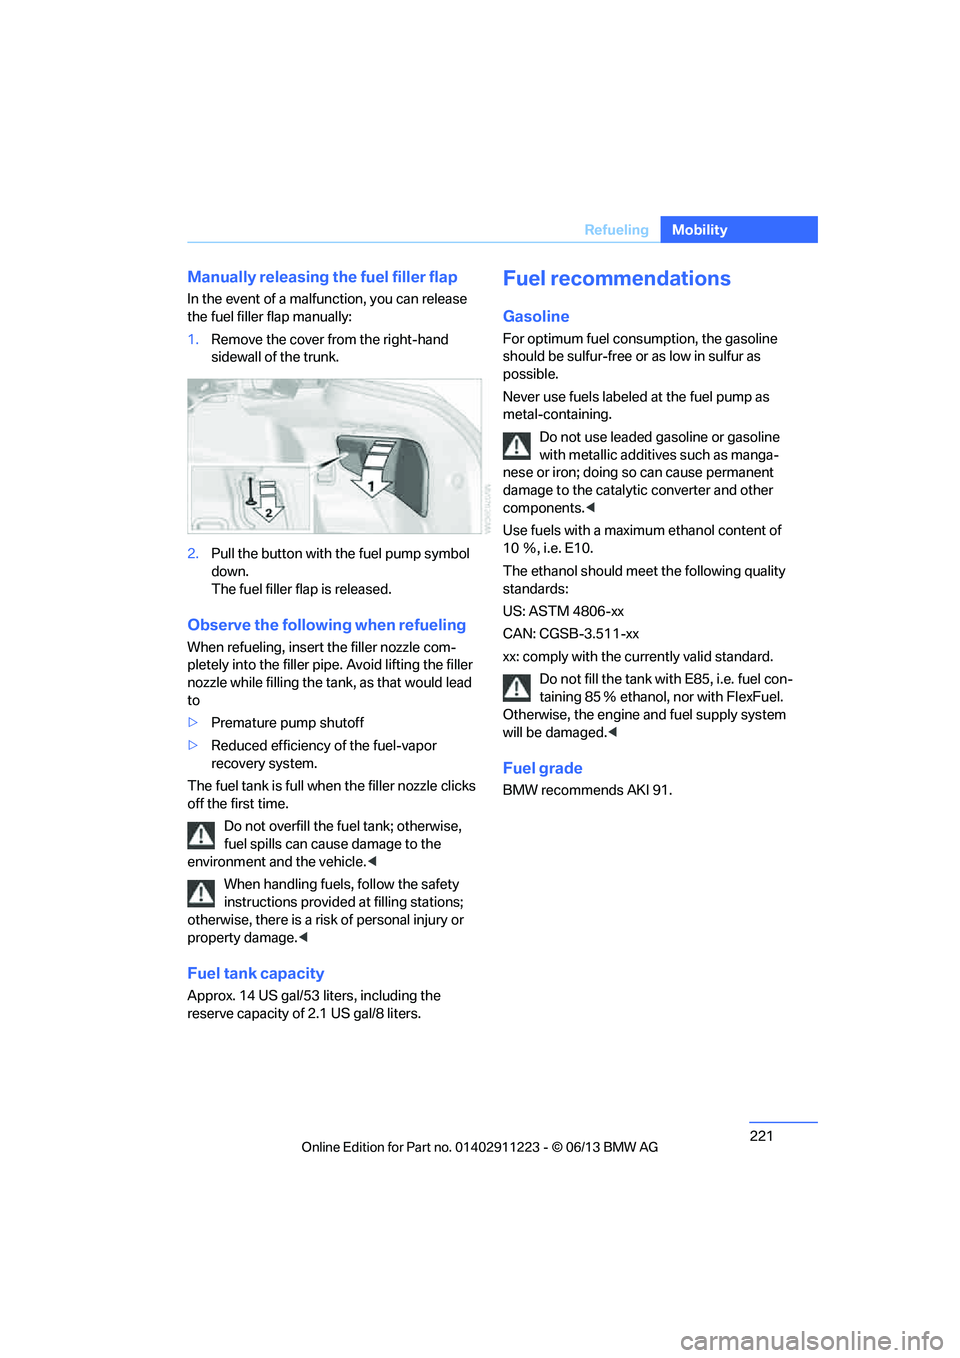
the fuel filler flap manually:
1.
Remove the cover fr om the right-hand
sidewall of the trunk.
2. Pull the button with the fuel pump symbol
down.
The fuel filler flap is released.
Observe the following when refueling
When refueling, insert the filler nozzle com-
pletely into the filler pipe. Avoid lifting the filler
nozzle while filling the tank , as that would lead
to
> Premature pump shutoff
> Reduced efficiency of the fuel-vapor
recovery system.
The fuel tank is full when the filler nozzle clicks
off the first time.
Do not overfill the fuel tank; otherwise,
fuel spills can caus e damage to the
environment and the vehicle. <
When handling fuels, follow the safety
instructions provided at filling stations;
otherwise, there is a risk of personal injury or
property damage. <
Fuel tank capacity
Approx. 14 US gal/53 liters, including the
reserve capacity of 2.1 US gal/8 liters.
Fuel recommendations
Gasoline
For optimum fuel consumption, the gasoline
should be sulfur-free or as low in sulfur as
possible.
Never use fuels labeled at the fuel pump as
metal-containing.
Do not use leaded gasoline or gasoline
with metallic additives such as manga-
nese or iron; doing so can cause permanent
damage to the catalyti c converter and other
components. <
Use fuels with a maximum ethanol content of
10 Ξ, i.e. E10.
The ethanol should meet the following quality
standards:
US: ASTM 4806-xx
CAN: CGSB-3.511-xx
xx: comply with the cu rrently valid standard.
Do not fill the tank with E85, i.e. fuel con-
taining 85 Ξ ethanol, nor with FlexFuel.
Otherwise, the engine and fuel supply system
will be damaged. <
Fuel grade
BMW recommends AKI 91.
00320051004F004C00510048000300280047004C0057004C005200510003
Page 244 of 284

243
Replacing components
Mobility
Replacing components
Vehicle equipment
In this chapter, all production, country, and
optional equipment that is offered in the model
range is described. For this reason, descrip-
tions will be given of some equipment that may
not be available in a vehi
cle, for example due to
the special options or national-market version
selected. This also app lies to safety related
functions and systems.
Onboard vehicle tool kit
The onboard vehicle tool kit is stored below the
floor mat in the trunk.
Wiper blades
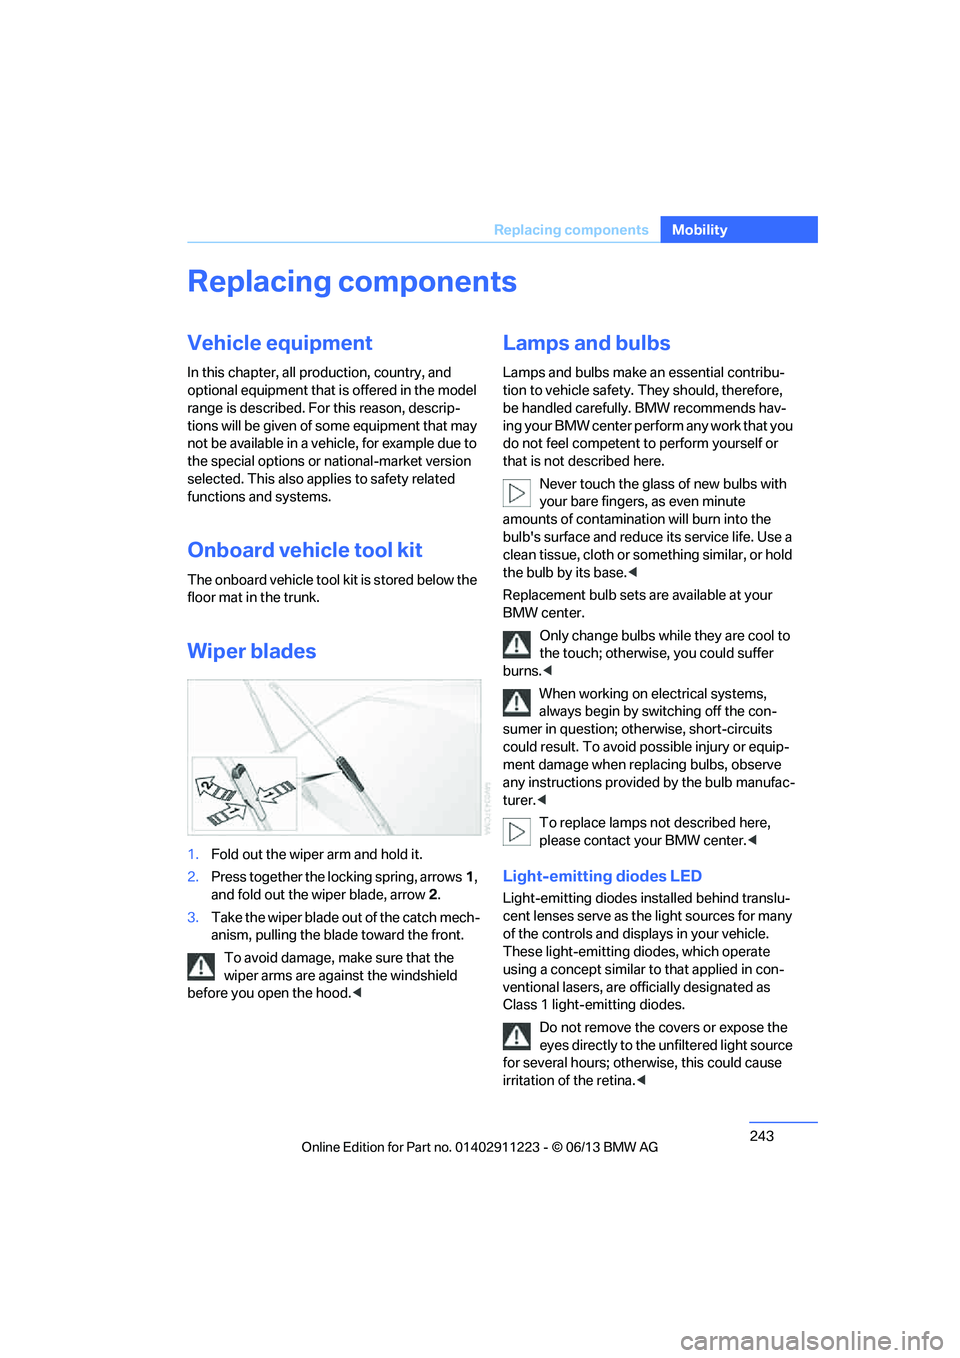
1. Fold out the wiper arm and hold it.
2. Press together the locking spring, arrows 1,
and fold out the wiper blade, arrow 2.
3. Take the wiper blade out of the catch mech-
anism, pulling the blade toward the front.
To avoid damage, make sure that the
wiper arms are against the windshield
before you open the hood. <
Lamps and bulbs
Lamps and bulbs make an essential contribu-
tion to vehicle safety. They should, therefore,
be handled carefully. BMW recommends hav-
ing your BMW center perform any work that you
do not feel competent to perform yourself or
that is not described here.
Never touch the glass of new bulbs with
your bare fingers, as even minute
amounts of contamination will burn into the
bulb's surface and reduce its service life. Use a
clean tissue, cloth or some thing similar, or hold
the bulb by its base. <
Replacement bulb sets are available at your
BMW center.
Only change bulbs while they are cool to
the touch; otherwise, you could suffer
burns. <
When working on electrical systems,
always begin by switching off the con-
sumer in question; otherwise, short-circuits
could result. To avoid possible injury or equip-
ment damage when replacing bulbs, observe
any instructions provided by the bulb manufac-
turer. <
To replace lamps not described here,
please contact your BMW center. <
Light-emitting diodes LED
Light-emitting diodes installed behind translu-
cent lenses serve as the light sources for many
of the controls and displays in your vehicle.
These light-emitting diodes, which operate
using a concept similar to that applied in con-
ventional lasers, are officially designated as
Class 1 light-emitting diodes.
Do not remove the co vers or expose the
eyes directly to the unfiltered light source
for several hours; otherwise, this could cause
irritation of the retina. <
00320051004F004C00510048000300280047004C0057004C005200510003
Page 248 of 284

247
Replacing components
Mobility
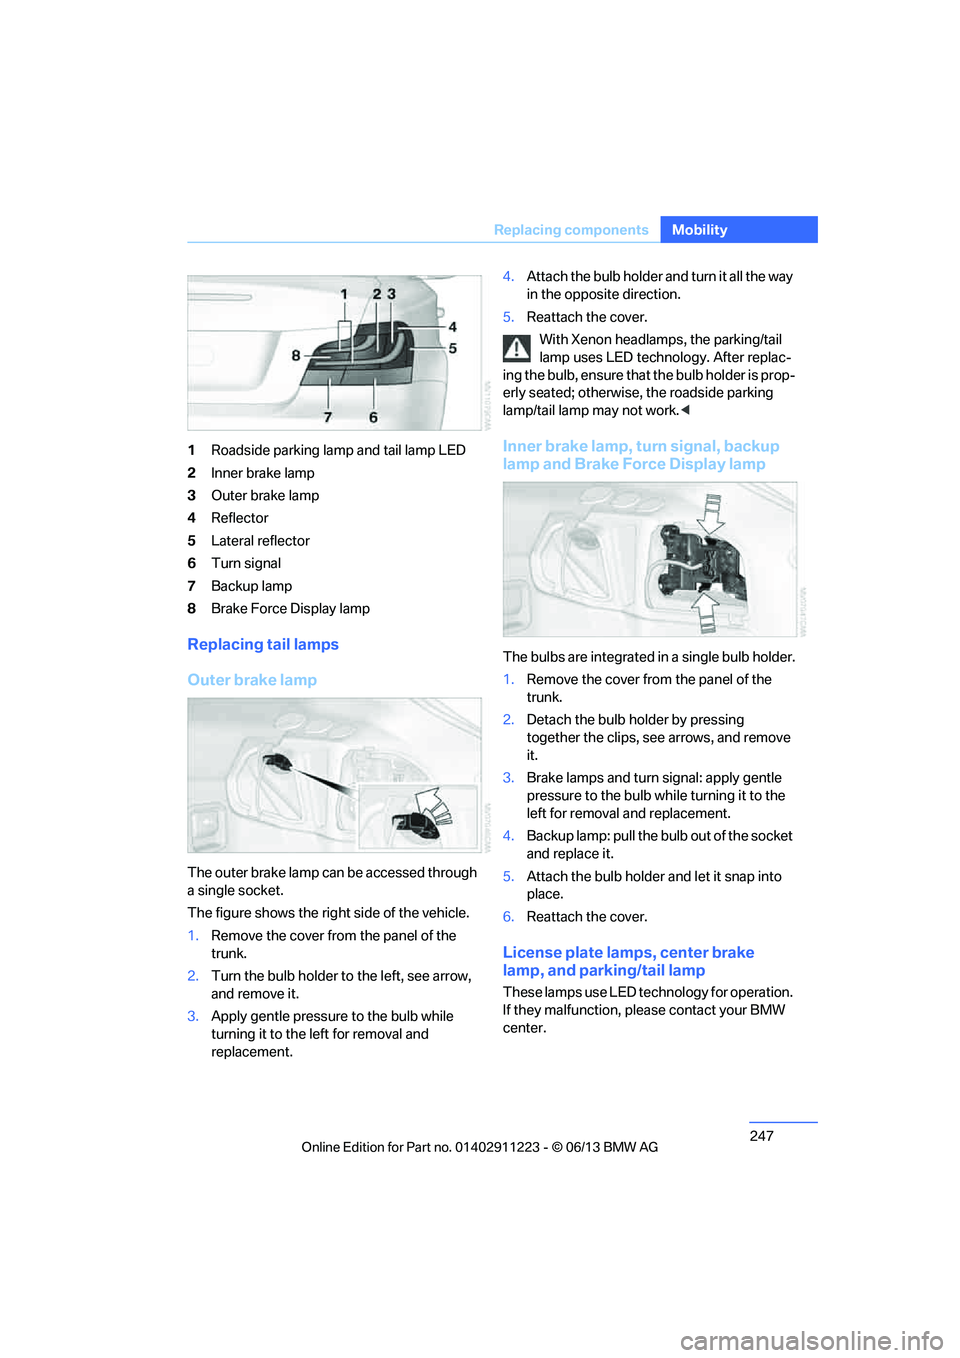
1
Roadside parking lamp and tail lamp LED
2 Inner brake lamp
3 Outer brake lamp
4 Reflector
5 Lateral reflector
6 Turn signal
7 Backup lamp
8 Brake Force Display lamp
Replacing tail lamps
Outer brake lamp
The outer brake lamp can be accessed through
a single socket.
The figure shows the right side of the vehicle.
1.Remove the cover from the panel of the
trunk.
2. Turn the bulb holder to the left, see arrow,
and remove it.
3. Apply gentle pressure to the bulb while
turning it to the left for removal and
replacement. 4.
Attach the bulb holder and turn it all the way
in the opposite direction.
5. Reattach the cover.
With Xenon headlamps, the parking/tail
lamp uses LED techno logy. After replac-
ing the bulb, ensure that the bulb holder is prop-
erly seated; otherwise, the roadside parking
lamp/tail lamp may not work. <
Inner brake lamp, turn signal, backup
lamp and Brake Force Display lamp
The bulbs are integrated in a single bulb holder.
1.Remove the cover from the panel of the
trunk.
2. Detach the bulb holder by pressing
together the clips, see arrows, and remove
it.
3. Brake lamps and turn signal: apply gentle
pressure to the bulb wh ile turning it to the
left for removal and replacement.
4. Backup lamp: pull the bulb out of the socket
and replace it.
5. Attach the bulb holder and let it snap into
place.
6. Reattach the cover.
License plate lamps, center brake
lamp, and parking/tail lamp
These lamps use LED technology for operation.
If they malfunction, please contact your BMW
center.
00320051004F004C00510048000300280047004C0057004C005200510003