2013 BMW 128I COUPE trunk
[x] Cancel search: trunkPage 41 of 284

40
ControlsOpening and closing
Avoiding uninten tional alarms
The tilt sensor and interior motion sensor can
be deactivated together , for example in the
following situations:
> In car washes
> In stacking garages
> During transport on car-carrying trains,
boats/ships or on a trailer
> When leaving animals in the vehicle
Switching off tilt alarm sensor and
interior motion sensor
Once the vehicle is locked, press the
button on the remote control again
within approx. 10 seconds.
The indicator lamp light s up briefly and then
begins flashing again. Th e tilt alarm sensor and
the interior motion sensor are switched off until
the next time the vehicle is unlocked and subse-
quently locked again.
Comfort Access
The concept
It is possible to access the vehicle without actu-
ating the remote control. It is sufficient to have
the remote control with you, for example in your
jacket pocket. The vehicle automatically
detects the remote control in the vicinity or in
the passenger compartment.
Comfort Access supports the following func-
tions:
> Unlocking/locking the vehicle
> Convenient closing
> Unlocking the trunk lid separately
> Engine starting
Functional requirement
>There are no external sources of interfer-
ence in the vicinity.
> The remote control mu st be outside the
vehicle to lock it. >
The next unlocking and locking cycle is not
possible until after approx. 2 seconds.
> It is only possible to start the engine if the
remote control is inside the vehicle.
Comparison with ordinary remote
control
The above functions can be controlled by
pressing the remote control buttons or by using
Comfort Access.
If you notice a brief delay while opening or
closing windows, the glass roof or the
convertible top, the system is checking whether
a remote control is inside the vehicle. Please
repeat the opening or closing procedure, if
necessary. <
Unlocking
Grasp the handle on the driver's or front
passenger door completely, arrow 1.
This corresponds to pressing the button.
Locking
Touch the surface on the door handle, arrow 2,
with your finger for approx. 1 second.
This corresponds to pressing the button.
To preserve the battery, please make
sure that the ignition and all electrical
consumers are switched off before locking the
vehicle. <
Coupe: convenient closing
Keep pressing the surface, arrow 2, with your
finger.
00320051004F004C00510048000300280047004C0057004C005200510003
Page 42 of 284

41
Opening and closing
Controls
Convertible: window and convertible
top operation
With the ignition at radio readiness or beyond,
you can open and close the windows and the
convertible top when a remote control is
located inside the vehicle.
Unlocking the trunk lid separately
Press the button on the ou
tside of the trunk lid.
This corresponds to pressing the button. If the vehicle detects that a remote con-
trol has been accident ally left inside the
locked vehicle after the trunk lid is closed, the
lid will reopen. The haza rd warning flashers
flash and a signal sounds. <
Switching on radio readiness
Pressing the Start/Stop button switches on
radio readiness.
Do not depress the brake or the clutch; other-
wise, the engine will start immediately.
Starting the engine
The engine can be started or the ignition can be
switched on when a remote control is inside the
vehicle. It is not necessa ry to insert a remote
control into the ignition lock, refer to page 61.
Switching off the engine in cars with
automatic transmission
The engine can only be switched off when the
selector lever is in po sition P, refer to page 63.
To switch the engine off when the selector lever
is in position N, the remote control must be in
the ignition lock.
Malfunctions
Local radio waves can in terfere with the func-
tion of Comfort Access, for example when a
mobile phone is in the immediate vicinity of the
remote control or by when a mobile phone is
being charged in the vehicle. If this happens, open and close the vehicle via
the buttons on the remote control or using the
integrated key. To star
t the engine afterward,
insert the remote control into the ignition lock.
Warning lamps
The warning lamp in the instrument
cluster lights up when you attempt to
start the engine: the engine cannot
be started. The remote co ntrol is not inside the
vehicle or is malfunctio ning. Take the remote
control with you inside the vehicle or have it
checked. If necessary, insert another remote
control into the ignition lock.
The warning lamp in the instrument
cluster lights up wh ile the engine is
running: the remote control is no
longer inside the vehicle. After the engine is
switched off, the engine can only be restarted
within approx. 10 seconds.
The indicator lamp in the instrument
cluster comes on and a message
appears on the Control Display:
replace the battery in the remote control.
Replacing the battery
The remote control for Comfort Access con-
tains a battery that will need to be replaced from
time to time.
1. Take the integrated ke y out of the remote
control, refer to page 32.
2. Remove the cover.
00320051004F004C00510048000300280047004C0057004C005200510003
Page 45 of 284

44
ControlsOpening and closing
After switching off the ignition
When the remote control is removed or the igni-
tion is switched off, you can still operate the roof
for approx. 1 minute as long as no door has
been opened.
Pinch protection system
If the glass roof encounters an obstruction dur-
ing closing from approximately the middle of
the opening in the roof, or during closing from
the tilted position, the closing movement is
interrupted and the glass roof is opened again
slightly.
Despite the pinch protection system
check and clear the roof's travel path prior
to closing it; otherwise, the safety system might
fail to detect certain kinds of obstructions, such
as very thin objects, and the roof would con-
tinue closing. <
Closing without pinch protection
If there is an external danger, press the switch
forward past the resistan ce point and hold it
there. The roof closes without pinch protection.
Following interruptions in electrical
power supply
After a power failure, there is a possibility that
the glass roof can only be tilted. The system
must be initialized. BMW recommends having
this work performed at your BMW center.
Convertible: convertible top
The fully automatic top combines reliable
weather protection with simple and easy-to-
use operation.
The following tips will enhance your driving
pleasure in your Convertible:
> It is recommended that you close the con-
vertible top whenever the vehicle is parked.
The closed convertible top not only pro-
tects the vehicle interior from damage due
to unforeseen bad we ather, but also pro- vides a certain degree of protection against
theft. However, even when the top is
closed, valuables should
only be stored in
the locked trunk.
> Do not mount any roof rack systems on the
convertible top.
> If the top is opened while it is wet, e.g. after
driving in the rain, water may drip into the
trunk. If necessary, remove items from the
trunk beforehand to av oid water stains or
soiling.
At temperatures below +14 7/–10 6, do
not move the convertible top as this could
result in damage.
Do not keep the convertible top in the convert-
ible top box for longer than one day if it is wet;
otherwise, the moistu re may cause damage.
Do not place objects on the convertible top, as
otherwise they may fall off when you operate
the convertible top and cause damage or injury.
Never move the converti ble top when the roll-
over protection system is in the activated
position.
Always completely finish the operation of the
convertible top. Driving with the convertible top
incompletely opened or closed can result in
damage or injury.
Do not reach into the mechanism during the
opening or closing procedure. Keep children
away from the opening/closing path of the
convertible top.
For safety reasons, only operate the convertible
top while the vehicle is standing. <
While opening and closing, the convert-
ible top pivots upward. When operating
the convertible top in a garage, under a bridge,
etc., ensure that there are at least 6.5 ft/2 m of
headroom; otherwise, the vehicle may be
damaged. <
00320051004F004C00510048000300280047004C0057004C005200510003
Page 46 of 284

45
Opening and closing
Controls
Before opening and closing
>
Comply with the sa fety precautions
described above.
> Ensure that the trunk partition is folded
down and engaged on both sides, refer to
page 118; otherwise, it will not be possible
to open the convertible top.
> Ensure that the cargo does not press
against the trunk partition from below.
> Ensure that the tr unk lid is closed.
Opening and closing
Convertible top operation with Comfort Access,
also refer to page 34.
As of radio readiness, refer to page 61:
To conserve battery power, if possible
operate the convertible top only while the
engine is running.
Prior to closing the conv ertible top, check for
and remove all debris from the windshield
frame; otherwise, the closing of the top may be
hampered. <
1 Push button: close the convertible top
2 Push button: open convertible top
3 LEDs
The side windows move down when the
convertible top is opened. <
If it is no longer possible to operate the cover
after it has been actuated several times in
immediate succession or after the cover has
remained in an interm ediate position for a
longer period, then the convertible top drive has
overheated. If possible, close the convertible top and allow
the drive unit to cool for a few minutes.
Operating while driving
You can open or close the convertible top while
driving, as long as the car is not moving faster
than approx. 25 mph/40 km/h.
If you accelerate to ov
er 30 mph/50 km/h while
the convertible top is moving, the procedure is
interrupted.
While operating the convertible top, pay
close attention to the surrounding traffic;
otherwise, an accident may happen. Try to
avoid operating the convertible top while
reversing the vehicle since the rear view is very
limited during the convertible top's movement.
Do not operate the convertible top while driving
in windy conditions. Do not drive faster than
30 mph/50 km/h; otherwise, damage to the
vehicle can occur. <
LEDs
>While the convertible top is being operated,
the left LED lights up green. It goes out as
soon as the top is fully opened or closed.
In the following situations, a message appears
on the Control Display or an acoustic signal
sounds in addition to the LED lighting up:
> If the right-hand LED flashes red when you
release the button, th e opening or closing
action has not yet finished.
> If the right-hand LED lights up red when the
button is pressed, the trunk partition is
raised, the trunk lid is not closed or there is a
malfunction. The convertible top cannot be
moved.
Interruption
The automatic sequence of movements is
interrupted if the button for the convertible top
operation is released. The sequence can be
continued in the desired direction by pushing or
pulling the buttons.
00320051004F004C00510048000300280047004C0057004C005200510003
Page 47 of 284

46
ControlsOpening and closing
If the opening or closing procedure is inter-
rupted for an extended period, the convertible
top remains in the raised position for approx.
10 minutes and then slowly moves to a stable
position.
A convertible top which is not completely
open or closed is hazardous. <
If the convertible top is not fully opened or
closed, the trunk lid cannot be opened
and the windows cannot be moved. <
Convenient opening and closing using
the remote control
Refer to page 34.
Closing manually
Only close the convertible top manually if
it is absolutely nece ssary. Never open it
manually. The convertible top box cover cannot
be locked if there is an electrical defect and
would then open while the vehicle is in motion.
Incorrect handling can result in damage. <
Closing the convertible top manually should be
performed by two people. The rear seats must
not be occupied.
Only move the converti ble top and the convert-
ible top box cover when th e ignition is switched
off.
Before closing
1. Open the trunk lid.
2. Take the screwdriver out of the onboard
vehicle tool kit, refer to page 243.3.
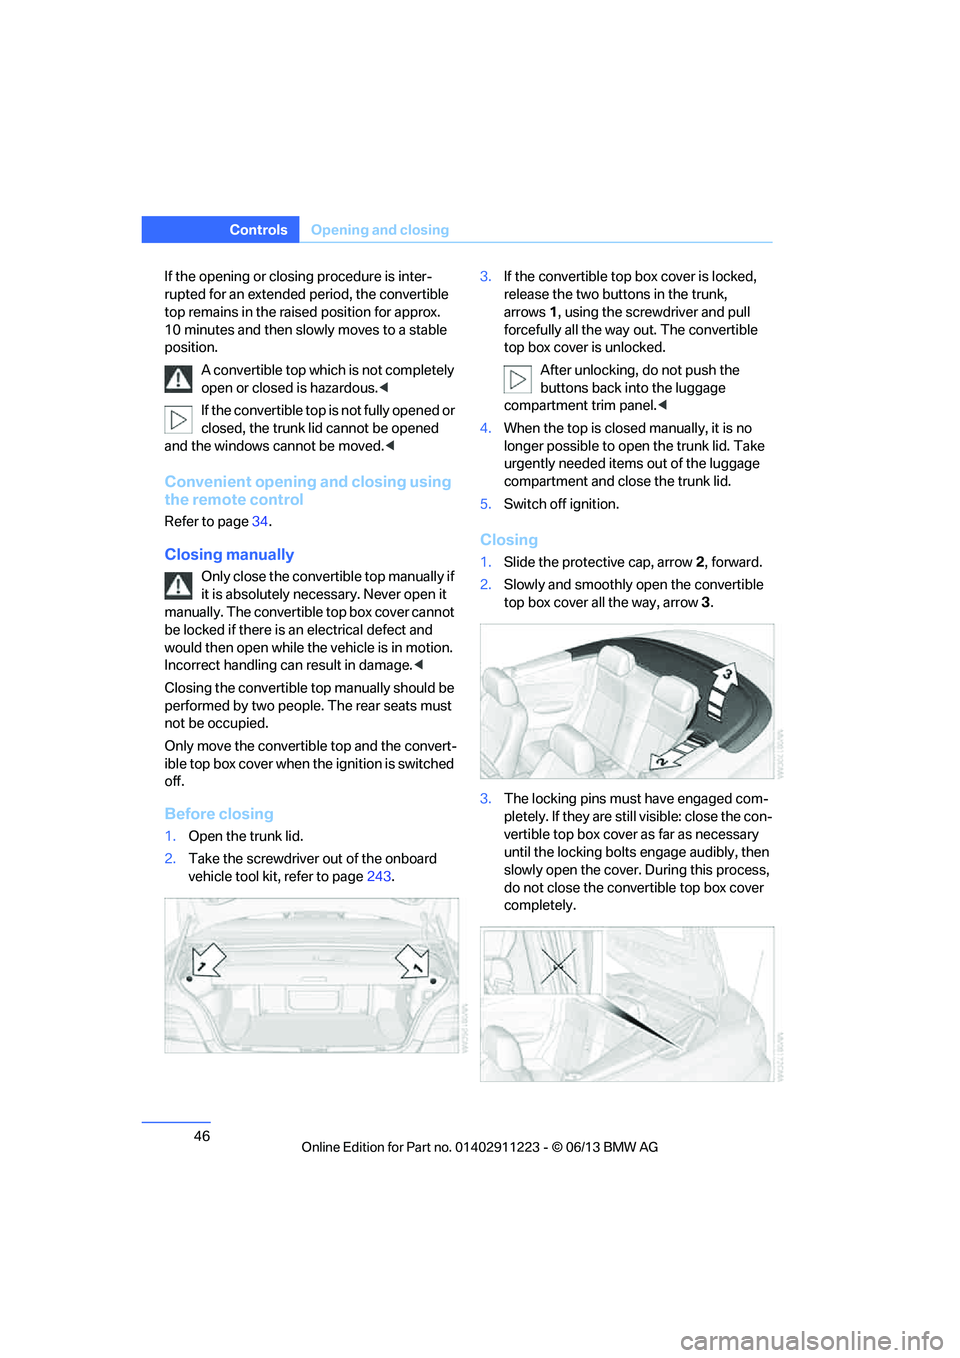
If the convertible top box cover is locked,
release the two buttons in the trunk,
arrows 1, using the screwdriver and pull
forcefully all the way out. The convertible
top box cover is unlocked.
After unlocking, do not push the
buttons back into the luggage
compartment trim panel.<
4. When the top is closed manually, it is no
longer possible to open the trunk lid. Take
urgently needed items out of the luggage
compartment and close the trunk lid.
5. Switch off ignition.
Closing
1.Slide the protective cap, arrow 2, forward.
2. Slowly and smoothly open the convertible
top box cover all the way, arrow 3.
3. The locking pins must have engaged com-
pletely. If they are still visible: close the con-
vertible top box cover as far as necessary
until the locking bolts engage audibly, then
slowly open the cover. During this process,
do not close the convertible top box cover
completely.
00320051004F004C00510048000300280047004C0057004C005200510003
Page 105 of 284

104
ControlsLamps
The parking lamps or low beams must
be switched on for the fog lamps to
operate. The green indicator lamp in
the instrument cluster lights up whenever the
fog lamps are on.
The fog lamps are switched off while you acti-
vate the headlamp flasher or switch on the high
beams.
If the automatic headla mp control is acti-
vated, the low beams will come on auto-
matically when you swit ch on the fog lamps.<
Instrument lighting
You can adjust the brightness of the instrument
lighting only when the parking lamps or the low
beams are switched on.
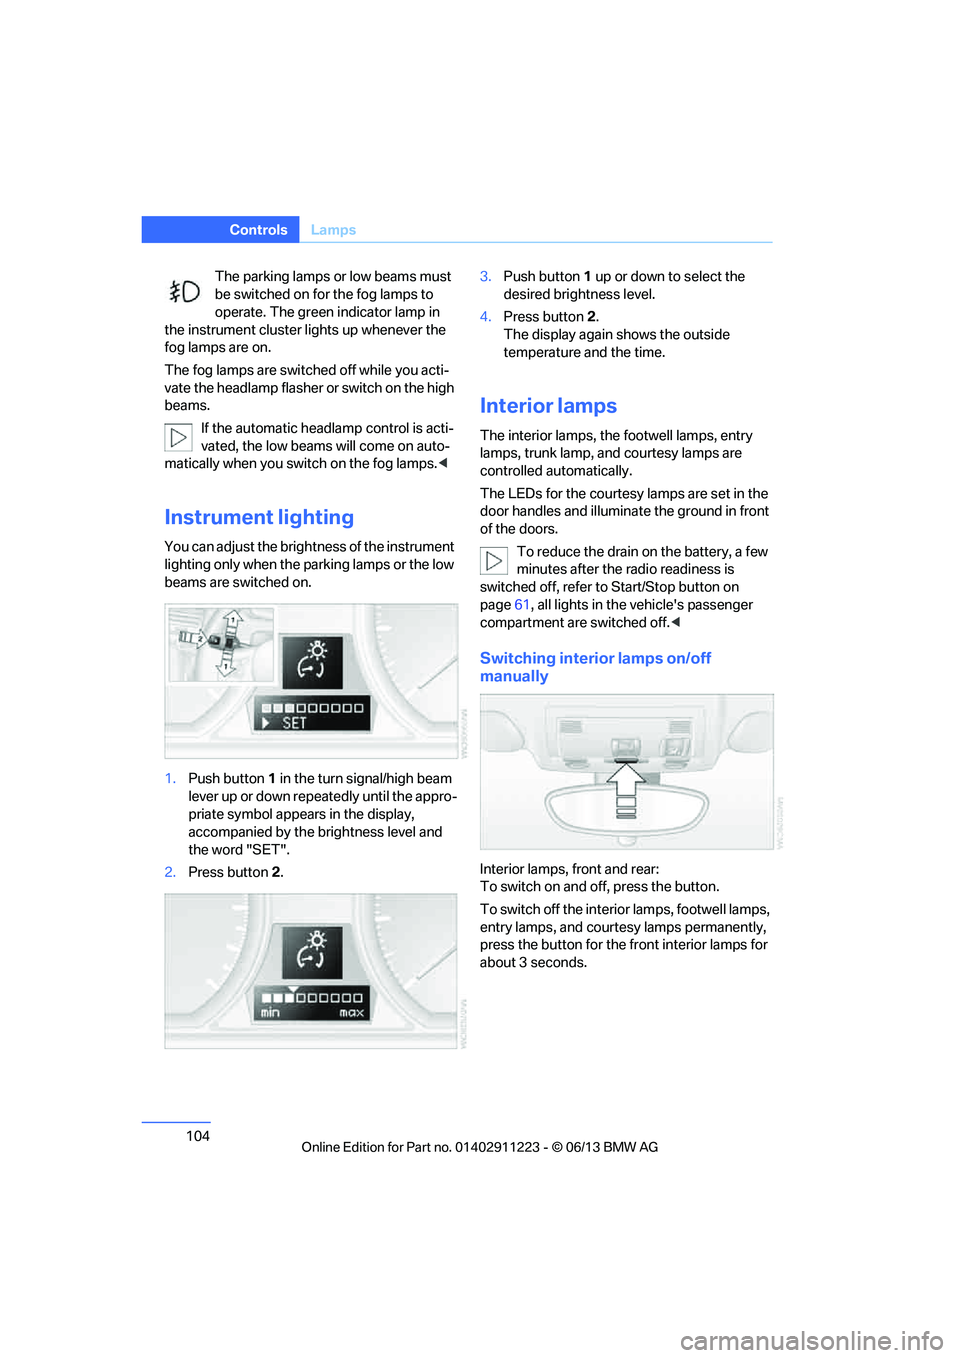
1.Push button 1 in the turn signal/high beam
lever up or down repe atedly until the appro-
priate symbol appear s in the display,
accompanied by the brightness level and
the word "SET".
2. Press button 2. 3.
Push button 1 up or down to select the
desired brightness level.
4. Press button 2.
The display again shows the outside
temperature and the time.
Interior lamps
The interior lamps, the footwell lamps, entry
lamps, trunk lamp, and courtesy lamps are
controlled automatically.
The LEDs for the courtesy lamps are set in the
door handles and illuminate the ground in front
of the doors.
To reduce the drain on the battery, a few
minutes after the radio readiness is
switched off, refer to Start/Stop button on
page 61, all lights in the vehicle's passenger
compartment are switched off. <
Switching interior lamps on/off
manually
Interior lamps, front and rear:
To switch on and off, press the button.
To switch off the interior lamps, footwell lamps,
entry lamps, and courtesy lamps permanently,
press the button for the front interior lamps for
about 3 seconds.
00320051004F004C00510048000300280047004C0057004C005200510003
Page 118 of 284

117
Practical interior accessories
Controls
Lighter
With the engine running or the ignition switched
on, press in the cigarette lighter.
The lighter can be pulled ou
t as soon as it pops
back out.
Hold or touch the hot cigarette lighter by
the knob only. Holding or touching it in
other areas could result in burns.
When leaving the car, always switch off the
ignition and remove the remote control so that
children cannot operate the cigarette lighter
and burn themselves. <
Connecting electrical
appliances
In your BMW, when the engine is running or the
ignition is switched on, you can use electrical
devices such as a hand lamp, car vacuum
cleaner, etc. if at least one of the following
sockets is available.
The total load of all sockets should not exceed
140 watts at 12 volts.
Avoid damaging the sockets by attempting to
insert plugs of unsuitable shape or size.
Do not connect battery chargers to the
sockets built into the vehicle at the plant;
doing so may damage the vehicle. <
Reinsert cigarette lighter or socket cover
after use; otherwise it ems that fall into the
cigarette lighter receptacle or the socket can
cause a short circuit.<
Cigarette lighter socket
To access the socket:
Open the front ashtray and remove the ciga-
rette lighter or cover from the socket.
In the center console
To access the socket, refer to External devices
on page 177.
Coupe: through-loading
system
Opening
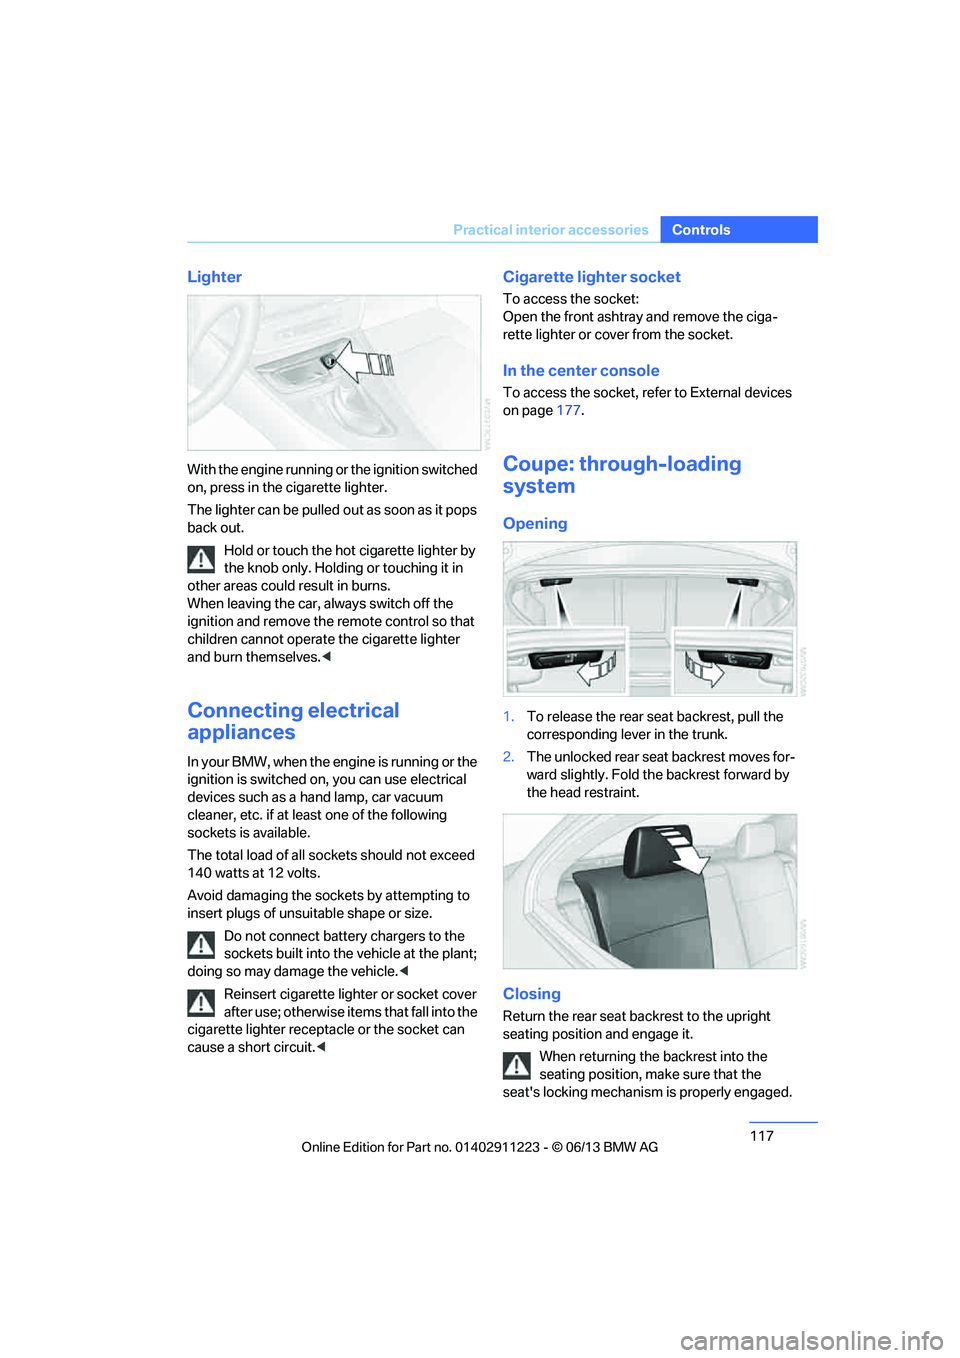
1.To release the rear seat backrest, pull the
corresponding lever in the trunk.
2. The unlocked rear seat backrest moves for-
ward slightly. Fold the backrest forward by
the head restraint.
Closing
Return the rear seat backrest to the upright
seating position and engage it.
When returning the backrest into the
seating position, make sure that the
seat's locking mechanism is properly engaged.
00320051004F004C00510048000300280047004C0057004C005200510003
Page 119 of 284

118
ControlsPractical interior accessories
Otherwise, cargo could be thrown around and
endanger the occupants in the event of sharp
braking or swerving. <
The lashing eyes in the trunk provide you with a
way to attach trunk nets or draw straps for
securing suitcases an d luggage, refer to
page 127.
Convertible: cargo loading
Enlarging the trunk
When the convertible top is closed you can
enlarge the trunk:
To do so, fold the trunk partition upward.
Before opening the convertible top, pull the
trunk partition down until it engages.
Ensure that pointed objects do not press
against the trunk partition from below.
The convertible top can only be opened
when the trunk partition is folded down. <
Storage compartments inside
the trunk
Depending on your vehicle's equipment, the left
side trim panel of the trunk will contain a rubber
strap for securing small objects such as a fold-
ing umbrella.
The lashing eyes in the trunk provide you with a
way to attach trunk nets or draw straps for
securing suitcases an d luggage, refer to
page 128.
Coupe: ski bag
The ski bag is designed for safe, clean transport
of up to 4 pairs of standard skis or up to
2snowboards.
With the ski bag you can stow skis with a length
of up to 6.6 ft/2.0 m. When skis of 6.6 ft/2.0 m
length are loaded, the over all capacity of the ski
bag is reduced due to its tapered design.
Loading
Ensure that the skis ar e clean when they are
loaded into the ski bag. Wrap sharp edges to
prevent damage.
1. Fold down the center pa nel in the rear seat
backrest.
2. Press the button, reach into the recess and
fold down the cover. To stabilize the cover
in the folded-down position, place the
center panel underneath it.
3. Open the Velcro fastener, spread the ski
bag between the front seats and insert the
skis or snowboards.
4. Attach the hook of the ski bag retaining
strap to the eyelet on the side of the ski bag
opening.
00320051004F004C00510048000300280047004C0057004C005200510003