2013 BMW 128I COUPE window
[x] Cancel search: windowPage 44 of 284
43
Opening and closing
Controls
After switching off the ignition
When the remote control
is removed or the igni-
tion is switched off, you can still operate the
windows for approx. 1 minute as long as no
door has been opened.
Convenient opening and closing
For Convenient opening and closing using the
remote control, refer to page 34. For Conve-
nient closing using Comfort Access, refer to
Locking on page 40.
Pinch protection system
If the closing force exceeds a specific value as a
power window closes, the closing action is
interrupted and the window reopens slightly.
Despite the pinch protection system
check and clear the window's travel path
prior to closing it; otherwise, the safety system
might fail to detect certain kinds of obstruc-
tions, such as thin objects, and the window
would continue closing.
Do not install any accessories that might inter-
fere with window movement. Otherwise, the
pinch protection system could be impaired.
Convertible: the rear windows are not equipped
with pinch protection. Therefore, watch them
closely when closing to avoid personal injury. <
Closing without pinch protection
If there is an external danger, or if ice on the
windows, etc., prevents you from closing the
windows normally, proceed as follows:
1.Pull the switch past the resistance point and
hold it there. Pinch protection is limited and
the window reopens slightly if the closing
force exceeds a certain value.
2. Pull the switch again past the resistance
point within approx. 4 seconds and hold it
there. The window closes without pinch
protection.
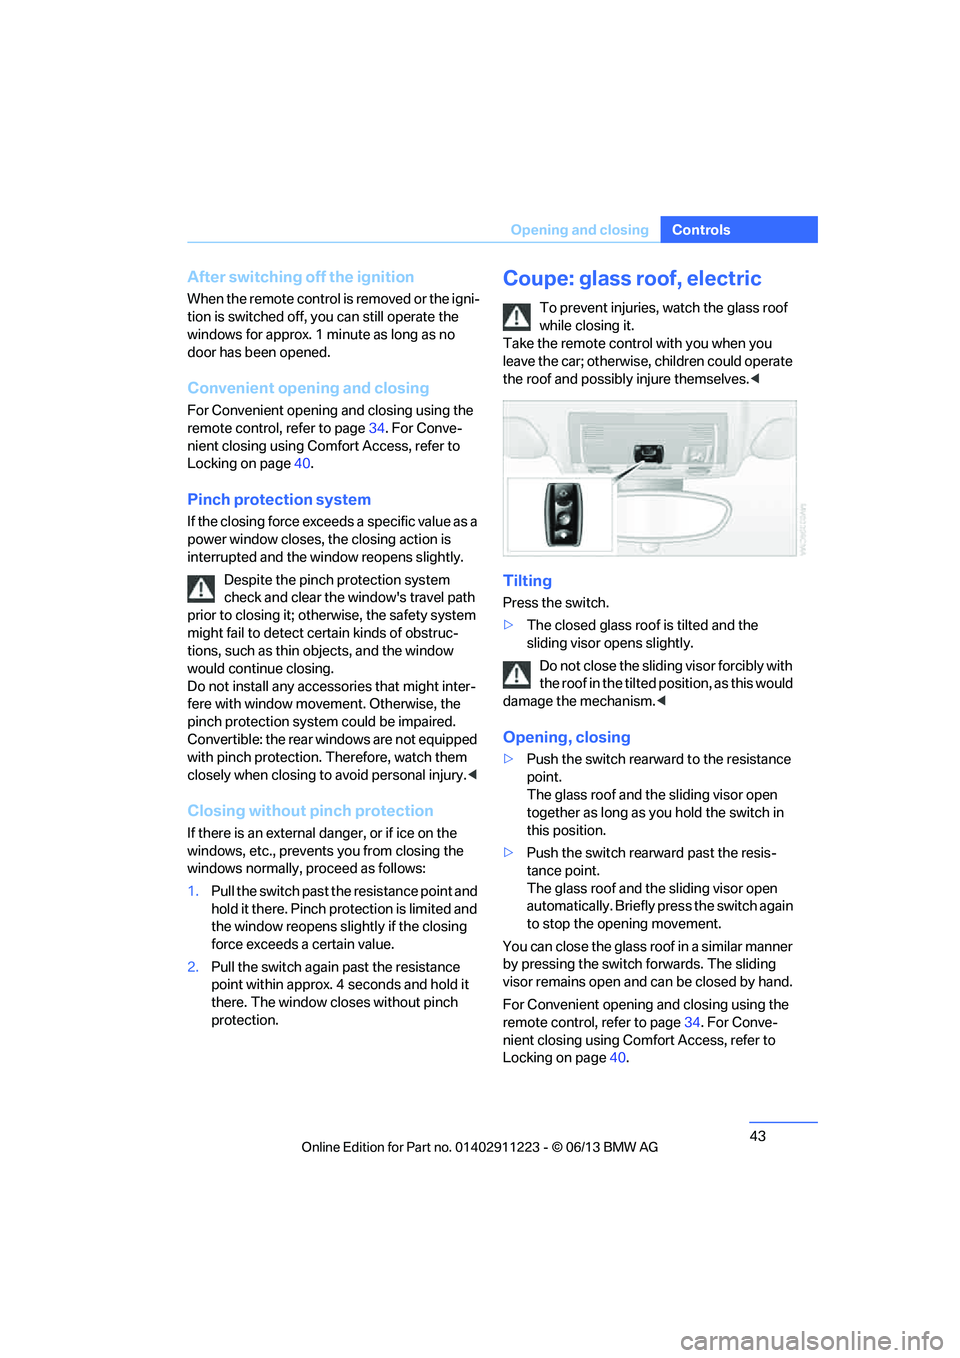
Coupe: glass roof, electric
To prevent injuries, watch the glass roof
while closing it.
Take the remote contro l with you when you
leave the car; otherwise, children could operate
the roof and possibly injure themselves. <
Tilting
Press the switch.
>The closed glass roof is tilted and the
sliding visor opens slightly.
Do not close the sliding visor forcibly with
the roof in the tilted position, as this would
damage the mechanism. <
Opening, closing
>Push the switch rearward to the resistance
point.
The glass roof and the sliding visor open
together as long as you hold the switch in
this position.
> Push the switch rearward past the resis-
tance point.
The glass roof and the sliding visor open
automatically. Briefly press the switch again
to stop the opening movement.
You can close the glass roof in a similar manner
by pressing the switch forwards. The sliding
visor remains open and can be closed by hand.
For Convenient opening and closing using the
remote control, refer to page 34. For Conve-
nient closing using Comfort Access, refer to
Locking on page 40.
00320051004F004C00510048000300280047004C0057004C005200510003
Page 46 of 284

45
Opening and closing
Controls
Before opening and closing
>
Comply with the sa fety precautions
described above.
> Ensure that the trunk partition is folded
down and engaged on both sides, refer to
page 118; otherwise, it will not be possible
to open the convertible top.
> Ensure that the cargo does not press
against the trunk partition from below.
> Ensure that the tr unk lid is closed.
Opening and closing
Convertible top operation with Comfort Access,
also refer to page 34.
As of radio readiness, refer to page 61:
To conserve battery power, if possible
operate the convertible top only while the
engine is running.
Prior to closing the conv ertible top, check for
and remove all debris from the windshield
frame; otherwise, the closing of the top may be
hampered. <
1 Push button: close the convertible top
2 Push button: open convertible top
3 LEDs
The side windows move down when the
convertible top is opened. <
If it is no longer possible to operate the cover
after it has been actuated several times in
immediate succession or after the cover has
remained in an interm ediate position for a
longer period, then the convertible top drive has
overheated. If possible, close the convertible top and allow
the drive unit to cool for a few minutes.
Operating while driving
You can open or close the convertible top while
driving, as long as the car is not moving faster
than approx. 25 mph/40 km/h.
If you accelerate to ov
er 30 mph/50 km/h while
the convertible top is moving, the procedure is
interrupted.
While operating the convertible top, pay
close attention to the surrounding traffic;
otherwise, an accident may happen. Try to
avoid operating the convertible top while
reversing the vehicle since the rear view is very
limited during the convertible top's movement.
Do not operate the convertible top while driving
in windy conditions. Do not drive faster than
30 mph/50 km/h; otherwise, damage to the
vehicle can occur. <
LEDs
>While the convertible top is being operated,
the left LED lights up green. It goes out as
soon as the top is fully opened or closed.
In the following situations, a message appears
on the Control Display or an acoustic signal
sounds in addition to the LED lighting up:
> If the right-hand LED flashes red when you
release the button, th e opening or closing
action has not yet finished.
> If the right-hand LED lights up red when the
button is pressed, the trunk partition is
raised, the trunk lid is not closed or there is a
malfunction. The convertible top cannot be
moved.
Interruption
The automatic sequence of movements is
interrupted if the button for the convertible top
operation is released. The sequence can be
continued in the desired direction by pushing or
pulling the buttons.
00320051004F004C00510048000300280047004C0057004C005200510003
Page 47 of 284
46
ControlsOpening and closing
If the opening or closing procedure is inter-
rupted for an extended period, the convertible
top remains in the raised position for approx.
10 minutes and then slowly moves to a stable
position.
A convertible top which is not completely
open or closed is hazardous. <
If the convertible top is not fully opened or
closed, the trunk lid cannot be opened
and the windows cannot be moved. <
Convenient opening and closing using
the remote control
Refer to page 34.
Closing manually
Only close the convertible top manually if
it is absolutely nece ssary. Never open it
manually. The convertible top box cover cannot
be locked if there is an electrical defect and
would then open while the vehicle is in motion.
Incorrect handling can result in damage. <
Closing the convertible top manually should be
performed by two people. The rear seats must
not be occupied.
Only move the converti ble top and the convert-
ible top box cover when th e ignition is switched
off.
Before closing
1. Open the trunk lid.
2. Take the screwdriver out of the onboard
vehicle tool kit, refer to page 243.3.
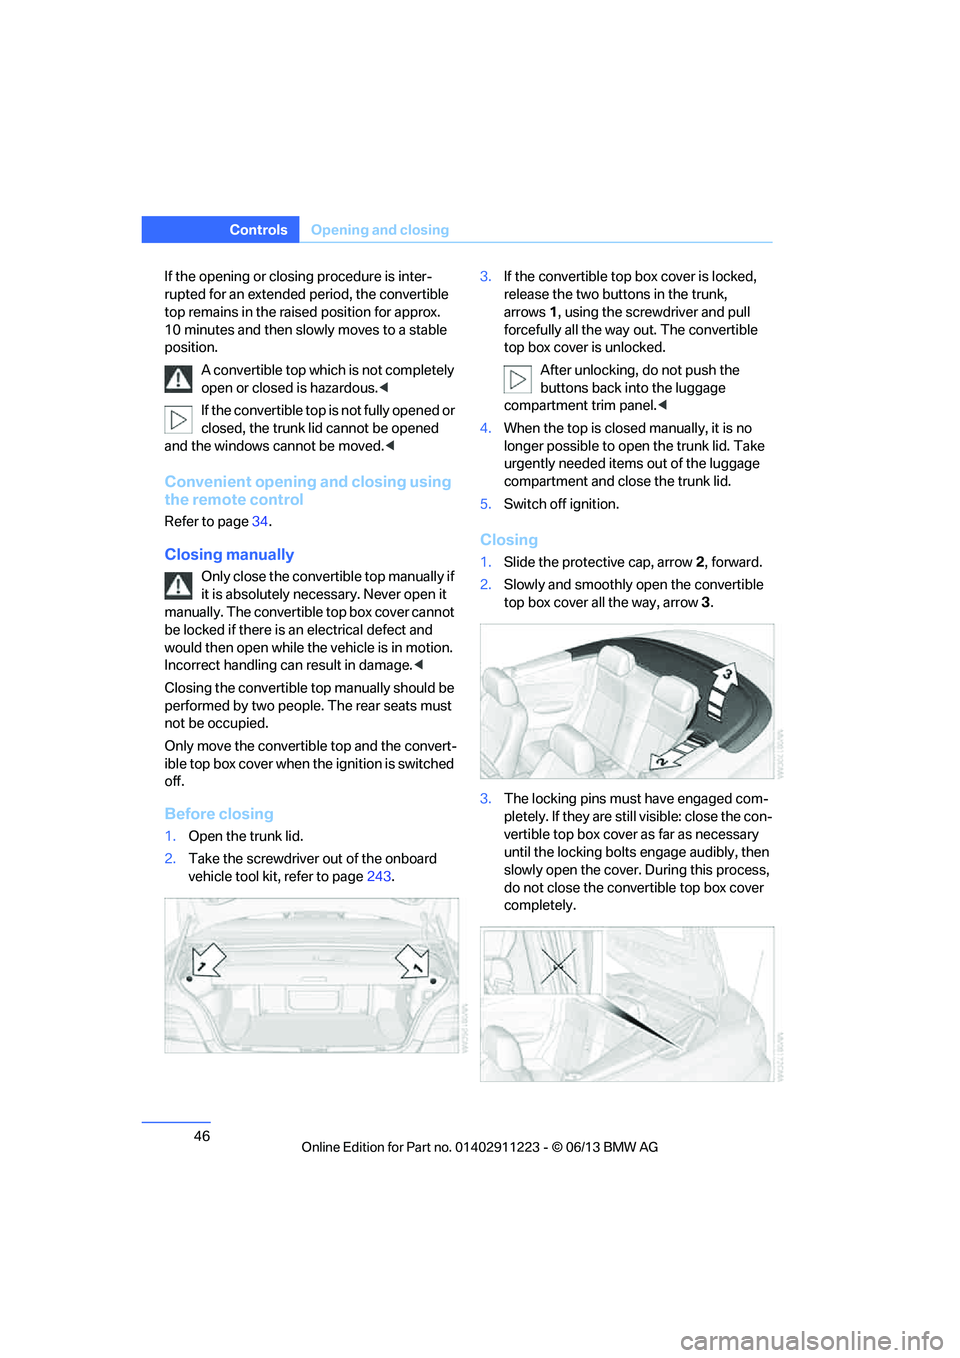
If the convertible top box cover is locked,
release the two buttons in the trunk,
arrows 1, using the screwdriver and pull
forcefully all the way out. The convertible
top box cover is unlocked.
After unlocking, do not push the
buttons back into the luggage
compartment trim panel.<
4. When the top is closed manually, it is no
longer possible to open the trunk lid. Take
urgently needed items out of the luggage
compartment and close the trunk lid.
5. Switch off ignition.
Closing
1.Slide the protective cap, arrow 2, forward.
2. Slowly and smoothly open the convertible
top box cover all the way, arrow 3.
3. The locking pins must have engaged com-
pletely. If they are still visible: close the con-
vertible top box cover as far as necessary
until the locking bolts engage audibly, then
slowly open the cover. During this process,
do not close the convertible top box cover
completely.
00320051004F004C00510048000300280047004C0057004C005200510003
Page 61 of 284
60
ControlsTransporting children safely
Child restraint system with tether strap
Convertible
For Canadian Customers Only.
The following statement is required by Trans-
port Canada.
This vehicle is not equipped with user-ready
tether anchorages. As such neither a child
restraint system, nor a booster cushion, requir-
ing the use of a tether strap can be properly
secured in the vehicle.
Coupe
Use the tether anchors to secure child
restraint systems only; otherwise, the
anchors could be damaged. <
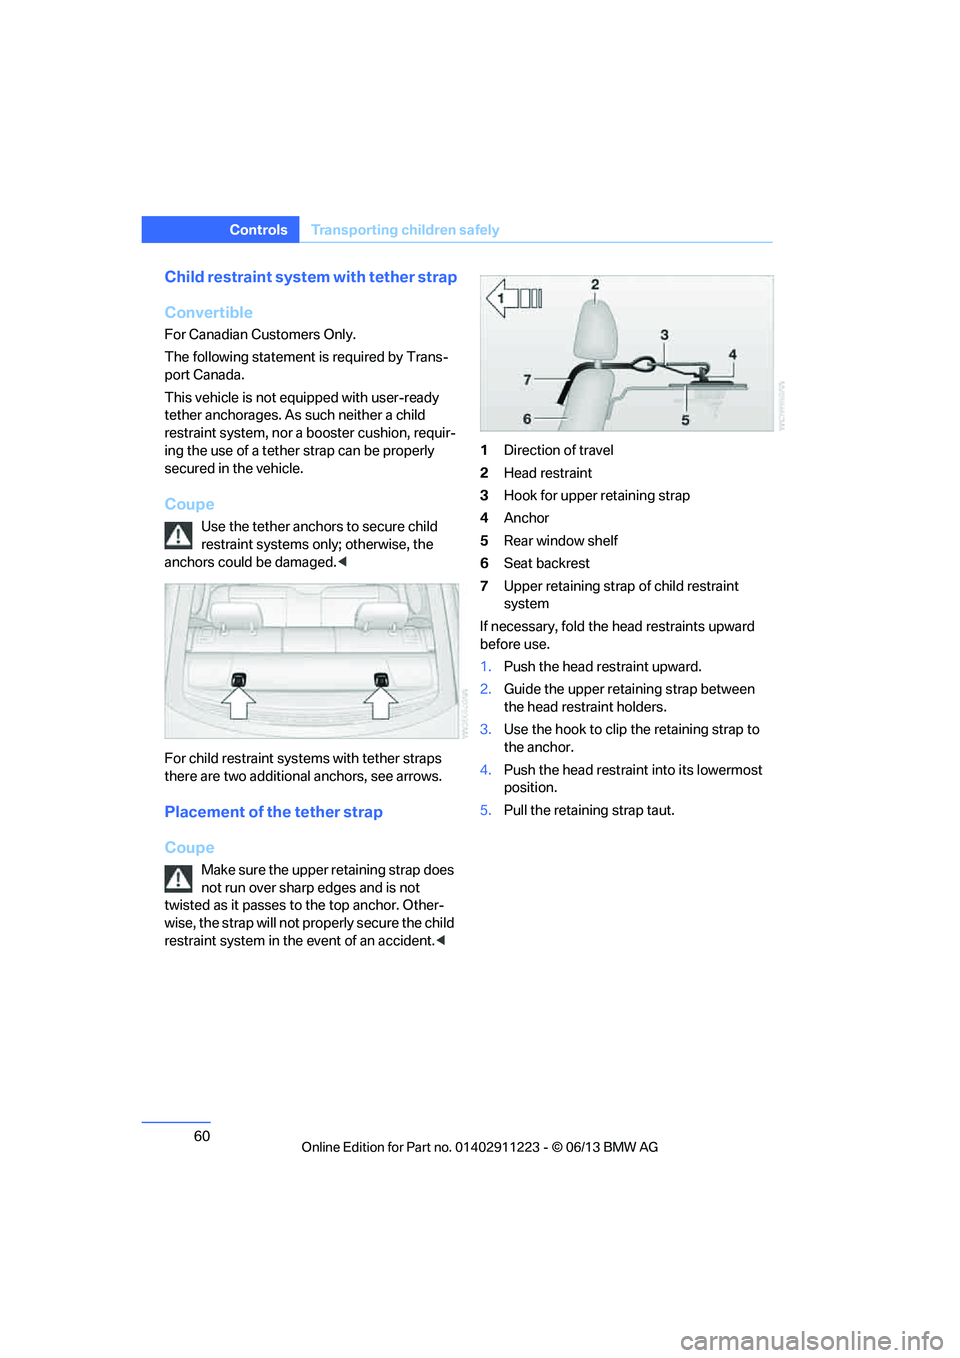
For child restraint system s with tether straps
there are two additional anchors, see arrows.
Placement of the tether strap
Coupe
Make sure the upper retaining strap does
not run over sharp edges and is not
twisted as it passes to the top anchor. Other-
wise, the strap will not pr operly secure the child
restraint system in the event of an accident. <1
Direction of travel
2 Head restraint
3 Hook for upper retaining strap
4 Anchor
5 Rear window shelf
6 Seat backrest
7 Upper retaining strap of child restraint
system
If necessary, fold the head restraints upward
before use.
1. Push the head restraint upward.
2. Guide the upper retaining strap between
the head restraint holders.
3. Use the hook to clip the retaining strap to
the anchor.
4. Push the head restraint into its lowermost
position.
5. Pull the retaining strap taut.
00320051004F004C00510048000300280047004C0057004C005200510003
Page 72 of 284

71
Driving
Controls
Turn signals/
headlamp flasher
1
High beams
2 Headlamp flasher
3 Turn signal
Using turn signals
Press the lever beyond the resistance point.
To turn off manually, press the lever to the
resistance point.
Unusually rapid flashing of the indicator
lamp and the turn signals indicates that
one of the turn signal bulbs has failed. <
Signaling a turn briefly
Press the lever as far as the resistance point for
as long as you wish to signal a turn.
Triple turn signal activation
Press the lever as far as the resistance point.
The turn signals flash three times.
You can activate or deactivate this function.
1. "Settings"
2. "Lighting" 3.
"Triple turn signal"
The setting is stored for the remote control
currently in use.
Wiper system
Do not switch on the wipers if they immo-
bilized by ice; otherw ise, damage to the
wiper blades and wiper motor may occur. <
Do not use the wipers when the window
glass is dry; otherwis e, the wiper blades
may experience accelerated wear or damage.<
1 Switching on wipers
2 Switching off wipers or brief wipe
3 Activating/deactivating intermittent wipe or
rain sensor
4 Cleaning windshield and headlamps
5 Setting speed for intermittent wipe or
sensitivity of the rain sensor
00320051004F004C00510048000300280047004C0057004C005200510003
Page 74 of 284
73
Driving
Controls
United States: the washer
fluid mixture ratio is
regulated by the U.S. EPA and many individual
states; do not exceed the allowable washer fluid
dilution ratio limits that apply. Follow the usage
instructions on the washer fluid container. Use
BMW's Windshield Washer Concentrate or the
equivalent.
Washer fluid filler neck
Only add washer fluid after allowing the
engine to cool and close the cover com-
pletely in order to prevent the washer fluid from
contacting hot engine parts. Otherwise, fluid
spills or leaks constitute a fire hazard and a risk
to personal safety. <
All washer nozzles are supplied with washer
fluid by the same reservoir.
The recommended minimum filling quantity is
0.2 US gal/1 liter.
Fill with a mixture of window cleaner concen-
trate, tap water and, if required, with a washer
antifreeze, according to manufacturer's recom-
mendations.
Do not fill with und iluted window cleaner
concentrate or with pure water since these can
result in damage to the wiper system.
Do not mix window cleaner concentrates from
different manufacturers si nce this may clog the
washer nozzles.
Cruise control
The concept
You can use the cruise control feature begin-
ning at approx. 20 mph/30 km/h. The car then
stores and maintains the speed that you specify
using the lever on the steering column.
Do not use cruise control when driving at
constant speed is prevented by adverse
conditions, e.g. winding roads, dense traffic or
poor road conditions due to, e.g. snow, rain, ice
or loose surfaces. Otherwise, you could lose
control of the vehicle and cause an accident as a
result.<
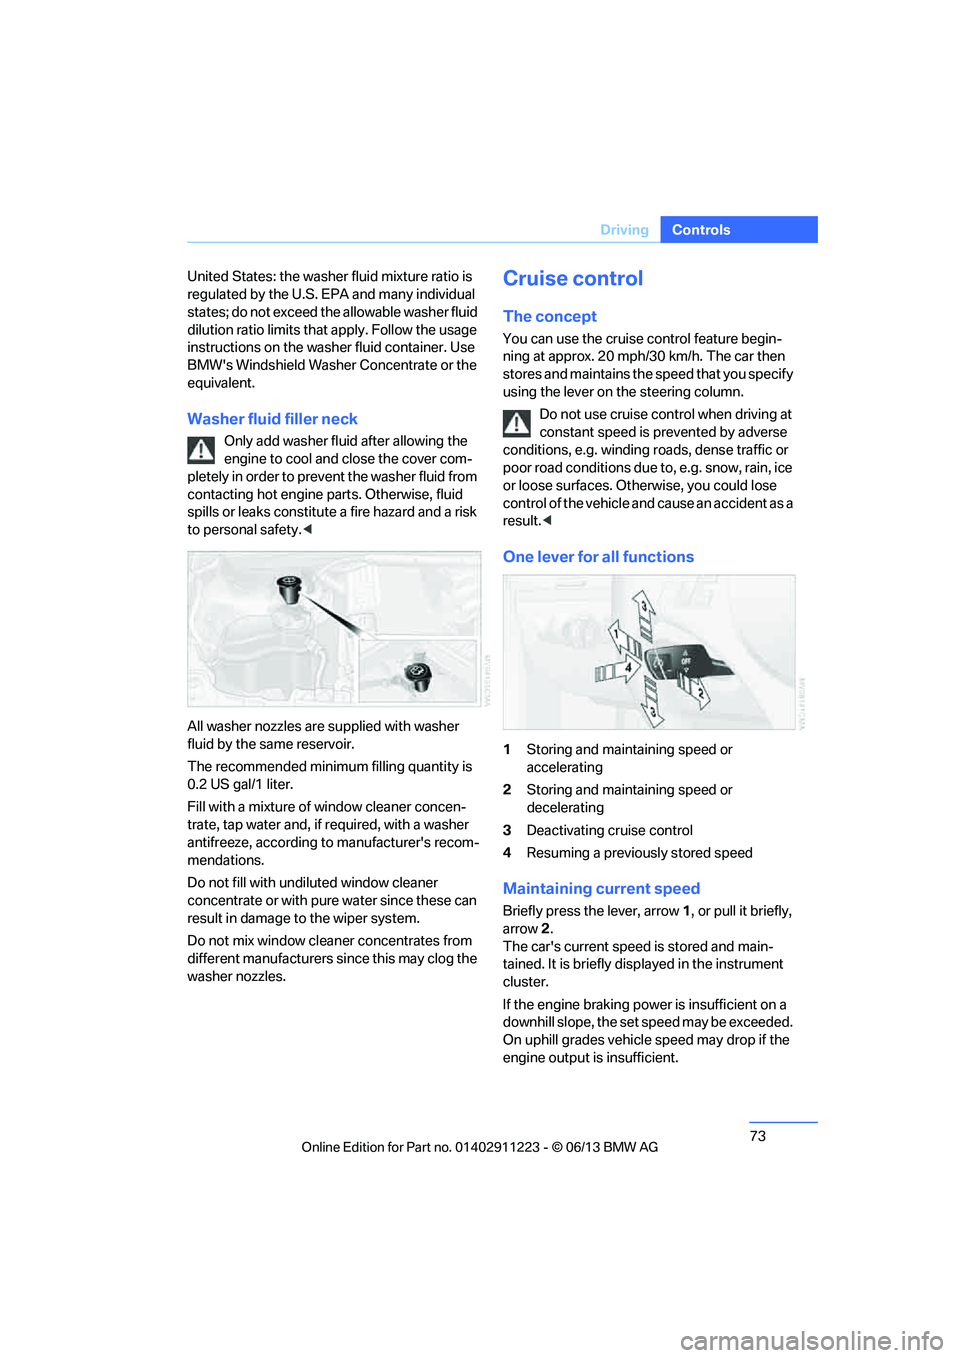
One lever for all functions
1 Storing and maintaining speed or
accelerating
2 Storing and maintaining speed or
decelerating
3 Deactivating cr uise control
4 Resuming a previously stored speed
Maintaining current speed
Briefly press the lever, arrow 1, or pull it briefly,
arrow 2 .
The car's current speed is stored and main-
tained. It is briefly disp layed in the instrument
cluster.
If the engine braking power is insufficient on a
downhill slope, the set speed may be exceeded.
On uphill grades vehicle speed may drop if the
engine output is insufficient.
00320051004F004C00510048000300280047004C0057004C005200510003
Page 98 of 284

97
Technology for driving comfort and safety
Controls
Airbags
The following airbags are located under the
marked covers:
1
Front airbags
2 Coupe: head airbags
3 Side airbags in the seat backrests
4 Convertible: knee airbags
Protective action
Observe the adjustment instructions on
page 49 to ensure the best possible
personal protection. <
The front airbags help protect the driver and
front passenger by responding to frontal
impacts in which safety belts alone cannot pro-
vide adequate restrain t. When needed, the
head and side airbags help provide protection in
the event of side impact. The relevant side air-
bag supports the side upper body area. The
head air bag supports the head.
The airbags have been designed to not be trig-
gered in every collision si tuation, e.g. not in
minor accidents or rear-end collisions.
Do not apply adhesive materials to the
cover panels of the airbags, cover them or
modify them in any other way.
Keep the dashboard and window on the front
passenger side clear, i. e., do not cover with
adhesive labels or coveri ngs, and do not attach
holders such as for navigation instruments and
mobile phones.
Do not attach seat cove rs, cushions or other
objects not specifically approved for seats with
integral side airbags to the front seats. Do not
hang items of clothing su ch as coats or jackets over the backrests. Do
not attempt to remove
the airbag retention system from the vehicle. Do
not modify the individu al components of the
system or its wiring in any way. This includes
the upholstered covers on the steering wheel,
instrument panel, seats and roof posts, as well
as the sides of the roof lining. Do not attempt to
remove or dismantle the steering wheel.
Do not touch the individual components imme-
diately after the system has been triggered,
because there is a danger of burns.
In the event of faults, immobilization, or after the
airbag system has been triggered, only have the
testing, repair, or disa ssembly and scrapping of
gas generator performed by your BMW center
or a workshop that has the required explosives
licenses. Unprofessional attempts to work on
the system could lead to failure in an emer-
gency or to undesired ai rbag activation, either
of which could result in personal injury. <
Warning notices and information about the
airbags can also be found on the sun visors.
Automatic deactivation of the front
passenger airbags
An analysis of the impr ession in the front pas-
senger seat cushion determines whether and
how the seat is occupied. The front and side air-
bags for the front passe nger are activated or
deactivated by the system accordingly.
The indicator lamp above the interior
rearview mirror shows the current status
of the front passenger ai rbags, deactivated or
activated, refer to Sta tus of front passenger
airbags below. <
00320051004F004C00510048000300280047004C0057004C005200510003
Page 107 of 284
106
ControlsClimate
Climate
Vehicle equipment
In this chapter, all pr oduction, country, and
optional equipment that is offered in the model
range is described. For this reason, descrip- tions will be given of some equipment that may
not be available in a vehi
cle, for example due to
the special options or national-market version
selected. This also app lies to safety related
functions and systems.
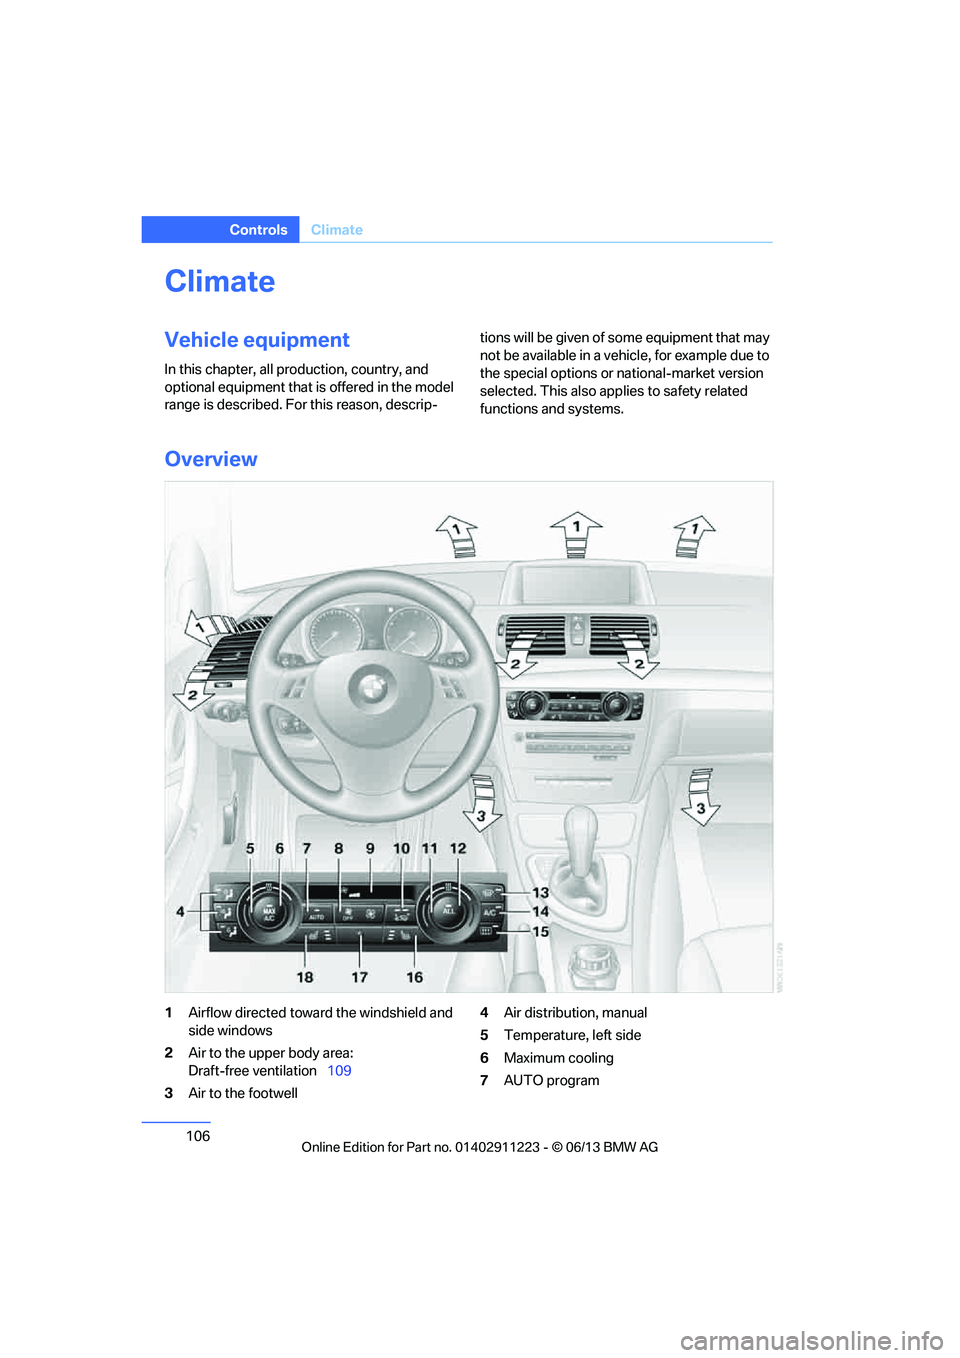
Overview
1 Airflow directed toward the windshield and
side windows
2 Air to the upper body area:
Draft-free ventilation 109
3 Air to the footwell 4
Air distribution, manual
5 Temperature, left side
6 Maximum cooling
7 AUTO program
00320051004F004C00510048000300280047004C0057004C005200510003