2013 BMW 128I COUPE indicator
[x] Cancel search: indicatorPage 67 of 284

66
ControlsDriving
>To upshift, briefly pull the right shift
paddle +.
> To downshift, briefly pull the left shift
paddle –.
Upshifts and downshifts are executed only
when they will result in a plausible combination
of engine and vehicle speed; thus, for example,
a downshift that would cause the engine to
overrev will not be exec uted by the system.
The gear selected is briefly displayed in the
instrument cluster, followed again by the gear
actually in use.
Overriding selector lever lock
If the selector lever will not move out of
position P even though the ignition is switched
on, the brake is depressed, and the button on
the selector lever is pre ssed, the selector lever
lock can be overridden:
1. Unclip the sleeve of the selector lever.
2. Pull the sleeve up over the selector lever
until the sleeve is inside out.
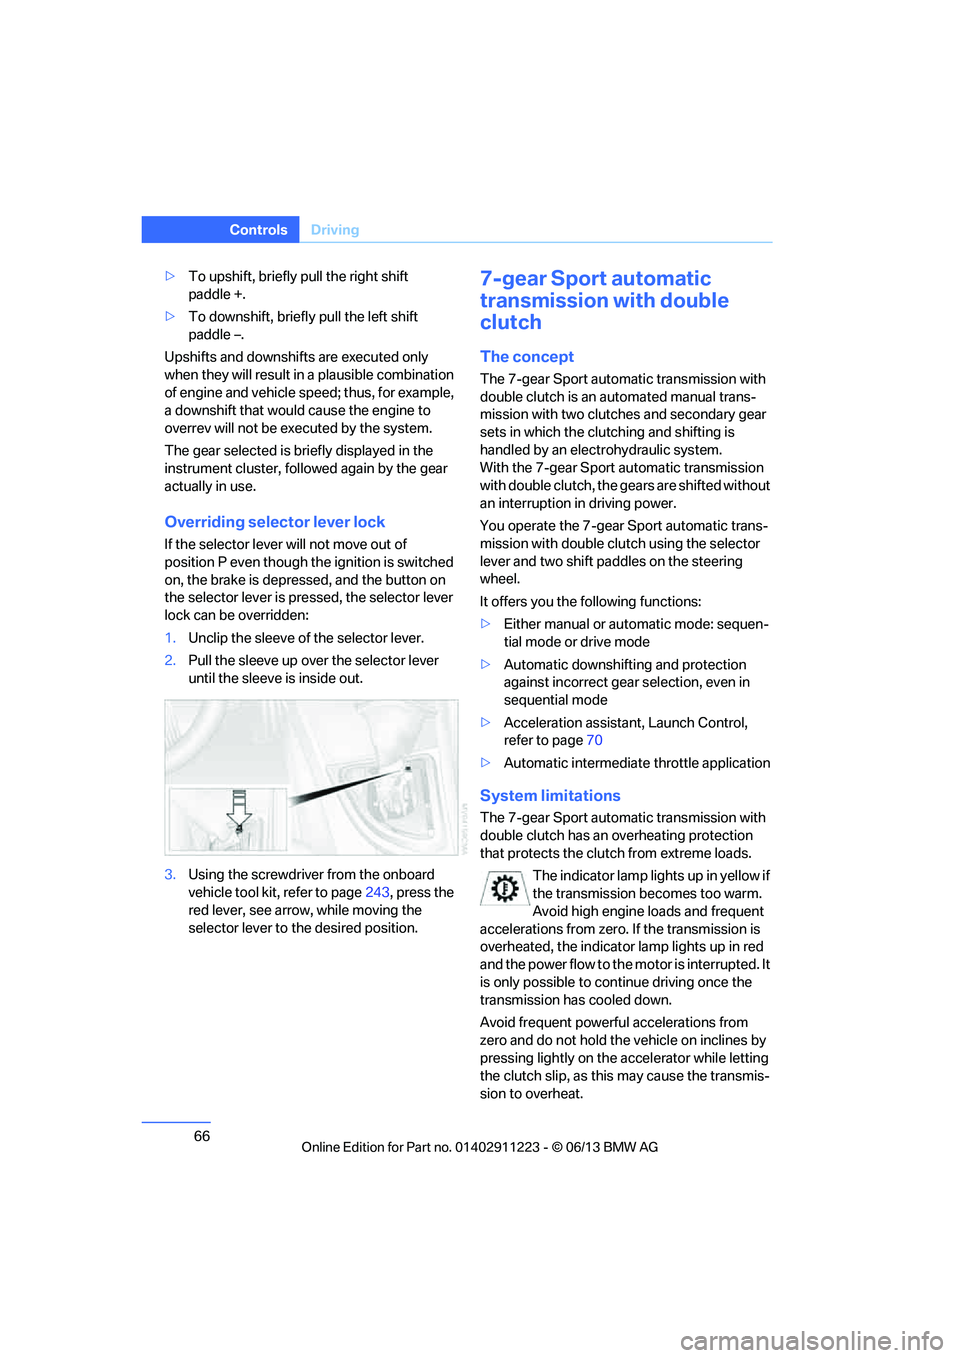
3. Using the screwdriver from the onboard
vehicle tool kit, refer to page 243, press the
red lever, see arrow, while moving the
selector lever to the desired position.
7-gear Sport automatic
transmission with double
clutch
The concept
The 7-gear Sport automatic transmission with
double clutch is an automated manual trans-
mission with two clutches and secondary gear
sets in which the clutching and shifting is
handled by an electr ohydraulic system.
With the 7-gear Sport automatic transmission
with double clutch, the gears are shifted without
an interruption in driving power.
You operate the 7-gear Sport automatic trans-
mission with double clutch using the selector
lever and two shift paddles on the steering
wheel.
It offers you the following functions:
> Either manual or au tomatic mode: sequen-
tial mode or drive mode
> Automatic downshifting and protection
against incorrect gear selection, even in
sequential mode
> Acceleration assistan t, Launch Control,
refer to page 70
> Automatic intermediate throttle application
System limitations
The 7-gear Sport automatic transmission with
double clutch has an overheating protection
that protects the clutch from extreme loads.
The indicator lamp lights up in yellow if
the transmission becomes too warm.
Avoid high engine loads and frequent
accelerations from zero. If the transmission is
overheated, the indicator lamp lights up in red
and the power flow to the motor is interrupted. It
is only possible to continue driving once the
transmission has cooled down.
Avoid frequent powerful accelerations from
zero and do not hold the vehicle on inclines by
pressing lightly on the accelerator while letting
the clutch slip, as this may cause the transmis-
sion to overheat.
00320051004F004C00510048000300280047004C0057004C005200510003
Page 72 of 284

71
Driving
Controls
Turn signals/
headlamp flasher
1
High beams
2 Headlamp flasher
3 Turn signal
Using turn signals
Press the lever beyond the resistance point.
To turn off manually, press the lever to the
resistance point.
Unusually rapid flashing of the indicator
lamp and the turn signals indicates that
one of the turn signal bulbs has failed. <
Signaling a turn briefly
Press the lever as far as the resistance point for
as long as you wish to signal a turn.
Triple turn signal activation
Press the lever as far as the resistance point.
The turn signals flash three times.
You can activate or deactivate this function.
1. "Settings"
2. "Lighting" 3.
"Triple turn signal"
The setting is stored for the remote control
currently in use.
Wiper system
Do not switch on the wipers if they immo-
bilized by ice; otherw ise, damage to the
wiper blades and wiper motor may occur. <
Do not use the wipers when the window
glass is dry; otherwis e, the wiper blades
may experience accelerated wear or damage.<
1 Switching on wipers
2 Switching off wipers or brief wipe
3 Activating/deactivating intermittent wipe or
rain sensor
4 Cleaning windshield and headlamps
5 Setting speed for intermittent wipe or
sensitivity of the rain sensor
00320051004F004C00510048000300280047004C0057004C005200510003
Page 77 of 284

76
ControlsControls overview
Tachometer
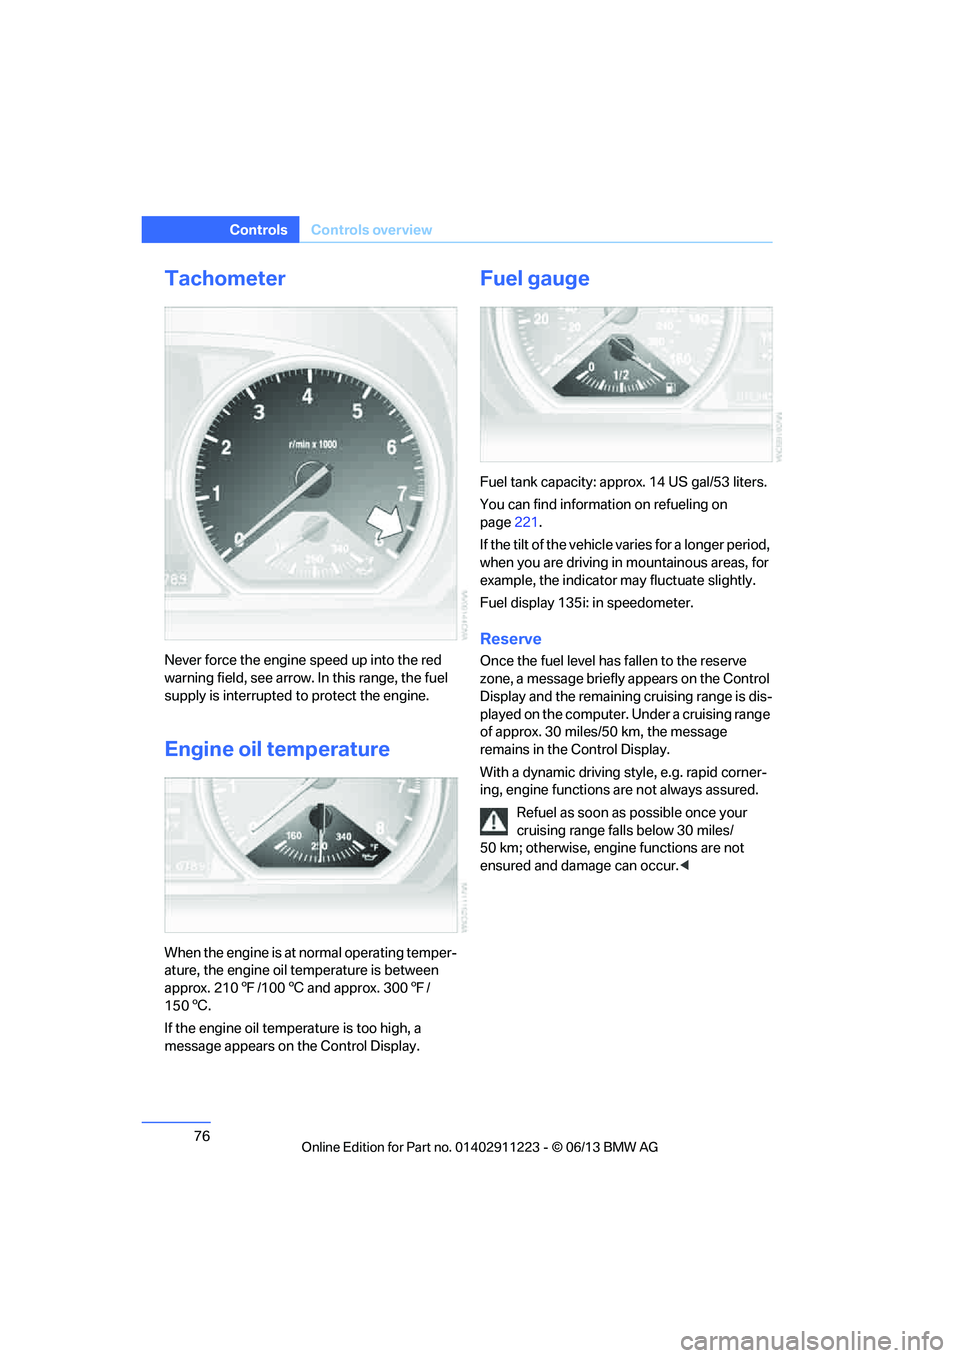
Never force the engine speed up into the red
warning field, see arrow. In this range, the fuel
supply is interrupted to protect the engine.
Engine oil temperature
When the engine is at normal operating temper-
ature, the engine oil temperature is between
approx. 2107/100 6 and approx. 300 7/
150 6.
If the engine oil temp erature is too high, a
message appears on the Control Display.
Fuel gauge
Fuel tank capacity: approx. 14 US gal/53 liters.
You can find information on refueling on
page 221.
If the tilt of the vehicle varies for a longer period,
when you are driving in mountainous areas, for
example, the indicator may fluctuate slightly.
Fuel display 135i: in speedometer.
Reserve
Once the fuel level ha s fallen to the reserve
zone, a message briefly appears on the Control
Display and the remaining cruising range is dis-
played on the computer. Under a cruising range
of approx. 30 miles/50 km, the message
remains in the Control Display.
With a dynamic driving style, e.g. rapid corner-
ing, engine functions are not always assured.
Refuel as soon as possible once your
cruising range falls below 30 miles/
50 km; otherwise, engine functions are not
ensured and damage can occur. <
00320051004F004C00510048000300280047004C0057004C005200510003
Page 85 of 284

84
ControlsControls overview
Date
The settings are stored for the remote control
currently in use, refer also to Personal Profile on
page32.
Setting the date
In the instrument cluster
To set the dd/mm or mm/dd date format, refer
to Setting the date format below.
1. Push button 1 in the turn signal/high beam
lever up or down repe atedly until the appro-
priate symbol appear s in the display,
accompanied by the date and the word
"SET".
2. Press button 2.
3. Use button 1 to set the day of the month.
4. Press button 2 to confirm the entry.
5. Set the month and the ye a r i n t he s a m e w a y .
6. Press button 2.
The system stores the new date.
Via iDrive
1. "Settings"
2. "Time/Date"
3. "Date:"
4. Turn the controller until the desired day is
displayed, and press the controller.
5. Create the necessary settings for the
month and year.
The date is stored.
Setting the date format
1. "Settings"
2. "Time/Date"
3. "Format:"
4. Select the desired format.
The date format is stored.
Check Control
The concept
The Check Control monitors vehicle functions
and alerts you to any malfunctions in the sys-
tems monitored. Such a Check Control mes-
sage includes indicato r and warning lamps in
the instrument cluster and, in some circum-
stances, an acoustic signal as well as text
messages at the top of the Control Display.
Indicator and warning lamps
Indicator and warning lamps can light up in a
variety of combinations and colors.
Several of the lamps are checked for proper
functioning and light up temporarily when the
engine is started or the ignition is switched on.
00320051004F004C00510048000300280047004C0057004C005200510003
Page 86 of 284

85
Controls overview
Controls
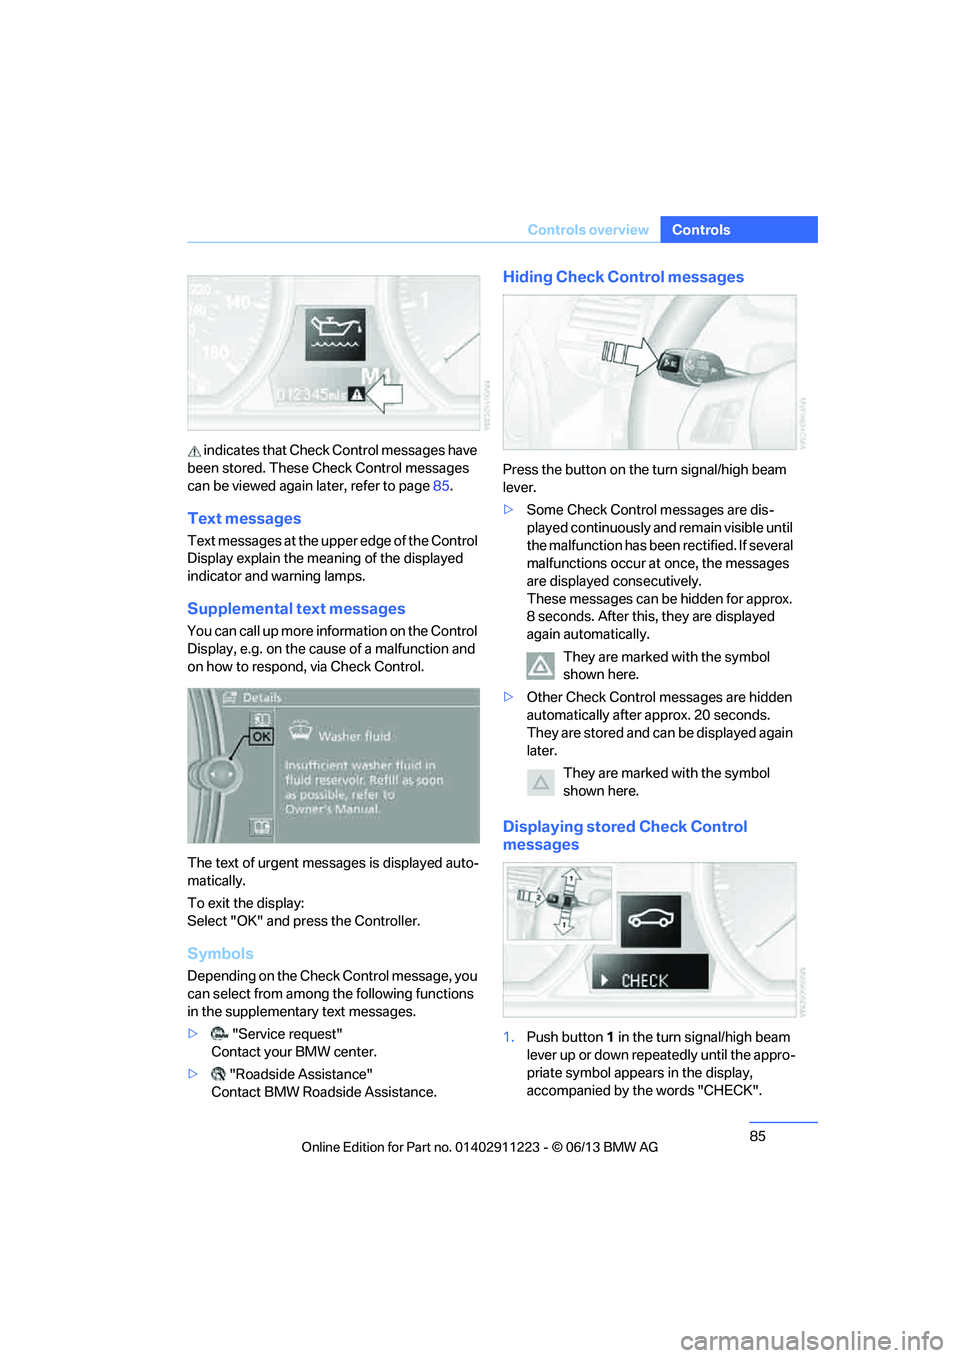
indicates that Check
Control messages have
been stored. These Check Control messages
can be viewed again later, refer to page85.
Text messages
Text messages at the uppe r edge of the Control
Display explain the meaning of the displayed
indicator and warning lamps.
Supplemental text messages
You can call up more information on the Control
Display, e.g. on the cause of a malfunction and
on how to respond, via Check Control.
The text of urgent messages is displayed auto-
matically.
To exit the display:
Select "OK" and press the Controller.
Symbols
Depending on the Check Control message, you
can select from among the following functions
in the supplementary text messages.
> "Service request"
Contact your BMW center.
> "Roadside Assistance"
Contact BMW Roadside Assistance.
Hiding Check Control messages
Press the button on the turn signal/high beam
lever.
> Some Check Control messages are dis-
played continuously an d remain visible until
the malfunction has been rectified. If several
malfunctions occur at once, the messages
are displayed consecutively.
These messages can be hidden for approx.
8 seconds. After this, they are displayed
again automatically.
They are marked with the symbol
shown here.
> Other Check Control messages are hidden
automatically after approx. 20 seconds.
They are stored and can be displayed again
later.
They are marked with the symbol
shown here.
Displaying stored Check Control
messages
1.Push button 1 in the turn signal/high beam
lever up or down repeatedly until the appro-
priate symbol appears in the display,
accompanied by the words "CHECK".
00320051004F004C00510048000300280047004C0057004C005200510003
Page 89 of 284

88
ControlsTechnology for driving comfort and safety
Technology for driving comfort and safety
Vehicle equipment
In this chapter, all pr oduction, country, and
optional equipment that is offered in the model
range is described. For this reason, descrip-
tions will be given of some equipment that may
not be available in a vehi cle, for example due to
the special options or national-market version
selected. This also app lies to safety related
functions and systems.
Park Distance Control PDC
The concept
The PDC assists you with maneuvering in tight
parking spaces. Acoustic signals and a visual
indicator warn you of the presence of an object
behind your vehicle. Four ultrasonic sensors in
the bumper measure the distance.
These sensors have a range of approx. 6.5 ft/
2 m. However, an acoustic warning does not
sound until an object is approx. 24 in/60 cm
from the corner sensors or approx. 5 ft/1.50 m
from the center sensors.
PDC is a parking aid that can indicate
objects when they are approached
slowly, as is usually th e case when parking.
Avoid approaching an object at high speed; oth-
erwise, physical circumstances may lead to the
system warning being issued too late. <
Switching on automatically
With the engine running or the ignition switched
on, the system is activated after approx. second
when you engage reverse gear or move the
automatic transmission selector lever to
position R. Wait this short period before driving.
Switching off automatically
After approx. 164 ft/50 m of driving or above
approx. 18 mph/30 km/h, the system switches
off and the LED goes out.
Signal tones
When nearing an object, its position is indicated
correspondingly by an in terval tone. As the dis-
tance between vehicle an d object decreases,
the intervals betwee n the tones become
shorter. If the distance to the nearest object
falls to below roughly 1 ft/30 cm, then a contin-
uous tone sounds.
An interval tone is interrupted after approx.
3seconds:
> If you stop in front of an object that has been
detected by only one of the corner sensors
> If you are driving parallel to a wall
Malfunction
The warning lamp lights up. A mes-
sage appears on the Control Display.
PDC is malfunctioning. Have the
system checked.
To avoid this problem, keep the sensors clean
and free of ice or snow in order to ensure that
they will continue to op erate effectively. When
using a high-pressure cleaner, do not spray the
sensors for extended periods of time and only
from a distance of at least 1 ft/30 cm.
PDC with visual warning
The approach of the vehicle to an object is
shown on the Control Display. Objects that are
farther away are displayed on the Control Dis-
play before a signal tone sounds. The display
appears on the Control Display as soon as PDC
is activated.
00320051004F004C00510048000300280047004C0057004C005200510003
Page 90 of 284

89
Technology for driving comfort and safety
Controls
System limitations
Even with PDC, final responsibility for
estimating the distance between the
vehicle and any obstructions always remains
with the driver. Even when sensors are pro-
vided, there is a blind spot in which objects can
no longer be detected. The system is also sub-
ject to the physical limit s that apply to all forms
of ultrasonic measurement, such as those
encountered with traile r towbars and hitches,
thin or wedge-shaped objects, etc. Low objects
that have already been displayed, e.g. curbs,
can disappear again from the detection area of
the sensors before or after a continuous tone
sounds. Higher, protruding objects, e.g. ledges,
cannot be detected. Loud sound sources out-
side or inside the car can drown out the PDC
signal. Therefore, always drive cautiously; oth-
erwise, there is a risk of personal injury or prop-
erty damage. <
Driving stability control
systems
Your BMW has a number of systems that help
to maintain the vehicle's stability even in
adverse driving conditions.
Antilock Brake System ABS
ABS prevents locking of the wheels during
braking. Safe steering response is maintained
even during full braking. Active safety is thus
increased.
The ABS is operational every time you start the
engine. Braking safely, refer to page 126.
Electronic brake-force distribution
EBV
The system controls the brake pressure in the
rear wheels to ensure stable braking behavior.
Dynamic Brake Control DBC
When you apply the brakes rapidly, this system
automatically produces the maximum braking
force boost and thus helps to achieve the short-
est possible braking distance during full brak-
ing. This system exploi ts all of the benefits
provided by ABS.
Do not reduce the pressu re on the brake for the
duration of the full braking application.
Dynamic Stability Control DSC
DSC prevents the driving wheels from losing
traction when you pull aw ay from rest or accel-
erate. The system also recognizes unstable
driving conditions, for example if the rear of the
car is about to swerve or if momentum is acting
at an angle past the front wheels. In these
cases, DSC helps the vehicle maintain a safe
course within physical limits by reducing engine
output and through brakin g actions at the indi-
vidual wheels.
The laws of physics cannot be repealed,
even with DSC. An appropriate driving
style always remains th e responsibility of the
driver. Therefore, do no t reduce the additional
s a f e t y m a r g i n a g a i n b y t a k i n g r i s k s , a s t h i s c o u l d
result in an accident. <
Deactivating DSC
Press the button for at least 3 seconds until the
indicator lamp for DSC OFF lights up and DSC
OFF is displayed in the instrument cluster.
Dynamic Traction Cont rol DTC and DSC have
been simultaneously de activated. Stabilizing
and drive-output promoting actions are no
longer executed.
00320051004F004C00510048000300280047004C0057004C005200510003
Page 91 of 284

90
ControlsTechnology for driving comfort and safety
In the same way as with a differential interlock,
even if DSC is deactivated, brake actions are
still performed on the rear axle to enhance drive
output if the drive whee ls experience a signifi-
cant loss of traction.
To increase vehicle stability, activate DSC again
as soon as possible.
Activating DSC
Press the button again; th e indicator lamp in the
instrument cluster goes out.
For better control
If the indicator lamp flashes: the DSC
controls the driving and braking forces.
If the indicator lamp lights up: DSC and
DTC have failed.
The indicator lamp lights up and
DSC OFF is displayed in the instrument
cluster: DSC is deactivated.
Dynamic Traction Control DTC
DTC is a version of DSC in which the drive out-
put is optimized for part icular road conditions,
e.g. unplowed snow-covered roads. The sys-
tem assures the maximal drive output, but with
reduced driving stability. It is therefore neces-
sary to drive with appropriate caution.
You may find it useful to briefly activate DTC
under the following sp ecial circumstances:
> When driving uphill on snow-covered roads,
in slush or on unplowed, snow-covered
roads
> When rocking a stuck vehicle free or start-
ing off in deep snow or on loose ground
> When driving with snow chains
Activating DTC
Press the button; the indicator lamp for DSC
OFF lights up and TRACTION is displayed in
the instrument cluster.
For better control
If the indicator lamp flashes: DTC con-
trols the driving and braking forces.
If the indicator lamp lights up: DSC and
DTC have failed.
The indicator lamp lights up and TRAC-
TION is displayed in the instrument
cluster: DTC is activated.
Deactivating DTC
Press the button again; th e indicator lamp in the
instrument cluster goes out.
Drive-off assistant
The drive-off assistant enables you to drive off
smoothly on uphill gradients. It is not necessary
to use the parking brake for this.
1. Hold the car in place by depressing the
brake.
2. Release the brake and drive off without
delay.
The drive-off assistant holds the car in
place for approx. 2 seconds after the
brake is released. Drive off without delay after
releasing the brake. Otherwise, the drive-off
assistant will no longer hold the car in place
after approx. 2 seconds and the car will start to
roll backwards. <
00320051004F004C00510048000300280047004C0057004C005200510003