2013 AUDI S4 SEDAN fuel cap release
[x] Cancel search: fuel cap releasePage 66 of 294
64 Seats and storage
loading the roof rack
Always distribute loads evenly . Make sure
anything on the roof rack is securely tied
down.
,. Always distribute the loads on the roof rack
evenly .
,. Always attach items to the roof rack secure-
ly befo re you dr ive off.
The maximum perm iss ible roof we ight is
2 00 lb (90 kg ). The roof weight is the total of
the we ight of the roof rack, the attachments
and the cargo you are car ry ing. You m ust also
not exceed the maximum load weight for the
roof rack you are using.
When us ing a roof rack system which has a
l owe r load carry ing capac ity, you must not use
up the total max imum pe rm issib le load carry
i ng capac ity specified
above . Instead, you
should load the roof rack system only to the
maximum capacity specified by the manufac
turer of the roof rack system.
A WARNING
Weak, damaged or improper straps used to secure items to the roof rack can fail
during hard braking or in a collision and
cause se rious personal injury .
- Make sure the roof rack is insta lled exact
ly as specified
above ¢ page 63.
- Always use suitable mounting straps for
sec uring items to the roof rack to help
prevent items from shift ing o r fly ing for
wa rd.
- Items on the roof rack must always be sec urely mounted.
- The use of a roof rack can negative ly af
fect the way a vehicle handles . Ca rgo
that is larg e, h eavy, bulky, long o r flat
will have a g reater negative influence on
the vehicle's aerodynamics, center of
gravity and overal l ha ndling. Always
dr ive slowly, avo id sudden braking and
mane uvers when transporting cargo o n
the roof of your vehicle.
- Never exceed the maxim um permissible
load carrying capacity of the roof of your
veh icle, the permissible axle weights and
the permissible total weight of your vehi cle ¢
page 268, Weights.
(D Note
Make sure that the opened rear lid does
not come in contact with the cargo on the
r oof.
@ For the sake of the environment
As a result of the increased wind resist
ance created by a roof rack, your vehicle is
us ing fuel unnecessarily. So
remove the
r oof rack after using it .
Luggage compartment
, General information
A WARNING
-Read and follow the important safety pre-
cautions on¢
page 132, Stowing lug
gage.
Enlarging the luggage compartment
Applies to vehicles: with folding rear seatback
The rear seat backrests can be folded forward
either separately or together .
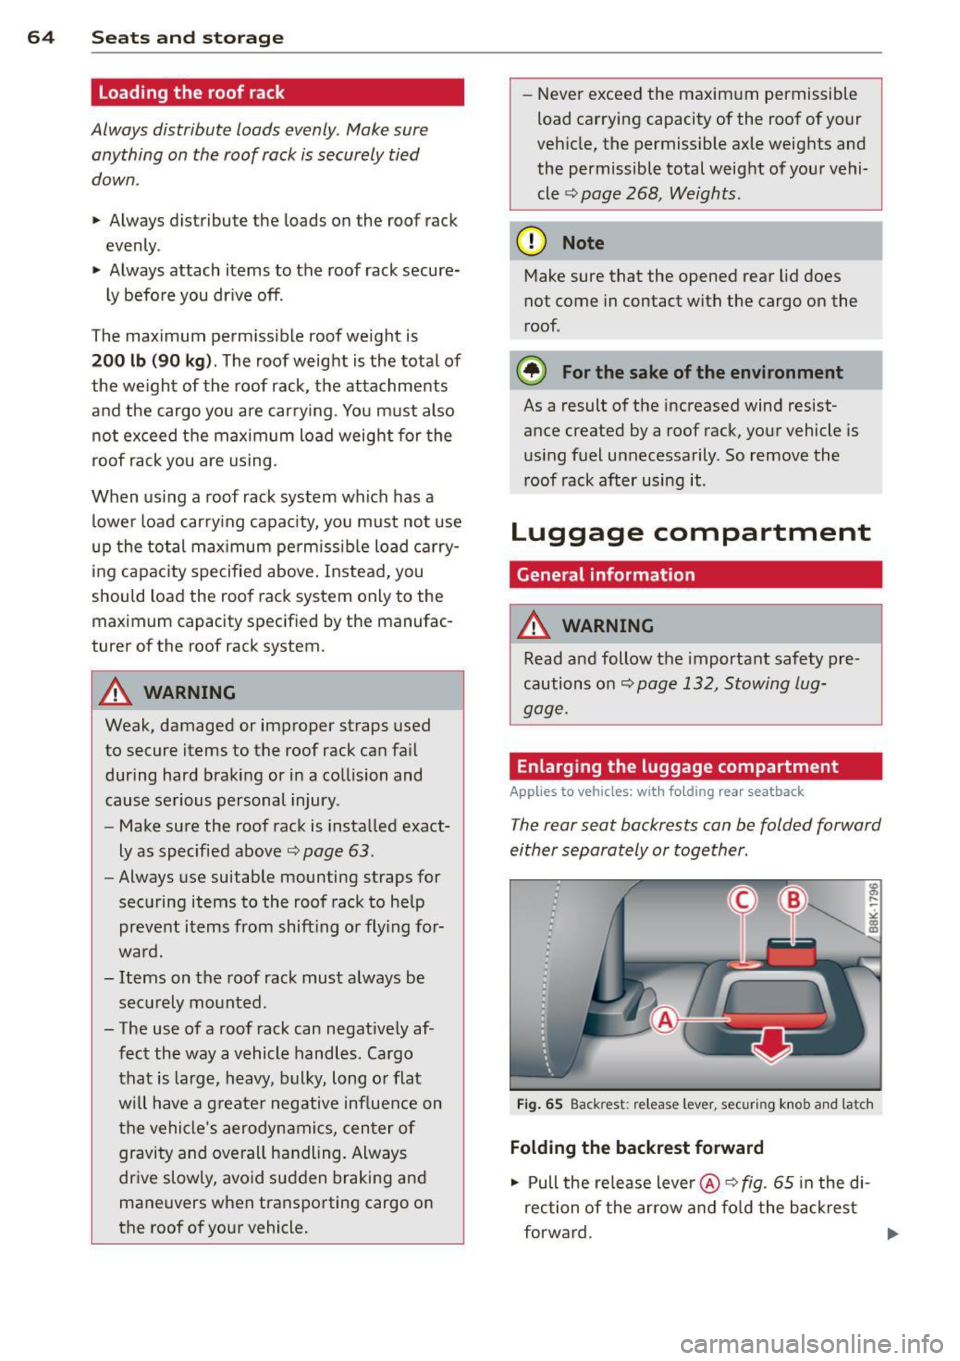
Fig . 65 Back rest : re lease lever , securing knob and latch
Folding the backr est forward
,. Pull the release lever @¢
fig. 65 in the di
rection of the arrow and fo ld the back rest
forward.
IJ,-
Page 215 of 294
Refuelling procedure
"' Inse rt the fue l nozzle from the gasoline
pump into the fue l filler neck as far as it will
go.
"' Se lect a m edium refuelling rate so that the
noz zle switches off automatically when the
tank is full.
Putting the fuel cap back on
"' After filling your tank, twist the fuel cap
clockwise as far as it will go.
"' Close the fuel filler flap.
To avoid fuel spi lling or evaporating from the
fuel tank always close fuel cap properly and
comp letely.
A WARNING
Improper refueling or handling of fuel can
cause fire, explosion and severe burns.
- Fuel is highly flammable and can cause
severe burns and other injuries.
- Failure to shut the engine off while refu
eling and/or to insert the pump nozzle
fully into the fuel f iller neck could cause
fuel to spray out of filler neck or to over
flow. Fuel spray and overflow ing fuel can
cause a fire.
- Never use a cellular telephone wh ile re
fueling. The electromagnetic radiation
can cause sparks that can ign ite fue l va
pors and cause a fire.
- Never get back into your vehicle while re
fueling. If in exceptiona l circumstances
you must get back in your vehicle wh ile
refue ling, make certain that you close
the door and touch me tal to discharge
static electricity before touching the fill
er nozzle again . Static electricity can
cause sparks that can ignite fuel vapors
released during refueling.
- Never smoke or have an open flame any
where in or near your vehicle when refu
eling or filling a portable fuel container.
- For your safety, we strongly recommend
that you do not travel with a portable
fuel container in your vehicle. The con-
Fuel supply and filling your fuel tank 213
tainer, full or empty may leak and could
cause a fire, especially in a crash.
- If, under exceptional circumstances, you
must transport a portable fuel container,
please observe the following:
- Never fill a portable fuel container
while it is anywhere in or on the vehicle
(for example, in the luggage compart
ment, or on the trunk) . Static electrici
ty can build up while filling and can ig
nite fuel vapors causing a fire.
-Always place a portab le fue l container
on the ground before fi lling .
- Always keep the filler nozzle complete
l y inside the portab le container befo re
and during filling.
- If filling a portable container made of
metal, the fi ller nozzle must always be
in contact with the container. This will
help prevent static electricity from dis
charging and cause a fire .
- Never spill fuel inside the vehicle or
luggage compartment . Fuel vapors are
highly flammable .
-Always observe loca l and state/provin
cial laws regarding the use, storage
and transportation of fuel containers .
- Make certain the fuel container meets
industry standards (ANSI/ ASTM
F852-86) .
(D Note
If any fuel has spi lled onto the car, it
should be removed immediately to prevent
damage to the paint.
@ For the sake of the environment
As soon as the correct ly operated nozzle
switches off automat ically for the first
time, the tank is full. Do not try to add
more fuel because fuel may spill out . In
addition , the expansion space in the fuel
tank w ill be filled -causing the fuel to
overflow when it becomes warm and pol
l ute the environment. •
•
Page 216 of 294
214 Fuel supply and filling your fuel tank
@ Tips
-Running your engine while refuelling
may cause vapors to escape or even
cause fue l to spill out of the tank. This
would then shut off the fuel nozzle be
fore the tank is full.
- Do not refuel your vehicle w ith the igni
tion turned on. The fuel gauge may oth
erwise not ind icate the correct fuel level
after refuell ing.
- The fuel filler flap of your vehicle is not
locked when you lock the vehicle from
the inside.
Unlocking the fuel filler flap by hand
You can open the fuel filler flap by hand if the
power locking system should fail .
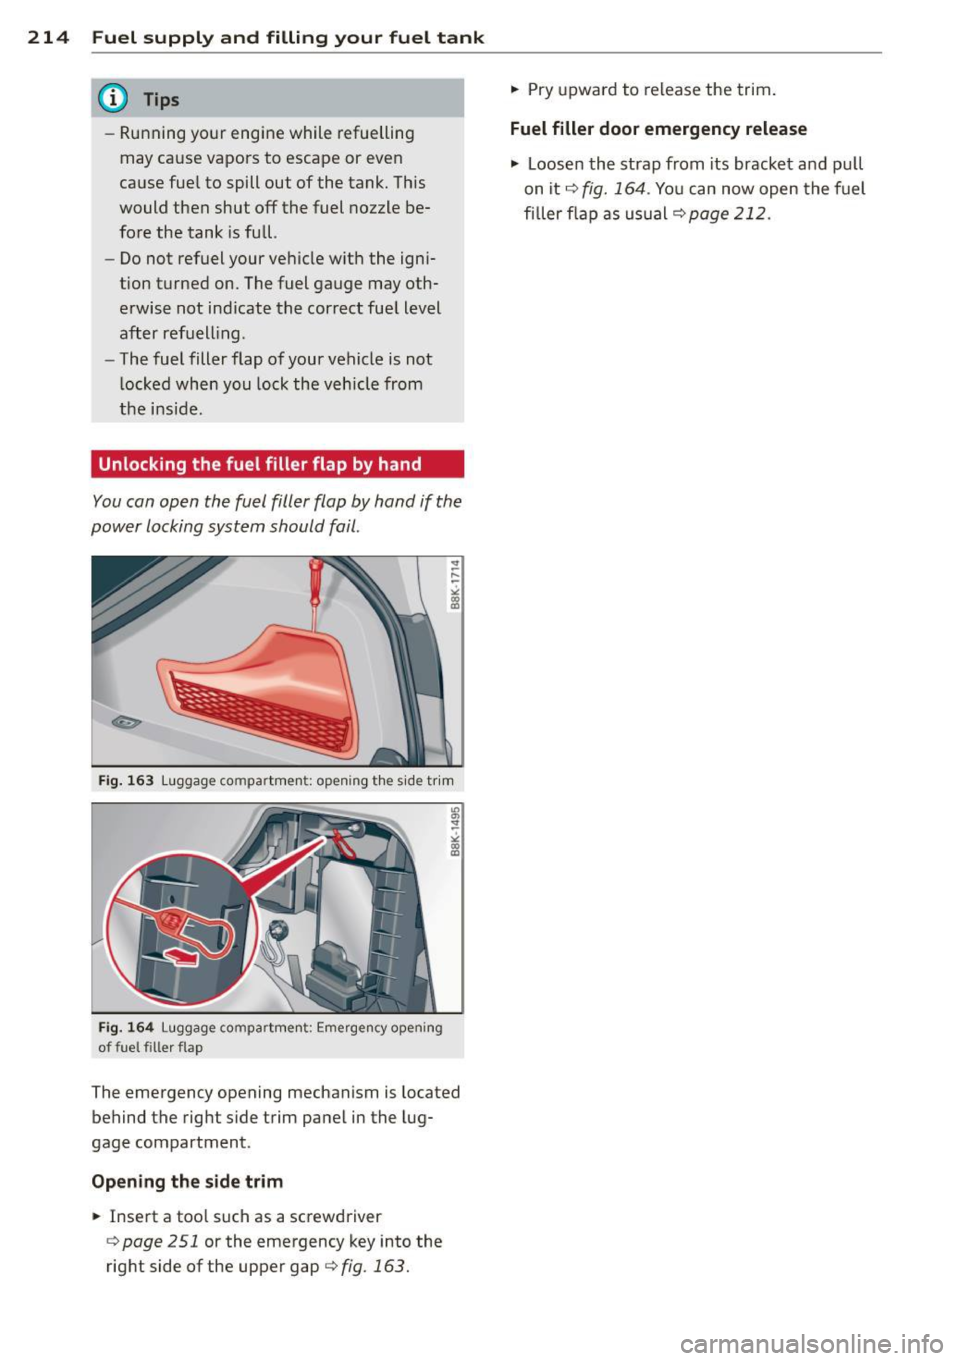
Fig. 163 Luggage compartme nt: opening the side tr im
Fig. 164 Luggage compartment: Emerge ncy open ing
of fuel filler flap
The emergency opening mechanism is located
behind the right side trim panel in the lug
gage compartment.
Opening the side trim
.,. Insert a too l such as a screwdriver
¢
page 251 or the emergency key into the
right side of the upper gap ¢
fig. 163.
.,. Pry upward to release the trim.
Fuel filler door emergency release
.,. Loosen the strap from its bracket and pull
on it ¢
fig. 164. You can now open the fuel
fi ller flap as usual¢
page 212.
Page 280 of 294
278 Index
Automatic Shift Lock (ASL) . . . . . . . . . . . . 86
Automatic transmission . . . . . . . . . . . 83, 89
Automatic Shift Lock (ASL) . . . . . . . . . . . 86
Driving .. .. .... .. ... .... .. .. .. .. .. 84
Dynamic shift program . . . . . . . . . . . . . . 87
Emergency mode . . . . . . . . . . . . . . . . . . . 88
Emergency release . . . . . . . . . . . . . . 89, 95
Kick-down . . . . . . . . . . . . . . . . . . . . . . . . . 87
Manual shift program . . . . . . . . . . . . . . . 88
multitronic . . . . . . . . . . . . . . . . . . . . . . . . 83
Removal lock (ignition key) ..... .. .. .. 72
Selector lever . . . . . . . . . . . . . . . . . . . . . . 85
S tron ic .. .. ................ ... ... . 89
tiptronic . . . . . . . . . . . . . . . . . . . . . . . . . . 83
also refer to S tron ic transmission ..... 89
Automatic wipers . . . . . . . . . . . . . . . . . . . . 50
Auto Safety Hotline ................. 134
Average speed . . . . . . . . . . . . . . . . . . . . . . . 25
Avoid damaging the vehicle .. .. .. .... . 192
B
Battery ..... ................ .. 17,225
Battery location inside the luggage com-
partment ........ ....... .. .. .... .
226
Charging . .. ... .. ..... ... .... .. .. . 228
Important warnings when working on
the battery .... ... .... ..... .. .. .. .
226
Jump starting . ........... .. .. .. .. . 262
Low . .. .. .. ............. .. .. .. .. . 190
Replacing the battery . .. .. .. .. .. .. . 229
State of charge ............ ... .... . 190
Winter operation .......... ... .... . 225
Working on the battery ..... .... ... . 226
Before driving .. ........... .... .... . 126
Bio-ethanol (Fuel) ............ .. .. .. . 211
Blended gasoline ................... 210
Blower (automatic climate control) . . . . . . 70
Body cavity sealing ........... .. .. .. . 204
Booster seats ...... ....... .. .. .... . 173
Brake fluid
Changing the brake flu id . ........ .. .
225
Check ing the brake fluid level . .. .. ... 224
Reservoir ... ............ .. .. .. .. . 224
What is the correct brake fluid level? . . 224
What should I do if the brake fluid warn-
ing light comes on? ........ ... .. ...
224
Brake system .... .. ............. .... 224
Anti- lock braking system ............. 19
Brake assist system ................ 184
Brake fluid .... .. ......... .... .... 224
Brake fluid specifications for refill and re-
placement ...... ................ .
225
Brake light defective . . . . . . . . . . . . . . . . 21
Brake power assist unit .......... ... 187
Brakes .. .. .. .. . ............ .... .. 187
Ceramic brakes . .. ... ... ... .... .. .. 187
Electromechanical parking brake ...... 77
Warning/indicator lights .......... .. . 15
Worn brake pads symbol . . . . . . . . . . . . . 20
Braking
Emergency braking funct ion ... .. .. .. .
79
braking guard . . . . . . . . . . . . . . . . . . . . . . . 97
Messages ..... .. .. ... ........... . 105
Settings .. ... ... .. .............. . 104
Break-in period . . . . . . . . . . . . . . . . . . . . . 192
Tires . .. .. .. .. .. ............. .. .. 192
Bulbs .......... .. ............. .... 261
C
Californ ia Proposition 65 Warn ing . .... 216
Battery specific .. ... .......... .. .. 227
Capac1t1es .. ... ... .. .............. . 270
Car care ........ .. ............. .... 199
Interior . .. .. .. .. ............. .. .. 205
Plastic and vinyl .. ... ...... .... .. .. 202
Care of exterior .... ................. 199
Cargo area
refer to Luggage compartment. . . 64, 132
Catalytic converter . . . . . . . . . . . . . . . . . . 193
Center armrest . . . . . . . . . . . . . . . . . . . . . . 56
Central lock ing .. .. .......... ...... .. 32
Central lock ing switch .... ...... .. .. . 36
Convenience key . . . . . . . . . . . . . . . . . . . . 36
Remote control key ............ .... . 35
Ceramic b rake ro tors
New brake pads .. ..... ........... .
18 7
Certification . ..... ................ . 275
Changing a flat t ire . ......... .... .... 252
Changing a wheel .. ......... .... .... 252
Changing engine oil
Chassis 221
Undercoating .. .. ... .. ... ..... .. .. 204
Page 284 of 294
282 Index
Front passenger's door emergency locking 3 7
Front seats Adjusting .... ............. .. .... . 128
Ch ild restra ints in the front seat ... ... 145
Fuel Addit ives . .. .......... ...... ... .. . 210
Blended gasoline .......... ... .. ... 210
Consumpt ion .......... .. .. .. .. .. .. 25
Fill er neck .... ........... .. .. .... . 212
Fu el gauge ............ .. .. .. .. .. .. 12
Gasoline ... ............ ... .. .... . 210
Gasoline additives ................ . 211
Low fuel level symbo l . . . . . . . . . . . . . . . 21
Octane rating ............ .. .. .. .. . 210
Recommendation ............. .... . 210
Refuelling .. .......... ...... ... .. . 212
Reserve .... .......... ...... ... .. .. 12
Tank capacity ............. ... .. ... 270
Tank system ........... .. .. .. .. .. .. 21
Un locki ng the f uel filler flap by hand .. 214
Fuel economy messages (eff iciency pro-
gram) ..... .. ................ ... .. .. 29
Fu el filler f lap
Unlocking the fuel filler f lap by hand .. 214
Fu ses
Assignment . . . . . . . . . . . . . 258, 259, 260
Replacing . . . . . . . . . . . . . . . . . . . . . . . . 258
G
Garage door opener (Homel ink) .. .. .. . 121
Garment hooks . . . . . . . . . . . . . . . . . . . . . . 62
Gas discharge lamps ....... ... .. .. .. . 261
Gauges Eng ine coolant temperature .. .. .. .... 10
Fu el gauge .... ........ .......... .. 12
Tachometer . . . . . . . . . . . . . . . . . . . . . . . 11
Gear recommendation ....... ... .. .. .. 28
Gearshift indicator ........... .. .... .. 27
Gearshift lever
6-speed manual transmission . . . . . . . . . 83
General illustration
I nstruments and controls . . . . . . . . . . . . . 8
Generator (warn ing/indicator lights) .... 17
Glossary of tire and load ing terminology 231
Glove compartment ............ .. .... 61
Valet park ing .. .... ...... .. .. .. .. .. 43 GPS
cont rolled clock . .. ...... .... ..... 12
Gross Vehicle Weight Rating (GVWR) ... 268
H
Headlights
Cleaning system . . . . . . . . . . . . . . . . . . . . 50
Defect ive . . . . . . . . . . . . . . . . . . . . . . . . . 21
Headlight range control ........ .... . 22
Left hand drive, right hand drive .. .. .. . 46
T ravel mode ... .. ............ ... .. . 46
Headlight washer reservoir ........ ... 229
Head restraints .... ... ....... ..... .. 130
Adjusting . . . . . . . . . . . . . . . . . . . . 57, 130
Removing/installing ........... .. .. . 57
Heated exterior mirrors . .... ...... ........ . 47
rear window . . . . . . . . . . . . . . . . . . . . . . . 70
seats . .... .... ................... . 70
windshield washer spray no zzles . . . . . . 50
Heating ... ..... .. .. ............ ... . 68
Heavy clothing and safety belts .. .. .. .. 139
High beam .. .... .. ............. .... . 45
High voltage warning label ..... .. .. .. 268
Hill descent control .. .... .... ... .. .. . 93
Homelink (remote control) ......... .. 121
Hood Open ing .. .... .. ............. .... 215
Release lever .. .. ............. .... 215
Horn .. ..... ... .. .. ... ........... ... 8
How are child restraint system anchors re-
l ated to chi ld safety . ............... . 179
How many a irbags does my vehicle have? 151
How often should I check my tire pres-
sures? ........ ... .. .............. . 237
How safety belt pretensioners work . . . . 142
Hydroplaning 241
I
Ignit ion
switching on/off . . . . . . . . . . . . . . . . . . . . 72
Ign ition key
Emergency unlock ing ........... .. .. . 35
Ignition lock .... .. .......... ........ 72
Indicator light ... ..... ...... ...... . 18
Malfunction ..... ... .......... .... . 23