2013 AUDI S4 SEDAN center console
[x] Cancel search: center consolePage 49 of 294
Interior lights
Front/rear interior lights
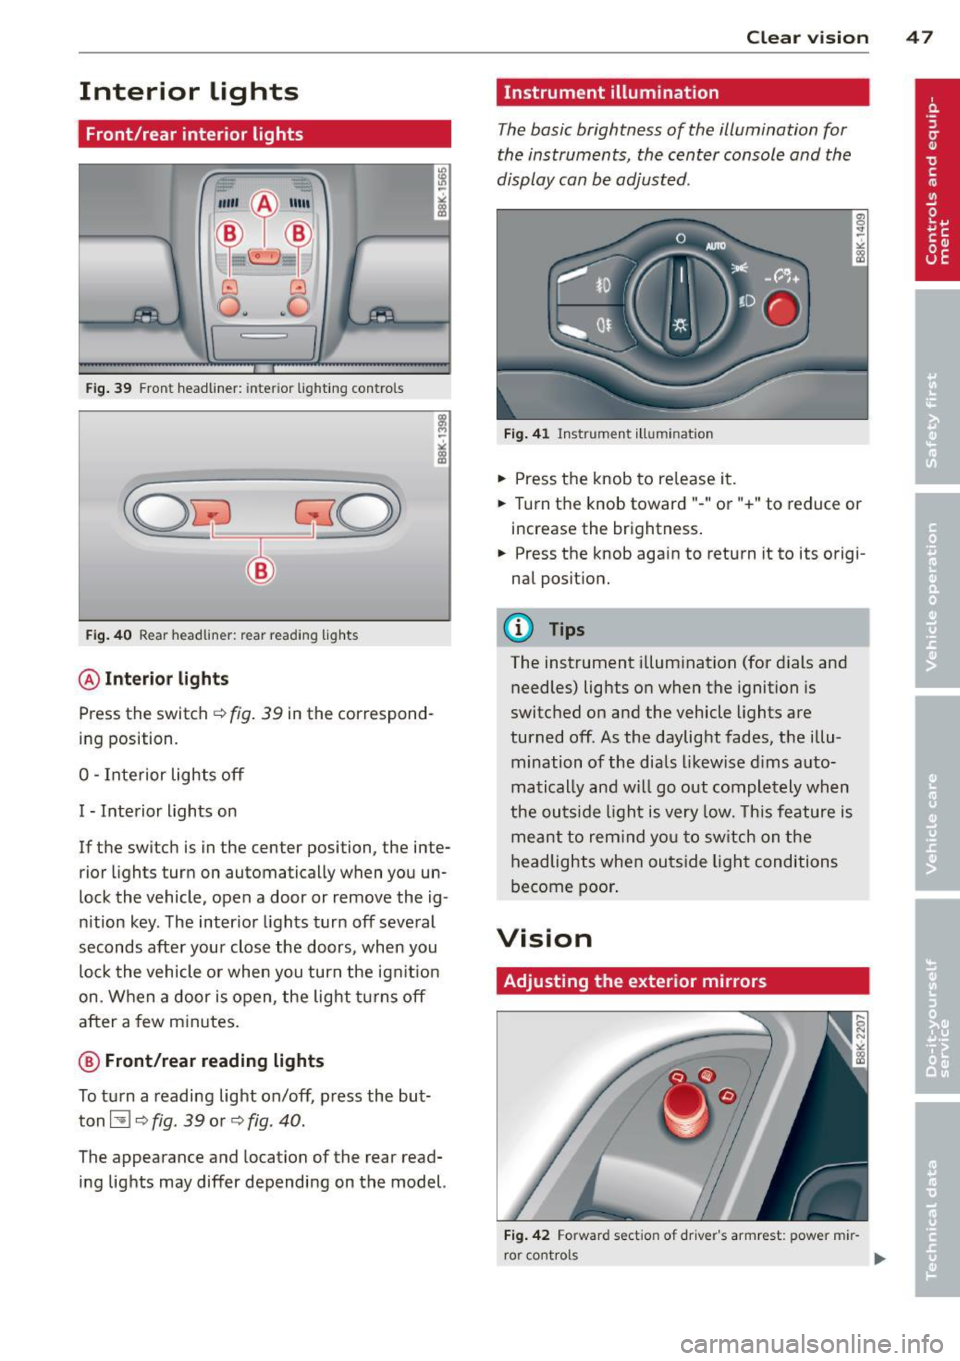
Fig. 39 Front headliner: inte rior ligh ting con trols
Fig . 40 Rear headlin er: rear rea ding lights
@ Interio r lig ht s
Press the sw itch c:::> fig. 39 in the correspond
ing position.
0 -Interior lights off
I -Interior lights on
If the switch is in the center position, the in te
rior lights turn on automatically when you un
lock the vehicle, open a door or remove the ig
n ition key . The inter ior lights turn
off several
seconds after your close the doors , when you
l ock the vehicle or when you turn the ig nition
on. When a door is open, the light turns
off
after a few minutes.
@ Front /re ar reading lights
To turn a reading light on/off , press the but
ton ~
c:::> fig. 39 or c:::> fig . 40 .
The appearance and location of the rear read
ing lights may differ depending on the model. Clear vi
sion 4 7
Instrument illumination
The basic brightness of the illumination for
the instruments, the center console and the
display can be adjusted.
F ig . 4 1 Ins trum ent ill u min atio n
.,. Press the knob to release it .
.. Turn the knob toward"-" or"+ " to reduce or
i ncrease the brightness .
.,. Press the knob aga in to return it to its origi
nal position.
(D Tips
The instrument illumination (for dials and
needles) lights on when the ignition is
switched on and the vehicle lights are
turned off . As the daylight fades, the illu
mination of the dials likewise d ims auto
matically and w ill go out completely when
the outs ide light is very low. This feature is
meant to rem ind you to sw itch on the
headlights when outs ide light conditions
become poor .
Vision
Adjusting the exterior mirrors
Fig. 42 Forwar d sect io n of dr iv er's armrest : pow er mir
r o r cont rols
Page 63 of 294
(upholder
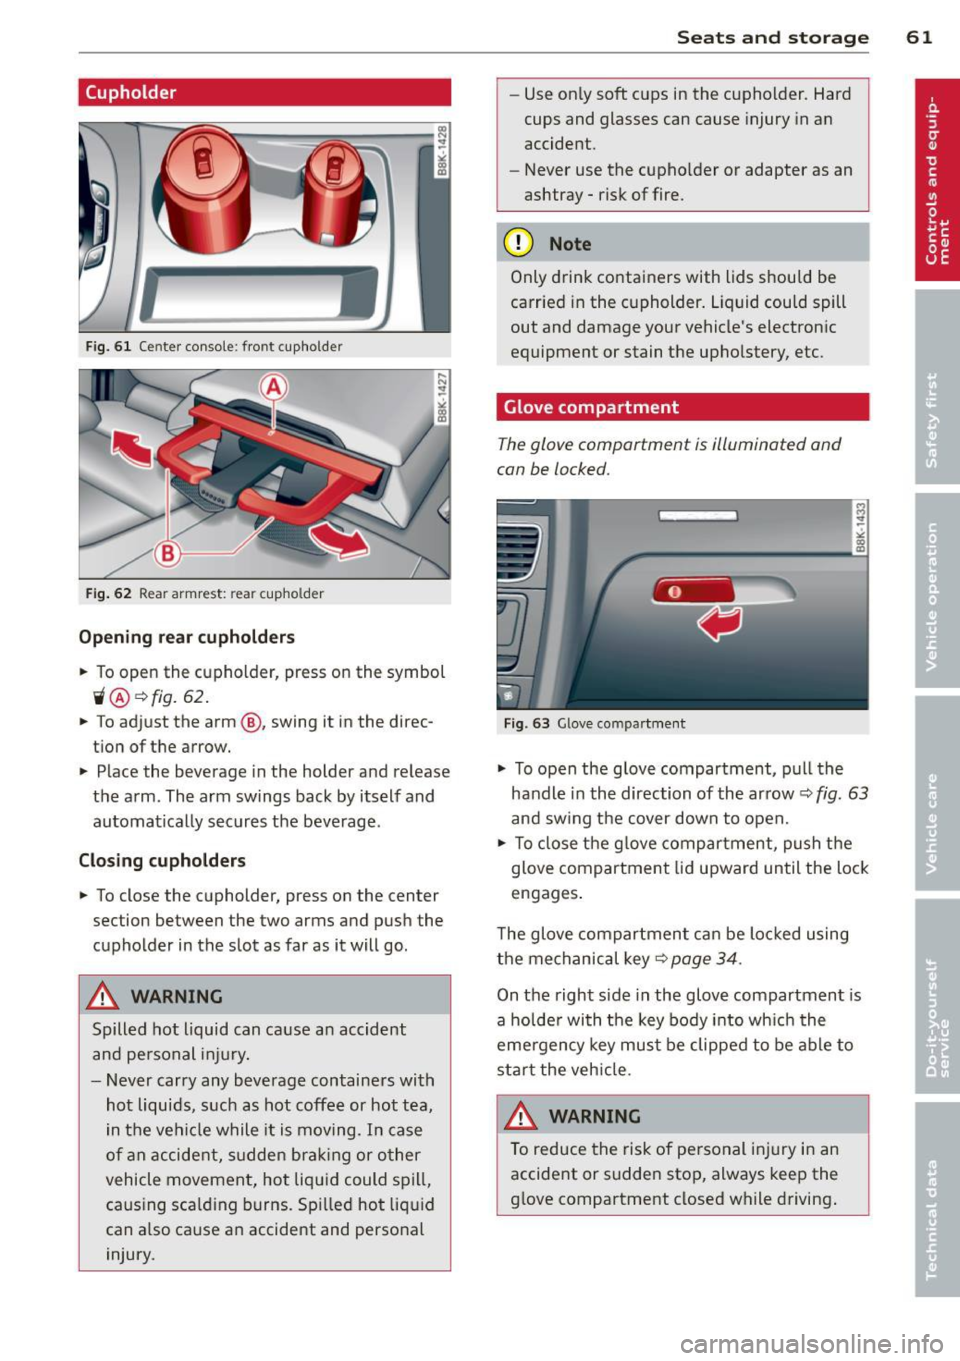
Fig. 61 Ce nter console: front cupholder
Fig. 62 Rear armrest: rea r cupho lder
Opening rear cupholders
~ To open the cupholder, press on the symbol
ii@ ~ fig. 62 .
~ To adjust the arm @, swing it in the direc
tion of the arrow.
~ Place the beverage in the holder and release
the arm. The arm swings back by itself and
automatically secures the beverage .
Closing cupholders
~ To close the cupholder, press on the center
section between the two arms and push the
cupholder in the slot as far as it will go.
A WARNING
Spilled hot liquid can cause an accident
and personal injury.
- Never carry any beverage containers with
hot liquids, such as hot coffee or hot tea,
in the vehicle while it is moving . In case
of an accident, sudden braking or o ther
vehicle movement, hot liqu id could spill,
caus ing scald ing burns . Spilled hot liquid
can also ca use an accident and personal
injury.
Seats and storage 61
-Use on ly soft cups in the cupholder. Hard
cups and glasses can cause injury in an
accident.
- Never use the cupho lder or adapter as an
ashtray -risk of fire.
(D Note
Only drink containers with lids should be
carried in the cupholder. Liquid could spill
out and damage your vehicle's electronic
equipment or stain the upholstery, etc.
Glove compartment
The glove compartment is illuminated and
can be locked.
Fig . 63 G love compar tment
~ To open the glove compartment, pull the
handle in the direction of the arrow~
fig. 63
and swing the cover down to open.
~ To close the glove compartment, push the
glove compartment lid upward until the lock
engages .
T he glove compartment can be locked using
the mechanical key~
page 34.
On the right side in the glove compartment is
a holder with the key body into which the
eme rgency key must be clipped to be able to
start the veh icle.
&_ WARNING
To reduce the risk of personal injury in an
accident or sudden stop, always keep the
glove compartment closed while driving .
-
Page 79 of 294
Shift to N or P to start engine
This message appea rs whe n attempti ng to
s ta rt the engine if the se le ctor lever for the
a u tomatic t ransmission is not in the P or N
p osition. The engine can on ly be sta rted w ith
the selector in these posit ions .
Is the key in the vehicle?
This m essage appears if the maste r key is re
moved from t he vehi cle w ith the eng ine run
ni ng.
If the mas ter key is no longe r in the ve
hicl e, yo u ca n not swi tch on the igni tion a fter
s t opping the eng ine a nd you also canno t st art
the eng ine again. Mo reover, yo u cannot lock
the vehicle from the outside with the key .
Shift to P otherwise vehicle can roll away.
Doors do not lo ck if lever is not in P.
This m essage appea rs for safety reaso ns
along w it h a wa rning signa l.
It appears if t he
s e lec to r l ever for the aut omat ic tra n sm iss io n
i s no t in the P po sition when switch ing off t he
ignit ion . Move the se lector lever to the P pos i
tion, othe rwise the veh icle is not sec ured
aga inst rolling away. You a lso cannot lock the
ve hicle using the locking button * on the door
h andle or using the remote key.
Convenience key defective! Use ignition lock
Thi s m essa ge appe ars if the eng ine mu st be
s ta rted or s to p ped using the ignition key and
no t th e
I S TART ENGINE STOP! button.
On the road 7 7
Electromechanical
parking brake
Operation
The ele ctromechani cal parking brake replaces
the hand br ake.
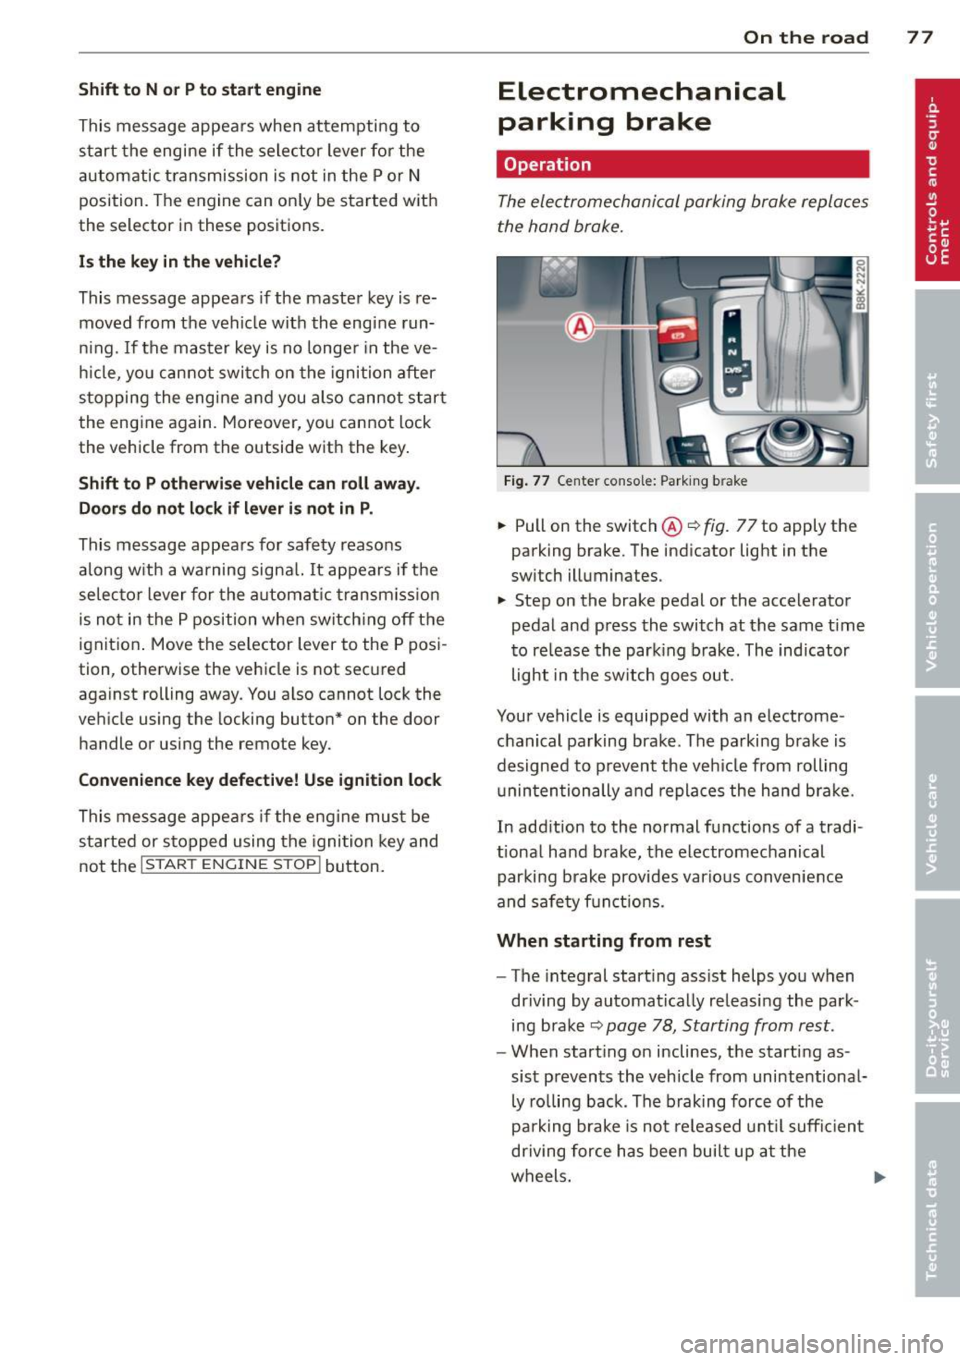
Fi g. 77 Center console: Park ing b rake
.,. Pull on the switc h@ ¢ fig. 77 to apply the
parking brake. The ind icator lig ht in the
sw itch illuminates.
.,. Step on the brake pedal or the accele rator
pedal and press the switch at the same t ime
t o re lease the par king brake. The indicator
light in the sw itch goes out.
Your vehicle is equipped with an e lectrome
c hanical p arking bra ke. The pa rking bra ke is
d esigned to p revent the ve hicle from rolling
u nin ten tionally and repla ces the hand b ra ke.
In add ition to the normal fu nctions of a tradi
t ional ha nd b rake, the electromechanical
par king b rake provides vario us conv enience
and sa fe ty f unct ion s.
When starting from rest
- The integral start ing ass ist helps you when
dr iving by automat ica lly releasi ng the par k
ing b ra ke ¢
pag e 78, Starting from rest .
-When start ing on inclines, the starting as
sis t preven ts the veh icle from unintentiona l
ly ro lling back . The braking force of the
pa rk ing brake is no t released u ntil su ffici ent
driving for ce h as been bui lt up at the
w heel s. ..,.
Page 90 of 294
88 Transmission
Manual shift program
Applies to vehicles: with multitronic or tiptron ic
Using the manual shift program you can
manually select gears .
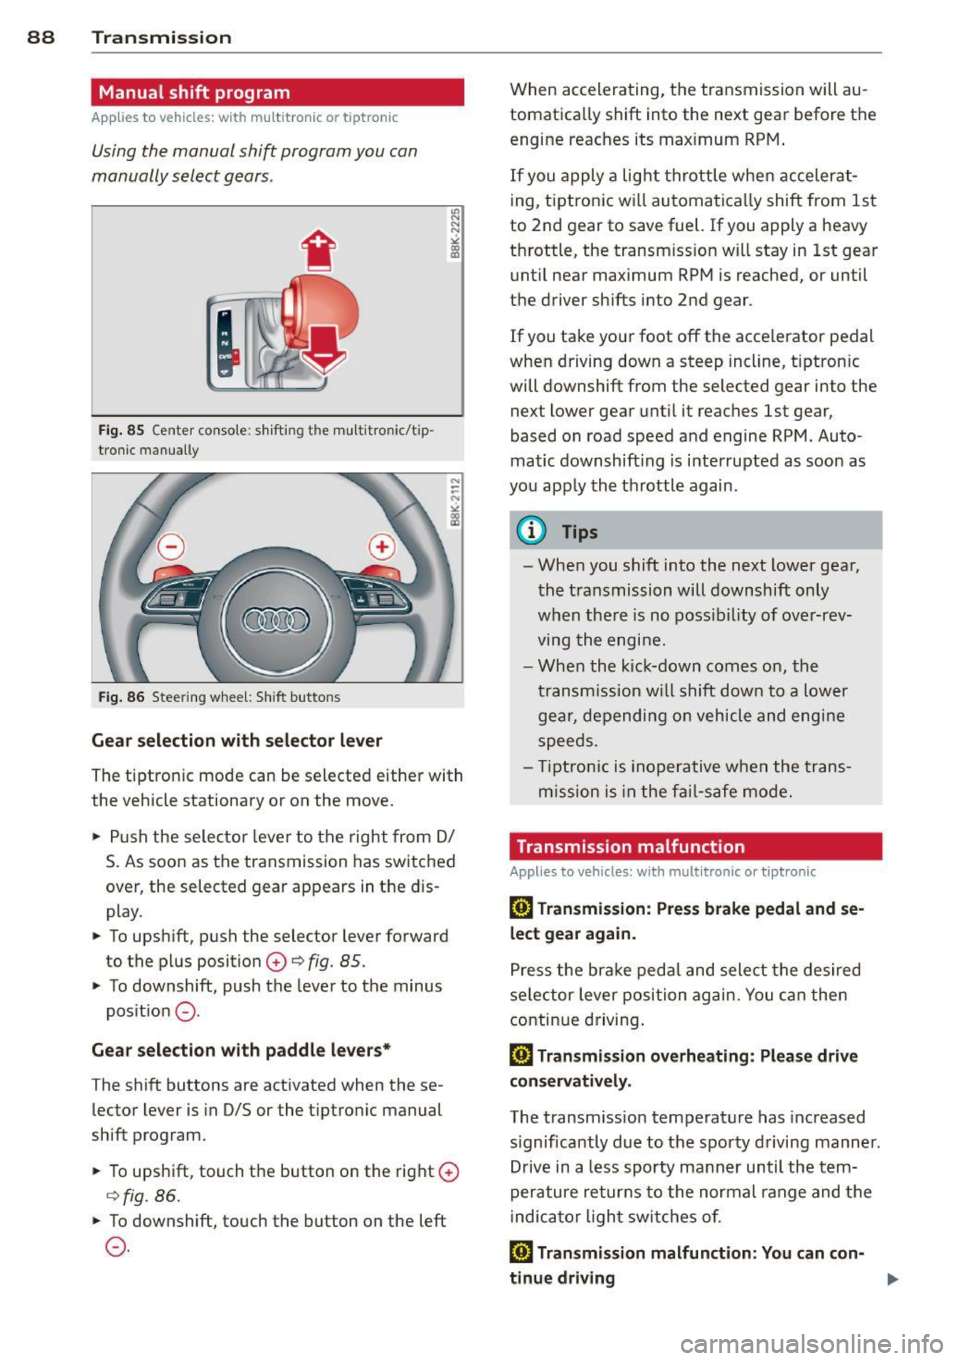
Fig. 85 Center console : shift ing t he multitro nic/t ip ·
tronic manual ly
Fig . 86 Steering wheel: Shift buttons
Gear selection with selector lever
"' N
N
~
" a> CD
The tiptronic mode can be selected either with
the vehicle stationary or on the move .
.,. Push the selector lever to the right from
DI
S. As soon as the transmission has switched
over , the selected gear appears in the dis
play.
.,. To upshift, push the selector lever forward
to the plus position
0 ¢ fig. 85 .
.,. To downshift, push the lever to the minus
position
0 -
Gear selection with paddle levers*
The shift buttons are activated when these
lector lever is in D/S or the tiptronic manual
shift program.
.,. To upshift, touch the button on the right
0
¢fig . 86.
.,. To downshift, touch the button on the left
0-
When accelerating, the transmission will au
tomatically shift into the next gear before the
engine reaches its maximum RPM .
If you apply a light throttle when accelerat
ing, tiptronic will automatically shift from 1st
to 2nd gear to save fuel. If you apply a heavy
throttle, the transm iss ion will stay in 1st gear
until near maximum RPM is reached, or until
the driver shifts into 2nd gear .
If you take your foot off the accelerator pedal
when driving down a steep incline, tiptronic
will downshift from the selected gear into the
next lower gear until it reaches 1st gear,
based on road speed and engine RPM . Auto ·
matic downshifting is interrupted as soon as
you apply the throttle again .
(D Tips
-When you shift into the next lower gear,
the transmission will downshift only
when there is no possibility of over-rev
ving the engine.
- When the kick-down comes on, the
transmission will shift down to a lower
gear, depending on vehicle and engine
speeds .
- Tiptronic is inoperative when the trans
m ission is in the fail-saf e mode.
Transmission malfunction
Applies to vehicles: with mult itronic or tiptronic
[O] Transmission: Press brake pedal and se
lect gear again .
Press the brake pedal and select the desired
selector lever position again. You can then
continue driving.
[O] Transmission overheating: Please drive
conservatively.
The transmission temperature has increased
s ignificantly due to the sporty driving manner.
Drive in a less sporty manner until the tern·
perature returns to the normal range and the
indicator light switches of.
[O] Transmission malfunction: You can con-
tinue driving ..,.
Page 93 of 294
-If you accidentally select N while driving,
take your foot off the accelerator pedal immediately and wait for the engine to
slow down to idle before selecting D/S.
- If there is a power failure, the selector
lever will not move out of the P position.
The emergency release can be used if
this happens¢page
95.
Selector lever lock
App lies to vehicles: with S tro nic transmiss ion
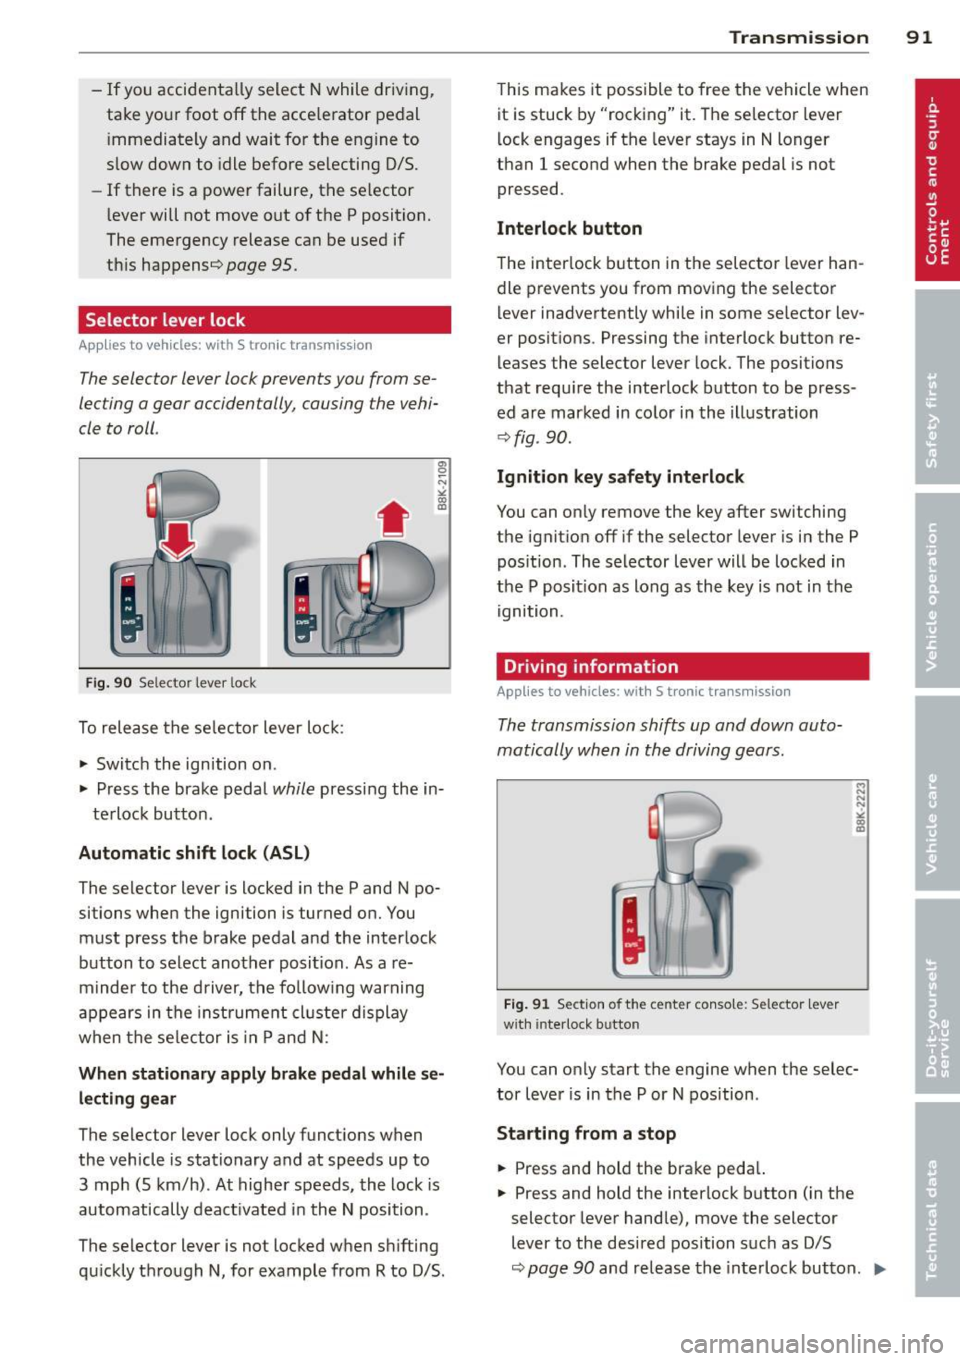
The selector lever lock prevents you from se
lecting a gear accidentally, causing the vehi
cle to roll .
I
Fig. 90 Selecto r leve r lock
To release the selector lever lock:
.,.. Switch the ignition on .
.,.. Press the brake pedal
while pressing the in-
terlock button .
Automatic shift lock (ASL)
The selector lever is locked in the P and N po
sitions when the ignition is turned on. You must press the brake pedal and the interlock
button to select another position . As a re
minder to the driver, the following warning
appears in the instrument cluster display
when the selector is in P and N :
When stationary apply brake pedal while se
lecting gear
The selector lever lock only functions when
the vehicle is stationary and at speeds up to 3 mph (5 km/h) . At higher speeds, the lock is
automatically deactivated in the N position .
The selector lever is not locked when shifting
qu ickly through N, for example from R to 0/5.
Transmission 91
This makes it possible to free the vehicle when
it is stuck by "rocking" it. The selector lever
lock engages if the lever stays in N longer
than 1 second when the brake pedal is not
pressed.
Interlock button
The interlock button in the selector lever han
dle prevents you from moving the selector
lever inadvertently while in some selector lev
er positions . Pressing the interlock button re
leases the selector lever lock. The positions
that require the interlock button to be press
ed are marked in color in the illustration
¢fig . 90.
Ignition key safety interlock
You can only remove the key after switching
the ignition off if the selector lever is in the P
position . The selector lever will be locked in
the P posit ion as long as the key is not in the
ignition.
Driving information
App lies to vehicl es: wi th S tronic tra nsmi ssio n
The transmission shifts up and down auto
matically when in the driving gears .
Fig. 91 Section of the center console: Selector lever
w ith in terlock button
.., N
N
N
"' .. ID
You can only start the engine when the selec
tor lever is in the P or N position .
Starting from a stop
.,.. Press and hold the brake pedal.
.,.. Press and hold the interlock button (in the
selector lever handle), move the selector
lever to the desired position such as D/S
~ page 90 and release the interlock button. IIJ,,
Page 95 of 294
press the brake pedal to prevent the ve
hicle from rolling .
- Allow ing the ve hicl e to roll when the en
gine is stopped and the selector lever is i n N will dama ge the S tronic transm is
s ion because it is not lubricated under
those c ircumstances.
@ Tips
For safety reasons, the park ing brake is re
leased automatically only when the dr iv-
er's safety belt is engaged in the buck le.
Hill descent control
Applies to vehicles: with S tro nic transmiss ion and hill de
scent co ntrol
T he hill descen t control sys tem assists the
driver when driving down declines .
Hill desce nt co ntrol is activated when these
l ec to r lever is in D/S and you press the bra ke
p edal. The S tro nic tr ansm ission au tom atically
shifts down into a gear sui table for the de
cline. Hi ll descent control tr ies to maintain
the speed achieved at the time of braking,
wit hin physical and techn ica l limitations . If
may still be necessary to adjust the speed
with the brakes.
H ill descent control switches off once the de
cline levels out or you press t he accelerator
pedal.
On ve hicles with the cruise co ntrol system *
c::> page 81, hill descent control is also act ivat
ed when the speed is set.
A WARNING
-
Hi ll descent control cannot overcome
physical l imitations, so it may not be able
t o m aintain a cons tant speed under all
c o nditions. Alway s be r eady to app ly th e
br ak es.
Transm ission 93
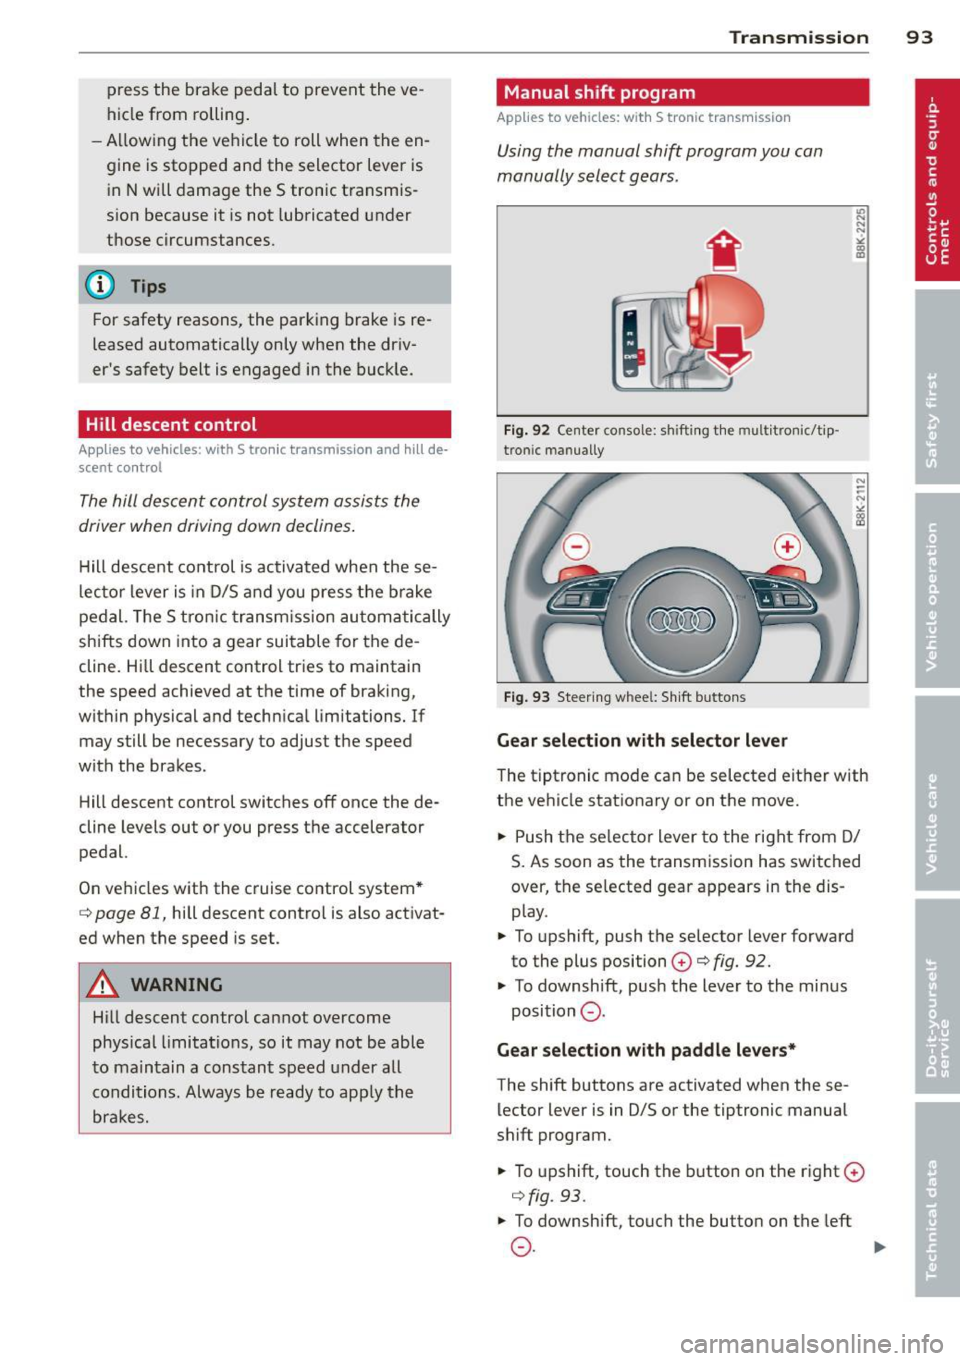
Manual shift program
Applies to vehicles: wit h S tronic transm ission
Using the manual shift program you can
manually select gears .
Fig. 92 Center console : sh ift in g t he m ult itron ic/t ip ·
tro nic m an u ally
Fig. 93 Steering w hee l: S hift b utto ns
Gear selection with selector lever
"' ... .... "!
"' co a,
The tipt ronic mode can be selected eit her with
the ve hicle stat ionary or on the move.
.,. Push the se lec tor lever to the rig ht from D/
S. As soon as the t ransmission has switched
over, the se lected gear ap pears in the dis
p lay .
.,. To upshift, push the se lector lever forward
to the plus position
0 c::> fig. 92.
.,. To downshift, pus h the lever to the mi nus
position
0 .
Gear selection with paddle levers*
The shift buttons are activated when these
lector lever is in D/S or the tiptronic manual
shift program .
.,. To upshift, touch the button o n the right ©
c::> fig. 93 .
.,. To downshift , touch the butto n on the left
0 . ~
Page 114 of 294
112 Audi drive select
-For vehicles with an automatic transmis
sio n*, se lecting the
Dynamic mode re
su lts in sporty shifting characteristics .
The S gear position engages automati
cally.
- In vehicles that have dynamic steering*,
operating noise is heard when starting or
stopping the eng ine . This does not ind i
cate a problem .
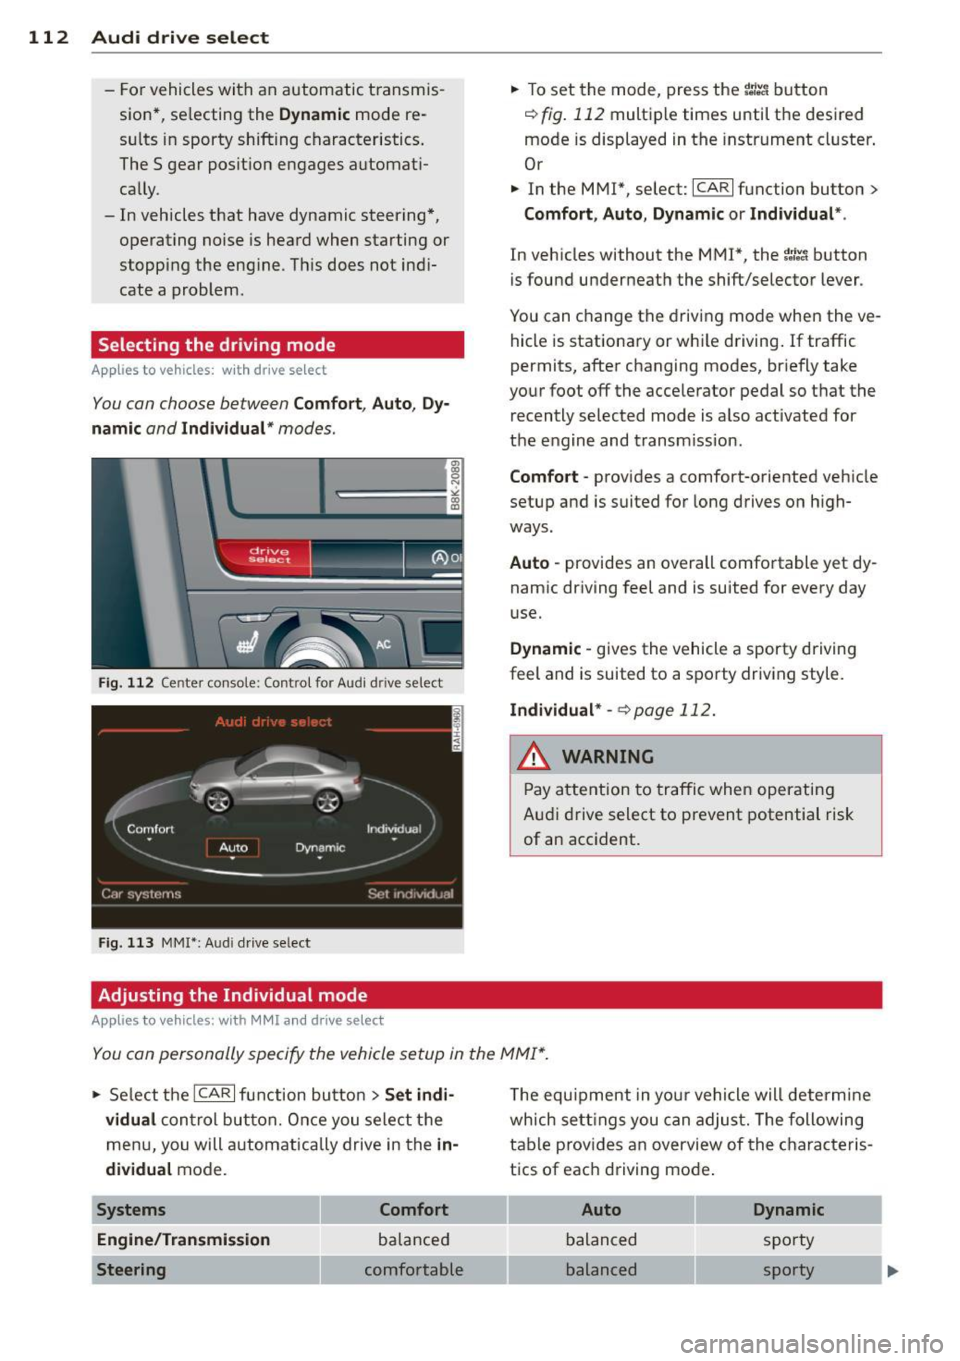
Selecting the driving mode
Applies to vehicles: w ith drive se lect
You can choose between Comfort, Auto, Dy
namic
and Individual * modes.
Fig. 112 Center console: Control for Au di dri ve select
Fig. 113 MMI•: Aud i drive select
Adjusting the Individual mode
Applies to vehicles: with MMI a nd drive se lect
.,. To set the mode, press the f:l:-.i button
~ fig. 112 multiple times until the desired
mode is displayed in the instrument cluster .
Or
.,. In the MMI*, select: ICARlfunction button>
Comfort, Auto, Dynamic or Individual *.
In vehicles without the MMI*, the~:/;,~ button
is found underneath the shift/selector lever.
You can change the driving mode when the ve
hicle is stationary or wh ile driving . If traffic
permits, after changing modes, br iefly take
your foot off the accelerator pedal so that the recently selected mode is also activated for
the engine and transm ission .
Comfort -provides a comfort-oriented vehicle
setup and is suited for long drives on h igh
ways .
Auto -provides an overall comfortable yet dy
namic driving feel and is suited for every day
use.
Dynamic -gives the vehicle a sporty driving
feel and is suited to a sporty driving style.
Individual * -¢page 112.
& WARNING
Pay atte ntion to traffic when operating
Audi drive select to prevent potential risk
of an accident.
You can personally specify the vehicle setup in the MMI* .
.,. Select the ICAR I f unc tion button > Set indi
vidual
control button. Once you select the
menu, you will automatically drive in the
in·
dividual
mode.
Systems Comfort
Engine/Transmission
balanced
Steering comfortable T
he equipment in your vehicle will determine
wh ich sett ings you can adjust. The following
table provides an overview of the characteris
tics of each driving mode .
Auto Dynamic
balanced sporty
balanced sporty
Page 161 of 294

dealer is familiar with these requi rements
and we recommend that you have your
dea ler perform this serv ice for you.
Other things that can affect Advanced
Airbag performance
Changing the vehicle's suspension system can
change the way that the Advanced A irbag Sys
tem performs in a crash. For example, us ing
tire-r im combinations not app roved by Aud i,
l owering the vehicle, changing the stiffness o f
the suspension, incl uding the sp rings, s uspen
sion struts, shock absorbers etc. can change
the forces that are measured by the airbag sensors and sent to the electronic control
un it. Some suspension changes can, for exam
ple, increase the force levels measured by the
sensors and make the airbag system deploy in
crashes in wh ic h it would not dep loy if the
changes had not been made. Other k inds of
changes may reduce the force levels meas
u red by the sensors and prevent the a irbag
from deploying when it shou ld .
The senso rs in the safety belt buckle fo r the
d river and front passenger sea t tell the elec
tronic control module if the safety belt is
l atched or not . If the safety belt is being used,
the front airbag will dep loy at a slightly high
er rate of vehicle deceleration than if the safe
ty belt is not being used. Therefore, in a par
ticular co llision, it is poss ible that an airbag
will not deploy at a seating position where the
safety belt is being use d but will inflate at the
position whe re the safety belt is not being
used. It is important tha t nothing i nterfe re
w it h the safety belt buckles so t hat the sen
sors can send t he correct information abo ut
safety belt use to the electronic contro l unit.
.&_ WARNING
Changing the vehicle 's s uspension includ
ing use of unapproved tire-rim c ombina
tions can change Advanced Airbag pe r
formance and increase the risk of ser ious
personal i njury in a crash.
- Never install suspens ion components
that do not have the same performance
A irba g sy stem 159
characteristics as the components o rigi
na lly installed on your vehicle.
- Never use tire-rim com binations that
have not been approved by Audi.
.&_ WARNING
= -
Items stored between the safety be lt
b uckle and the center console can cause
the sens ors in t he buckle to send the
wrong information to the e lectronic con
trol module and prevent the Advanced Air bag Syst em from wo rking properly.
- Always make s ure that nothing can in ter-
fe re with the safety b elt buckles and that
they are no t obstructed.
Side airbags
Description of side airbags
The airbag system can provide supplemental
protection to properly restrained occupants.
Fi g. 144 Side airbag location in t he drive r's seat
The side airbags are located in the sides of the
front seat backrests¢
fig. 144 and the rea r
backrest faci ng the doors. They are ident ified
by the word "AIRBAG".
The side airbag system basically consists of :
-the electronic control modu le and external
side impact sensors
- the two a irbags located in the sides of the
front backrests and the two a irbags* located
in the rear backrest
- the airbag warn ing light in the instrument
cl uster .
T he airbag system is mo nitored e lec tronically
t o make ce rtain tha t it is f unction ing p ro perly
Ill-