2013 AUDI S4 SEDAN child seat
[x] Cancel search: child seatPage 5 of 294
Safety belts . . . . . . . . . . . . . . . . . . . 136
General notes . . . . . . . . . . . . . . . . . . . . 136
Why safety be lts? . . . . . . . . . . . . . . . . 137
Safety belts . . . . . . . . . . . . . . . . . . . . . 139
Safety belt pretens ioners . . . . . . . . . . 142
Airbag system ................ .
Important things to know ......... .
Front airbags ................... .
Mon itor ing the Advanced Airbag
System ........................ .
Side airbags ............. .... .. . .
Side curta in a irbags .............. .
Child Safety ........ .... ... .. . .
Impor tant th ings to know ......... .
C hi ld safety sea ts ................ .
I nstall ing a chi ld safety seat . ... .. . .
L A T CH Lower anchorages and tether
for children ... .... .... ... .. .. .. . .
Addit ional Information
Vehi cle operat ion ..... .. .. .. . .
Intelligent technology .. .. .. . .
Not ice about data recorded by vehicle
control modules .......... .... .. . .
Electronic Stabilization Control (ESC) .
Braking .. ... ................ ... .
E lect ro-mechanical power assist ,
dynamic stee ring ................ .
Driving w ith your qu attro ® ... .. .. . . 144
144
148
155
1 59
162
165
165
17 1
175
179
183
184
184
184
184
187
188
189
E nergy management . . . . . . . . . . . . . . 190
Driving and environment . . . . . 192
The first 1,000 miles (1,500 km) and
afterwards . . . . . . . . . . . . . . . . . . . . . . 192
Avoid damaging the vehicle . . . . . . . . . 192
Driving through water on roads . . . . . 192
Catalytic converter . . . . . . . . . . . . . . . . 193
Operate your vehicle econom ically and
minim ize pollution . . . . . . . . . . . . . . . . 194
Trailer towing . . . . . . . . . . . . . . . . . 196
Driving w ith a trailer . . . . . . . . . . . . . . 196
Trailer towing tips . . . . . . . . . . . . . . . . 198
Table of contents 3
Vehicle care . . . . . . . . . . . . . . . . . . .
199
Cleaning and protection . . . . . . 199
Genera l information . . . . . . . . . . . . . . 199
Care of exterior . . . . . . . . . . . . . . . . . . 199
Care of interior . . . . . . . . . . . . . . . . . . . 205
Fuel supply and filling your
fuel tank ... .. .. .. . .............
210
Gasoline . . . . . . . . . . . . . . . . . . . . . . . . 210
Fuel tank .. .. .. .. .. . .. .... ...... . 212
Checking and filling . . . . . . . . . . . 21S
Engine hood . . . . . . . . . . . . . . . . . . . . . 215
Engine compartment . . . . . . . . . . . . . . 217
E ngine oil . . . . . . . . . . . . . . . . . . . . . . . 217
E ngine cooling system . . . . . . . . . . . . . 222
B ra ke fluid . . . . . . . . . . . . . . . . . . . . . . 224
Battery . . . . . . . . . . . . . . . . . . . . . . . . . 225
Windshie ld/headlight* washer
container . . . . . . . . . . . . . . . . . . . . . . . 229
Tires and wheels . . . . . . . . . . . . . . 230
Tires . . . . . . . . . . . . . . . . . . . . . . . . . . . 230
Tire pressure monitoring system 248
Do-it-yourself service . . . . . . . . . 251
What do I do now? . . . . . . . . . . . . 251
Vehicle tool kit . . . . . . . . . . . . . . . . . . . 251
Space-saving spare tire (compact
spare tir e) . . . . . . . . . . . . . . . . . . . . . . . 251
Changi ng a wheel . . . . . . . . . . . . . . . . . 252
Fuses and bulbs . . . . . . . . . . . . . . . 258
Fuses ... .. .. .. .. .. . .. .... ...... . 258
Bulbs . . . . . . . . . . . . . . . . . . . . . . . . . . . 261
Emergency situations . . . . . . . . . 262
General . . . . . . . . . . . . . . . . . . . . . . . . . 262
Starting by pushing or towing . . . . . . . 262
Star ting with jumpe r cables . . . . . . . . 262
U se of jumpe r cables . . . . . . . . . . . . . . 263
E mergency towing with commercia l
tow truck . . . . . . . . . . . . . . . . . . . . . . . 264
Lifting vehicle . . . . . . . . . . . . . . . . . . . . 266
•
•
Page 36 of 294
34 Openin g and clo sing
keys. Unguarded access to the keys pro
vides children the opportunity to start the engine and/or act ivate vehicle sys
tems such as the power w indows etc . Un
supervised operation of any veh icle sys
tem by ch ildren can res ult in serious in
Jury.
- Do not remove the key from the ignition
lock until the vehicle has come to a com
plete stop. Otherwise the steering col
um n loc k co uld suddenly e ngage -caus
ing the risk of an accident.
@ Tips
- The operation of the remote contro l key
c a n be tempo rarily disrupted by in terfer
ence from tran smi tters in t he v ici nity of
the veh icle work ing in the same frequen
cy ra nge (e.g . a ce ll phone, radio equip
ment).
- Fo r security reasons, replacement keys
are on ly available from Aud i dea le rs .
- Fo r De clarat ion o f Compliance to United
States FCC and Industry Canada regu la
tions
¢ page 275.
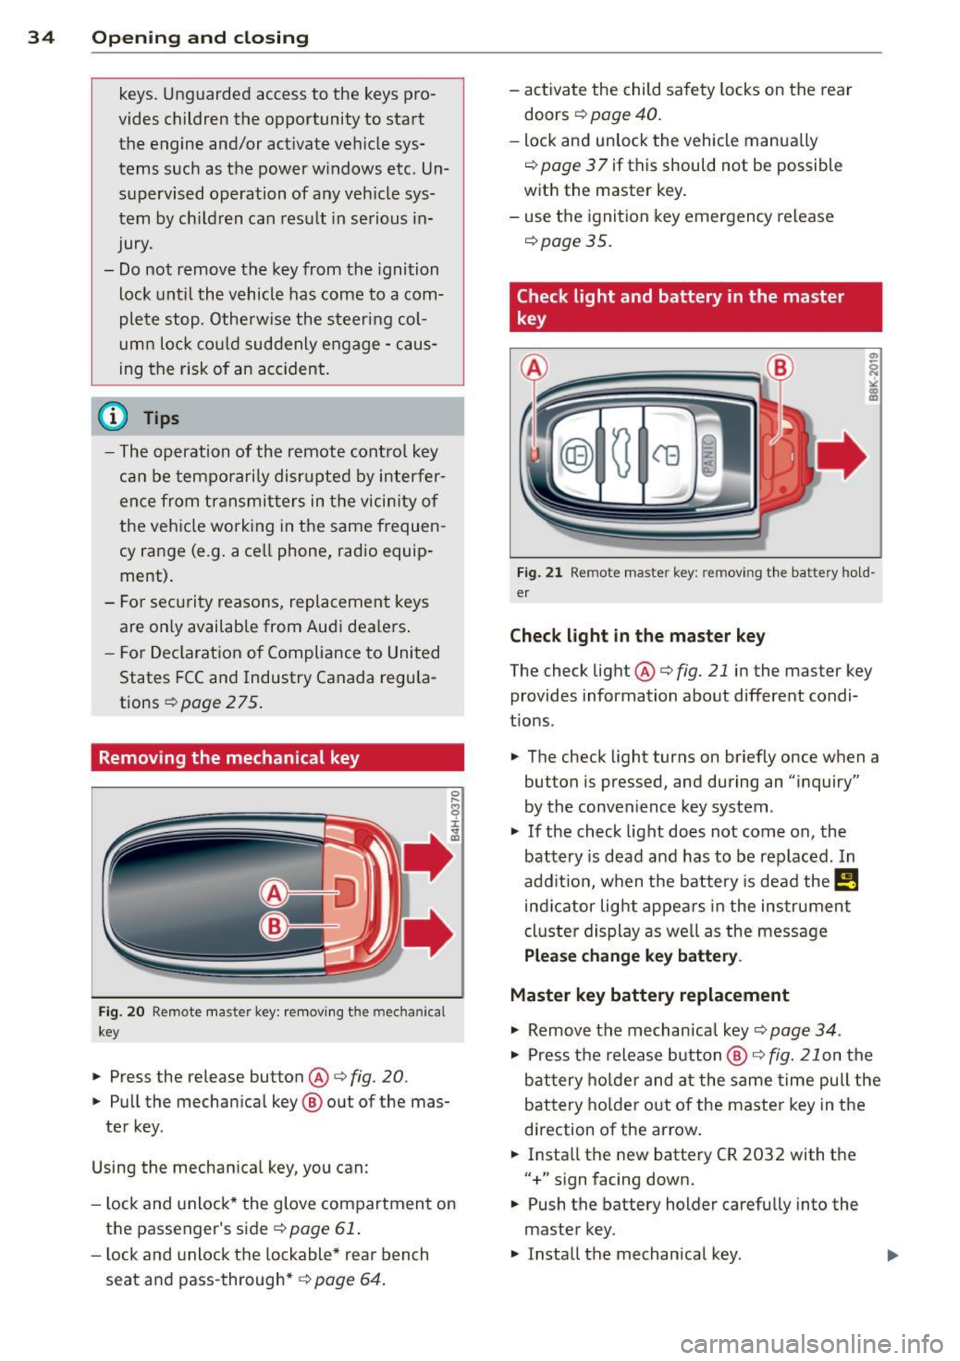
Removing the mechanical key
Fig . 20 Remot e ma ste r key: re mov ing the mec hanic al
key
.. Press the release button @¢ fig. 20.
.. Pu ll the mecha nical key @ out of the mas
te r key .
Using the mechan ica l key, you can :
- l ock and unlock* the glove compartmen t on
the passenger's side ¢
page 61 .
-lock and unlock t he lockable* rear bench
seat and pass-through* ¢
page 64. -
activate the child sa fety locks on the rear
doors ¢
page 40.
- lock and unlock the vehicle manua lly
~ page 3 7 if this should not be possible
w ith the master key.
- use t he ignition key emergency release
~ page 35.
Check light and battery in the master
key
Fig. 21 Rem ote mas ter key: re m ov ing th e ba ttery h old
e r
Check light in the ma ster key
The check light@¢ fig. 21 in the mas ter key
provides information about different condi
t ions .
.. The check light turns on br iefly once when a
button is pressed, and during an "inquiry"
by the convenience key system .
.,. If the check light does not come on, the
battery is dead and has to be replaced . In
add it io n, w hen t he battery is dead
the m
indicator light appea rs in the instrument
cl uster display as we ll as the message
Please change key battery .
Master key battery replacement
.,. Remove the m echan ical key ~ page 34.
.,. Press t he release button @~
fig. 21 on the
b attery ho lde r and at the same time pull the
battery holder o ut o f the master key in the
direction of the arrow .
.. Insta ll the new battery CR 2032 with the
"+ " sign facing down.
.. Push the battery holder carefully into the
master key .
.. Insta ll the mechanical key .
Page 41 of 294

Rear lid
Opening/closing rear lid
Fig. 27 Drive r"s door: re m ote rear lid rele ase
Fig. 28 Rear lid: handle
Opening the rear lid
.,. Press the button .c::5 on the remote control
master key for at least one second. The rear
lid unlocks and opens slightly . Or
.,. Pull the release button
.c::5 in the driver's
door
q fig. 2 7. Or
.,. Press the handle on the rear lid
¢fig . 28.
Closing the rear lid
.,. Pull the rear lid down at the grip on the in
side and allow it to drop gently to close it
¢ ,&. .
A WARNING
-After closing the rear lid, always pull up
on it to make sure that it is properly
closed. Otherwise it could open sudden ly
when the veh icle is moving .
- To help prevent poisonous exhaust gas
from being drawn into the vehicle, al
ways keep the rear lid closed while driv
ing. Never transport objects larger than
those which fit comp letely into the lug-
Opening and closing 39
gage area, because then the rear lid can
not be fully closed.
- Never leave your vehicle unattended es
pecia lly with the rear lid left open. A
child could craw l into the car through the
luggage compartment and pull the lid
shut, becoming trapped and unable to
get out. To reduce the risk of personal in
jury, never let childre n play in or around
your vehicle. Always keep the rear lid as
well as the vehicle doors closed when not
in use.
- Always ensure that no one is within
range of the rear lid when it is moving, in
particular close to the hinges -fingers or
hands can be pinched .
@ Tips
When the vehicle is locked, the rear lid can
be opened separately by pressing the but
ton
.c::5 on the master key . When you close
the rear lid aga in, it locks automat ica lly.
Rear lid emergency release
Applies to vehicles: wi th fixed rear seat back rest
Fig. 29 Rear be nch s eat: eme rgen cy re lease cab le
On vehicles with fixed seat backrest*, the rear
lid can be opened from the rear bench seat us
ing the emergency re lease .
.,. Carefully pull the left side of the rear bench
seat out of its retainer until you can reach
the release cable¢
fig. 29.
.,. Remove the adhesive tape @.
.,. Pull on the loop ® until the rear lid releas
es .
... Tape the release cable back in place and
press the bench seat back into its retainer .
liJ,
Page 42 of 294
40 Opening and closing
_&. WARNING
After opening the rear lid using the emer
gency release in vehicles with a fixed rear
seat backrest, make sure the bracket under
the rear bench seat
9 fig. 29 locks securely
into the mounting eye let again.
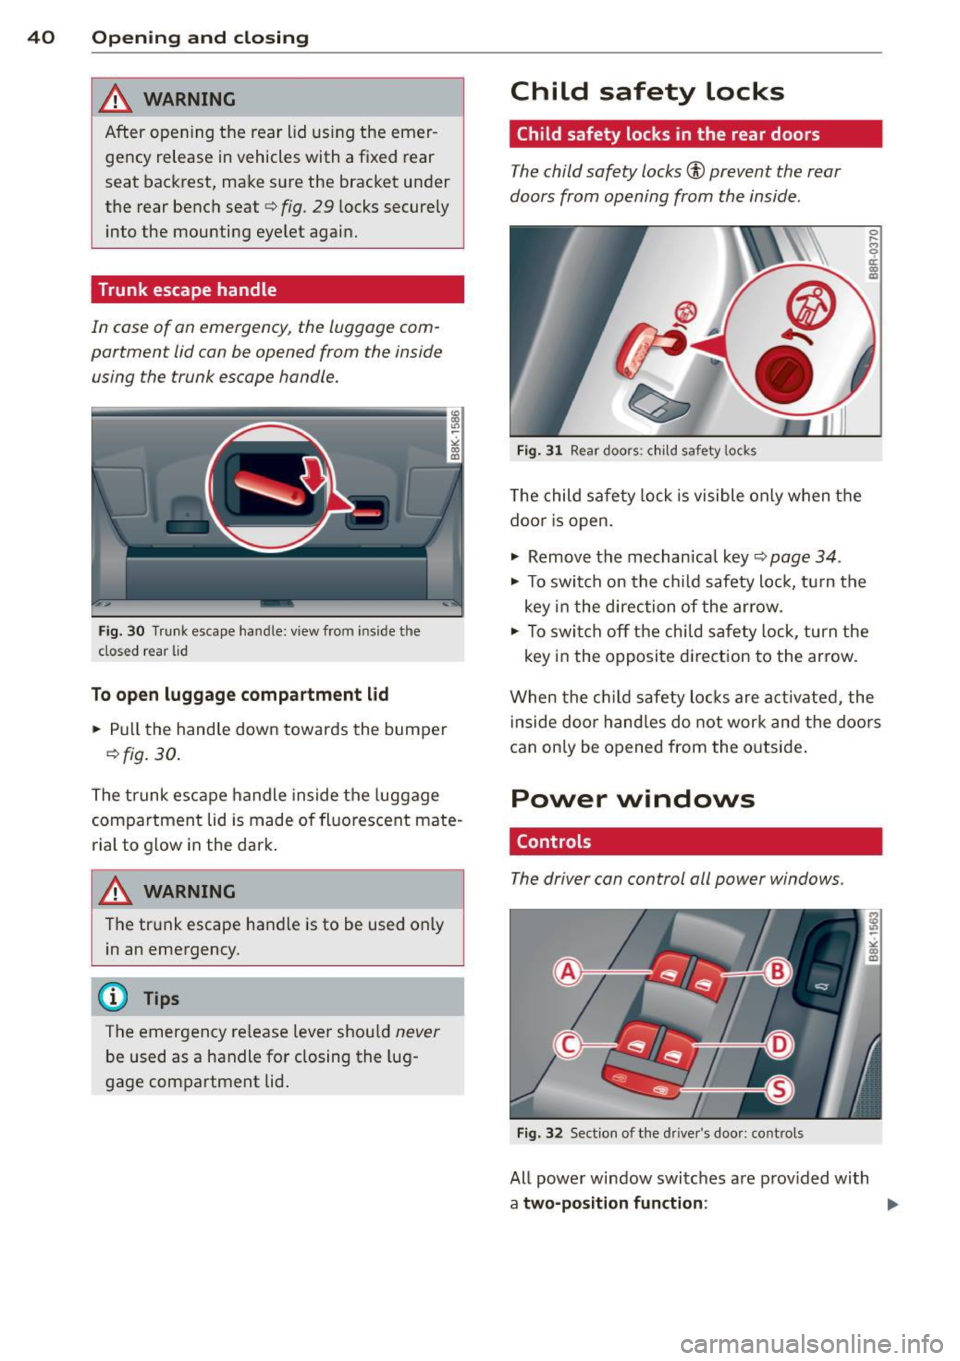
Trunk escape handle
In case of an emergency, the luggage com
partment lid can be opened from the inside using the trunk escape handle.
Fig. 30 Tru nk escape handle: view from inside the
closed rear lid
To open luggage compartment lid
.. Pull the handle down towards the bumper
r=;, fig. 30.
The trunk escape handle inside the luggage
compartment lid is made of fluorescent mate
rial to g low in the dark .
,&. WARNING
The trunk escape handle is to be used only
in an emergency .
@ Tips
The emergency re lease leve r shou ld never
be used as a handle for closing the lug
gage compartment lid.
Child safety locks
Child safety locks in the rear doors
The child safety locks® prevent the rear
doors from opening from the inside.
Fig. 31 Rear doors: chil d safety locks
T he child safety lock is visible only when the
door is open .
.. Remove the mechan ica l key
c:> page 34 .
.,. To switch on the child safety loc k, turn the
key in the direction of the arrow .
0
s ti:
"' "'
.. To switch off the child safety lock, turn the
key in the opposite direction to the arrow.
When the child safety locks are activated, the
inside doo r hand les do not work and the doors
can only be opened from the outside .
Power windows
Controls
The driver can control all power windows.
Fig. 32 Section of the driver's door: con tro ls
All power window switches a re provided with
a two-position function :
Page 56 of 294

54 Seat s a nd s tor ag e
Seats and storage
General recommen
dations
Why is your seat adjustment so
important?
The safety belts and the airbag system can
only provide maximum protection if the front
seats are correctly adjusted.
There are various ways of adjust ing the front
seats to provide safe and comfortable support
for the driver and the front passenger . Adjust
your seat properly so that :
- you can easily and quick ly reach all the
switches and controls in the instrument
panel
-your body is prope rly supported thus reduc
ing physical stress and fatigue
- the safety be lts and airbag system can offer
maximum protection ¢
page 144.
In the following sec tions, you will see exactly
how you can best adjust you r seats .
There are special regulations and instructions
for insta lling a child safety seat on the front
passenger's seat. Always follow the informa
tion rega rd ing child safety provided in
G page 165, Child Safety.
WARNING
Refer to G page 126, Driving Safely for
important information, tips, suggestions
and warnings that you should read and fol
low for your own safety and the safety of
your passengers.
A WARNING
, -
Incorrect seating position of the dr iver and
all other passengers can result in serious
personal inj ury .
- Always keep your feet on the f loor when
the vehicle is in motion -never put your
feet on top of the instrument panel, out of the w indow or on top of the seat cush
ion. This app lies especially to the passen- gers
. If your seating position is incorrect,
you increase the risk of injury in the case of sudden braking or an accident. If the
airbag inflates and the seating position is incorrect, this could result in pe rsonal
in ju ry or even death.
- It is important for both the driver and front passenge r to keep a distance of at
least 10 inches (25 cm) between them
selves and the steering wheel and/or in
strumen t panel.
If you're s itting any
closer than th is, the a irbag system can
not protect you properly. In addition, the
front seats and head restraints m ust be
adj usted to your body height so that they
can give you max imum protect ion.
- Always try to keep as much distance as
possible between yourself and the steer
ing wheel or instrument panel.
- Do not adjust the driver's or front pas
senger's seat while the vehicle is moving.
Your seat may move unexpectedly , caus
ing sudden loss of veh icle control and
personal injury. If you adjust you r seat
while the veh icle is moving, yo u are out
of pos it ion.
Driver's seat
The correct seat position is important for safe
and relaxed driving .
We recommend that you adjust the dr iver's
seat in the follow ing manner:
.. Adjust the seat in fore and aft direction so
that you can easily push the pedals to the
floor wh ile keeping your knees slightly bent
G &. in Why is your seat adjustment so im
portant? on page 54 .
.,. Adjust the seatback so that when you sit
w ith your back against t he seatback, you can
s till grasp the top of the steering whee l.
.. Applies to veh icles with adjustable head re
straints: Adjust the head restraint so the up
per edge is as even as possible with the top
of yo ur head. If that is not possib le, try to
adjust the head restraint so that it is as .,.
Page 61 of 294
Switching the memory function on/off
• Press the !O FF ! button to sw itch the memo
ry function on/off. The word
OFF lights up
when the memory function is switched off .
S eat profi le s are not stor ed .
Storing a seat profile
" Press the !SE T! button. When the word SET
lights up, the memory is ready to store set
tings.
" Press a memory button
([II or rn ) briefly. A
tone confirms that the s ett ing s wer e stored.
Accessing a seat profile
" If the driver's door is open, press a memory
button.
" If the driver 's door is closed, press and ho ld
the memory button until the seat adjust
ment is complete .
.&_ WARNING
- For safety reasons, the seat sett ing can
only be recalled when the veh icle is sta
tionary- otherwise you risk having an ac
c ident .
- In an emergency the recall procedure can
be cancelled by press ing the
!OF F! switch
or by tapping the memory buttons .
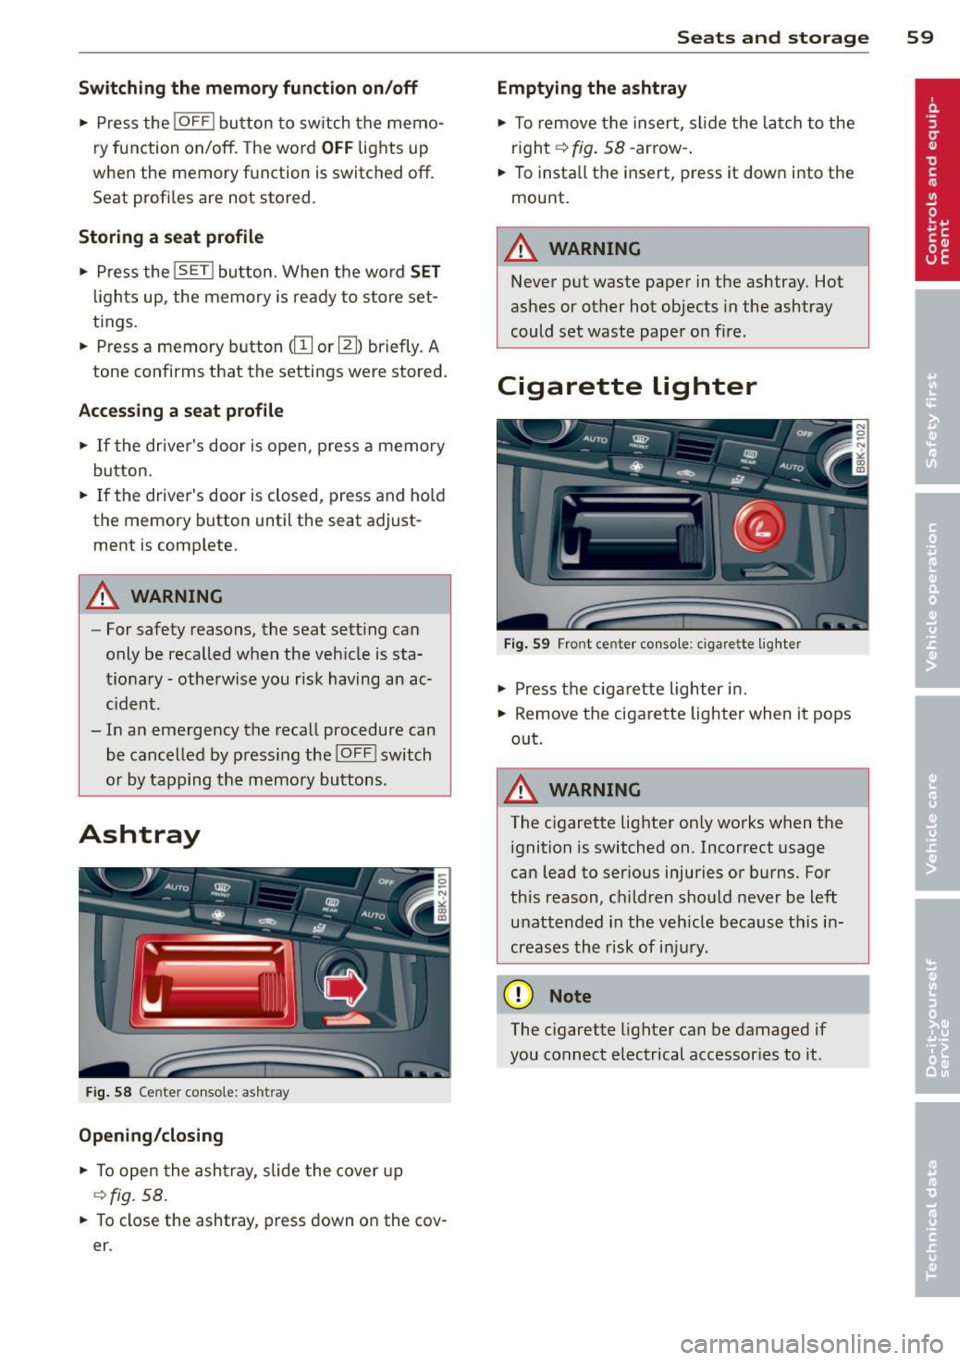
Ashtray
Fig. 58 Cente r conso le: ash tray
Opening /closing
• To open the ashtray , slide the cover up
¢ fig. 58 .
.. To close the ashtray, press down on the cov
e r.
Seats and storage 59
Emptying the ashtray
" To remove the insert, slide the latch to the
r ight ¢
fig. 58 -arrow- .
.. To insta ll the insert, press it down into the
mount.
.&_ WARNING
--Never put waste paper in the ashtray. Hot
ashes or other hot objects in the ashtray
could set waste paper on fire .
Cigarette lighter
Fig. 59 Fro nt ce nter con sole : cigare tte lighter
" Press the cigarette lighter in.
" Remove the cigarette lighter when it pops
out .
A WARNING
The cigarette lighter on ly works when the
ignition is switched on .1ncorrect usage
can lead to ser ious injuries or burns. For
this reason, children should never be left
unattended in the vehicle because this in
creases the risk of injury .
(D Note
The cigarette lighter can be damaged if
you connect electrical accessories to it .
Page 62 of 294
60 Seats and st o rage
12-volt socket
Appl ies to vehicles: wit h 12-volt socket
Electrical accessories can be connected to the
12-volt socket.
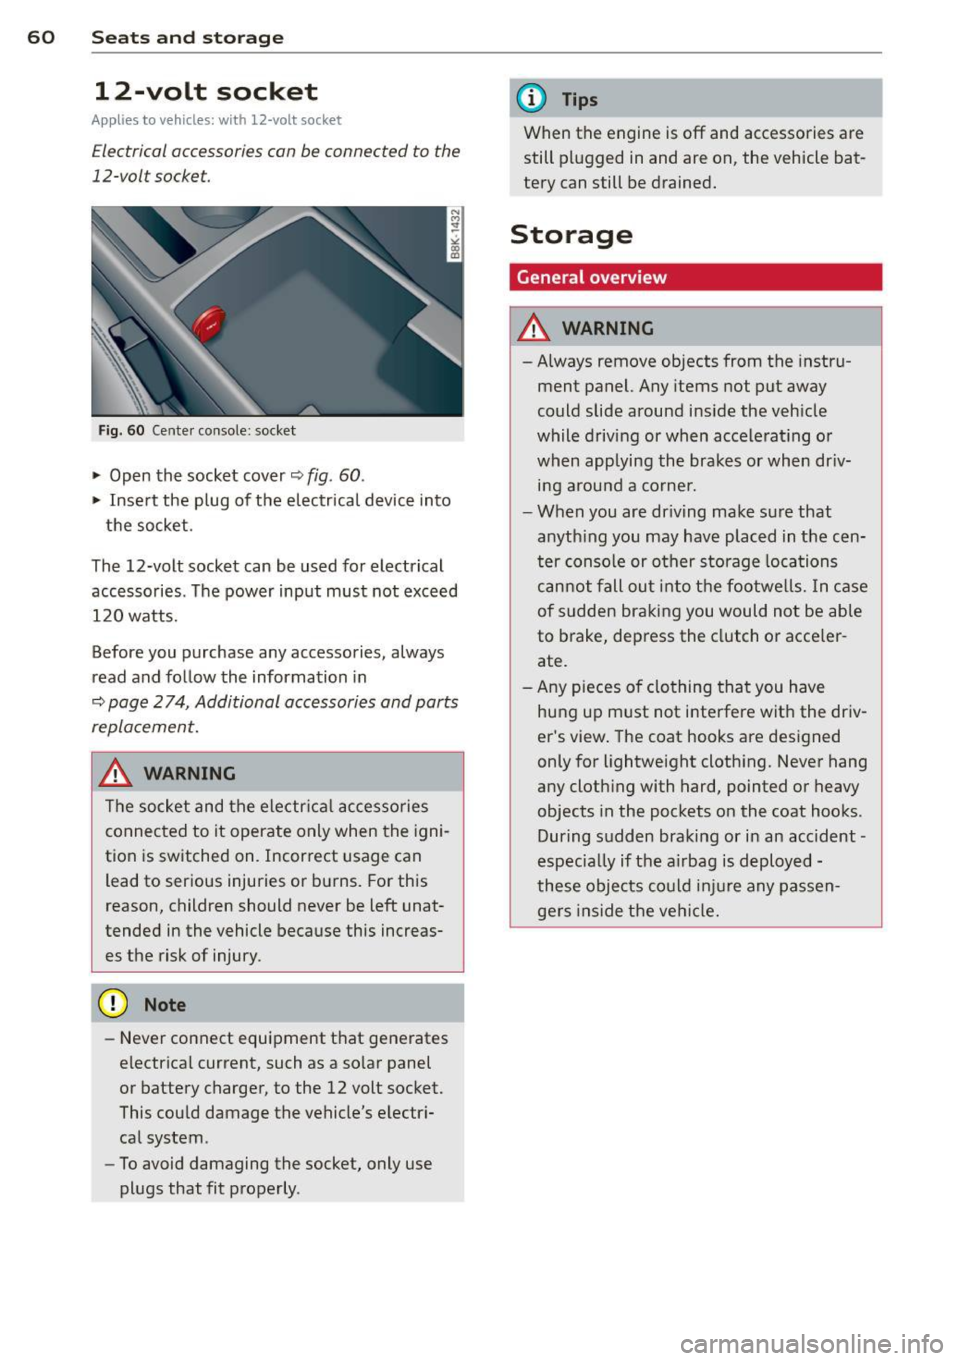
Fig. 60 Cente r console: socket
.,. Open the socket cover~ fig. 60 .
.,. Insert the plug of the electrical device into
the socket.
The 12-volt socket can be used for electrical accessories. The power input must not exceed 120 watts.
Before you purchase any accessories, always
read and follow the information in
~ page 2 74, Additional accessories and parts
replacement.
.&_ WARNING
The socket and the electr ica l accesso ries
connected to it operate only when the igni
tion is switched on. Incorrect usage can lead to ser ious injuries or burns. For this
reason, children should never be Left unat
tended in the vehicle because this increas es the risk of injury.
- Never connect equipment that generates
electrical current, such as a so lar panel
or battery charger, to the 12 volt socket.
This could damage the vehicle's electr i
cal system .
- To avoid damaging the socket, only use
plugs that fit properly .
(D Tips
When the engine is off and accessories are
still plugged in and are on, the vehicle bat
tery can still be drained.
Storage
General overview
.&_ WARNING
-Always remove objects from the instru
ment panel. Any items not put away
could slide around inside the veh icle
while driv ing or when accelerat ing o r
when applying the brakes or when dr iv
ing around a corne r .
- When you are driving make sure that
anyth ing you may have placed in the cen
ter console or other storage locations
cannot fall out into the footwells. In case
of sudden braking you would not be able
to brake, depress the clutch or acce ler
ate.
- Any pieces o f clothing that you have
hung up must not i nterfere wit h the driv
er's view . The coat hooks are designed
only for lightweight clothing. Never hang
any cloth ing with hard, pointed or heavy
objects in the pockets on the coat hooks .
During sudden braking or in an accident -
especia lly if the a irbag is deployed -
these objects could injure any passen gers inside the vehicle.
-
Page 68 of 294
66 Seats and st o rage
kinetic energy which varies with the vehicle
and the weight of the item . Vehicle speed is
the most significant factor .
F or example, in a frontal coll is ion at a speed
of 30 mph ( 48 km/h), the forces acting on a
10 -lb (5 kg) object are about 20 times the
normal weight of the item. Th is means that
the weight of the item would suddenly be the
equivalent of about 200 lbs (90 kg). One can
eas ily imagine the injur ies that an item of that
weight flying freely through the passenger compartment can cause in a co llision at a
speed conside red relat ively low.
& WARNING
Weak, d amaged or improper s traps used
to secure items to t ie-downs can fail du r
ing hard brak ing or in a coll ision and cause
serious persona l in jury .
- Always use suitab le retaining straps and
properly secure items to the tie-downs in
the luggage compartment to help pre
vent items from shifting or flying for
ward.
- Never attach a child seat tether strap to
a tie-down.
- For strength-related reasons, the mount
ing hooks can only be used to secure ob
jects weighing up to 10 lb. (5 kg). Heav i
er objects w ill not be adequately secured
- there is a r isk of injury .
Ski sack
Applies to vehicles: with sk i sack
Long objects such as skis or snowboards can
be transported in the ski sack.
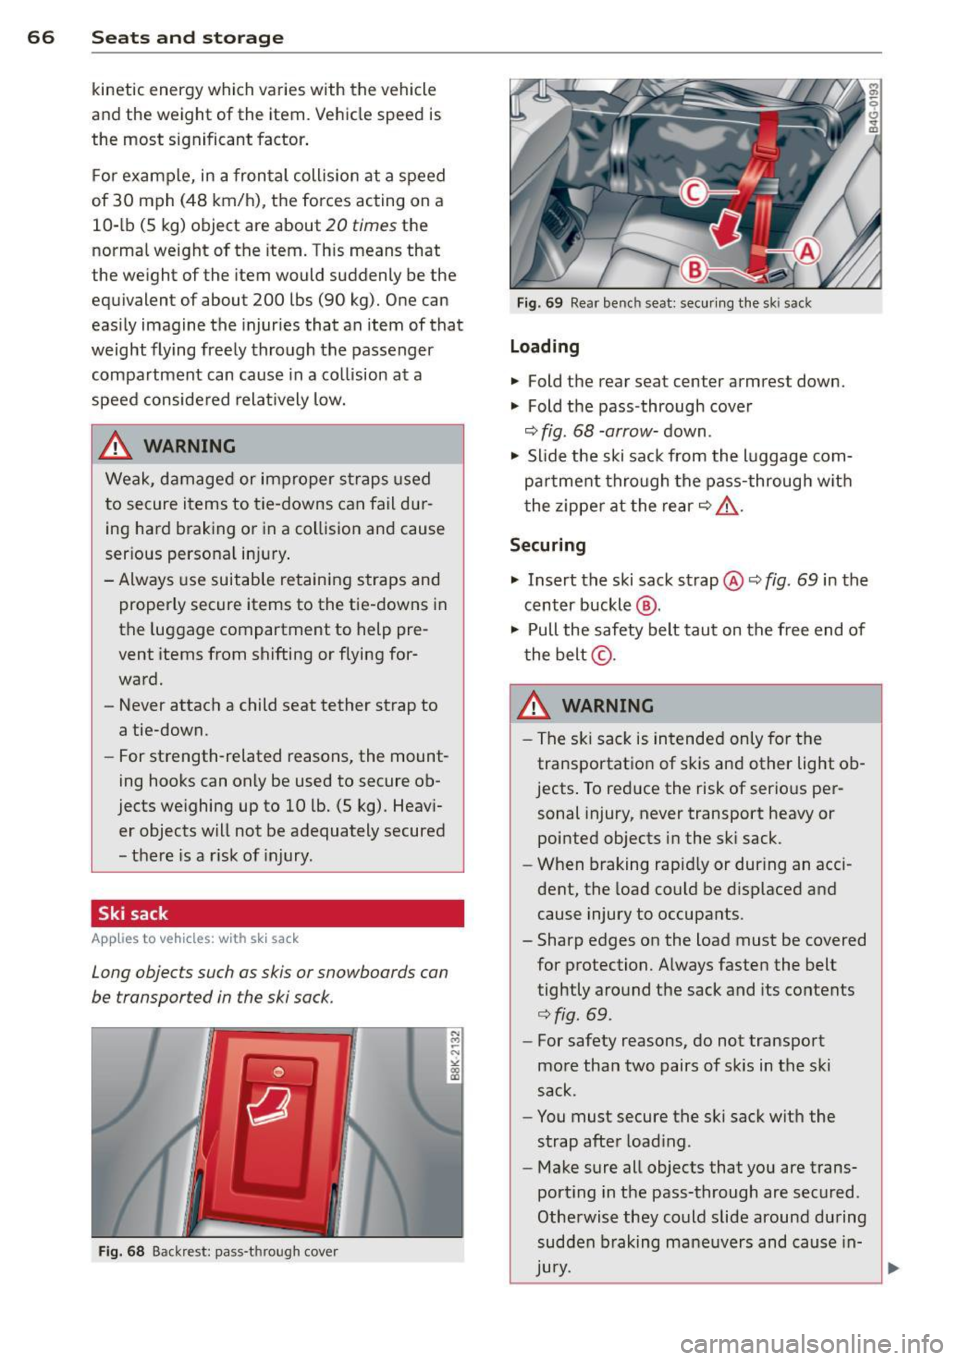
F ig . 6 8 Backre st: pass-t hrough cover
Fig. 69 Rear bench seat: secu ring the sk i sack
Loading
.,. Fold t he rear seat center armrest down.
.,. Fold the pass-through cover
¢ fig. 68 -arrow- down.
.,. Slide the ski sack from the luggage com
pa rtment thro ugh the pass-through w it h
t he zipper at the rear¢ .&,.
Securing
.,. Insert the ski sack strap @¢ fig . 69 in the
center buckle @.
.,. Pull the safety belt taut on the free end of
the belt @.
A WARNING
-
-The ski sa ck is intende d only for the
transportat io n of skis and other light ob
jects . To red uce the risk of serio us per
sonal injury , never transport heavy or
pointed objects in the ski sack.
- When braking rapi dly or during an acci
dent, the load could be d isplaced and
cause injury to occupants .
- Sharp edges on the load must be covered
for protection. A lways fasten the belt
tightly around the sack and its contents
¢fig.
69.
- For safety reasons, do not transport
mo re than two pairs of sk is in the ski
sack.
- You must secure the ski sack with the
strap afte r load ing.
- Make sure all objects that you are trans
porting in the pass-through are sec ured .
Otherwise they could slide around du ring
sudden b rak ing maneuvers and cause in-
Jury. ..,.