2013 AUDI S4 SEDAN automatic transmission
[x] Cancel search: automatic transmissionPage 96 of 294
94 Transmi ssion
When acce lerating, the transmiss ion will au
tomatically shift into the next gear before the
engine reaches its maximum RPM.
I f you apply a ligh t throttle when accelerat
ing, tiptronic will automatically shift from 1st
to 2nd gear to save fuel. If you app ly a heavy
thrott le, the transmission will stay in 1st gear
unti l near maximum RPM is reached, or unt il
the dr iver shifts into 2nd gear.
If you take your foot off the accelerator peda l
when dr iving down a steep incline, tiptronic
will downshift from the selected gear into the next lower gear until it reaches 1st gear,
based on road speed and eng ine RPM . Auto
mat ic downshifti ng is interrupted as soon as
you apply the th rottle aga in .
(D} Tips
- When you sh ift into the next lower gear,
the transmiss ion will downshift only
when there is no possibility of over-rev
v ing the engine.
- When the kick-down comes on, the
transmission will sh ift down to a lower
gear, depending on vehicle and engine
speeds.
- Tiptronic is inope rat ive when the t rans
mission is in the fail-sa fe mode.
Kick-down
A pp lies to vehicles: with S tro nic tr ansmiss ion
Kick-down enables maximum acceleration.
When you press the acce lerator pedal down
beyond the resistance po int, the automatic
transmission downshifts into a lower gear, de
pending on vehicle speed and engine RP M.
It
shifts up into the next h igher ge ar once the
max imum specified engine RPM is reached.
& WARNING
Please note that the wheels could spin on
slick or slippery roads when kick-down is
active.
Launch Control Program
App lies to vehicles : wit h S tronic tra nsmi ssio n
The Launch Control Program provides the
best acceleration possible when starting from
a stop .
Requirement: The engine must be at operat
ing temperature and the steering wheel must
not be t urned .
.. Press the
I~ OF F! button c::;, page 186 while
the engine is running. The
fl ind icator light
illuminates in the instrument cluster and
Traction control (ASR ): Off . Warning! Re
stricted stability
appea rs in the driver infor
mat io n system display .
.. Move the se lector lever to the D/S posit ion
or select the
d ynamic dr iv ing mode in Audi
drive select*
c::;, page 112 .
.. Press the brake peda l strongly with your left
foot and ho ld it down for at least one sec
ond.
.. At the same time, press the accelerator
pedal down complete ly w ith your r ight foot
until t he e ngine reaches and mainta ins a
h igh RP M.
.. Remove yo ur foot from the brake pedal
w ith in S seconds
c::;, A, .
& WARNING
-Always adapt your driving to the traffic
f low .
- On ly use the Launch Cont ro l Program
when road and traffic conditions a llow it
and other drivers w ill not be endangered
or annoyed by your driving and the vehi
cle's acceleration.
- Please note that the d riving wheels can
spin and the vehicle can break away
when ASR is switched off , especially
when the road is slippery .
- Once you have accelerated, you shou ld
sw itch the ASR back on by pressing the
lfl O FF ! button . .__ _____________ _J ...
Page 107 of 294

Audi adaptive cruise control and braking guard 105
-If you switch the ASR/ESC off or the off
road mode on (allroad), Audi braking
guard switches off automatically
<=> page 186.
-Switch Audi braking guard off when you
are loading the vehicle onto a vehicle car
rier, train, ship or other type of transpor
tation. This can prevent undesired warn ings from the braking guard system .
Messages
Applies to vehicles: with Audi adaptive cruise co ntrol
Braking guard: Off
This driver message appears if the system is
turned off via the radio/MM I*. Otherwise, if
the system is turned off, the information ap
pears every time shortly after the start of the
trip.
Braking guard: Activated
This driver message appears if sharp brake
pressure was applied due to an acute warning.
•••
Three white dots appear if a setting cannot be
selected with the operating lever. For exam
ple, this happens if you want to raise/lower
the speed even though there was no previous
ly saved speed .
ACC: Deactivation
The driver message appears in vehicles with
manual transmission . If the clutch pedal was
pressed down for too long, the adaptive cruise
control turns off. A chime sounds as a remind
er.
ACC: Sensor blocked
This message appears if the sensor view is ob
structed, for example by leaves, snow, heavy
spray or dirt. Clean the sensor
<=>page 97,
fig. 96.
ACC: not available
The driver message appears if there is a mal
function. The adaptive cruise control turns off.
A chime sounds as a reminder. Have the sys- tern checked by an authorized Audi dealer or
authorized Audi Service
Facility.
ACC: unavailable
The driver message appears if, for example,
the brake temperature is too high . The adap
tive cruise control is temporarily unavailable.
A chime sounds as a reminder.
Engine speed!
This driver message appears in vehicles with
manual transmission if the driver had not up
shifted or downshifted in time while using
adaptive cruise control braking or accelerat ing, causing the vehicle to exceed or not reach
the permitted limit speed. The adaptive cruise
control turns off. A chime sounds as a remind
er .
Shift lever position!
Vehicles with an automatic transmission: the
driver message appears if the selector lever is
shifted to the N position . The adaptive cruise
control is not available while in this position .
Vehicles with manual transmission: the driver message appears for vehicles with manual
transmission if there is no forward gear en
gaged, meaning if the reverse gear or the 1st
gear is engaged or if the selector lever is in
the neutral position. The adaptive cruise con
trol is not available while in this position.
Stabilization control (ESC)
This message appears if the electronic stabili
zation control (ESC) is taking action to stabi
lize the vehicle. The adaptive cruise control
turns off . A chime sounds as a reminder.
Speed too low
This message appears if the current speed is
too low
to set or to maintain the desired
speed .
The speed being saved must be at least
20 mph (30 km/h). The cruise control is
turned off for speeds lower than 12 mph
(20 km/h). The adaptive cruise control re
mains turned on for speeds above 95 mph
(150 km/h) (override).
It will stabilize again at.,..
Page 113 of 294

Audi drive select Driving settings
Introduction
App lies to vehicles: w it h drive se lect
Audi drive select provides the possibility to ex
perience different types of veh icle sett ings in
one vehicle. For instance, using the three
Comfort, Auto and Dynamic modes, the driv
er can switch from a sporty to a comfortab le
driving mode with the press of a button.
Addit ionally, in vehicles with MM I*, the vehi
cle setup for
Individual* mode can be cus
tomized by you. This makes it possib le to
combine settings such as a sporty engine tun
ing with comfortable steering.
A WARNING
Improper use of the Audi drive select can
cause collisions, other acc idents and seri
ous personal injury.
Description
Ap plies to vehicles: w it h drive se lect
The vehicle setup in each mode depends on
the vehicle's features. However, the engine,
automatic t ransmission* and steering are al
ways involved.
.
Engine and automatic transmission*
Depending on the mode, the engine and the
automatic transmission respond quicker or in
a more ba lanced manner to acce lerator pedal
movements. In the sporty dynamic mode, the
automatic transmission shifts at higher R PMs.
Steering
The steering adapts in terms of steering effort
and steering ratios . Indirect steer ing that
moves easily, like the stee ring in comfort
mode, is best su ited to long dr ives on a high
way. In contrast, dynamic mode prov ides
sporty, di rect steering .
The follow ing applies to vehicles with dynam ic
steer ing*: the stee ring ratio changes based on
ve hicl e speed in order to maintain optimum
Audi drive select 111
steering effort for the driver at all times. This
sets the steering to be less sensitive at higher
speeds in order to provide improved vehicle
control. At reduced speeds, however, steer ing
is more direct in order to keep the steering ef
fort as minimal as possible when the driver is
maneuveri ng the vehicle . At low and average
speeds, dynamic steering addit iona lly pro
vides more responsive steering pe rformance.
Adaptive dampers*
The adaptive dampers* use sensors to record
i nformation regarding steering movements,
braking and acceleration operations by the
drive r, road surface, driving speed, and load.
T his makes it possible to adapt damp ing to
the driving situation virtually i n rea l time.
Audi drive select also makes it possible to sat
isfy the desire for sporty s uspension (Dynam
ic) and comfortable suspension (Comfort)
without giv ing up balanced tuning (Auto).
Sport differential*
As a component of the all whee l dr ive system
(quattro ®)
q page 189, the sport differential*
distributes the driving power to the rear axle
depending on the situation . The distribution
of power var ies depending on the mode se
lected. The goal is a high level of agility and
ability to accelerate on curves . The ve hicle is
very respons ive to steering .
Adaptive cruise control*
The behavior when accelerating can be adjust
ed from comfortab le to sporty, depending on
the drive select mode. Adaptive cru ise control
also responds to the driving behavior of the
vehicle ahead in a more conservative or sporty
manner .
Engine sound*
The sound of the eng ine is adapted to the se
lected mode and ranges from subtle to sporty.
0) Tips
-In some models, the maximum vehicle
speed can only be reached in the
Auto
and Dynamic modes.
Page 114 of 294
112 Audi drive select
-For vehicles with an automatic transmis
sio n*, se lecting the
Dynamic mode re
su lts in sporty shifting characteristics .
The S gear position engages automati
cally.
- In vehicles that have dynamic steering*,
operating noise is heard when starting or
stopping the eng ine . This does not ind i
cate a problem .
Selecting the driving mode
Applies to vehicles: w ith drive se lect
You can choose between Comfort, Auto, Dy
namic
and Individual * modes.
Fig. 112 Center console: Control for Au di dri ve select
Fig. 113 MMI•: Aud i drive select
Adjusting the Individual mode
Applies to vehicles: with MMI a nd drive se lect
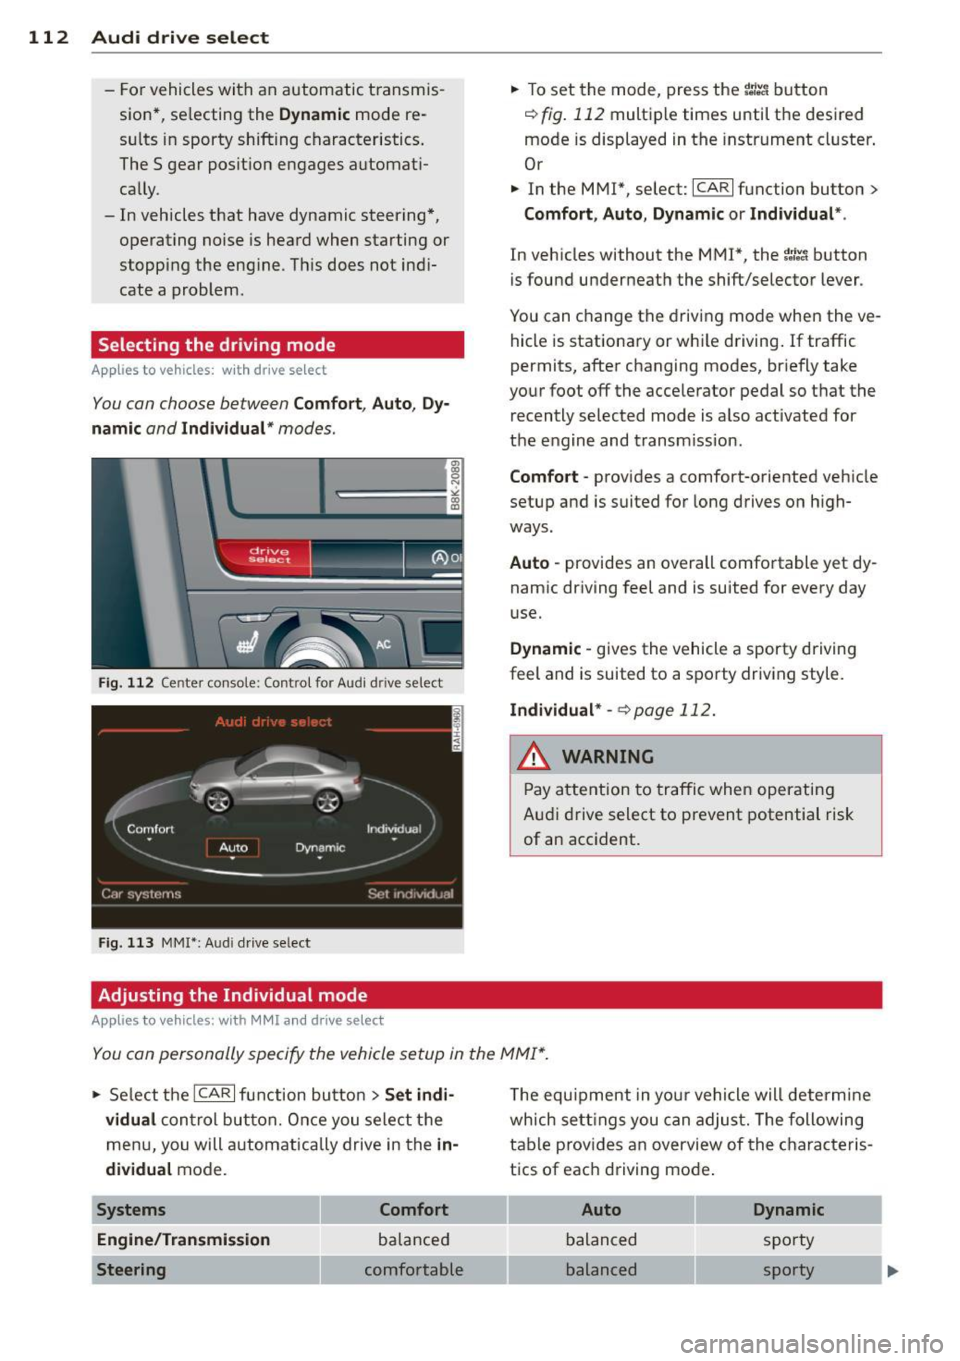
.,. To set the mode, press the f:l:-.i button
~ fig. 112 multiple times until the desired
mode is displayed in the instrument cluster .
Or
.,. In the MMI*, select: ICARlfunction button>
Comfort, Auto, Dynamic or Individual *.
In vehicles without the MMI*, the~:/;,~ button
is found underneath the shift/selector lever.
You can change the driving mode when the ve
hicle is stationary or wh ile driving . If traffic
permits, after changing modes, br iefly take
your foot off the accelerator pedal so that the recently selected mode is also activated for
the engine and transm ission .
Comfort -provides a comfort-oriented vehicle
setup and is suited for long drives on h igh
ways .
Auto -provides an overall comfortable yet dy
namic driving feel and is suited for every day
use.
Dynamic -gives the vehicle a sporty driving
feel and is suited to a sporty driving style.
Individual * -¢page 112.
& WARNING
Pay atte ntion to traffic when operating
Audi drive select to prevent potential risk
of an accident.
You can personally specify the vehicle setup in the MMI* .
.,. Select the ICAR I f unc tion button > Set indi
vidual
control button. Once you select the
menu, you will automatically drive in the
in·
dividual
mode.
Systems Comfort
Engine/Transmission
balanced
Steering comfortable T
he equipment in your vehicle will determine
wh ich sett ings you can adjust. The following
table provides an overview of the characteris
tics of each driving mode .
Auto Dynamic
balanced sporty
balanced sporty
Page 200 of 294
198 Trailer towing
Trailer towing tips
Important to know
Your vehicle hand les different ly when tow ing
a trailer because of the addit ional weight and
different weight distribution . Safety, perform
ance and economy wi ll greatly depend on how
carefully you load your trailer and operate
your rig.
Before you actually tow your trailer, practice
turning, stopp ing and backing up in an area
away from traffic. Keep practicing until you have become completely familiar with the way
your veh icle-trailer combination behaves and
responds.
Backing up is difficult and requires practice.
Backing up with a trai ler generally requires
steering action opposite to that when backing
up your vehicle without a trailer.
Maintain a greater distance between your ve
hicle and the one in front of you. You will need
more room to stop. To compensate for the
trailer, you will need a larger than normal
turning radius .
When passing, remember that you cannot ac
celerate as fast as you normally would be
cause of the added load. Make sure you have
enough room to pass . After passing, allow
plenty of room for your tra iler before chang
in g lanes again.
Avoid jerky starts, sharp turns or rapid lane
changes.
(D Tips
- Do not tow a tra iler dur ing the break-in
period of your vehicle.
- If you tow a trailer, your Audi may re
quire more frequent maintenance due to
the extra load
q page 2 72.
Parking on a slope
Do not park on a slope with a trailer . If it can
not be avoided, do so only after doing the fol lowing :
When parking:
.. App ly the foot brake.
.. Have someone place chocks under both the
vehicle and the trailer wheels .
.,. With chocks in place, slowly release the
brakes until the wheel chocks absorb the
load.
.. Tur n the wheels towards the curb.
.. App ly the parking b rake.
.. Place an automatic transmission* in P, re
spectively a manual transmission in first or reverse gear.
When restarting after parking:
.. App ly the foot brake .
.. Start the engine.
.. Move the se lector lever to D/S, respectively
a manual transmission in first gear.
.. Release the parking brake and slow ly pu ll
out and away from the wheel chocks.
.. Stop and have someone retr ieve the wheel
chocks .
(D Tips
If you move the selector lever of the auto
matic transmission* to P before applying
the parking brake and before blocking the
whee ls, you may have to use more force
lat er to move the lever out of the P posi
tion.
Page 218 of 294
216 Checking and filling
-Apply the parking brake.
- Move selector lever of automatic trans- mission to "P" (Park); put manual trans
mission in Neutral.
- Always let the engine cool down. Hot
components will burn skin on contact.
- To reduce the risk of being burned, never
open the hood if you see or hear steam
or coolant escaping from the engine
compartment . Wait until no steam or
coolant can be seen or heard before care
fully opening the hood .
- Keep children away from the engine com
partment .
- Never spill fluids on hot engine compo
nents. They can cause a fire.
- Never touch the radiator fan. The auxili ary electric fan is temperature controlled
and can switch on suddenly.
- Never open the coolant reservoir cap when the engine is still warm. The cool
ant system is pressurized and hot cool
ant could spray out .
-Protect your face, hands and arm from
steam or hot engine coolant by placing a
thick rag over the cap when you open the coolant reservoir .
- Do not remove the engine cover under
any circumstances. This increases the
risk of burns.
- If work on the fuel system or the electri
cal system is necessary:
- Always disconnect the battery .
- Never smoke or work near heaters or
open flames. Fluids in the engine com
partment could start a fire.
- Keep an approved fire extinguisher im
mediately available.
- To avoid electrical shock and personal in
jury while the engine is running or being
started, never touch:
- Ignition cables
- Other components of the high voltage
electronic ignition system.
- If you must perform a check or repair with the engine running: -
First, fully apply the parking brake,
move selector lever of automatic trans
mission to "P" (Park); put manual
transmission in Neutral.
- Always use extreme caution to prevent
clothing, jewelry, or long hair from get
ting caught in the radiator fan, V-belts
or other moving parts, or from contact ing hot parts. Tie back hair before
starting, and do not wear clothing that
will hang or droop into the engine.
- Minimize exposure to emission and
chemical hazards~&, .
.&_ WARNING
California Proposition 65 Warning:
- Engine exhaust, some of its constituents,
and certain vehicle components contain
or emit chemicals known to the State of
California to cause cancer and birth de
fects and reproductive harm. In addition, certain fluids contained in vehicles and
certain products of component wear con
tain or emit chemicals known to the
State of California to cause cancer and
birth defects or other reproductive harm.
- Battery posts, terminals and related ac
cessories contain lead and lead com
pounds, chemicals known to the State of
California to cause cancer and reproduc
tive harms. Wash hands after handling.
(D Note
When adding fluids, always make sure that
they are poured into the proper container
or filler opening, otherwise serious dam
age to vehicle systems will occur.
@ For the sake of the environment
To detect leaks in time, inspect the vehicle
floor pan from underneath regularly . If
you see spots from oil or other vehicle flu ids, have your vehicle inspected by an au
thorized Audi dealer.
Page 257 of 294
@ Tips
-Never use the hexagonal socket in the
handle of the screwdriver to loosen or
tighten the wheel bolts.
- If a whee l bolt is very tight, you may find
it easier to loosen by carefully pushing
down on the end of the wheel bolt
wrench w ith
one foot only. As you do so,
hold on to the car to keep your ba lance
and take ca re not to slip.
Raising the vehicle
The vehicle must be li~ed with the jack first
before the wheel can be removed .
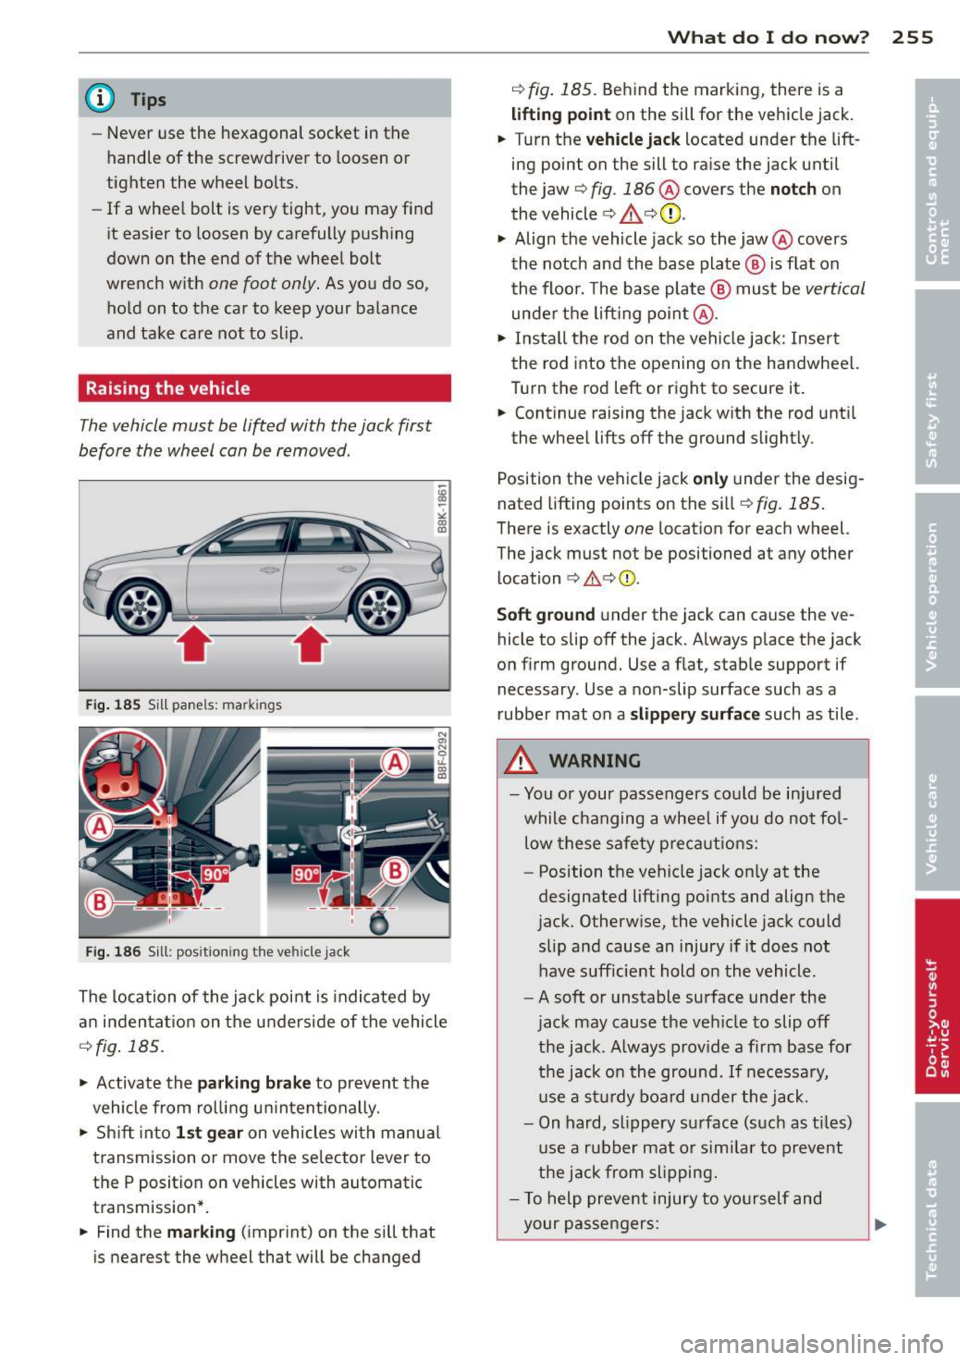
Fig. 1 85 Sill pane ls: ma rki ngs
Fi g. 186 Sill: posit ion ing the ve hicle jack
The location of the jack point is indica ted by
a n in den ta ti on on the underside of the vehicle
Q fig . 185.
"' Activate the parking brake to prevent the
vehicle from ro lling u ninten tionally.
"' Sh ift into
1 st gear on vehicles with m anua l
transmission or move the se lector lever to
the P position on vehicles with automatic
transmission* .
"' Find the
mark ing (imprint) on the sill that
is nearest the wheel that will be changed
What do I d o now ? 255
¢ fig. 185. Behind the marking, there is a
lifting point on the sill for the vehicle jack.
"' Turn the
vehicle jack located under the lift
ing point on the sill to ra ise the jack until
the jaw ¢
fig. 186 @ covers the notch on
the vehicle
¢ & ¢ (D .
"' Align the vehicle jack so the jaw@ covers
th e notch and the base plate @ is flat on
the floor. The base plate @ must be
vertical
unde r th e lift ing po in t @ .
"' Insta ll the rod on the vehi cle jack: Insert
the rod into the opening on the handwheel.
Turn the rod left or right to secure it.
"' Cont inue raising the jack w ith the rod unt il
the wheel lifts off the ground slightly.
Position the veh icle jack
only under the desig
nated lifting points on the sill ¢
fig. 185 .
There is exactly one location for each wheel.
The jack must not be positioned at any other location
¢ ,&. ¢(I) .
Soft ground under the jack can cause the ve
hicle to slip off the jack. Always place the jack
on f irm ground. Use a f lat, stab le support if
necessary . Use a non-slip surface such as a
rubber mat on a
s lipp ery surface such as tile .
A WARNING
-You or your passengers co uld be in ju red
while c hanging a whee l if you do no t fo l
low these safety p re ca utions:
- Position t he veh icle jack on ly at the
designated lifting poi nts and align the
jack. Otherw ise, the vehicle jack could
slip a nd cause an injury if it does not
have sufficie nt hold o n the vehicle.
- A soft or unstable surface under the
jac k may cause the ve hicle to slip off
the jack . A lways prov ide a fi rm base for
the jack o n the ground. If necessa ry,
u se a st ur dy boa rd under the jack .
- On hard, sl ippery su rface (such as t iles)
u se a rubber mat or simi lar to prevent
the j ack from slipping.
- T o help preve nt injury to yo urself and
your pas sengers:
Page 264 of 294

262 Emergency situations
Emergency situations
General
This chapter is intended for trained emer
gency crews and working personnel who
have the necessary tools and equipment to perform these operations.
Starting by pushing or
towing
Q;) Note
Vehicles with an automatic transmission
cannot be started by pushing or towing.
Starting with jumper
cables
If necessary , the engine can be started by
connecting it to the battery of another vehi
cle.
If the engine should fail to start because of a
discharged or weak battery, the battery can be
connected to the battery of
another vehicle,
using a
pair of jumper cables to start the en
gine .
Jumper cables
Use only jumper cables of sufficiently
large cross section to carry the starter current
safely. Refer to the manufacturer's specifica
ti ons.
Use only jumper cables with
insulated termi
nal clamps which are distinctly marked :
plus(+) cable in most cases colored red
minus (-) cable
in most cases colored black .
A WARNING
Batteries contain electricity, acid, and gas.
Any of these can cause very serious or fatal
injury. Follow the instructions below for
safe handling of your vehicle's battery.
- Always shield your eyes and avoid lean
ing over the battery whenever possible. -
A discharged battery can freeze at tem
peratures just below 32 °F (0 °C). Before
connecting a jumper cable, you must
thaw the frozen battery completely, oth
erwise it could explode.
- Do not allow battery acid to contact eyes
or skin . Flush any contacted area with
water immediately .
- Improper use of a booster battery to
start a vehicle may cause an explosion.
- Vehicle batteries generate explosive gas
es . Keep sparks, flame and lighted ciga
rettes away from batteries .
- Do not try to jump start any vehicle with
a low acid level in the battery .
- The voltage of the booster battery must
also have a 12-Volt rating. The capacity
(Ah) of the booster battery should not be
lower than that of the discharged bat
tery . Use of batteries of different voltage
or substantially different "Ah" rating
may cause an explosion and personal in
jury.
- Never charge a frozen battery. Gas trap
ped in the ice may cause an explosion.
- Never charge or use a battery that has
been frozen. The battery case may have
be weakened.
- Use of batteries of different voltage or
substantially different capacity (Ah) rat
ing may cause an explosion and injury.
The capacity (Ah) of the booster battery
should not be lower than that of the dis
charged battery.
- Before you check anything in the engine
compartment, always read and heed all
WARNINGS¢
page 208, Engine com
partment.
@ Note
- Applying a higher voltage booster bat
tery will cause expensive damage to sen
sitive electronic components, such as
control units, relays, radio, etc.
- There must be no electrical contact be
tween the vehicles as otherwise current
could already start to flow as soon as the
positive(+) terminals are connected. ..,.