2013.5 Peugeot 308 CC lock
[x] Cancel search: lockPage 149 of 268
10
i
147
PRACTICAL INFORMATION
Parking the vehicle
Immobilise the vehicle where it
does not block traffi c: the ground
must be level, stable and non-
slippery ground.
Apply the parking brake, switch off
the ignition and engage fi rst gear *
to lock the wheels.
If necessary, place a chock under
the wheel diagonally opposite the
wheel to be changed.
It is imperative that you ensure that
the occupants get out of the ve-
hicle and wait where they are safe.
Never go underneath a vehicle
raised using a jack; use an axle
stand.
Removing a wheel List of operations
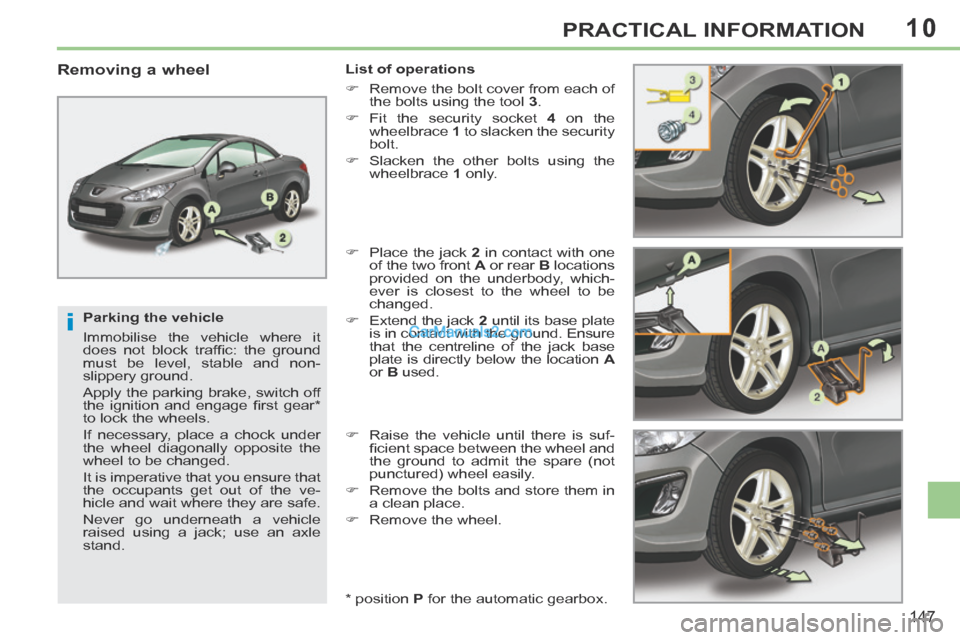
Remove the bolt cover from each of the bolts using the tool 3 .
Fit the security socket 4 on the
wheelbrace 1 to slacken the security
bolt.
Slacken the other bolts using the wheelbrace 1 only.
Place the jack 2 in contact with one
of the two front A or rear B locations
provided on the underbody, which-
ever is closest to the wheel to be
changed.
Extend the jack 2 until its base plate
is in contact with the ground. Ensure
that the centreline of the jack base
plate is directly below the location A
or B used.
Raise the vehicle until there is suf- fi cient space between the wheel and
the ground to admit the spare (not
punctured) wheel easily.
Remove the bolts and store them in a clean place.
Remove the wheel.
* position P for the automatic gearbox.
Page 158 of 268
10
156
PRACTICAL INFORMATION
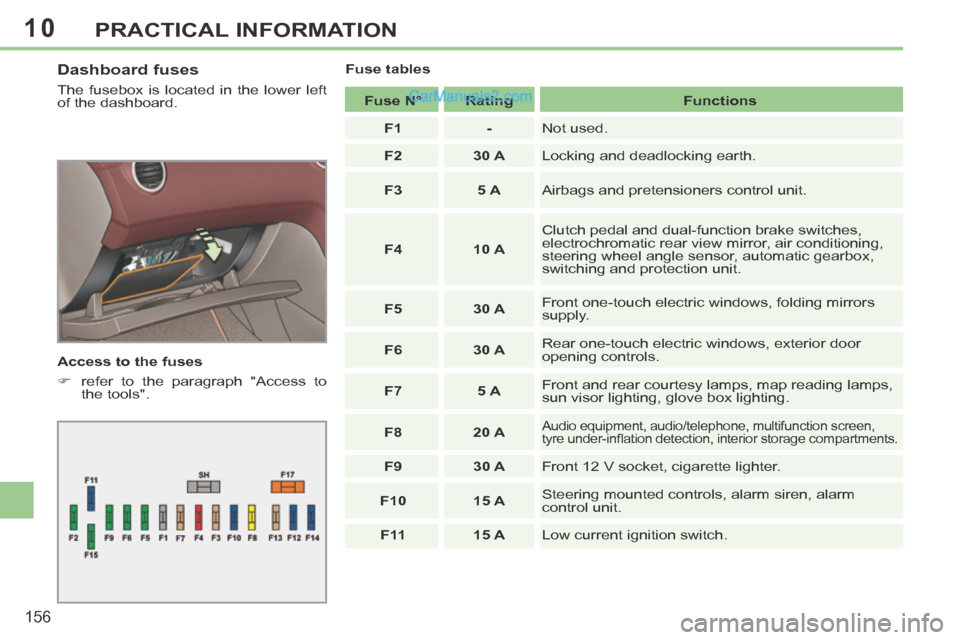
Dashboard fuses
The fusebox is located in the lower left
of the dashboard.
Access to the fuses
refer to the paragraph "Access to the tools". Fuse tables
Fuse N° Rating Functions
F1 - Not used.
F2 30 A Locking and deadlocking earth.
F3 5 A Airbags and pretensioners control unit.
F4 10 A Clutch pedal and dual-function brake switches,
electrochromatic rear view mirror, air conditioning,
steering wheel angle sensor, automatic gearbox,
switching and protection unit.
F5 30 A Front one-touch electric windows, folding mirrors
supply.
F6 30 A Rear one-touch electric windows, exterior door
opening controls.
F7 5 A Front and rear courtesy lamps, map reading lamps,
sun visor lighting, glove box lighting.
F8 20 A
Audio equipment, audio/telephone, multifunction screen,
tyre under-infl ation detection, interior storage compartments.
F9 30 A Front 12 V socket, cigarette lighter.
F10 15 A Steering mounted controls, alarm siren, alarm
control unit.
F 11 15 A Low current ignition switch.
Page 159 of 268
10
157
PRACTICAL INFORMATION
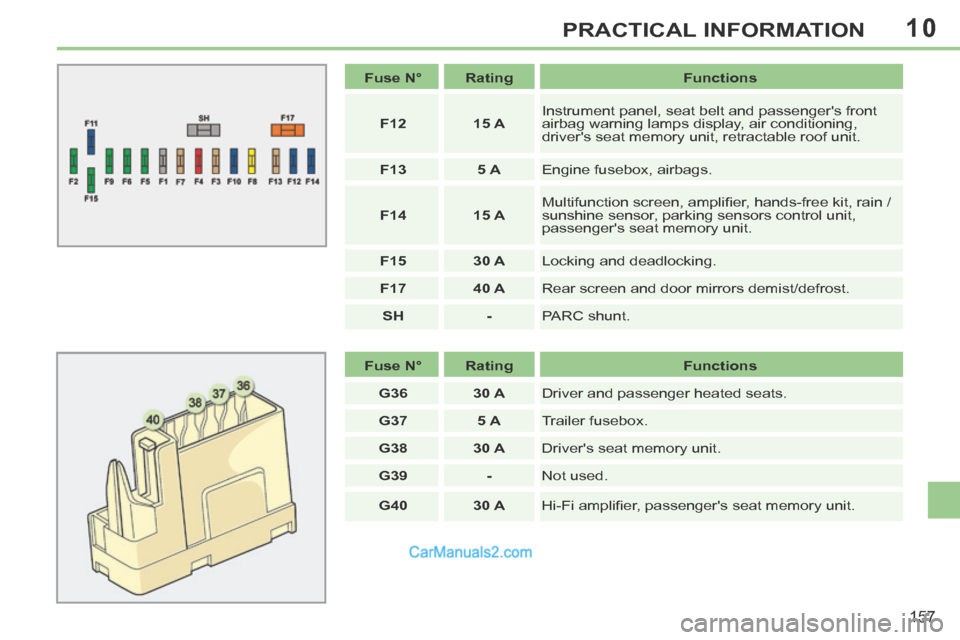
Fuse N° Rating Functions
F12 15 A Instrument panel, seat belt and passenger's front
airbag warning lamps display, air conditioning,
driver's seat memory unit, retractable roof unit.
F13 5 A Engine fusebox, airbags.
F14 15 A Multifunction screen, amplifi er, hands-free kit, rain /
sunshine sensor, parking sensors control unit,
passenger's seat memory unit.
F15 30 A Locking and deadlocking.
F17 40 A Rear screen and door mirrors demist/defrost.
SH - PARC shunt.
Fuse N° Rating Functions
G36 30 A Driver and passenger heated seats.
G37 5 A Trailer fusebox.
G38 30 A Driver's seat memory unit.
G39 - Not used.
G40 30 A Hi-Fi amplifi er, passenger's seat memory unit.
Page 164 of 268
10
i
!
162
PRACTICAL INFORMATION
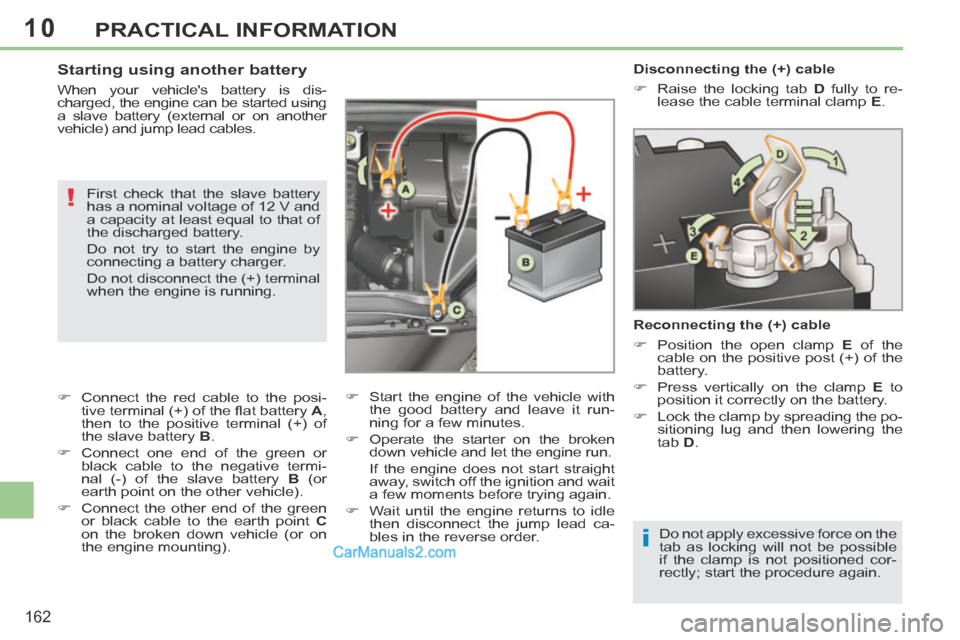
Disconnecting the (+) cable
Raise the locking tab D fully to re-
lease the cable terminal clamp E .
Reconnecting the (+) cable
Position the open clamp E of the
cable on the positive post (+) of the
battery.
Press vertically on the clamp E to
position it correctly on the battery.
Lock the clamp by spreading the po- sitioning lug and then lowering the
tab D .
Do not apply excessive force on the
tab as locking will not be possible
if the clamp is not positioned cor-
rectly; start the procedure again. Starting using another battery
When your vehicle's battery is dis-
charged, the engine can be started using
a slave battery (external or on another
v ehicle) and jump lead cables. First check that the slave battery
has a nominal voltage of 12 V and
a capacity at least equal to that of
the discharged battery.
Do not try to start the engine by
connecting a battery charger.
Do not disconnect the (+) terminal
when the engine is running.
Connect the red cable to the posi- tive terminal (+) of the fl at battery A ,
then to the positive terminal (+) of
the slave battery B .
Connect one end of the green or black cable to the negative termi-
nal (-) of the slave battery B (or
earth point on the other vehicle).
Connect the other end of the green or black cable to the earth point C
on the broken down vehicle (or on
the engine mounting). Start the engine of the vehicle with
the good battery and leave it run-
ning for a few minutes.
Operate the starter on the broken down vehicle and let the engine run .
If the engine does not start straight away, switch off the ignition and wait
a few moments before trying again.
Wait until the engine returns to idle then disconnect the jump lead ca-
bles in the reverse order.
Page 165 of 268
10
i
i
!
!
i
163
PRACTICAL INFORMATION
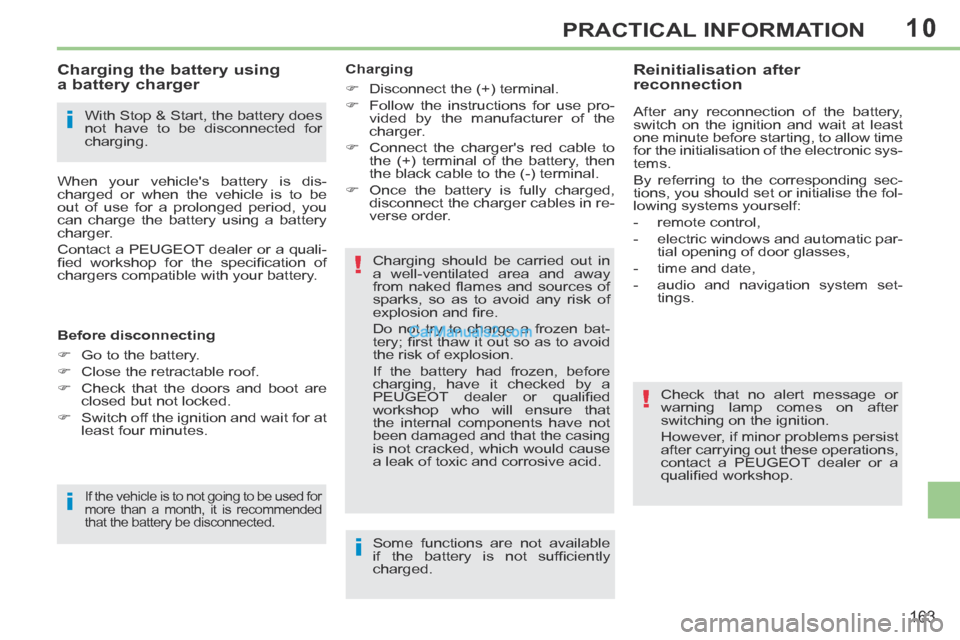
With Stop & Start, the battery does
not have to be disconnected for
charging.
Charging the battery using
a battery charger
When your vehicle's battery is dis-
charged or when the vehicle is to be
out of use for a prolonged period, you
can charge the battery using a battery
charger.
Contact a PEUGEOT dealer or a quali-
fi ed workshop for the specifi cation of
chargers compatible with your battery.
Before disconnecting
Go to the battery.
Close the retractable roof.
Check that the doors and boot are closed but not locked.
Switch off the ignition and wait for at least four minutes.
If the vehicle is to not going to be used for
more than a month, it is recommended
that the battery be disconnected.
Charging
Disconnect the (+) terminal.
Follow the instructions for use pro-vided by the manufacturer of the
charger.
Connect the charger's red cable to the (+) terminal of the battery, then
the black cable to the (-) terminal.
Once the battery is fully charged, disconnect the charger cables in re-
verse order.
Charging should be carried out in
a well-ventilated area and away
from naked fl ames and sources of
sparks, so as to avoid any risk of
explosion and fi re.
Do not try to charge a frozen bat-
tery; fi rst thaw it out so as to avoid
the risk of explosion.
If the battery had frozen, before
charging, have it checked by a
PEUGEOT dealer or qualifi ed
workshop who will ensure that
the internal components have not
been damaged and that the casing
is not cracked, which would cause
a leak of toxic and corrosive acid.
Some functions are not available
if the battery is not suffi ciently
charged. Reinitialisation after
reconnection
After any reconnection of the battery,
switch on the ignition and wait at least
one minute before starting, to allow time
for the initialisation of the electronic sys-
tems.
By referring to the corresponding sec-
tions, you should set or initialise the fol-
lowing systems yourself:
- remote control,
- electric windows and automatic par- tial opening of door glasses,
- time and date,
- audio and navigation system set- tings.
Check that no alert message or
warning lamp comes on after
switching on the ignition.
However, if minor problems persist
after carrying out these operations,
contact a PEUGEOT dealer or a
qualifi ed workshop.
Page 167 of 268
10
i
165
PRACTICAL INFORMATION
CHANGING A WIPER BLADE
Removing
Raise the corresponding wiper arm.
Unclip the wiper blade and remove it.
Fitting
Put the corresponding new wiper blade in place and clip it.
Fold down the wiper arm carefully.
Before removing a front wiper
blade
Within one minute after switching off the ignition, operate the wiper stalk
to position the wiper blades verti-
cally on the windscreen.
After fitting a front wiper blade
Switch on the ignition.
Operate the wiper stalk again to park the wiper blades.
TOWING THE VEHICLE
Procedure for having your vehicle
towed or for towing another vehicle us-
ing a removable towing eye.
Access to the tools
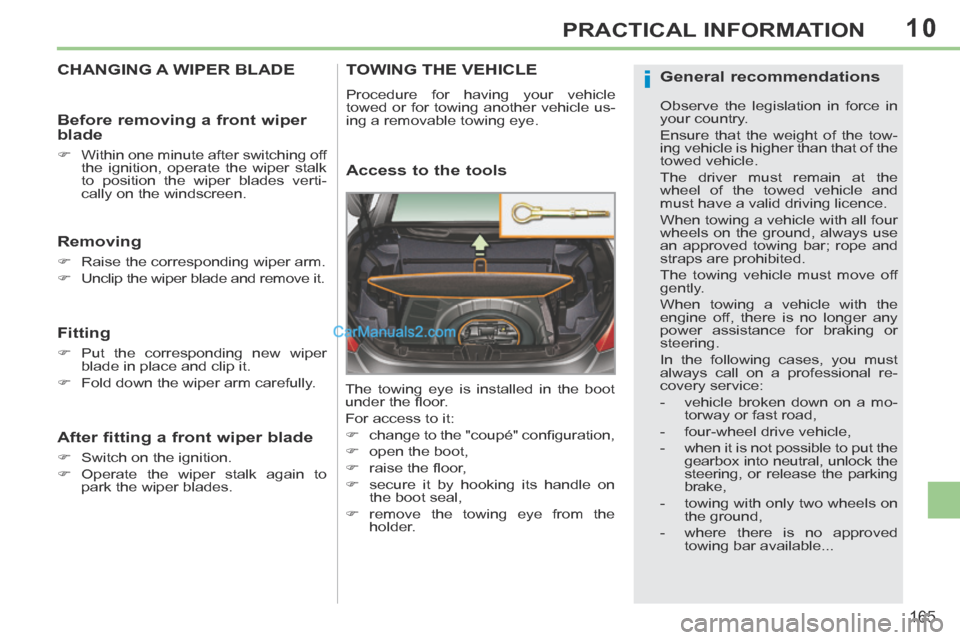
The towing eye is installed in the boot
under the fl oor.
For access to it:
change to the "coupé" confi guration,
open the boot,
raise the fl oor,
secure it by hooking its handle on the boot seal,
remove the towing eye from the holder.
General recommendations
Observe the legislation in force in
your country.
Ensure that the weight of the tow-
ing vehicle is higher than that of the
towed vehicle.
The driver must remain at the
wheel of the towed vehicle and
must have a valid driving licence.
When towing a vehicle with all four
wheels on the ground, always use
an approved towing bar; rope and
straps are prohibited.
The towing vehicle must move off
gently.
When towing a vehicle with the
engine off, there is no longer any
power assistance for braking or
steering.
In the following cases, you must
a lways call on a professional re-
covery service:
- vehicle broken down on a mo-torway or fast road,
- four-wheel drive vehicle,
- when it is not possible to put the gearbox into neutral, unlock the
steering, or release the parking
brake,
- towing with only two wheels on the ground,
- where there is no approved towing bar available...
Page 239 of 268
04
237
AUDIO
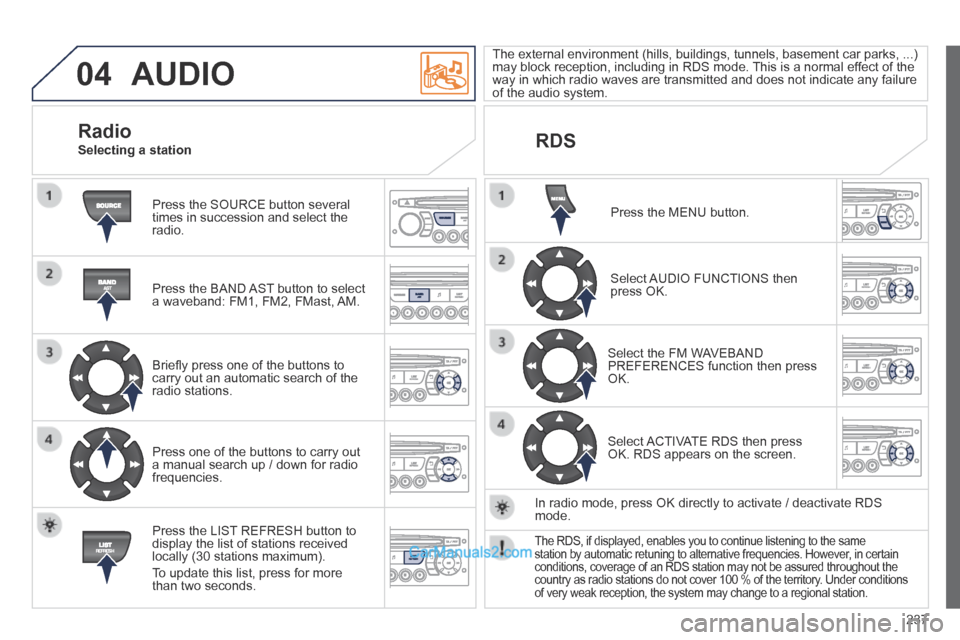
Press the SOURCE button several times in succession and select the radio.
Press the BAND AST button to select a waveband: FM1, FM2, FMast, AM.
Briefl y press one of the buttons to carry out an automatic search of the radio stations.
Press one of the buttons to carry out a manual search up / down for radio frequencies.
Press the LIST REFRESH button to display the list of stations received locally (30 stations maximum).
To update this list, press for more than two seconds.
The external environment (hills, buildings, tunnels, basement car parks, ...) may block reception, including in RDS mode. This is a normal effect of the way in which radio waves are transmitted and does not indicate any failu\
re of the audio system.
RDS
Radio Selecting a station
Press the MENU button.
Select AUDIO FUNCTIONS then press OK.
Select the FM WAVEBAND PREFERENCES function then press OK.
Select ACTIVATE RDS then press OK. RDS appears on the screen.
In radio mode, press OK directly to activate / deactivate RDS mode.
The RDS, if displayed, enables you to continue listening to the same station by automatic retuning to alternative frequencies. However, in certain conditions, coverage of an RDS station may not be assured throughout the\
country as radio stations do not cover 100 % of the territory. Under conditions of very weak reception, the system may change to a regional station.
Page 254 of 268
252
VISUAL SEARCH
EXTERIOR
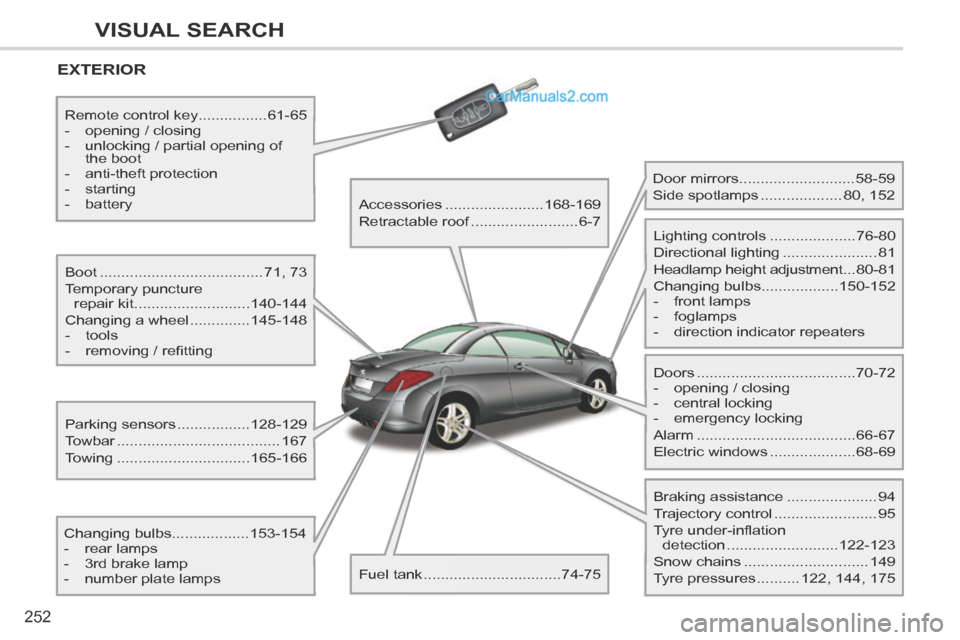
Boot ......................................71, 73
Temporary puncture repair kit ........................... 140-144
Changing a wheel .............. 145-148
- tools
- removing / refi tting
Changing bulbs ..................153-154
- rear lamps
- 3rd brake lamp
- number plate lamps Parking sensors .................
128-129
Towbar ...................................... 167
Towing ............................... 165-166
Remote control key
................61-65
- opening / closing
- unlocking / partial opening of the boot
- anti-theft protection
- starting
- battery Accessories .......................168-169
Retractable roof ......................... 6-7
Fuel tank ................................ 74-75 Door mirrors ...........................
58-59
Side spotlamps ................... 80, 152
Doors ..................................... 70-72
- opening / closing
- central locking
- emergency locking
Alarm ..................................... 66-67
Electric windows .................... 68-69
Lighting controls ....................
76-80
Directional lighting ...................... 81
Headlamp height adjustment ... 80-81
Changing bulbs ..................150-152
- front lamps
- foglamps
- direction indicator repeaters
Braking assistance ..................... 94
Trajectory control ........................ 95
Tyre under-inflation detection .......................... 122-123
Snow chains ............................. 149
Tyre pressures .......... 122, 144, 175