Page 129 of 336

127
6
Safety
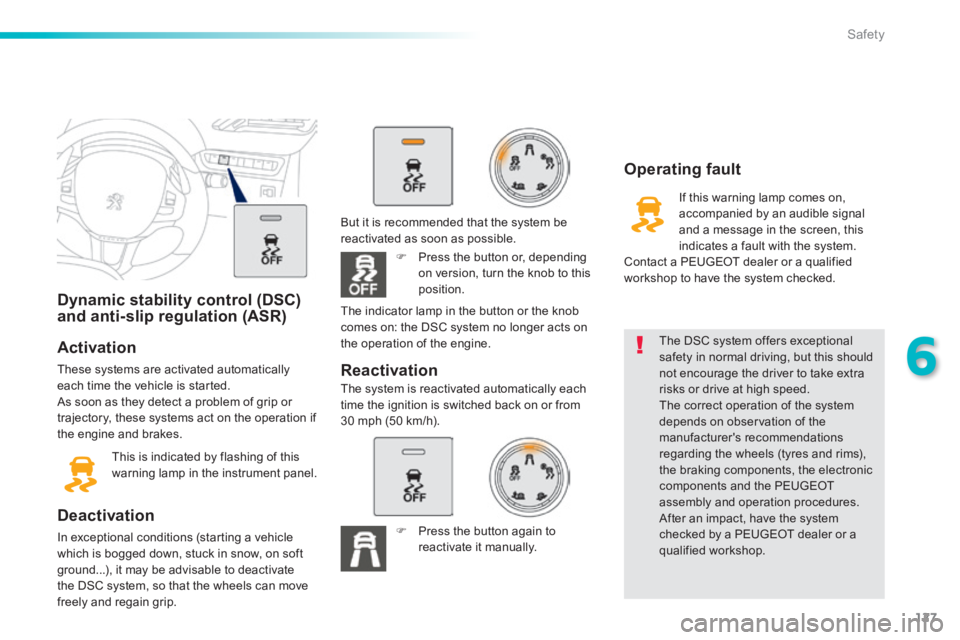
Dynamic stability control (DSC) and anti-slip regulation (ASR)
Activation
These systems are activated automatically each time the vehicle is started. As soon as they detect a problem of grip or trajectory, these systems act on the operation if the engine and brakes.
This is indicated by flashing of this warning lamp in the instrument panel.
Deactivation
In exceptional conditions (starting a vehicle which is bogged down, stuck in snow, on soft ground...), it may be advisable to deactivate the DSC system, so that the wheels can move freely and regain grip.
The DSC system offers exceptional safety in normal driving, but this should not encourage the driver to take extra risks or drive at high speed. The correct operation of the system depends on observation of the manufacturer's recommendations regarding the wheels (tyres and rims), the braking components, the electronic components and the PEUGEOT assembly and operation procedures. After an impact, have the system checked by a PEUGEOT dealer or a qualified workshop.
Operating fault
If this warning lamp comes on, accompanied by an audible signal and a message in the screen, this indicates a fault with the system. Contact a PEUGEOT dealer or a qualified workshop to have the system checked.
Reactivation
But it is recommended that the system be reactivated as soon as possible.
Press the button or, depending on version, turn the knob to this position.
The system is reactivated automatically each time the ignition is switched back on or from30 mph (50 km/h).
The indicator lamp in the button or the knob comes on: the DSC system no longer acts on the operation of the engine.
Press the button again to reactivate it manually.
Page 162 of 336

160
Practical information
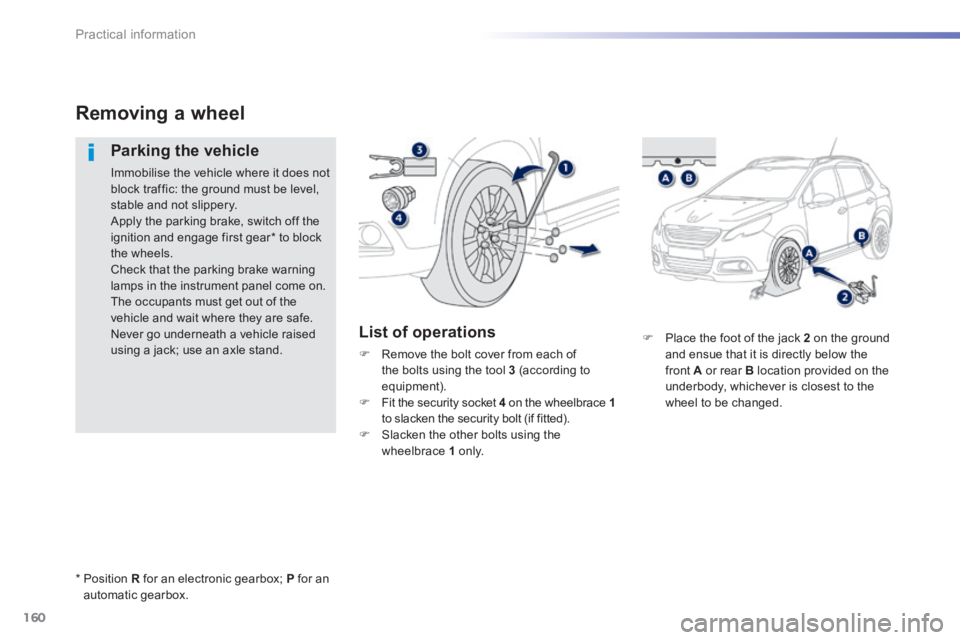
Place the foot of the jack 2 on the ground and ensue that it is directly below the front A or rear B location provided on the underbody, whichever is closest to the wheel to be changed.
Removing a wheel
Parking the vehicle
Immobilise the vehicle where it does not block traffic: the ground must be level, stable and not slippery. Apply the parking brake, switch off the ignition and engage first gear * to block the wheels. Check that the parking brake warning lamps in the instrument panel come on. The occupants must get out of the vehicle and wait where they are safe. Never go underneath a vehicle raised using a jack; use an axle stand.
List of operations
Remove the bolt cover from each of the bolts using the tool 3 (according to equipment). Fit the security socket 4 on the wheelbrace 1 to slacken the security bolt (if fitted). Slacken the other bolts using the wheelbrace 1 o n l y.
* Position R for an electronic gearbox; P for an automatic gearbox.
Page 166 of 336

164
Practical information
Snow chains
In wintry conditions, snow chains improve traction as well as the behaviour of the vehicle when braking.
The snow chains must be fitted only to the front wheels. They must never be fitted to "space-saver" type spare wheels.
Take account of the legislation in force in your country on the use of snow chains and the maximum running speed authorised.
Use only the chains designed to be fitted to the type of wheel fitted to your vehicle:
For more information on snow chains, contact a
PEUGEOT dealer or a qualified workshop.
Advice on installation
If you have to fit the chains during a journey, stop the vehicle on a flat sur face on the side of the road. Apply the parking brake and position any wheel chocks to prevent movement of your vehicle. Fit the chains following the instructions provided by the manufacturer. Move off gently and drive for a few moments, without exceeding 30 mph (50 km/h). Stop your vehicle and check that the snow chains are correctly tightened.
Avoid driving on roads that have been cleared of snow, to avoid damaging your
vehicle's tyres and the road sur face. It is recommended that before you leave, you practise fitting the snow chains on a level and dry sur face. If your vehicle is fitted with alloy wheels, check that no part of the chain or its fixings is in contact with the wheel rim.
Original tyre size Maximum link size.
195/65 R15
9 mm
195/60 R16
205/55 R16
205/50 R17
Page 171 of 336
169
7
Practical information
1. Brake lamps (P21W).2. Sidelamps (light emitting diodes - LEDs).3. Direction indicators (PY21W amber).
Rear lamps
Changing the light emitting diode-LED lamps
For replacement, contact a PEUGEOT dealer or qualified workshop.
4. Foglamp (P21W).5. Reversing lamp (P21W).
Page 172 of 336
170
Practical information
Changing brake lamp and direction indicator bulbs
These bulbs are changed from inside the boot:
open the boot, remove the access grille from the corresponding side trim panel, slacken and remove the nut, disconnect the lamp unit connector, remove the lamp unit carefully by it pulling in line towards the outside,
press the retaining tabs and remove the bulb holder, turn the bulb a quarter of a turn and change it. To reassemble, carry out these operations in reverse order. Take care to engage the lamp unit in its guides, while keeping it in line with the vehicle. Tighten sufficiently to ensure sealing, but without damaging the lamp.
Page 173 of 336
171
7
Practical information
Changing the third brake lamp (light emitting diodes - LEDs)
Contact a PEUGEOT dealer or a qualified workshop.
Number plate lamps
To facilitate the removal of the lamp, carry out this operation with the tailgate half open.
Insert a thin screwdriver into the lens cutout. Push it outwards. Remove the lens. Change the faulty bulb. To refit, press on the lens to clip it in place.
Access is by passing a hand under the bumper. Turn the bulb holder an eighth of a turn and pull it out. Change the failed bulb. To refit, carry out these operations in reverse o r d e r.
Changing a foglamp or reversing lamp bulb
On the left hand side, take care to not touch the exhaust silencer; risk of burns if changing a bulb after stopping the engine.
Page 185 of 336

183
7
Practical information
Towing the vehicle
Access to the tools
The towing eye is installed in the boot under the floor. To gain access to it: open the boot, lift the floor and remove it, remove the towing eye from the holder.
General recommendations
Observe the legislation in force in your country. Ensure that the weight of the towing vehicle is higher than that of the towed vehicle. The driver must remain at the wheel of the towed vehicle and must have a valid driving licence. When towing a vehicle with all four wheels on the ground, always use an approved towing bar; rope and straps are prohibited. The towing vehicle must move off gently.
When towing a vehicle with the engine off, there is no longer any power assistance for braking or steering. In the following cases, you must always call on a professional recovery service: - vehicle broken down on a motor way or fast road, - four-wheel drive vehicle, - when it is not possible to put the gearbox into neutral, unlock the steering, or release the parking brake, - towing with only two wheels on the ground, - where there is no approved towing bar available...
Procedure for having your vehicle towed or for towing another vehicle using a removable towing eye.
Page 186 of 336
184
Practical information
Towing your vehicle Towing another vehicle
On the front bumper, unclip the cover by inserting the flat end of the towing eye in the bottom of the cover. Screw the towing eye in fully. Install the towing bar.
On the rear bumper, unclip the cover by pressing at the bottom. Screw the towing eye in fully. Install the towing bar. Switch on the hazard warning lamps on both vehicles. Move off gently, drive slowly and for a short distance.
Place the gear lever in neutral (position N on an electronic or automatic gearbox). Failure to observe this instruction could result in damage to certain components (braking, transmission...) and the absence of braking assistance the next time the engine is started.
Unlock the steering by turning the key in the ignition one notch and release the parking brake. Switch on the hazard warning lamps on both vehicles. Move off gently, drive slowly and for a short distance.