2013.5 Citroen DS5 HYBRID4 RHD tow
[x] Cancel search: towPage 62 of 380

Warning / indicator lampStateCauseAction / Observations
Left-hand direction indicator flashing with buzzer. The lighting stalk is pushed down.
Right-hand direction indicator flashing with buzzer. The lighting stalk is pushed up.
Sidelamps fixed. The lighting stalk is in the "Sidelamps" position.
Dipped beam headlamps fixed. The lighting stalk is in the "Dipped beam headlamps" position.
Main beam headlamps fixed. The lighting stalk is pulled towards you. Pull the stalk to return to dipped beam headlamps.
Front foglamps fixed. The front foglamps are switched on. Turn the ring on the stalk rear wards twice to switch off the front foglamps.
For more information on the lighting controls, refer to the corresponding section.
Automatic headlamp dipping
fixed. The lighting stalk has been pulled towards you and the button (to the right of the steering wheel) has been pressed. Its warning lamp is on.
The camera, located in the interior rear view mirror, authorises or not switching between main and dipped beam, depending on the exterior lighting and the driving conditions. Pull the lighting stalk to return to dipped beam.
Ready fixed. The vehicle is ready to move off; you can press the accelerator. It comes on once high voltage is established in the vehicle.
Operation indicator lamps
If one of the following indicator lamps comes on in the instrument panel and/or instrument panel screen, this confirms that the corresponding system has come into operation.
Page 90 of 380

Back-up mechanical key
Unlocking/locking using the integral key
The integral key is used to lock and unlock the vehicle when the electronic key cannot operate: - cell battery flat, vehicle battery discharged or disconnected, ... - vehicle located in an area with strong electromagnetic signals. Maintain a pull on button 1 , to extract the integral key 2 .
Complete unlocking
Turn the key towards the front of the vehicle to unlock the vehicle.
Normal locking
Turn the key towards the rear of the vehicle to lock the vehicle completely.
Deadlocking
Turn the key towards the rear in the driver's door lock to lock the vehicle completely. Turn the key towards the rear again within five seconds to deadlock the vehicle.
If the alarm is activated, the audible signal on opening a door with the key (integral with the remote control) will stop on starting the engine.
Page 94 of 380

Locking the front and rear passenger doors
Open the doors. On the rear doors, check that the child lock is not on (see the corresponding section). Remove the black cap, located on the edge of the door, using the key. Insert the key in the socket without forcing it, then without turning it, move the latch sideways towards the inside of the door. Remove the key and refit the cap. Close the doors and check that the vehicle has locked correctly from the outside.
Unlocking the front and rear passenger doors
Pull the interior door opening control.
Page 97 of 380

OFF
95Access
Where the vehicle locks itself again automatically (occurs 30 seconds after unlocking, if a door or the boot is not opened), the monitoring system is not reactivated automatically. To reactivate it, the vehicle must be unlocked and locked again, using the remote control or the "Keyless Entry and Starting" system.
Locking the vehicle
with exterior perimeter
monitoring only
Deactivation of the interior volumetric and anti-tilt monitoring
Switch of the ignition and within ten seconds, press this button until the indicator lamp is on continuously. Get out of the vehicle.
Press the locking button on the remote control immediately or lock the vehicle using the Keyless Entry and Starting system.
The exterior perimeter monitoring alone is activated: the indicator lamp in the button flashes once per second. To be effective, this deactivation must be carried out each time the ignition is switched off.
Deactivate the interior volumetric and anti-lift monitoring to avoid unwanted triggering of the alarm in certain cases such as: - leaving a window partially open, - washing your vehicle, - changing a wheel, - having your vehicle towed, - transportation by sea.
Page 115 of 380

11 3Comfort
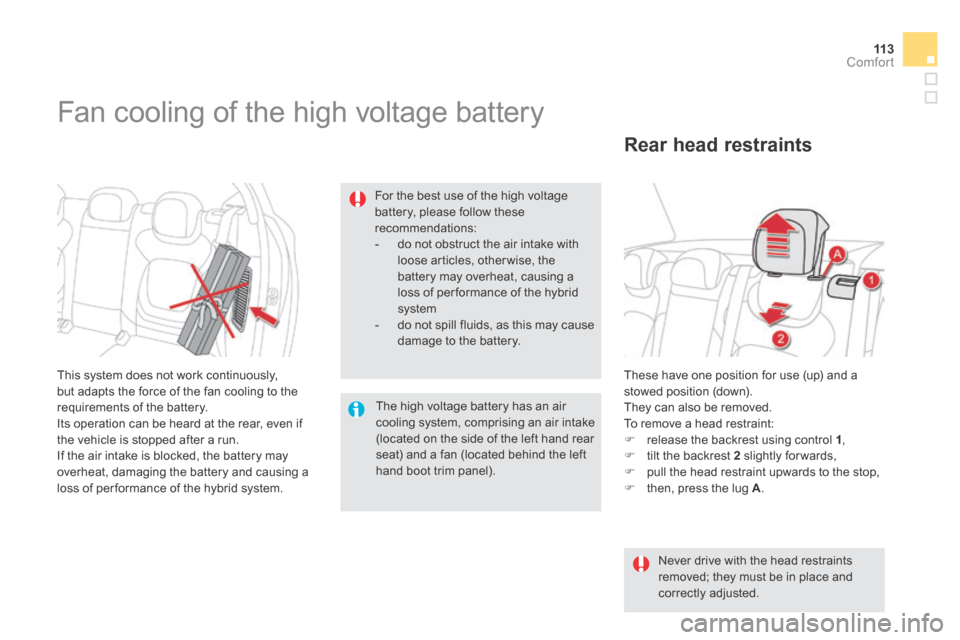
These have one position for use (up) and a stowed position (down). They can also be removed. To remove a head restraint: release the backrest using control 1 , tilt the backrest 2 slightly for wards, pull the head restraint upwards to the stop, then, press the lug A .
Rear head restraints
Never drive with the head restraints removed; they must be in place and correctly adjusted.
Fan cooling of the high voltage battery
This system does not work continuously, but adapts the force of the fan cooling to the requirements of the battery. Its operation can be heard at the rear, even if the vehicle is stopped after a run. If the air intake is blocked, the battery may overheat, damaging the battery and causing a loss of per formance of the hybrid system.
For the best use of the high voltage battery, please follow these recommendations: - do not obstruct the air intake with loose articles, otherwise, the battery may overheat, causing a loss of per formance of the hybrid system - do not spill fluids, as this may cause damage to the battery.
The high voltage battery has an air cooling system, comprising an air intake (located on the side of the left hand rear seat) and a fan (located behind the left hand boot trim panel).
Page 123 of 380

121Comfort
Warning triangle (stowing)
Use the straps on the interior boot trim to stow the folded triangle or its storage box.
Before getting out of your vehicle to assemble the triangle and place it on the road, put on your high visibility vest. The triangle is available as an accessory, contact a CITROËN dealer or a qualified workshop. Refer to the manufacturer's instructions for use of the triangle.
Placing the triangle in
the road
Place the triangle at a distance behind the vehicle, as shown in the table below, according to the type of road and the level of ambient light.
Distance from your vehicle (in metres)
RoadMotor wayDayNight
50 m 80 m 150 m
These are the internationally recognised values. Use the triangle in line with local driving regulations.
Placing the triangle on the road
Place the triangle behind the vehicle, as required by the legislation in force in your c o unt r y.
Page 125 of 380

123Comfort
In order for these systems to be fully effective, follow the operation and maintenance guidelines below: To obtain an even air distribution, take care not to obstruct the exterior air intake grilles located at the base of the windscreen, the nozzles, the vents and the air outlets, as well as the air extractor located in the boot. Do not cover the sunshine sensor, located on the dashboard; this is used for regulation of the digital air conditioning system. Operate the air conditioning system for at least 5 to 10 minutes, once or twice a month to keep it in per fect working order. Ensure that the passenger compartment filter is in good condition and have the filter elements replaced regularly (refer to the "Checks" section). We recommend the use of a combined passenger compartment filter. Thanks to its special active additive, it contributes to the purification of the air breathed by the occupants and the cleanliness of the passenger compartment (reduction of allergic symptoms, bad odours and greasy deposits). To ensure correct operation of the air conditioning system, you are also advised to have it checked regularly as recommended in the maintenance and warranty guide. If the system does not produce cold air, switch it off and contact a CITROËN dealer or a qualified workshop. You can switch off the air conditioning (AC button) and stay in Automatic mode in order to limit fuel consumption. If misting appears while in this mode, you can switch the air conditioning back on temporarily to improve the situation. When towing the maximum load on a steep gradient in high temperatures, switching off the air conditioning increases the available engine power and so improves the towing ability.
Recommendations for ventilation and air conditioning
If after an extended stop in sunshine, the interior temperature is very high, first ventilate the passenger compartment for a few moments. Put the air flow control at a setting high enough to quickly change the air in the passenger compartment. The air conditioning system does not contain chlorine and does not present any danger to the ozone layer.
The condensation created by the air conditioning results in a discharge of water under the vehicle which is per fectly normal.
Page 128 of 380

5. Air conditioning On / Off
Press this button to switch off the air conditioning.
Switching the system off could result in discomfort (humidity, condensation). Press this button again to return to automatic operation of the air conditioning. The indicator lamp in the "A /C " button comes on. To obtain cool air more quickly, you can use recirculation of the interior air for a few moments. Then revert to the intake of exterior air.
6. Air distribution adjustment
Press one or more buttons to direct the air flow towards:
- the windscreen and side windows, - the outer and centre air vents, - the footwells. You can combine the three orientations to obtain the desired air distribution.
7. Air fl ow adjustment
Turn this control to the left to decrease the air flow or to the right to increase the air flow.
The air flow indicator lamps, between the two fans, come on progressively in relation to the value requested.
8. Air intake / Air recirculation
Air recirculation enables the passenger compartment to be isolated from exterior odours and smoke when external pollution is detected (if your vehicle is fitted with a pollution sensor).
It is activated automatically on operation of the screenwash. It is inactive when the ambient temperature is below 5 °C to avoid the risk of misting in the vehicle.
- The indicator lamp with "A" on indicates that recirculation is controlled automatically. - The indicator lamp without "A" on indicates that recirculation is forced manually. - Both indicator lamps off indicates that recirculation is controlled automatically without taking account of the detection of pollution.
Without pollution sensor
If your vehicle is not fitted with a pollution sensor, press this button to force recirculation manually.
In ZEV mode, the hybrid system may temporarily inhibit operation of the air conditioning.
The ZEV mode gives preference to electric driving rather than maintaining a comfortable temperature.