Page 41 of 152
4-16
4
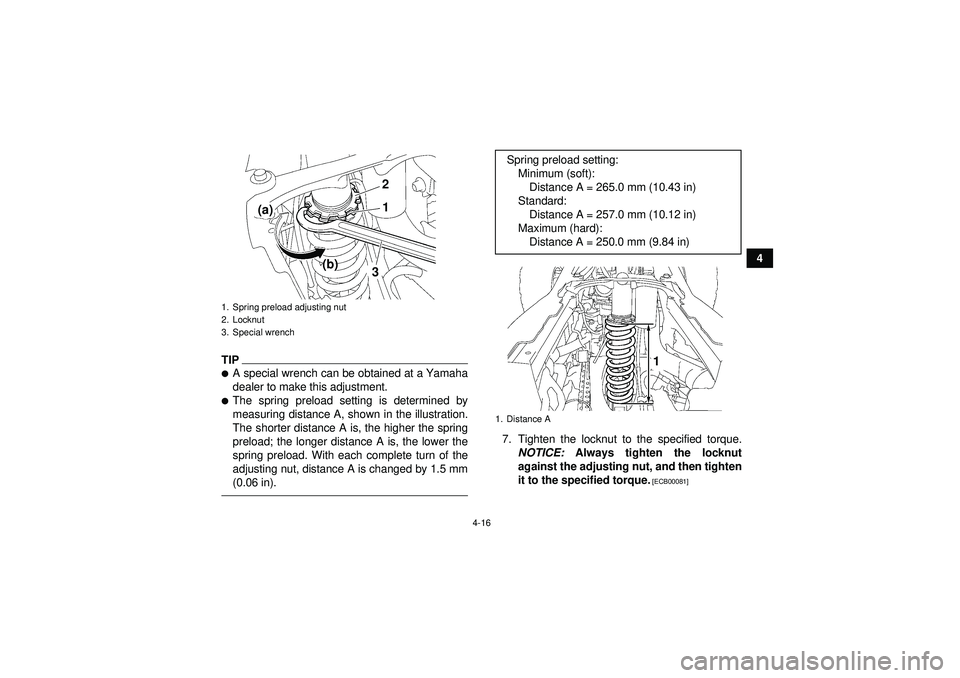
TIP�A special wrench can be obtained at a Yamaha
dealer to make this adjustment.�The spring preload setting is determined by
measuring distance A, shown in the illustration.
The shorter distance A is, the higher the spring
preload; the longer distance A is, the lower the
spring preload. With each complete turn of the
adjusting nut, distance A is changed by 1.5 mm
(0.06 in).
7. Tighten the locknut to the specified torque.NOTICE: Always tighten the locknut
against the adjusting nut, and then tighten
it to the specified torque.
[ECB00081]
1. Spring preload adjusting nut
2. Locknut
3. Special wrench
2
1
(a)
(b)3
Spring preload setting:
Minimum (soft):Distance A = 265.0 mm (10.43 in)
Standard: Distance A = 257.0 mm (10.12 in)
Maximum (hard): Distance A = 250.0 mm (9.84 in)1. Distance A
1
U1PD60E0.book Page 16 Monday, June 13, 2011 2:57 PM
Page 42 of 152

4-17
48. Place the air filter case in the original position,
connect the air intake duct, and then tighten
the clamp screw at the carburetor side.
NOTICE: Make sure that the air intake duct
is properly connected to the carburetor,
and that the clamp screw is tightened se-
curely.
[ECB01170]
9. Install the bolts, install the hose joint, and then connect the hoses.
10. Install the seat.
WARNING
EWB00450This shock absorber assembly contains highly
pressurized nitrogen gas. If the shock absorb-
er assembly is damaged, it could explode
causing injury or property damage. Shock ab-
sorber cylinder damage could also result in
poor handling which could cause an accident.�Do not tamper with or attempt to open the
cylinder assembly.�Do not subject the shock absorber assembly
to an open flame or other high heat.
�Do not deform or damage the cylinder in any
way.�Do not dispose of a damaged or worn out
shock absorber assembly yourself. Take the
shock absorber assembly to a Yamaha deal-
er for any service.
Tightening torque: Locknut:44 Nm (4.4 m ·kgf, 32 ft· lbf)
U1PD60E0.book Page 17 Monday, June 13, 2011 2:57 PM
Page 55 of 152
6-6
6
EBU20865Parking on a slope
WARNING
EWB00851Avoid parking on hills or other inclines. Park-
ing on a hill or other incline could cause the
ATV to roll out of control, increasing the
chance of an accident. If you must park on an
incline, place the ATV transversely across the
incline, shift into first gear, stop the engine, ap-
ply the parking brake, and then block the front
and rear wheels with rocks or other objects.Never park the ATV on hills that are too steep
to walk up easily.
1. Bring the ATV to a stop by applying the front
brake, shift into first gear, and then stop the
engine.
2. With the front and rear brakes applied, apply the parking brake.
3. Release the front and rear brakes.
4. Turn the fuel cock to “OFF ”.
1. Parking brake lever (locked position)U1PD60E0.book Page 6 Monday, June 13, 2011 2:57 PM
Page 63 of 152

7-6
7
opening, even when the throttle lever is pushed to
the maximum. Turning in the adjusting screw limits
the maximum engine power available and de-
creases the maximum speed of the ATV. Turning
in the adjusting screw decreases top speed, and
turning it out increases top speed. (See page 4-4.)
Loading and accessories
WARNING
EWB00972Improper loading or towing can increase the
risk of loss of control, an overturn, or other ac-
cident. To reduce the risk of an accident:
�Do not exceed the maximum loading limits
for the vehicle (see “
MAXIMUM LOADING
LIMIT” below or vehicle labeling).�Make sure the load does not interfere with
your control or ability to see where you are
going.�Reduce speed and allow more room to stop.
A heavier vehicle takes longer to stop.�Avoid hills and rough terrain. Choose terrain
carefully. Use extreme caution when towing
or carrying a load on inclines.�Turn gradually and go slowly.As originally equipped, this ATV is not designed to
carry cargo or tow a trailer. If you choose to add ac-
cessories to carry cargo, you must use common
sense and good judgment.
Use extra caution when riding the ATV with addi-
tional loads, such as accessories or cargo. The
ATV’s handling may be adversely affected. Re-
duce your speed when adding additional loads.
1. Adjusting screw
2. Locknut
2 1
MAXIMUM LOADING LIMIT
ATV loading limit (total weight of cargo, rider,
accessories, and tongue):100.0 kg (220 lb)
U1PD60E0.book Page 6 Monday, June 13, 2011 2:57 PM
Page 73 of 152
7-16
7
If you start to roll backwards, DO NOT apply the
rear brake, and apply the front brake gradually.
The ATV could easily tip over backwards. When
fully stopped, apply the rear brake as well, and
then lock the parking brake. Dismount the ATV im-
mediately on the uphill side or to a side if pointed
straight uphill. Turn the ATV around and remount,
following the procedure described in the Owner
’s
Manual. WARNING! Stalling, rolling backwards
or improperly dismounting while climbing a hill
could result in ATV overturning. If you cannot
control the ATV, dismount immediately on the
uphill side.
[EWB01802]
RIDING DOWNHILL
WARNING
EWB01131Going down a hill improperly could cause
overturns or loss of control. Always follow
proper procedures for going down hills as de-
scribed in this Owner ’s Manual.�Always check the terrain carefully before
you start down any hill.
U1PD60E0.book Page 16 Monday, June 13, 2011 2:57 PM
Page 91 of 152
8-11
8
To remove the spark plug
1. Remove the seat. (See page 4-12.)
2. Remove the bolts and the quick fastener screws shown.
3. Remove the fuel tank cap by turning it coun- terclockwise. WARNING! Never remove the
fuel tank cap while smoking, or in the vi-
cinity of sparks, open flames, or other
sources of ignition such as pilot lights of
water heaters and clothes dryers. Always
turn off the engine before removing the
fuel tank cap. Do not remove the fuel tank
cap immediately after the engine has been
running, as it is still very hot. Do not spill
gasoline on the engine, exhaust pipe or
muffler.
[EWB01871]
4. Pull the panel backward, and then remove the panel.
5. Install the fuel tank cap by turning it clockwise.
6. Remove the bolt, and then lift the rear of the fuel tank while sliding the tank slightly rear-
ward.1. Panel
2. Bolt
3. Quick fastener screw
4. Fuel tank cap
2
4 3 1
U1PD60E0.book Page 11 Monday, June 13, 2011 2:57 PM
Page 94 of 152

8-14
8To install the spark plug
1. Clean the surface of the spark plug gasket and its mating surface, and then wipe off any
grime from the spark plug threads.
2. Install the spark plug with the spark plug wrench, and then tighten it to the specified
torque.
TIPIf a torque wrench is not available when installing
the spark plug, a good estimate of the correct
torque is 1/4 –1/2 turn past finger tight. However,
the spark plug should be tightened to the specified
torque as soon as possible.3. Install the spark plug cap.
4. Place the fuel tank in the original position, and then install the bolt.
5. Remove the fuel tank cap by turning it coun- terclockwise.
6. Place the panel in the original position. 7. Install the fuel tank cap by turning it clockwise.
8. Install the bolts and the quick fastener screws.
9. Install the seat.
EBU23307Engine oil and oil filter element The engine oil level should be checked before
each ride. In addition, the oil must be changed and
the oil filter element replaced at the intervals spec-
ified in the periodic maintenance and lubrication
chart.
Tightening torque:
Spark plug:13 Nm (1.3 m ·kgf, 9.4 ft ·lbf)1. Projection
2. Slot
2 1
U1PD60E0.book Page 14 Monday, June 13, 2011 2:57 PM
Page 109 of 152
8-29
8
4. Insert the tailpipe into the muffler and align the
bolt holes.
5. Install the bolt and tighten it to the specified torque.
6. Remove the purging bolt and the gasket. 7. Start the engine and rev it up approximately
twenty times while momentarily creating ex-
haust system back pressure by blocking the
end of the muffler with a shop towel.
8. Stop the engine and allow the exhaust pipe to cool.
9. Check the gasket for damage, and replace it if necessary.
10. Install the gasket and the purging bolt, and then tighten the bolt to the specified torque.
1. Tailpipe
2. Spark arresterTightening torque:Tailpipe bolt:10 Nm (1.0 m ·kgf, 7.2 ft· lbf)
1
2
1. Purging bolt
2. Gasket
1
2
U1PD60E0.book Page 29 Monday, June 13, 2011 2:57 PM


2. Remove the bolts and the quick fastener screws shown.
3. Remove the fuel tank cap by turning it coun- terclockwise. WARNING! Ne")
