2012 YAMAHA XCITY 125 engine oil
[x] Cancel search: engine oilPage 51 of 86
PERIODIC MAINTENANCE AND ADJUSTMENT
6-10
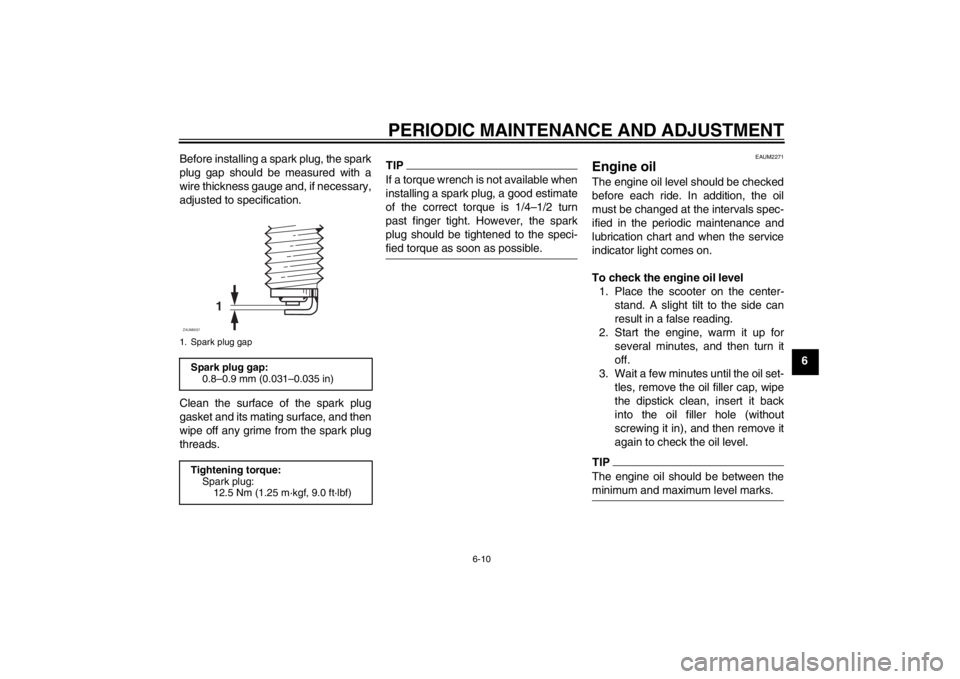
6 Before installing a spark plug, the spark
plug gap should be measured with a
wire thickness gauge and, if necessary,
adjusted to specification.
Clean the surface of the spark plug
gasket and its mating surface, and then
wipe off any grime from the spark plug
threads.
TIPIf a torque wrench is not available when
installing a spark plug, a good estimate
of the correct torque is 1/4–1/2 turn
past finger tight. However, the spark
plug should be tightened to the speci-
fied torque as soon as possible.
EAUM2271
Engine oil The engine oil level should be checked
before each ride. In addition, the oil
must be changed at the intervals spec-
ified in the periodic maintenance and
lubrication chart and when the service
indicator light comes on.
To check the engine oil level
1. Place the scooter on the center-
stand. A slight tilt to the side can
result in a false reading.
2. Start the engine, warm it up for
several minutes, and then turn it
off.
3. Wait a few minutes until the oil set-
tles, remove the oil filler cap, wipe
the dipstick clean, insert it back
into the oil filler hole (without
screwing it in), and then remove it
again to check the oil level.TIPThe engine oil should be between the
minimum and maximum level marks.
1. Spark plug gapSpark plug gap:
0.8–0.9 mm (0.031–0.035 in)
Tightening torque:
Spark plug:
12.5 Nm (1.25 m·kgf, 9.0 ft·lbf)
1
ZAUM0037
U16PE3E0.book Page 10 Tuesday, June 19, 2012 5:17 PM
Page 52 of 86
PERIODIC MAINTENANCE AND ADJUSTMENT
6-11
64. If the engine oil is below the mini-
mum level mark, add sufficient oil
of the recommended type to raise
it to the correct level.
5. Insert the dipstick into the oil filler
hole, and then tighten the oil filler
cap.
To change the engine oil (with or
without oil filter element replace-
ment)
1. Start the engine, warm it up for
several minutes, and then turn it
off.
2. Place an oil pan under the engine
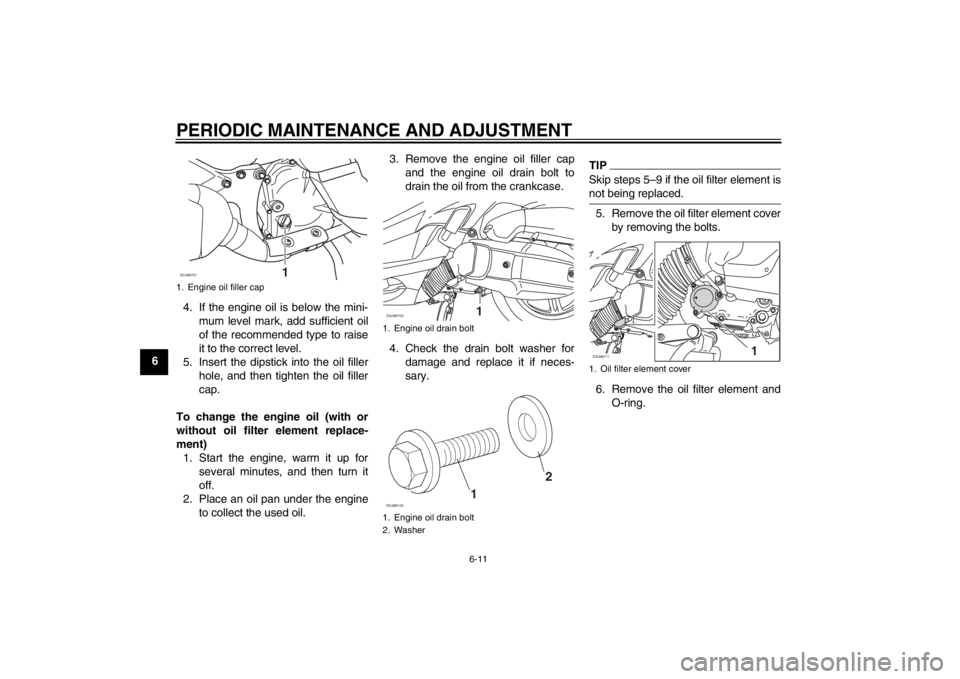
to collect the used oil.3. Remove the engine oil filler cap
and the engine oil drain bolt to
drain the oil from the crankcase.
4. Check the drain bolt washer for
damage and replace it if neces-
sary.
TIPSkip steps 5–9 if the oil filter element is
not being replaced.5. Remove the oil filter element cover
by removing the bolts.
6. Remove the oil filter element and
O-ring.
1. Engine oil filler capZAUM0701
1
1. Engine oil drain bolt
1. Engine oil drain bolt
2. WasherZAUM0702
112
ZAUM0129
1. Oil filter element coverZAUM0711
1
U16PE3E0.book Page 11 Tuesday, June 19, 2012 5:17 PM
Page 53 of 86
PERIODIC MAINTENANCE AND ADJUSTMENT
6-12
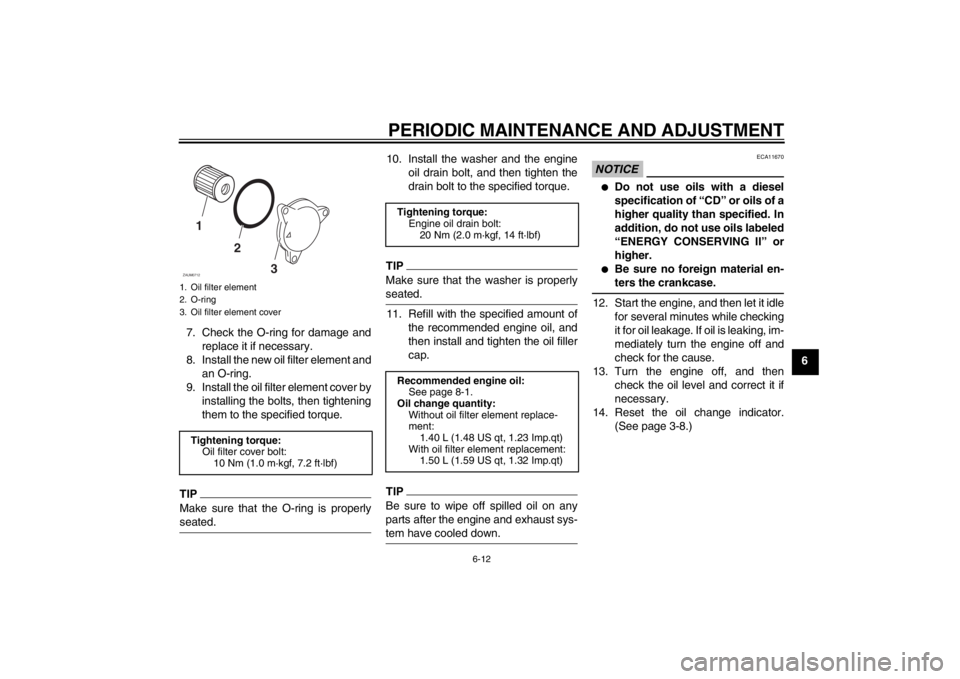
6 7. Check the O-ring for damage and
replace it if necessary.
8. Install the new oil filter element and
an O-ring.
9. Install the oil filter element cover by
installing the bolts, then tightening
them to the specified torque.
TIPMake sure that the O-ring is properly
seated.
10. Install the washer and the engine
oil drain bolt, and then tighten the
drain bolt to the specified torque.TIPMake sure that the washer is properly
seated.11. Refill with the specified amount of
the recommended engine oil, and
then install and tighten the oil filler
cap.TIPBe sure to wipe off spilled oil on any
parts after the engine and exhaust sys-
tem have cooled down.
NOTICE
ECA11670
●
Do not use oils with a diesel
specification of “CD” or oils of a
higher quality than specified. In
addition, do not use oils labeled
“ENERGY CONSERVING II” or
higher.
●
Be sure no foreign material en-
ters the crankcase.
12. Start the engine, and then let it idle
for several minutes while checking
it for oil leakage. If oil is leaking, im-
mediately turn the engine off and
check for the cause.
13. Turn the engine off, and then
check the oil level and correct it if
necessary.
14. Reset the oil change indicator.
(See page 3-8.)
1. Oil filter element
2. O-ring
3. Oil filter element coverTightening torque:
Oil filter cover bolt:
10 Nm (1.0 m·kgf, 7.2 ft·lbf)1
2
3
ZAUM0712
Tightening torque:
Engine oil drain bolt:
20 Nm (2.0 m·kgf, 14 ft·lbf)
Recommended engine oil:
See page 8-1.
Oil change quantity:
Without oil filter element replace-
ment:
1.40 L (1.48 US qt, 1.23 Imp.qt)
With oil filter element replacement:
1.50 L (1.59 US qt, 1.32 Imp.qt)
U16PE3E0.book Page 12 Tuesday, June 19, 2012 5:17 PM
Page 54 of 86

PERIODIC MAINTENANCE AND ADJUSTMENT
6-13
6
EAU20066
Final transmission oil The final transmission case must be
checked for oil leakage before each
ride. If any leakage is found, have a
Yamaha dealer check and repair the
scooter. In addition, the final transmis-
sion oil must be changed as follows at
the intervals specified in the periodic
maintenance and lubrication chart.
1. Start the engine, warm up the final
transmission oil by riding the
scooter for several minutes, and
then stop the engine.
2. Place the scooter on the center-
stand.
3. Place an oil pan under the final
transmission case to collect the
used oil.
4. Remove the final transmission oil
filler cap and its O-ring from the fi-
nal transmission case.5. Remove the final transmission oil
drain bolt and its gasket to drain
the oil from the final transmission
case.6. Install the final transmission oil
drain bolt and its new gasket, and
then tighten the bolt to the speci-
fied torque.
7. Refill with the specified amount of
the recommended final transmis-
sion oil. WARNING! Make sure
that no foreign material enters
the final transmission case.
Make sure that no oil gets on the
tire or wheel.
[EWA11311]
8. Install the final transmission oil fill-
er cap and its new O-ring, and then
tighten the oil filler cap.
9. Check the final transmission case
for oil leakage. If oil is leaking,
check for the cause.
1. Final transmission oil filler cap
1. Final transmission oil drain bolt
1
ZAUM0658 ZAUM0703
1
Tightening torque:
Final transmission oil drain bolt:
20 Nm (2.0 m·kgf, 14 ft·lbf)
Recommended final transmission
oil:
See page 8-1.
Oil quantity:
0.21 L (0.22 US qt, 0.18 Imp.qt)
U16PE3E0.book Page 13 Tuesday, June 19, 2012 5:17 PM
Page 63 of 86

PERIODIC MAINTENANCE AND ADJUSTMENT
6-22
6 fluid level goes down suddenly, have a
Yamaha dealer check the cause before
further riding.
EAU22721
Changing the brake fluid Have a Yamaha dealer change the
brake fluid at the intervals specified in
the TIP after the periodic maintenance
and lubrication chart. In addition, have
the oil seals of the brake master cylin-
der and caliper as well as the brake
hose replaced at the intervals listed be-
low or whenever they are damaged or
leaking.●
Oil seals: Replace every two
years.
●
Brake hose: Replace every four
years.
EAU23095
Checking and lubricating the
cables The operation of all control cables and
the condition of the cables should be
checked before each ride, and the ca-
bles and cable ends should be lubricat-
ed if necessary. If a cable is damaged
or does not move smoothly, have a
Yamaha dealer check or replace it.
WARNING! Damage to the outer
housing of cables may result in in-
ternal rusting and cause interfer-
ence with cable movement. Replace
damaged cables as soon as possi-
ble to prevent unsafe conditions.[EWA10711]
Recommended lubricant:
Yamaha Chain and Cable Lube or
engine oil
U16PE3E0.book Page 22 Tuesday, June 19, 2012 5:17 PM
Page 76 of 86
SCOOTER CARE AND STORAGE
7-1
7
EAU26094
Care While the open design of a scooter re-
veals the attractiveness of the technol-
ogy, it also makes it more vulnerable.
Rust and corrosion can develop even if
high-quality components are used. A
rusty exhaust pipe may go unnoticed
on a car, however, it detracts from the
overall appearance of a scooter. Fre-
quent and proper care does not only
comply with the terms of the warranty,
but it will also keep your scooter looking
good, extend its life and optimize its
performance.
Before cleaning
1. Cover the muffler outlet with a
plastic bag after the engine has
cooled down.
2. Make sure that all caps and covers
as well as all electrical couplers
and connectors, including the
spark plug cap, are tightly in-
stalled.
3. Remove extremely stubborn dirt,
like oil burnt onto the crankcase,
with a degreasing agent and a
brush, but never apply such prod-ucts onto seals, gaskets and wheel
axles. Always rinse the dirt and de-
greaser off with water.
Cleaning
NOTICE
ECA10783
●
Avoid using strong acidic wheel
cleaners, especially on spoked
wheels. If such products are
used on hard-to-remove dirt, do
not leave the cleaner on the af-
fected area any longer than in-
structed. Also, thoroughly rinse
the area off with water, immedi-
ately dry it, and then apply a cor-
rosion protection spray.
●
Improper cleaning can damage
plastic parts (such as cowlings,
panels, windshields, headlight
lenses, meter lenses, etc.) and
the mufflers. Use only a soft,
clean cloth or sponge with wa-
ter to clean plastic. However, if
the plastic parts cannot be thor-
oughly cleaned with water, di-
luted mild detergent with water
may be used. Be sure to rinseoff any detergent residue using
plenty of water, as it is harmful
to plastic parts.
●
Do not use any harsh chemical
products on plastic parts. Be
sure to avoid using cloths or
sponges which have been in
contact with strong or abrasive
cleaning products, solvent or
thinner, fuel (gasoline), rust re-
movers or inhibitors, brake flu-
id, antifreeze or electrolyte.
●
Do not use high-pressure wash-
ers or steam-jet cleaners since
they cause water seepage and
deterioration in the following ar-
eas: seals (of wheel and swing-
arm bearings, fork and brakes),
electric components (couplers,
connectors, instruments,
switches and lights), breather
hoses and vents.
●
For scooters equipped with a
windshield: Do not use strong
cleaners or hard sponges as
they will cause dulling or
scratching. Some cleaning com-
pounds for plastic may leave
scratches on the windshield.
U16PE3E0.book Page 1 Tuesday, June 19, 2012 5:17 PM
Page 78 of 86
SCOOTER CARE AND STORAGE
7-3
7
NOTICE
ECA10800
●
Apply spray oil and wax spar-
ingly and make sure to wipe off
any excess.
●
Never apply oil or wax to any
rubber and plastic parts, but
treat them with a suitable care
product.
●
Avoid using abrasive polishing
compounds as they will wear
away the paint.
TIP●
Consult a Yamaha dealer for ad-
vice on what products to use.
●
Washing, rainy weather or humid
climates can cause the headlight
lens to fog. Turning the headlight
on for a short period of time will
help remove the moisture from the
lens.
EAU36563
Storage Short-term
Always store your scooter in a cool, dry
place and, if necessary, protect it
against dust with a porous cover. Be
sure the engine and the exhaust sys-
tem are cool before covering the scoot-
er.NOTICE
ECA10820
●
Storing the scooter in a poorly
ventilated room or covering it
with a tarp, while it is still wet,
will allow water and humidity to
seep in and cause rust.
●
To prevent corrosion, avoid
damp cellars, stables (because
of the presence of ammonia)
and areas where strong chemi-
cals are stored.
Long-term
Before storing your scooter for several
months:
1. Follow all the instructions in the
“Care” section of this chapter.2. Fill up the fuel tank and add fuel
stabilizer (if available) to prevent
the fuel tank from rusting and the
fuel from deteriorating.
3. Perform the following steps to pro-
tect the cylinder, piston rings, etc.
from corrosion.
a. Remove the spark plug cap
and spark plug.
b. Pour a teaspoonful of engine oil
into the spark plug bore.
c. Install the spark plug cap onto
the spark plug, and then place
the spark plug on the cylinder
head so that the electrodes are
grounded. (This will limit spark-
ing during the next step.)
d. Turn the engine over several
times with the starter. (This will
coat the cylinder wall with oil.)
e. Remove the spark plug cap
from the spark plug, and then
install the spark plug and the
spark plug cap. WARNING! To
prevent damage or injury
from sparking, make sure to
ground the spark plug elec-
trodes while turning the en-
gine over.
[EWA10951]
U16PE3E0.book Page 3 Tuesday, June 19, 2012 5:17 PM
Page 80 of 86

SPECIFICATIONS
8-1
8
Dimensions:Overall length:
2175 mm (85.6 in)
Overall width:
785 mm (30.9 in)
Overall height:
1475 mm (58.1 in)
Seat height:
790 mm (31.1 in)
Wheelbase:
1455 mm (57.3 in)
Ground clearance:
165 mm (6.50 in)
Minimum turning radius:
2300 mm (90.6 in)Weight:Curb weight:
167 kg (368 lb)Engine:Engine type:
Liquid cooled 4-stroke, SOHC
Cylinder arrangement:
Single cylinder
Displacement:
124 cm³
Bore × stroke:
52.0 × 58.6 mm (2.05 × 2.31 in)
Compression ratio:
11.20 : 1
Starting system:
Electric starter
Lubrication system:
Wet sump
Engine oil:Type:
SAE 10W-30, 10W-40, 15W-40, 20W-40 or
20W-50
Recommended engine oil grade:
API service SG type or higher, JASO
standard MA
Engine oil quantity:
Without oil filter element replacement:
1.40 L (1.48 US qt, 1.23 Imp.qt)
With oil filter element replacement:
1.50 L (1.59 US qt, 1.32 Imp.qt)Final transmission oil:Type:
SAE 10W-30 type SE motor oil
Quantity:
0.21 L (0.22 US qt, 0.18 Imp.qt)Cooling system:Coolant reservoir capacity (up to the
maximum level mark):
0.20 L (0.21 US qt, 0.18 Imp.qt)
Radiator capacity (including all routes):
1.02 L (1.08 US qt, 0.90 Imp.qt)
Air filter:Air filter element:
Oil-coated paper elementFuel:Recommended fuel:
Premium unleaded gasoline only
Fuel tank capacity:
10.5 L (2.77 US gal, 2.31 Imp.gal)
Fuel reserve amount:
2.7 L (0.72 US gal, 0.60 Imp.gal)Fuel injection:Throttle body:
ID mark:
1B91 00Spark plug(s):Manufacturer/model:
NGK/CPR9EA-9
Spark plug gap:
0.8–0.9 mm (0.031–0.035 in)Clutch:Clutch type:
Dry, centrifugal automaticTransmission:Primary reduction ratio:
1.000
Final drive:
Gear
Secondary reduction ratio:
41/14 × 44/12 (10.73)
Transmission type:
V-belt automaticChassis:Frame type:
Underbone
-20 -10 0
10 20 30
40
50 ˚C
SAE 10W-30
SAE 15W-40SAE 20W-40SAE 20W-50
SAE 10W-40SAE 10W-50
U16PE3E0.book Page 1 Tuesday, June 19, 2012 5:17 PM