Page 16 of 492

PERIODIC MAINTENANCE AND
ADJUSTMENT ......................................... 8-1
Owner’s manual and tool kit ................. 8-5
Periodic maintenance chart for the
emission control system ..................... 8-7
General maintenance and lubrication
chart ................................................... 8-8
Hood ................................................... 8-17
Console .............................................. 8-21
Engine oil and oil filter cartridge ......... 8-25
Final gear oil ....................................... 8-39
Differential gear oil ............................. 8-47
Coolant ............................................... 8-55
Axle boots........................................... 8-59
Spark plug inspection ......................... 8-61
Cleaning the air filter element............. 8-67
Drive select lever box check hose ...... 8-79
V-belt cooling duct check hose........... 8-79
V-belt case drain plug......................... 8-81
Cleaning the spark arrester ................ 8-83
Valve clearance .................................. 8-85
Brakes ................................................ 8-87
Checking the front and rear brake
pads ................................................. 8-89
Checking the parking brake pads ....... 8-91
Checking the brake fluid level ............ 8-93
Brake fluid replacement...................... 8-99
8
Checking the brake pedal .................. 8-99
Parking brake lever free play
adjustment ..................................... 8-101
Brake light switch adjustment .......... 8-105
Cable inspection and lubrication ...... 8-107
Brake pedal and accelerator pedal
lubrication ...................................... 8-109
Rear knuckle upper and lower pivot
lubrication (left and right) ............... 8-111
Steering shaft lubrication ................. 8-115
Wheel removal ................................. 8-115
Tire replacement .............................. 8-117
Wheel installation ............................. 8-119
Battery.............................................. 8-121
Jump-starting ................................... 8-131
Fuse replacement ............................ 8-137
Replacing a headlight bulb............... 8-143
Headlight beam adjustment ............. 8-149
Tail/brake light bulb replacement ..... 8-151
Troubleshooting ............................... 8-157
Troubleshooting charts .................... 8-159
CLEANING AND STORAGE ................... 9-1
A. Cleaning .......................................... 9-1
B. Storage ............................................ 9-7
SPECIFICATIONS................................. 10-1
910
1RB60-EE.book Page 3 Thursday, April 7, 2011 10:43 AM
Page 60 of 492
3-1
EVU00080
1 -DESCRIPTION
1. Headlights
2. Front shock absorber assembly
3. Brake fluid reservoir
4. Air filter element
5. V-belt case
6. Driver seat
7. Driver seat belt
8. Cargo bed
9. Tail/brake lights
10. Rear shock absorber assembly
11. Cargo bed release levers
12. Spark plug
13. Door
CBA 089
14. Spark arrester
15. Passenger seat belt
16. Sun top (YXR7FSPB)
17. Passenger seat
18. Passenger handhold
19. Engine oil dipstick
20. Battery
21. Fuses
22. Coolant reservoir
23. Radiator cap
24. Oil filter cartridge
25. Fuel tank cap
I H G F EJKLM
AC N O D
1RB60-EE.book Page 1 Thursday, April 7, 2011 10:43 AM
Page 160 of 492
5-13
WARNING
Gasoline is poisonous and can cause injury or
death. Handle gasoline with care. Never si-
phon gasoline by mouth. If you should swal-
low some gasoline or inhale a lot of gasoline
vapor, or get some gasoline in your eyes, see
your doctor immediately. If gasoline spills on
your skin, wash with soap and water. If gaso-
line spills on your clothing, change your
clothes.Your Yamaha engine has been designed to use
regular unleaded gasoline with a research octane
number of 91 or higher. If knocking or pinging oc-
curs, use a different brand of gasoline or premium
unleaded fuel. Unleaded fuel will give you longer
spark plug life and reduced maintenance cost.
1RB60-EE.book Page 13 Thursday, April 7, 2011 10:43 AM
Page 298 of 492
8-7
EVU01640
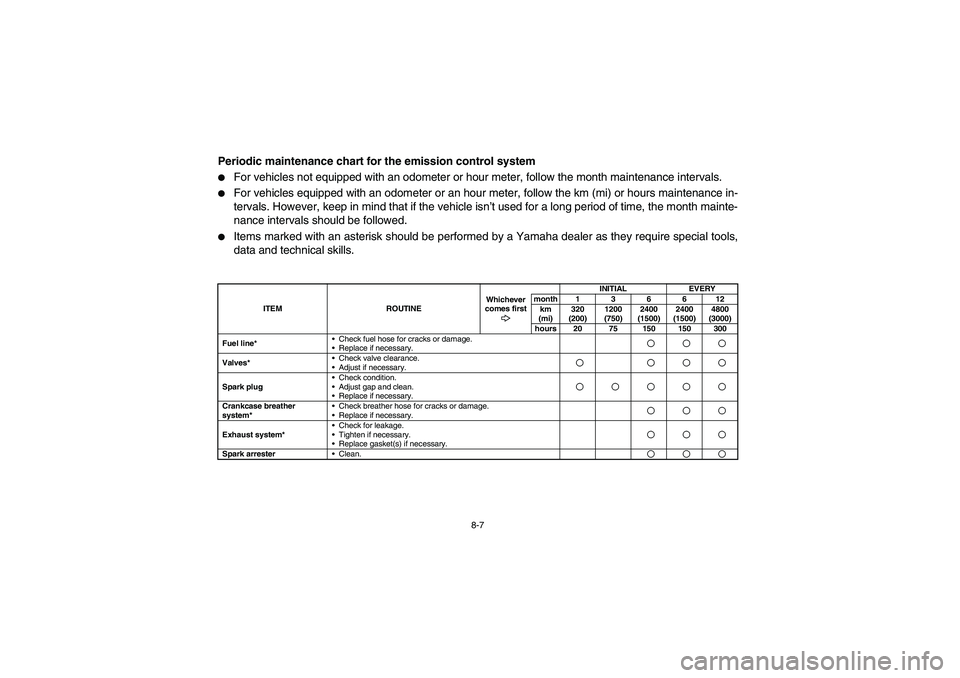
Periodic maintenance chart for the emission control system�
For vehicles not equipped with an odometer or hour meter, follow the month maintenance intervals.
�
For vehicles equipped with an odometer or an hour meter, follow the km (mi) or hours maintenance in-
tervals. However, keep in mind that if the vehicle isn’t used for a long period of time, the month mainte-
nance intervals should be followed.
�
Items marked with an asterisk should be performed by a Yamaha dealer as they require special tools,
data and technical skills.
ITEM ROUTINEWhichever
comes firstINITIAL EVERY
month136612
km
(mi)320
(200)1200
(750)2400
(1500)2400
(1500)4800
(3000)
hours 20 75 150 150 300
Fuel line*Check fuel hose for cracks or damage.
Replace if necessary.
Valves*Check valve clearance.
Adjust if necessary.Spark plugCheck condition.
Adjust gap and clean.
Replace if necessary.Crankcase breather
system*Check breather hose for cracks or damage.
Replace if necessary.Exhaust system*Check for leakage.
Tighten if necessary.
Replace gasket(s) if necessary.Spark arresterClean.1RB60-EE.book Page 7 Thursday, April 7, 2011 10:43 AM
Page 352 of 492
8-61 1. Spark plug cap
1. Capuchon de bougie
1. Tapa de bujía
1
1. Spark plug wrench
1. Clé à bougie
1. Llave de bujías
1
EVU00750
Spark plug inspection
Removal
1. Remove the console. (See pages 8-21–8-23
for console removal and installation proce-
dures.)
2. Remove the spark plug cap.
3. Use the spark plug wrench in the tool kit to re-
move the spark plug as shown.
1RB60-EE.book Page 61 Thursday, April 7, 2011 10:43 AM
Page 354 of 492
8-63 a. Spark plug gap
a.Écartement des électrodes
a. Distancia entre electrodos de la bujía
Inspection
The spark plug is an important engine component
and is easy to inspect. The condition of the spark
plug can indicate the condition of the engine.
The ideal color of the porcelain insulator around
the center electrode is a medium-to-light tan for a
vehicle that is being ridden normally.
You should periodically remove and inspect the
spark plug because heat and deposits will cause
the spark plug to slowly break down and erode. If
electrode erosion becomes excessive, or if carbon
and other deposits are excessive, you should re-
place the spark plug with the specified plug.
Measure the spark plug gap with a wire thickness
gauge and, if necessary, adjust the gap to specifi-
cation.Specified spark plug:
CPR7EA-9 (NGK)
Spark plug gap:
0.8–0.9 mm (0.031–0.035 in)
1RB60-EE.book Page 63 Thursday, April 7, 2011 10:43 AM
Page 356 of 492
8-65
Installation
1. Clean the surface of the spark plug gasket
and its mating surface, and then wipe off any
grime from the spark plug threads.
2. Install the spark plug and tighten it to the
specified torque. If a torque wrench is not
available when you are installing the spark
plug, a good estimate of the correct torque is
one-quarter to one-half turn past finger tight.
Have the spark plug tightened to the speci-
fied torque as soon as possible.
3. Install the spark plug cap.
4. Reinstall the console.Tightening torque:
Spark plug:
13 Nm (1.3 m·kgf, 9.4 ft·lbf)
1RB60-EE.book Page 65 Thursday, April 7, 2011 10:43 AM
Page 450 of 492
8-159
5B410024
Troubleshooting charts
Starting problems or poor engine performance1. Fuel
Check if there is fuel
in the fuel tank.There is fuel.
Restart the engine.
No fuel.Supply fuel.
2. Compression
Use the electric
starter to see if
there is compression.There is compression.
Compression normal.
No compression.Ask a Yamaha dealer to
inspect.
3. Ignition
Remove the
spark plug and
check the electrodes.WetWipe clean with dry cloth.
DryAttach spark plug cap and
ground to chassis.Use the
electric starter.Spark is good.Ignition system is
normal.
Spark is weak.
Adjust the spark plug gap
or replace the spark plug. No spark.
Ask a Yamaha dealer to
inspect. 4. Battery
Use the electric starter.Engine turns over
quickly.Battery is good.
Engine turns over
slowly.
Check the compression.
Check the connections, and ask
a Yamaha dealer to charge the
battery if necessary.
1RB60-EE.book Page 159 Thursday, April 7, 2011 10:43 AM


