2012 YAMAHA EC-03 buttons
[x] Cancel search: buttonsPage 22 of 78

INSTRUMENT AND CONTROL FUNCTIONS
4-3
1
2
34
5
6
7
8
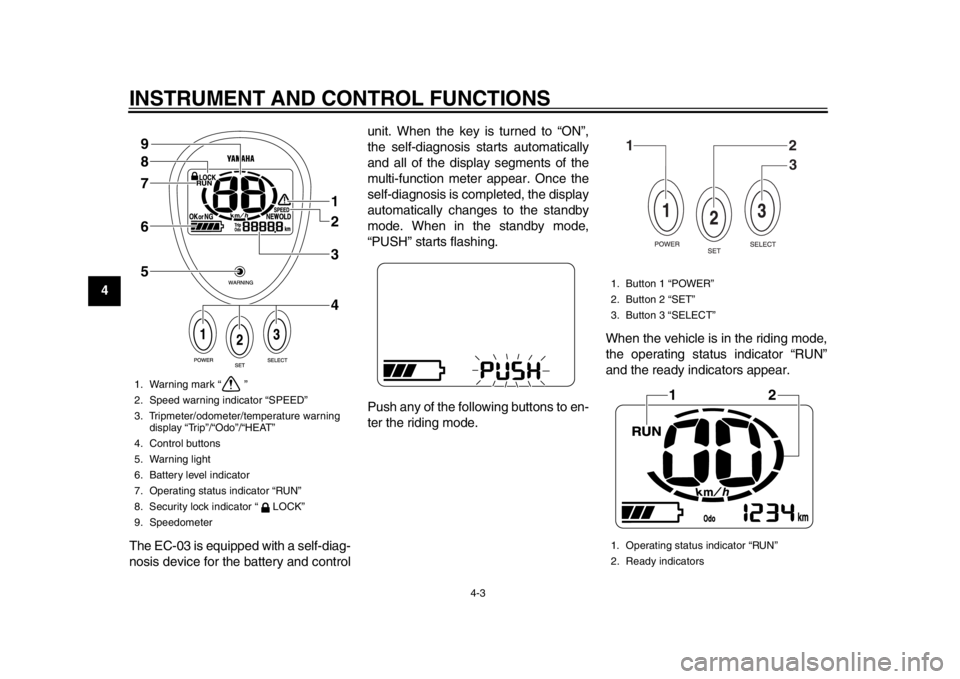
9The EC-03 is equipped with a self-diag-
nosis device for the battery and control unit. When the key is turned to “ON”,
the self-diagnosis starts automatically
and all of the display segments of the
multi-function meter appear. Once the
self-diagnosis is completed, the display
automatically changes to the standby
mode. When in the standby mode,
“PUSH” starts flashing.
Push any of the following buttons to en-
ter the riding mode.
When the vehicle is in the riding mode,
the operating status indicator “RUN”
and the ready indicators appear.
1. Warning mark “ ”
2. Speed warning indicator “SPEED”
3. Tripmeter/odometer/temperature warning
display “Trip”/“Odo”/“HEAT”
4. Control buttons
5. Warning light
6. Battery level indicator
7. Operating status indicator “RUN”
8. Security lock indicator “ LOCK”
9. Speedometer
1
2
3
4
5 6 7 8 9
1. Button 1 “POWER”
2. Button 2 “SET”
3. Button 3 “SELECT”
1. Operating status indicator “RUN”
2. Ready indicators
12
3
12
1CB-9-EA.book 3 ページ 2012年4月11日 水曜日 午前9時34分
Page 23 of 78

INSTRUMENT AND CONTROL FUNCTIONS
4-4
2
345
6
7
8
9
TIPWhen the vehicle is in the riding mode,
the beeper sounds. The beeper stops
when either brake lever is squeezed orthe vehicle starts moving.
Control buttons
Button 1 “POWER”
Button 2 “SET”
Button 3 “SELECT”
The following operations and settings
are made using these buttons.
Changing from the standby mode
to the riding mode
Switching between the odometer
and the tripmeter
Resetting the tripmeter
Registering or changing the secu-
rity number
Locking and unlocking the security
lock
Speedometer
The speedometer shows the riding
speed.
Tripmeter “Trip”
The tripmeter shows the distance trav- eled since it was last set to zero. To re-
set the tripmeter, push and hold button
3 “SELECT” for a few seconds until
“0.0” is displayed.
Odometer “Odo”
Push button 3 “SELECT” for at least
one second to switch the display to the
odometer.
The odometer shows the total distance
traveled. Use the odometer as a refer-
ence for the intervals between perform-
ing periodic maintenance.
Push button 3 for at least one second to
switch the display to the tripmeter.
Temperature warning display
“HEAT”/“COOL”
The EC-03 is equipped with a tempera-
ture protection function to protect the
battery and control unit.
If a problem is detected, the tripmeter/
odometer display is canceled and
“COOL” or “HEAT” flash.
When the temperature of the bat-
tery or control unit exceeds a spec-
ified temperature, “HEAT” flashes.
When the temperature of the bat-
tery falls below a specified temper-ature, “COOL” flashes.
TIP
When the temperature of the bat-
tery exceeds a specified tempera-
ture, “HEAT” flashes and the
driving power is reduced to limit
the electric output from the battery,
but this is normal.
When the temperature of the bat-
tery falls below a specified temper-
ature, “COOL” flashes and the
driving power is reduced to limit
the electric output from the battery,
but this is normal.
If the vehicle is ridden for an ex-
tended period in high tempera-
tures, “HEAT” may flash and the
riding speed may be reduced.
If the vehicle is ridden after it has
been left in a hot place or under di-
rect sunlight, “HEAT” may flash
and the riding speed may be re-
duced.
If the vehicle is ridden after it has
been left in an excessively cold
place (less than 0
C), “COOL”
may flash and the riding speed
may be reduced.
1CB-9-EA.book 4 ページ 2012年4月11日 水曜日 午前9時34分
Page 26 of 78

INSTRUMENT AND CONTROL FUNCTIONS
4-7
1
2
34
5
6
7
8
9Error warnings
If a problem is detected, the warning
light comes on. In this case, check for
the warning mark “ ”. If this warning
mark also appears, have a Yamaha
dealer check the vehicle.
Warning mark “ ”
This warning mark flashes if a problem
is detected. If the warning mark keeps
flashing after turning the key to “OFF”
and then back to “ON”, have a Yamaha
dealer check the vehicle.TIPAfter turning the key to “ON”, the warn-
ing mark appears. If the warning mark
goes out after a few seconds, there isno malfunction. Go ahead with riding.
EAU50034
Using the security lock The EC-03 is equipped with a security
lock that can be used by registering a
security number. Once the security
number has been set, the vehicle can-
not be ridden unless the correct securi-
ty number is entered, even if the key is
turned to “ON”.
Registering and changing the secu-
rity number
WARNING
EWA15611
Be sure to stop the vehicle before
registering or changing the security
number. Changing settings while
riding can distract the operator andincrease the risk of an accident.TIPThe security number registration/
change mode is canceled if the regis-
tering procedure is not completed in
one minute. If the mode cancels, repeatthe procedure.
1. Turn the key to “ON”. All display segments appear for a
few seconds, then the vehicle en- ters the standby mode and
“PUSH” flashes.
TIPWhen the security lock has been
locked, the security number indicator
“ LOCK” appears when the vehicle isin the standby mode.
2. Change to the riding mode by pushing any of the buttons.1. Security lock indicator “ LOCK”
1
1CB-9-EA.book 7 ページ 2012年4月11日 水曜日 午前9時34分
Page 27 of 78

INSTRUMENT AND CONTROL FUNCTIONS
4-8
2
345
6
7
8
9
The display shows that the vehicle
is in the riding mode.
TIP
When the security lock is locked,
after changing to the riding mode,
enter the security number to un- lock the security lock. (See page
7-1 for more information about un-
locking the security lock.)
When the vehicle enters the riding
mode, the beeper sounds. The
beeper stops sounding when ei-
ther brake lever is squeezed or thevehicle starts moving.
3. Press buttons 2 and 3 simulta- neously.
The display changes to the securi-
ty lock registration mode.
Registering the security numberfor the first timeProceed to step 5.
Changing the security number“OLD” and “– – – – –” are dis-
played. 4. Use the buttons to enter the regis-
tered security number.
Proceed to step 5 if the correct se-
curity number is entered.
If an incorrect number is entered,
the beeper sounds, “NG” flashes
1. Button 1 “POWER”
2. Button 2 “SET”
3. Button 3 “SELECT”
12
3
1. Input number indicator “– – – – –”
2. Registered number indicator “OLD”
2
1
1CB-9-EA.book 8 ページ 2012年4月11日 水曜日 午前9時34分
Page 28 of 78

INSTRUMENT AND CONTROL FUNCTIONS
4-9
1
2
34
5
6
7
8
9for a few seconds, and the vehicle
returns to the riding mode. Repeat
the procedure from step 3.
5. “NEW” and “– – – – –” are dis- played. Enter a new security number.
The security number consists of a
four-digit number. Enter a number
using the buttons.
TIPThe number “1111” cannot be used as
a security number.
When a four-digit security number
has been entered, “OK or NG” is
displayed.
6. Push button 3 “SELECT” to display “OK”.
1. Incorrect number indicator “NG”
1
1. Input number indicator “– – – – –”
2. New number indicator “NEW”
21
1. Number confirmation indicator “OK”
1
1CB-9-EA.book 9 ページ 2012年4月11日 水曜日 午前9時34分
Page 29 of 78

INSTRUMENT AND CONTROL FUNCTIONS
4-10
2
345
6
7
8
9
7. Push button 2 “SET”. The security
number flashes for a few seconds,
and then the vehicle enters the
riding mode.
TIP
Be sure to record the security
number and keep it in a safe place.
Pushing button 3 “SELECT”
switches the display between “OK”
and “NG”.
To change the registered security
number, switch the display to “NG”
by pushing button 3 “SELECT”,
and then push button 2 “SET”. Re-peat the procedure from step 5. Locking and unlocking the security
lock
Locking the security lock
Push button 2 “SET” for a few seconds.
When the security lock is locked, the
security lock indicator “ LOCK” is dis-
played.TIPDo not lock the security lock when hav-
ing a Yamaha dealer perform service orrepairs on the vehicle.
Unlocking the security lockChange to the standby mode by push-
ing one of the buttons, then enter the security number. (See “Preparations
for starting off” on page 7-1.)1. Security lock indicator “ LOCK”
1
1CB-9-EA.book 10 ページ 2012年4月11日 水曜日 午前9時34分
Page 46 of 78

OPERATION AND IMPORTANT RIDING POINTS
7-2
1
2
3
4
5
67
8
95. Turn the key to “ON”.
After all displays come on for a few
seconds, the vehicle enters the
standby mode.
TIP
When the security lock is locked,
the security lock indicator “ LOCK” comes on.
If the accelerator grip is turned
while the vehicle is in the standbymode, the beeper sounds.
6. Cancel the standby mode by pressing one of the buttons.
The vehicle enters the security
lock unlocking mode.
“– – – – –” is displayed.
TIPIf the security lock is not locked, after
canceling the standby mode, the vehi-
cle enters the riding mode. When the
vehicle is in the riding mode, the beeper
sounds. The beeper stops sounding
when either brake lever is squeezed or
the vehicle starts moving. Proceed tostep 8.
7. Enter the security number using the buttons.
Entering the correct number un-
locks the security lock and the ve-
hicle enters the riding mode.
1. Security lock indicator “ LOCK”
1
1. Button 1 “POWER”
2. Button 2 “SET”
3. Button 3 “SELECT”
12
3
1. Input number indicator “– – – – –”
1
1CB-9-EA.book 2 ページ 2012年4月11日 水曜日 午前9時34分
Page 68 of 78

PERIODIC MAINTENANCE AND ADJUSTMENT
8-19
1
2
3
4
5
6
78
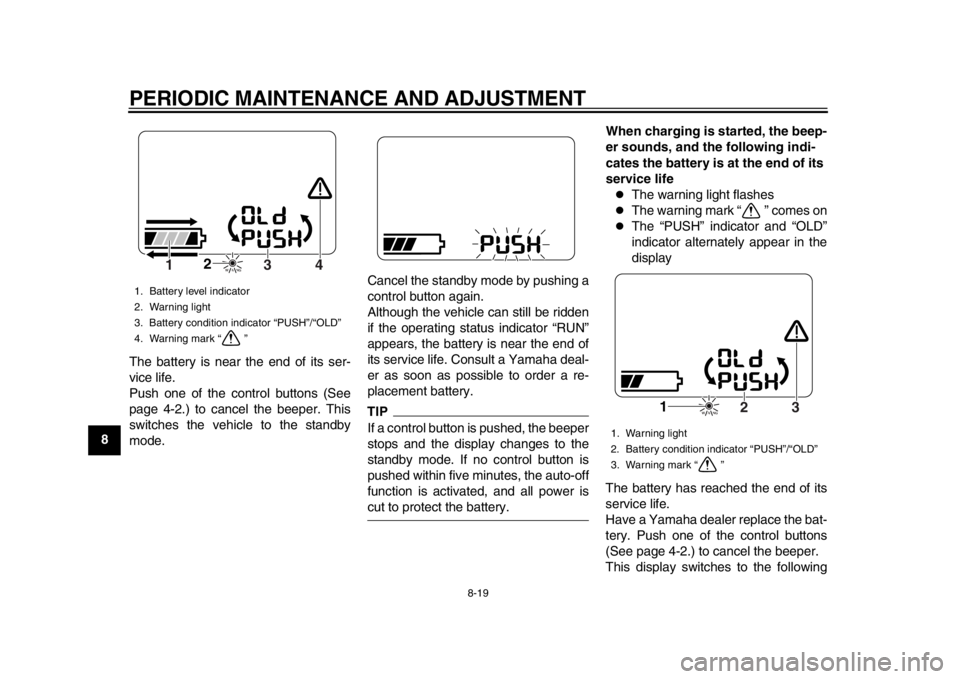
9The battery is near the end of its ser-
vice life.
Push one of the control buttons (See
page 4-2.) to cancel the beeper. This
switches the vehicle to the standby
mode. Cancel the standby mode by pushing a
control button again.
Although the vehicle can still be ridden
if the operating status indicator “RUN”
appears, the battery is near the end of
its service life. Consult a Yamaha deal-
er as soon as possible to order a re-
placement battery.
TIPIf a control button is pushed, the beeper
stops and the display changes to the
standby mode. If no control button is
pushed within five minutes, the auto-off
function is activated, and all power iscut to protect the battery.When charging is started, the beep-
er sounds, and the following indi-
cates the battery is at the end of its
service life
The warning light flashes
The warning mark “ ” comes on
The “PUSH” indicator and “OLD”
indicator alternately appear in the
display
The battery has reached the end of its
service life.
Have a Yamaha dealer replace the bat-
tery. Push one of the control buttons
(See page 4-2.) to cancel the beeper.
This display switches to the following
1. Battery level indicator
2. Warning light
3. Battery condition indicator “PUSH”/“OLD”
4. Warning mark “ ”
2
4
3
1
1. Warning light
2. Battery condition indicator “PUSH”/“OLD”
3. Warning mark “ ”
1
3
2
1CB-9-EA.book 19 ページ 2012年4月11日 水曜日 午前9時34分