2012 VOLKSWAGEN TRANSPORTER tailgate
[x] Cancel search: tailgatePage 235 of 486
Connecting the gas bottle
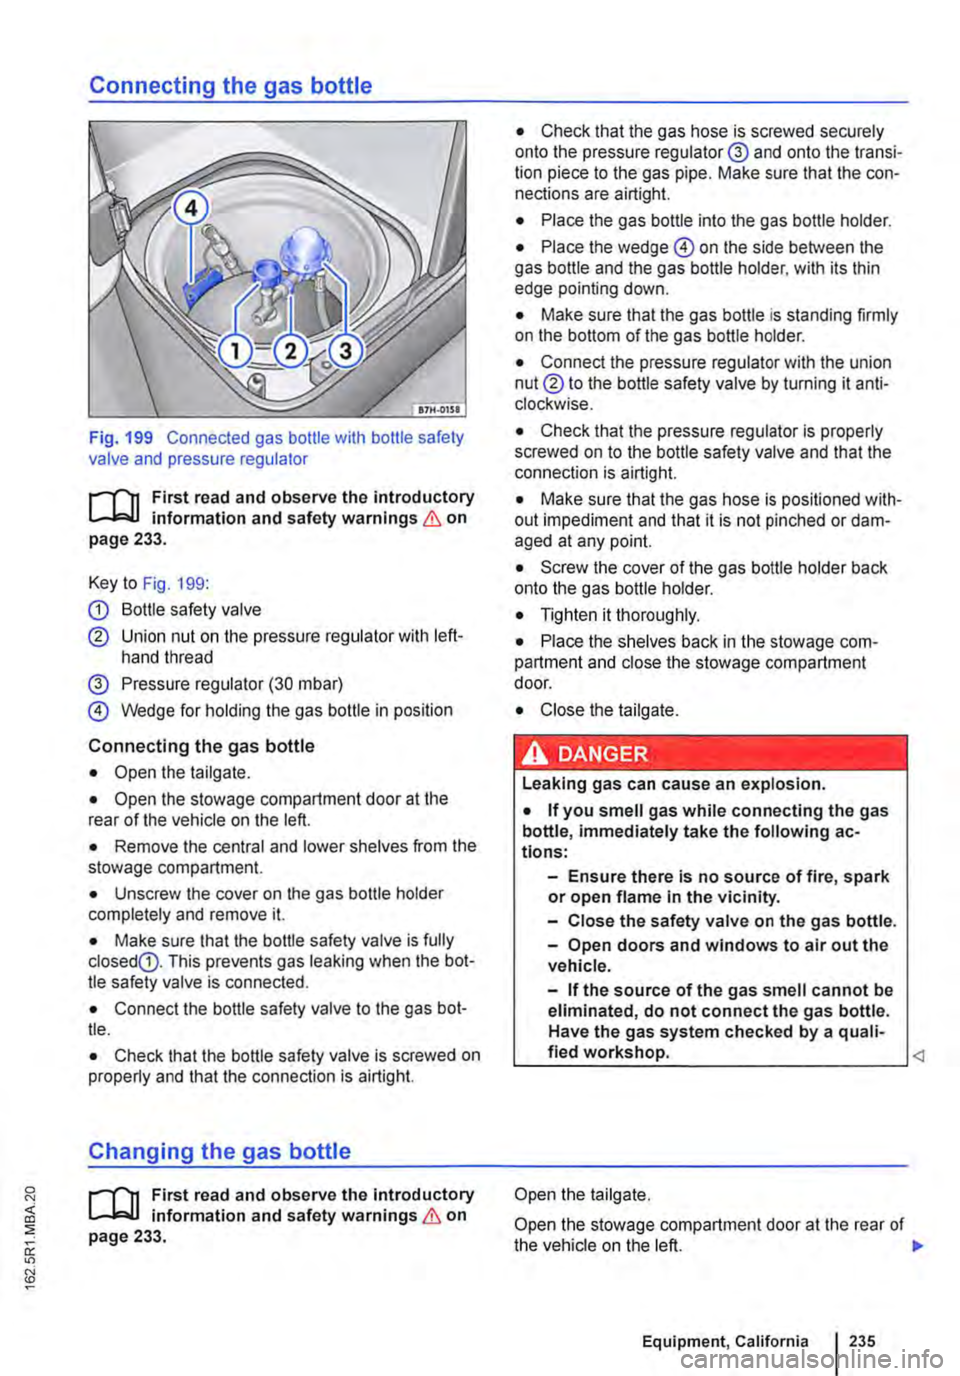
Fig. 199 Connected gas bottle with bottle safety valve and pressure regulator
r-l'n First read and observe the introductory L-J.:.IJ information and safety warnings & on page 233.
Key to Fig. 199:
G) Bottle safety valve
® Union nut on the pressure regulator with left-hand thread
@ Pressure regulator (30 mbar)
@ Wedge for holding the gas bottle in position
Connecting the gas bottle
• Open the tailgate.
• Open the stowage compartment door at the rear of the vehicle on the left.
• Remove the central and lower shelves from the stowage compartment.
• Unscrew the cover on the gas bottle holder completely and remove it.
• Make sure that the bottle safety valve is fully closedG). This prevents gas leaking when the bot-tle safety valve is connected.
• Connect the bottle safety valve to the gas bot-tle.
• Check that the bottle safety valve is screwed on properly and that the connection is airtight.
Changing the gas bottle
r-l'n First read and observe the Introductory L-J.:.IJ information and safety warnings & on page 233.
• Check that the gas hose is screwed securely onto the pressure regulator@ and onto the transi-tion piece to the gas pipe. Make sure that the con-nections are airtight.
• Place the gas bottle into the gas bottle holder.
• Place the wedge @ on the side between the gas bottle and the gas bottle holder. with its thin edge pointing down.
• Make sure that the gas bottle is standing firmly on the bottom of the gas bottle holder.
• Connect the pressure regulator with the union nut® to the bottle safety valve by turning it anti-clockwise.
• Check that the pressure regulator is properly screwed on to the bottle safety valve and that the connection is airtight.
• Make sure that the gas hose is positioned with-out impediment and that it is not pinched or dam-aged at any point.
• Screw the cover of the gas bottle holder back onto the gas bottle holder.
• Tighten it thoroughly.
• Place the shelves back in the stowage com-partment and close the stowage compartment door.
• Close the tailgate.
· &' DANGER .. --' • ,.,_.._.. '·-• I Leaking gas can cause an explosion.
• If you smell gas while connecting the gas bottle, immediately take the following ac-tions:
-Ensure there is no source of fire, spark or open flame in the vicinity.
-Close the safety valve on the gas bottle.
-Open doors and windows to air out the vehicle.
-If the source of the gas smell cannot be eliminated, do not connect the gas bottle. Have the gas system checked by a quali-fied workshop.
Open the stowage compartment door at the rear of the vehicle on the left. 11>
Equipment, California I 235
Page 291 of 486
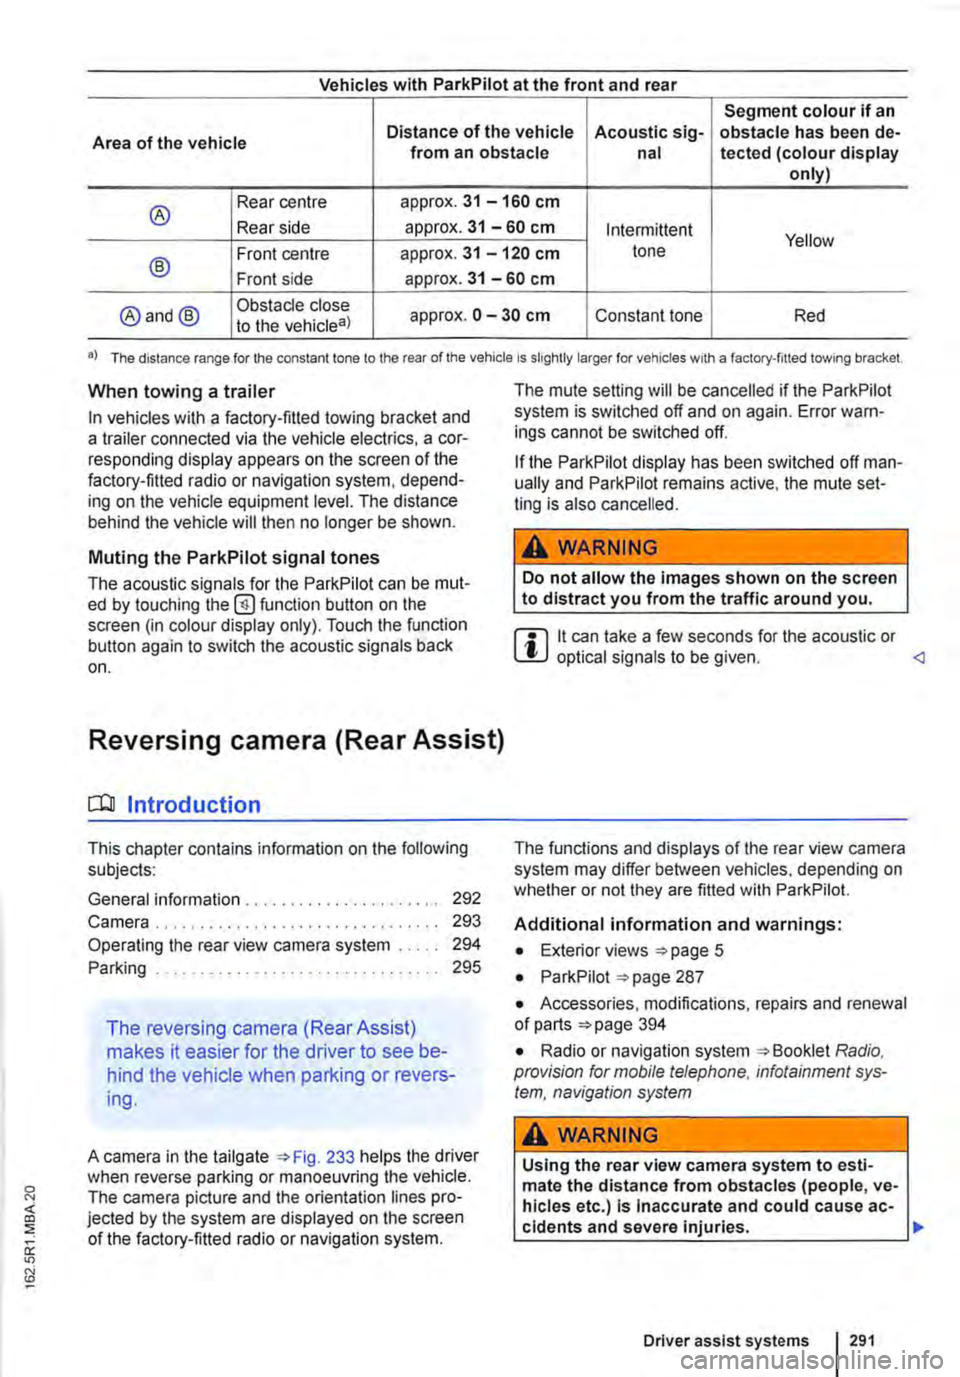
Vehicles with ParkPilot at the front and rear
Segment colour if an
Area of the vehicle Distance of the vehicle Acoustic sig-obstacle has been de-from an obstacle nal tected (colour display only)
® Rear centre approx. 31 -160 cm
Rear side approx. 31 -60 cm Intermittent Yellow
® Front centre approx. 31 -120 cm tone
Front side approx. 31 -60 cm
@and@ Obstacle close approx. 0 -30 cm Constant tone Red to the vehicle8)
•) The distance range for the constant lone to the rear of the vehicle is slightly larger for vehicles w1th a factory-filled towing bracket.
When towing a trailer
In vehicles with a factory-fitted towing bracket and a trailer connected via the vehicle electrics, a cor-responding display appears on the screen of the factory-fitted radio or navigation system, depend-ing on the vehicle equipment level. The distance behind the vehicle will then no longer be shown.
Muting the ParkPilot signal tones
The acoustic signals for the ParkPilot can be mut-ed by touching the @function button on the screen (in colour display only). Touch the function button again to switch the acoustic signals back on.
Reversing camera (Rear Assist)
o:n Introduction
This chapter contains information on the following subjects:
General information ..................... . Camera.
292 293
Operating the rear view camera system . . . . . 294
....................... 2%
The reversing camera (Rear Assist)
makes it easier for the driver to see be-
hind the vehicle when parking or revers-
ing.
A camera in the tailgate 233 helps the driver when reverse parking or manoeuvring the vehicle. The camera picture and the orientation lines pro-jected by the system are displayed on the screen of the factory-fitted radio or navigation system.
The mute setting will be cancelled if the ParkPilot system is switched off and on again. Error warn-ings cannot be switched off.
If the ParkPilot display has been switched off man-ually and ParkPilot remains active, the mute set-ting is also cancelled.
A WARNING
Do not allow the Images shown on the screen to distract you from the traffic around you.
m it can take a few seconds for the acoustic or W optical signals to be given.
Additional information and warnings:
• Exterior views =>page 5
• ParkPilot 287
• Accessories, modifications, repairs and renewal of parts 394
• Radio or navigation system Radio, provision for mobile telephone, infotainment sys-tem, navigation system
A WARNING
Using the rear view camera system to esti-mate the distance from obstacles (people, ve-hicles etc.) Is Inaccurate and could cause ac-cidents and severe injuries. 11>
Driver assist systems I 291
Page 292 of 486
A WARNING (Continued)
• The camera lens enlarges and distorts the field of vision and the objects on the screen will not be depicted as precisely and accu-rately as they are In reality.
• Certain objects, for example narrow posts or railings, may be difficult or Impossible to see on the screen because of its low resolu-tion or poor light conditions.
• The rear view camera system has blind spots within which obstacles and people can-not be detected.
• Keep the camera lens clean, free of snow and Ice and do not cover it.
A WARNING
The Intelligent rear view camera system tech-nology cannot overcome the laws of physics, and functions only within the limits of the system. Careless or unintentional use of the rear view camera system can cause accl· dents and lead to serious Injury. The system is not a substitute for the full concentration of the driver.
• Always adapt your speed and driving style to suit visibility, weather, road and traffic con· ditions.
General information
r'""'('n First read and observe the Introductory L-J,::.U information and safety warnings & on page 291.
Requirements for parking and manoeuvring while using the rear view camera system
Checklist
./ The tailgate must be closed.
./ The camera must give a clear and accurate image, i.e. there must be good visibility and the camera lens must be clean =:o Fig. 233.
./ There must be a clear and unobstructed view of the area behind the vehicle.
./ The rear of the vehicle must not be heavily loaded.
2921 While driving
A WARNING (ConUnued)
• Keep looking In the direction In which you are parking and at the relevant area sur-rounding the vehicle. The front of the vehicle swings out more than the rear of the vehicle.
• Do not allow the Images shown on the screen to distract you from the traffic around you.
• Always monitor the area around the vehi· cle as small children, animals and objects will not always be detected by the rear view cam-era system.
• The rear view camera system may not be able to display all areas clearly.
• The rear view camera system should only be used when the tallgate is fully closed.
CD
• The rear view camera system shows only two-dimensional images on the screen. The lack of depth of field means that potholes and protruding objects on the ground may only be detected with difficulty, or may not be detected at all.
• The rear view camera system may notal· ways be able to detect objects such as thin rails, fences, posts, trees etc. This could result In damage to your vehicle.
./ The vehicle must be undamaged. The rear view camera system must be checked by a qualified workshop if the position or angle of the camera has changed, e.g. following a rear impact.
Volkswagen Commercial Vehicles recommends that you practise parking with the reversing camera in a traffic-calmed area or car park with good visi-bility and weather conditions, so that you can famil· iarise yourself with the system, orientation lines and guiding functions in a safer environment.
Rear view camera system settings
Various settings, including brightness, contrast and colour, can be by touching the relevant function buttons 1j or G. or by moving the corre-sponding slider.
• Stop the vehicle in a safe place.
• Apply the handbrake firmly.
• Switch on the ignition.
Page 293 of 486
• Switch on radio/navigation system, if not al-ready on.
• Select reverse gear or move the selector lever to position R.
Camera
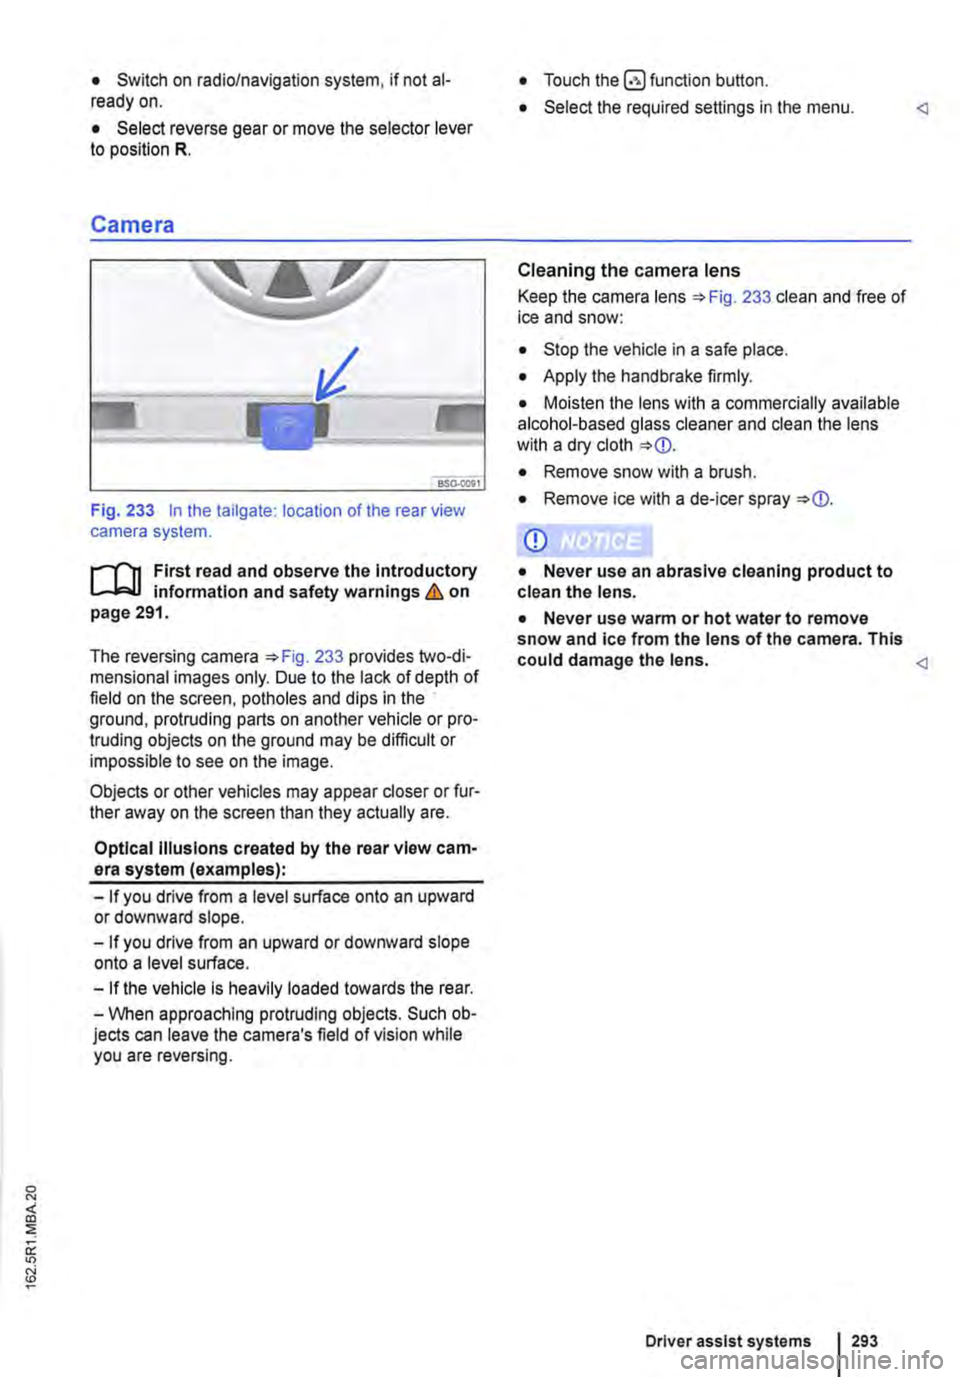
Fig. 233 In the tailgate: location of the rear view camera system.
....--r'n First read and observe the Introductory L.-J,:.U information and safety warnings & on page 291.
The reversing camera 233 provides two-di-mensional images only. Due to the lack of depth of field on the screen, potholes and dips in the ground, protruding parts on another vehicle or pro-truding objects on the ground may be difficult or impossible to see on the image.
Objects or other vehicles may appear closer or fur-ther away on the screen than they actually are.
Optical Illusions created by the rear view cam-era system (examples):
-If you drive from a level surface onto an upward or downward slope.
-If you drive from an upward or downward slope onto a level surface.
-If the vehicle Is heavily loaded towards the rear.
-When approaching protruding objects. Such ob-jects can leave the camera's field of vision while you are reversing.
• Touch the button.
• Select the required settings in the menu.
Cleaning the camera lens
Keep the camera lens 233 clean and free of ice and snow:
• Stop the vehicle in a safe place.
• Apply the handbrake firmly.
• Moisten the lens with a commercially available alcohol-based glass cleaner and clean the lens with a dry cloth
• Remove snow with a brush.
• Remove ice with a de-icer spray
CD
• Never use an abrasive cleaning product to clean the lens.
• Never use warm or hot water to remove snow and ice from the lens of the camera. This could damage the lens.
Driver assist systems 293
Page 381 of 486

Washing the vehicle
r-f'n First read and observe the introductory Information and safety warnings & on page 380.
The longer substances such as insects, bird drop-pings, resinous tree sap, road dirt, industrial de-posits, tar, soot or road salt and other corrosive materials remain on the vehicle, the more damage they do to the paintwork. High temperatures (for in-stance in strong sunlight) accelerate the corrosion process. The underside of the vehicle should also be cleaned thoroughly and regularly.
Car washes
Please observe the signs on the automatic car wash. Before using an automatic car wash take the usual precautions, such as closing all windows and folding in the exterior mirrors, in order to avoid damage to the vehicle. You must consult the car wash operator if there are special parts on your ve-hicle such as spoilers, roof luggage carrier systems or radio aerials ::.CD.
The paint is so hard-wearing that the car can nor-mally be washed without problems in an automatic car wash. However, the effect on the paint de-pends to a large extent on the design of the car wash. Volkswagen Commercial Vehicles recom-mends the use of car washes without brushes.
To remove any wax residue from the windows and to stop wipers rubbing, please note the following points ::.page 382, Cleaning windows and exterior mirrors.
Washing the car by hand
When washing by hand, first soften the dirt with plenty of water and rinse off as well as possible.
Then clean the vehicle with a soft sponge, a glove or a brush using only light pressure. Start with the roof and work from the top to the bottom. Use a shampoo for very stubborn dirt only.
The sponge or glove should be wrung out thor-oughly at regular intervals.
Clean the wheels, sill panels etc. last. Use a differ-ent sponge for this purpose.
A WARNING
Parts of the vehicle with sharp edges can cause Injury.
• Protect your hands and arms from cuts on sharp parts, for example when cleaning the underbody or the inside of the wheel hous-lngs.
A WARNING
After the car has been washed, the braking effect could set in later than normal and ex-tend the braking distance as the brake discs and brake pads will be wet, or iced up In win-ter.
• You can "dry and de-ice" the brakes by performing careful braking manoeuvres. Make sure that you do not endanger any oth-er road users or violate any legal regulations when doing so.
CD
• The water should be no warmer than +so•c (+140.FJ.
• Do not wash the vehicle in direct sunlight in order to avoid damage to the vehicle palntwork.
• Never clean with insect sponges, rough kitchen sponges or similar products as these can damage the surface.
• Never clean the headlights with a dry cloth or sponge. Always use a wet cloth or sponge. lt is best to use soapy water.
• Washing the vehicle In cold weather: if the vehicle is rinsed with a hose, do not direct the water at the lock cylinders or the gaps around the doors, boot, or bonnet. The locks and seals could freeze.
CD
Observe the following guidelines before driving the vehicle into an automatic car wash in order to avoid damage to the vehicle:
• Ensure that the gap between the guide rails In the car wash is sufficient for the vehicle track. If the track is too narrow your wheels and tyres will be damaged.
• Switch off the rain sensor before driving the vehicle Into an automatic car wash.
• Check that the car wash is tall and wide enough for your vehicle.
• Fold In the exterior mirrors. Electrically fold-Ing exterior mirrors must be moved electrically. Do not fold them in and out by hand.
• In order to prevent damage to the palntwork on the bonnet, fold the wipers back onto the windscreen after drying the wiper blades. Do not drop the wipers onto the glass.
• Lock the tailgate to prevent it from opening accidentally In the car wash.
Page 413 of 486
First aid kit, warning triangle, high-visibility waistcoat and fire
extinguisher
l"'""'('n First read and observe the introductory L.-J,::,JI Information and safety warnings & on page 411.
High-visibility waistcoat
In some vehicles there is a stowage compartment for a high-visibility waistcoat in the driver door 9.
Warning triangle
The warning triangle must comply with legal re-quirements.
First aid kit
The first aid kit must comply with legal require-ments. Comply with the expiry dates of the con-tents.
In some vehicles, there is a bag containing the warning triangle and first aid kit next to the vehicle toolkit.
To remove the bag, pull it inwards by the long end at the front while turning it downwards slightly.
Manual opening and closing
COl Introduction
This chapter contains information on the following subjects:
Unlocking the driver door manually . . . . . . . . . 414 Unlocking the tailgate manually ............ 414
Closing the sliding/tilting roof manually . . . . . 415
Unlocking the selector lever lock manually . . . 415
Should the radio signal of the remote control key or the central locking system fails, the doors, tailgate and sliding/tilting roof can be locked and, with some exceptions, unlocked manually.
Additional information and warnings:
• Vehicle key set 36
• Central locking system 39
• Doors 45
• Tailgate 49
• Sliding/tilting roof 58
• Closing the electric pop-up roof manually, Cali-fornia 192
In vehicles with a kitchenette, the first aid kit is lo-cated on the rear panel of the left stowage com-partment in the kitchen unit.
Fire extinguisher
Before using the fire extinguisher, make sure you are familiar with its operation. If an operating man-ual is supplied with the fire extinguisher, place it in the vehicle wallet.
The fire extinguisher must comply with the valid legal requirements. lt must be fully functional and checked regularly. See the test certificate on the fire extinguisher.
A WARNING
In the event of a sudden driving or braking manoeuvre or accident, loose objects could be flung though the vehicle and cause severe Injuries.
• Always secure the fire extinguisher, high-visibility waistcoat, first aid kit and warning triangle safely In the holders.
• In an emergency 411
A WARNING
Careless manual opening and closing can cause serious Injury.
• If the vehicle Is locked from the outside, the doors and windows cannot be opened from the inside.
• Never leave children or people requiring assistance alone In the vehicle. They could become trapped In the vehicle In an emergen-cy and may not be able to get themselves to safety.
• Temperatures Inside a locked vehicle may reach extremes of heat or cold, according to season. This can cause serious Injuries and Illness or fatalities, especially to small chil-dren. .,.
Practical tips 413
Page 414 of 486
A WARNING
The path of the doors, tailgate and sliding/tilt-ing roof is a dangerous area. Injuries could be sustained here.
Unlocking the driver door manually
rl'11 First read and observe the introductory L-J.:.I.I Information and safety warnings & on page 413.
If unlocked manually, only the driver door is un-locked. Observe information on the anti-theft alarm 39.
Unlocking the tailgate manually
Fig. 290 In the vehicle interior: removing the cov-er in the tailgate.
rl'11 First read and observe the introductory L-J.:.I.I information and safety warnings & on page 413.
• Ensure that the child proof lock is not engaged.
• Remove the round cover from the interior trim on the tailgate 290.
• Push the release lever 291 @ in the di-rection of the arrow to unlock the tailgate.
4141 If and when
A WARNING (Continued)
• Therefore doors, the tailgate and the slid-ing/tilting roof should only be opened or closed when nobody is in their path.
CD
When carrying out manual opening or closing remove and Install parts carefully In order to avoid damage to the vehicle.
• Insert the key bit into the driver door lock cylin-der and unlock the vehicle. The anti-theft alarm re-mains activated. However, the alarm will not be triggered.
• Switch on the ignition within 15 seconds. When the ignition is switched on, the electronic immobiliz-er recognises a valid remote control key and deac-tivates the anti-theft alarm system.
m In some vehicles, there is a rubber stopper l!.J instead of the cover. Carefully lever it out with the screwdriver from the vehicle toolkit.
Page 432 of 486

Detecting a blown fuse
If the metal strip is melted this indicates that the fuse has blown 305.
Shine a torch onto the fuse. This will help you to spot the blown fuse more easily.
Changing a fuse
• If applicable, take the plastic pliers 306 G) out of the fuse box cover.
• For small fuses. push the catch on G) from above 306
• For larger fuses, push the catch G) onto the fuse from the side 306@
Changing bulbs
o::n Introduction
This chapter contains information on the following subjects:
Indicator lamp . . . . . . . . . . . . . . . . . . . . . . . . . 433
Information on changing bulbs . 433 LED lights on the vehicle . . . . . . . . . 434
Changing bulbs in H4 halogen headlights 435
Changing bulbs in H7 halogen headlights . . . 437
Changing bulbs in the LED headlights . . . 438
Changing the bulbs in the fog light . . . . . . . . . 439 Changing the bulbs in the tail light cluster on vehicles with tailgate . . . . . . . . . . . . . . . . . . . . . 440
Changing the bulbs in the tail light cluster on vehicles with wing doors .................. 441
Changing the bulbs in the LED tail light cluster . . . . . . . . . . . . . . . . . . . . . . . . . 442 Changing the side turn signal bulbs . . . . . . . . 443
Changing the vehicle bulbs requires considerable technical skill. Therefore if you do not feel confi-dent with the procedure. Volkswagen Commercial Vehicles recommends having the bulbs changed by a Volkswagen Commercial Vehicles dealership or other professional assistance. You must contact a qualified workshop if other vehicle parts around the lights need to be removed or LED lights need to be replaced.
You should keep a box with spare light bulbs for the lights that ensure the vehicle is roadworthy in the vehicle at all times. Spare bulbs are available from Volkswagen Commercial Vehicles dealers. In some countries it is a legal requirement to have these spare bulbs in the vehicle.
lt may be illegal to drive with a defective bulb in the exterior lighting.
4321 If and when
• Pull out the blown fuse.
• If the fuse has blown, replace it with a new fuse of the same amp rating (same colour and same markings) and same size
• Replace the cover.
CD
You can damage another position In the electri-cal system by using a fuse with a higher amp rating.
You can change the following bulbs yourself:
• Bulbs of the halogen headlights.
• Turn signal bulb in the LED headlights.
• Bulbs in non-LED tail light cluster.
• Turn signal and reversing light bulb in the LED tail light cluster.
• Bulb of turn signal repeater.
• Bulb of fog lights.
All LED lights in the vehicle should always be changed by an expert.
Additional bulb specifications
Some bulbs in headlights or In tail light clusters might have factory specifications that are different to standard bulbs. The designation is inscribed on the bulb, either on the glass part or on the base.
Additional information and warnings:
• Exterior views 5
• Lights and vision 106
• Preparation for working In the engine compart-ment 350
• Vehicle toolkit 416
• Fuses 429
A WARNING
Accidents can occur If roads are not suffi-ciently Illuminated and other road users have difficulty seeing the vehicle, or cannot see it atall. 11>