2012 VOLKSWAGEN TRANSPORTER buttons
[x] Cancel search: buttonsPage 292 of 486
A WARNING (Continued)
• The camera lens enlarges and distorts the field of vision and the objects on the screen will not be depicted as precisely and accu-rately as they are In reality.
• Certain objects, for example narrow posts or railings, may be difficult or Impossible to see on the screen because of its low resolu-tion or poor light conditions.
• The rear view camera system has blind spots within which obstacles and people can-not be detected.
• Keep the camera lens clean, free of snow and Ice and do not cover it.
A WARNING
The Intelligent rear view camera system tech-nology cannot overcome the laws of physics, and functions only within the limits of the system. Careless or unintentional use of the rear view camera system can cause accl· dents and lead to serious Injury. The system is not a substitute for the full concentration of the driver.
• Always adapt your speed and driving style to suit visibility, weather, road and traffic con· ditions.
General information
r'""'('n First read and observe the Introductory L-J,::.U information and safety warnings & on page 291.
Requirements for parking and manoeuvring while using the rear view camera system
Checklist
./ The tailgate must be closed.
./ The camera must give a clear and accurate image, i.e. there must be good visibility and the camera lens must be clean =:o Fig. 233.
./ There must be a clear and unobstructed view of the area behind the vehicle.
./ The rear of the vehicle must not be heavily loaded.
2921 While driving
A WARNING (ConUnued)
• Keep looking In the direction In which you are parking and at the relevant area sur-rounding the vehicle. The front of the vehicle swings out more than the rear of the vehicle.
• Do not allow the Images shown on the screen to distract you from the traffic around you.
• Always monitor the area around the vehi· cle as small children, animals and objects will not always be detected by the rear view cam-era system.
• The rear view camera system may not be able to display all areas clearly.
• The rear view camera system should only be used when the tallgate is fully closed.
CD
• The rear view camera system shows only two-dimensional images on the screen. The lack of depth of field means that potholes and protruding objects on the ground may only be detected with difficulty, or may not be detected at all.
• The rear view camera system may notal· ways be able to detect objects such as thin rails, fences, posts, trees etc. This could result In damage to your vehicle.
./ The vehicle must be undamaged. The rear view camera system must be checked by a qualified workshop if the position or angle of the camera has changed, e.g. following a rear impact.
Volkswagen Commercial Vehicles recommends that you practise parking with the reversing camera in a traffic-calmed area or car park with good visi-bility and weather conditions, so that you can famil· iarise yourself with the system, orientation lines and guiding functions in a safer environment.
Rear view camera system settings
Various settings, including brightness, contrast and colour, can be by touching the relevant function buttons 1j or G. or by moving the corre-sponding slider.
• Stop the vehicle in a safe place.
• Apply the handbrake firmly.
• Switch on the ignition.
Page 294 of 486
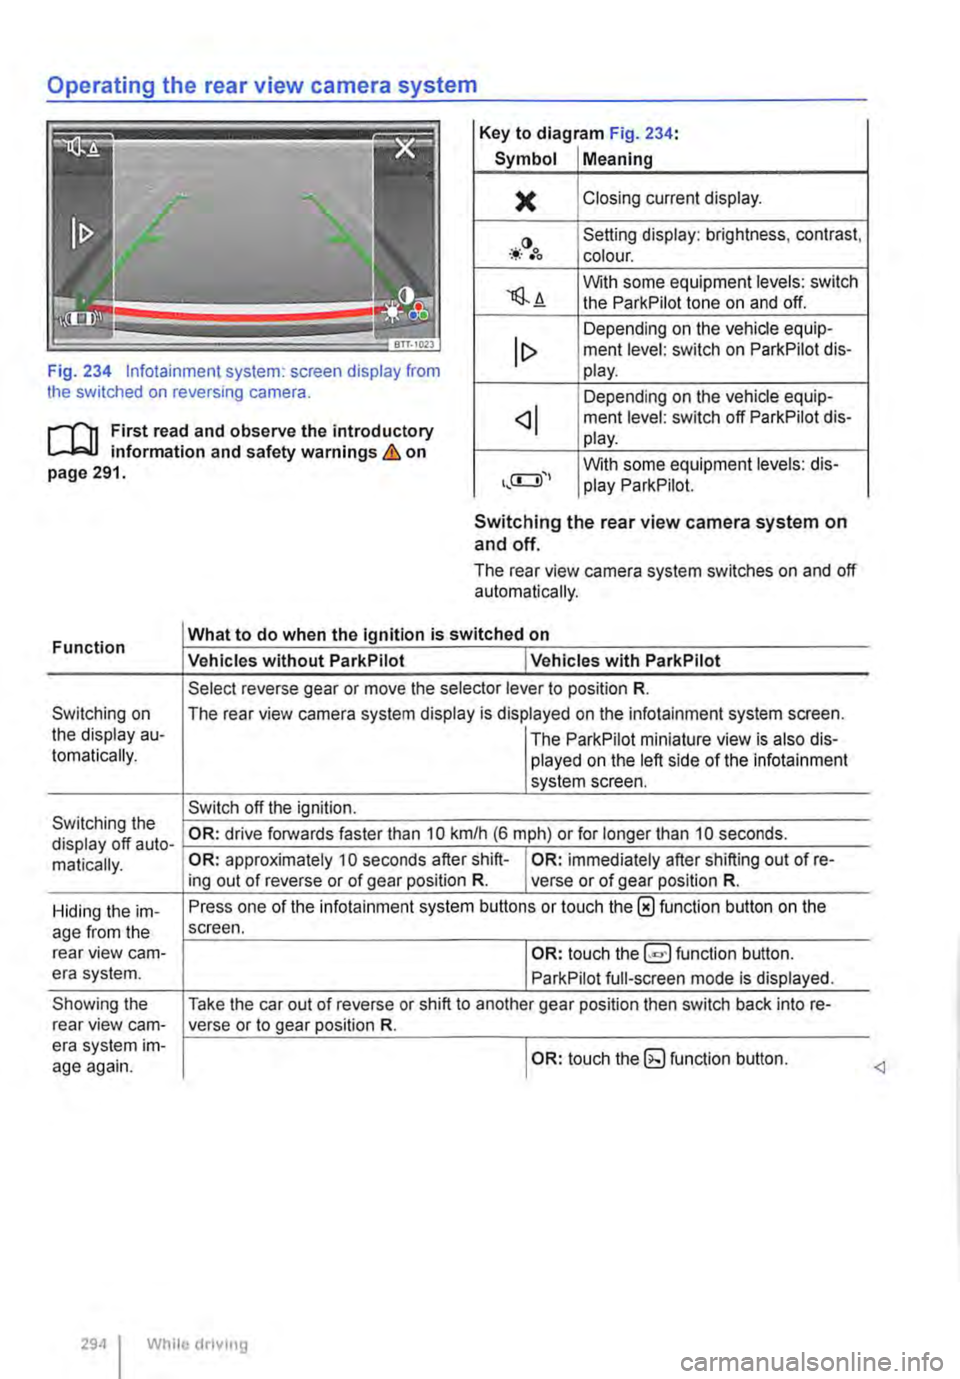
Operating the rear view camera system
Key to diagram Fig. 234:
Symbol Meaning
)( Closing current display.
-*·()•oo Setting display: brightness, contrast, colour.
'lS.A With some equipment levels: switch the ParkPilot tone on and off.
Depending on the vehicle equip-ment level: switch on ParkPilot dis-Fig. 234 lnfotainment system: screen display from the switched on reversing camera.
lt> play.
Depending on the vehicle equip-
r--f'n First read and observe the introductory L-J,:.U information and safety warnings & on page 291.
ment level: switch off ParkPilot dis-play.
With some equipment levels: dis-play ParkPilot.
Function
Switching on the display au-tomatically.
Switching the display off auto-matically.
Hiding the im-age from the rear view cam-era system.
Showing the rear view cam-era system im-age again.
Switching the rear view camera system on and off.
The rear view camera system switches on and off automatically.
What to do when the Ignition is switched on
Vehicles without ParkPilot I Vehicles with ParkPilot
Select reverse gear or move the selector lever to position R.
The rear view camera system display is displayed on the infotainment system screen.
I The ParkPilot miniature view is also dis-played on the left side of the infotainment system screen.
Switch off the ignition.
OR: drive forwards faster than 10 km/h (6 m ph) or for longer than 10 seconds.
OR: approximately 10 seconds after shift-I OR: immediately after shifting out of re-ing out of reverse or of gear position R. verse or of gear position R.
Press one of the infotainment system buttons or touch the 0 function button on the screen.
I OR: touch function button.
ParkPilot full-screen mode is displayed.
Take the car out of reverse or shift to another gear position then switch back into re-verse or to gear position R.
I OR: touch the (g function button.
294 I While driving
Page 297 of 486
Using the cruise control system (CCS)
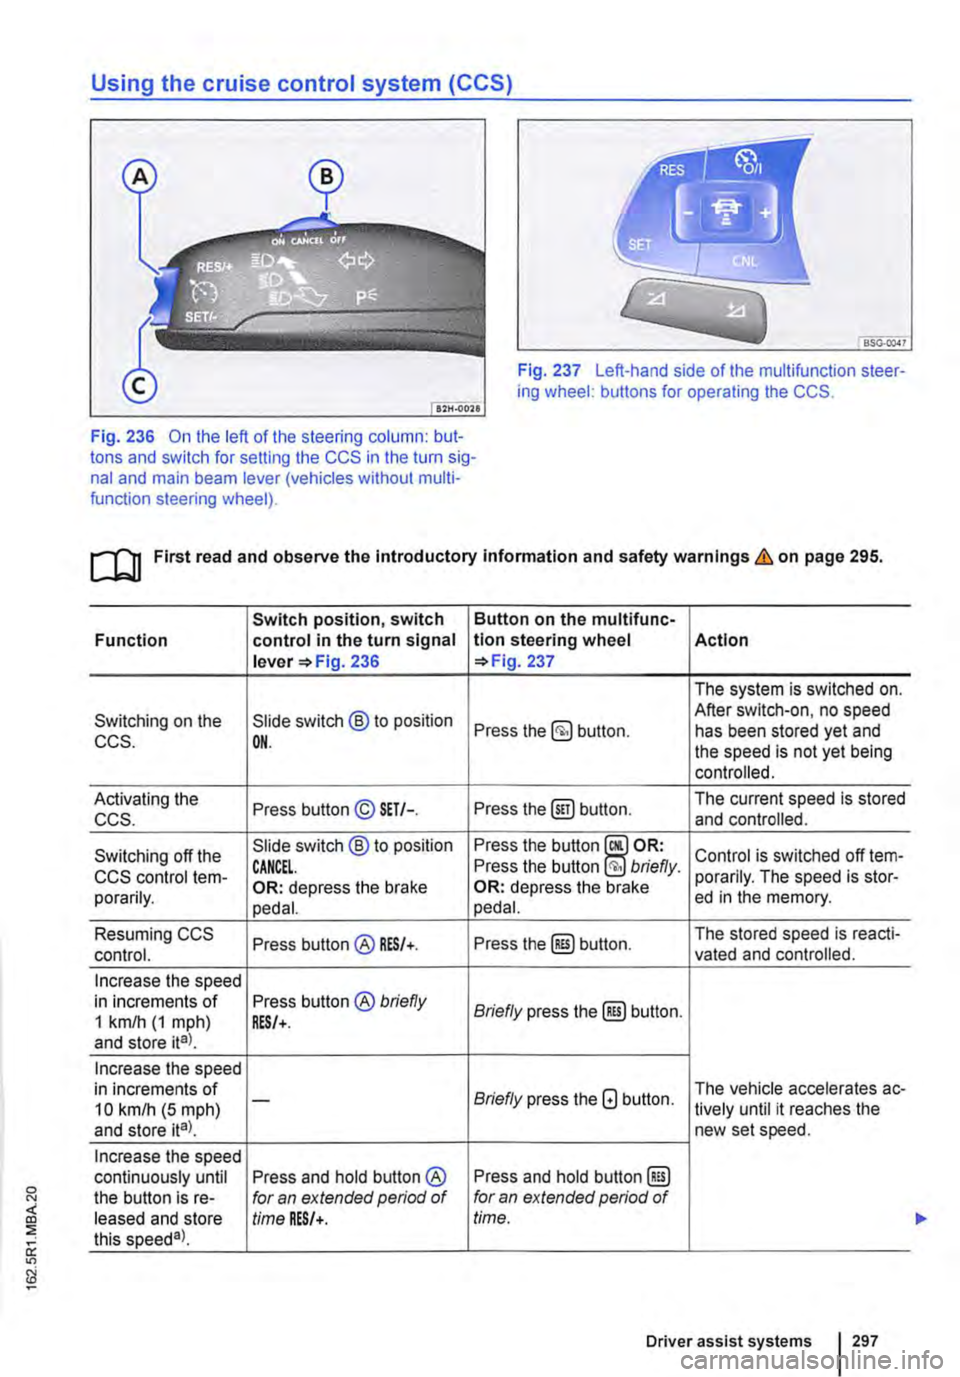
Fig. 237 Left-hand side of the multifunction steer-ing wheel: buttons for operating the CCS.
Fig. 236 On the left of the steering column: but-tons and switch for setting the CCS in the turn sig-nal and main beam lever (vehicles without multi-function steering wheel).
ro First read and observe the introductory information and safety warnings & on page 295.
Switch position, switch Button on the multifunc-Function control in the turn signal tlon steering wheel Action lever =>Fig. 236 =>Fig. 237
The system is switched on.
Switching on the Slide switch @ to position After switch-on, no speed Press the button. has been stored yet and CCS. OH. the speed is not yet being controlled.
Activating the Press button© SET/-. Press the@) button. The current speed is stored ccs. and controlled.
Switching off the Slide switch @ to position Press the button Control is switched off !em-CCS control !em-CANCEL. Press the button briefly. porarily. The speed is stor-porarily. OR: depress the brake OR: depress the brake ed in the memory. pedal. pedal.
Resuming CCS Press button@ RES/+. Press the@) button. The stored speed is reacti-control. vated and controlled.
Increase the speed in increments of Press button® briefly Briefly press the@) button. 1 km/h (1 mph) RES/+. and store ita).
Increase the speed in increments of Briefly press the G button. The vehicle accelerates ac-10 kmlh (5 mph) -lively until it reaches the and store ita). new set speed.
Increase the speed continuously until Press and hold button ® Press and hold button @) the button is re-for an extended period of for an extended period of leased and store time RES/+. time. this speeda).
Driver assist systems 297
...
Page 302 of 486

CD CD
• Remove snow with a brush, and remove Ice • Repair work on the radar sensor will require special knowledge and tools. Volkswagen rec-ommends using a Volkswagen dealership for this purpose.
preferably with a solvent-free de-leer spray.
SSG-0047
Fig. 241 Left-hand side of the multifunction steer-ing wheel: buttons for operating the adaptive cruise control (ACC)
1"1'11 First read and observe the introductory L-I=J.I information and safety warnings Lb. on page 298.
When the adaptive cruise control (ACC) is switch-ed on, the green indicator lamp(') lights up in the instrument cluster, and the speed memory and the status of the adaptive cruise control are shown in the display.
Button on the multifunc-Function lion steering wheel 241
Conditions for starting the adaptive cruise control (ACC)
• The selector lever must be in position D/S or be in the Tiptronic gate. A forward gear, but not first gear, must be selected in the manual gearbox.
• In vehicles with a manual gearbox, the actual speed must be a minimum of 25 kmlh (16 m ph).
Controlling speed
When switched on, the speed can be stored and set. The stored speed can vary from the speed ac-tually being driven if the distance is being actively controlled.
Action
Switching on adaptive Press the §) button on the The system is switched on. No speed has yet
cruise control (ACC). multifunction steering been stored and the speed is not yet being con-wheel. trolled.
The current speed is stored and controlled. When adaptive cruise control (ACC) Is al-ready active:
Activating adaptive cruise Press the@!) button on the Press briefly: reduces the speed by 1 kmlh
control (ACC). multifunction steering (1 mph) and stores it. wheel. Press and hold: As long as you keep pressing, the stored speed is reduced incrementally by 1 km/h (1 mph). A reduction in speed is achieved by accelerator release or automatic braking.
302 While driving
...
Page 304 of 486

When the highest level is reached, the distance re-turns to the lowest level when the button is press-ed again.
The distance level can also be set using the Q or Q buttons on the multifunction steering wheel im-mediately after the(!) button on the multifunction steering Fig. 241 has been pressed.
Select the Settings menu, Assist systems submenu, ACC to set the distance to be used when the ACC is switched on 24.
Setting the gearbox programme
The acceleration response can be influenced by the gearbox programme selected. The programme can be set Using the ACC option in the Assistant submenu in the Settings menu. The following gearbox programmes can be selected:
• Normal
• Sport
• Eco
The following conditions can prevent the adaptive cruise control (ACC) from reacting:
• If the accelerator is depressed.
• If no gear is selected.
• If the ESC is taking corrective action.
• If there is a fault in several brake lights on the vehicle or on a trailer with an electrical connection to the vehicle.
• If the vehicle is reversing.
• System version 1: if the vehicle is travelling faster than approximately 160 km/h (1 00 m ph).
• System version 2: if the vehicle is travelling faster than approximately 210 km/h (130 mph).
A WARNING
If you do not maintain the minimum distance to a vehicle In front and the difference In speed between the two vehicles is so great that the braking action of the adaptive cruise control (ACC) is insufficient, you are In dan-ger of colliding with the vehicle in front. You should reduce the vehicle speed immediately with the foot brake.
• The adaptive cruise control (ACC) may not be able to detect all driving situations cor-rectly.
• Leaving your foot on the accelerator means that the adaptive cruise control (ACC) will not brake automatically. This is because manual acceleration overrides the system.
• You should always be prepared to brake the vehicle yourself.
• Observe country-specific regulations re-garding the minimum distance.
m The set speed will be deleted if the ignition or L!.J the adaptive cruise control (ACC) is switched off.
m The adaptive cruise control (ACC) is auto-L!.J matically deactivated when the traction con-trol system (TCS) is deactivated.
m In vehicles with a start/stop system, the en-L!.J gine is switched off automatically during the stationary phase of adaptive cruise control (ACC) and is then restarted for moving off.
situations
1""111 First read and observe the introductory L-J,:.IJ Information and safety warnings & on page 298.
The adaptive cruise control (ACC) should be switched off in the following situations due to sys-tem limitations &:
304 I While driving
• When turning off roads, driving around round-abouts, narrow curves, joining motorways, exiting from motorways or driving through road works, to prevent the vehicle from unnecessarily accelerat-ing to the set speed in these situations
• When driving through a tunnel as this situation could impair the system function.
• On roads with more than one lane, if other vehi-cles are driving more slowly in the fast lane. The slower vehicles In the other lane would be overtak-en from the right side in this case.
• In heavy rain, snow or spray as vehicles travel-ling ahead cannot be monitored sufficiently or maybe cannot be monitored at all. .,.
Page 324 of 486
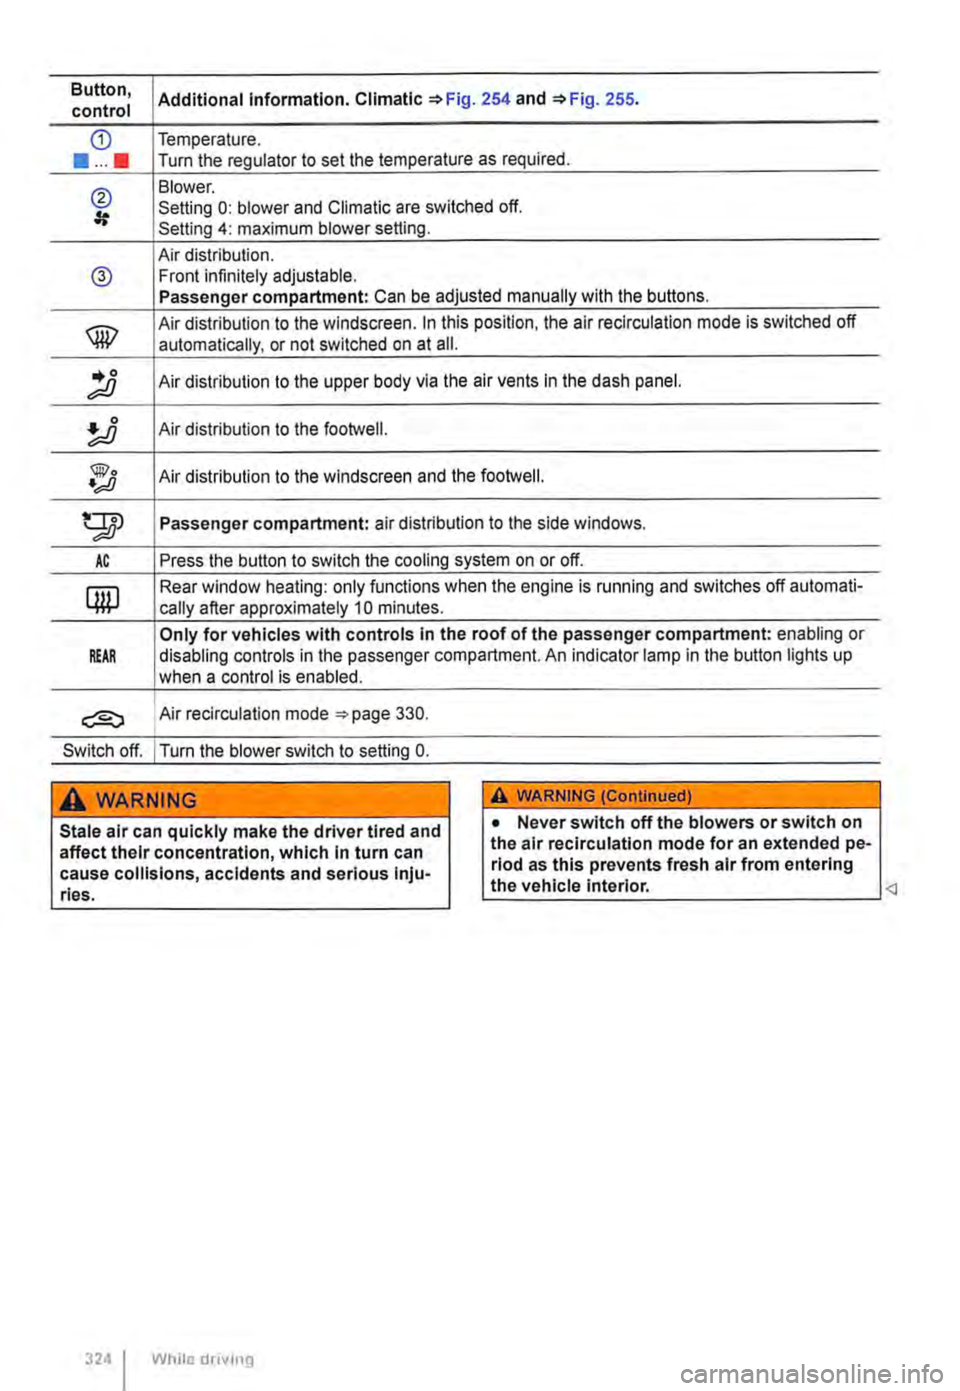
Button, Additional information. Climatic '*Fig. 254 and '*Fig. 255. control
CD Temperature .
••••• Turn the regulator to set the temperature as required.
@ Blower. Setting 0: blower and Climatic are switched off. Setting 4: maximum blower setting.
Air distribution. @ Front infinitely adjustable. Passenger compartment: Can be adjusted manually with the buttons.
® Air distribution to the windscreen. In this position, the air re circulation mode is switched off
automatically, or not switched on at ail .
.. 0 ;;;o Air distribution to the upper body via the air vents In the dash panel.
Air distribution to the footwell.
@o •;;JJ Air distribution to the windscreen and the footweii.
gp Passenger compartment: air distribution to the side windows.
AC Press the button to switch the cooling system on or off.
QW Rear window heating: only functions when the engine is running and switches off automati-
cally after approximately 10 minutes.
Only for vehicles with controls in the roof of the passenger compartment: enabling or REAR disabling controls in the passenger compartment. An indicator lamp in the button lights up
when a control is enabled.
Air recirculation mode =-page 330.
Switch off. I Turn the blower switch to setting 0.
A WARNING
Stale air can quickly make the driver tired and affect their concentration, which in turn can cause collisions, accidents and serious Inju-ries.
324 I While drivmg
A WARNING (ConUnued)
• Never switch off the blowers or switch on the air recirculation mode for an extended pe-riod as this prevents fresh air from entering the vehicle interior.
Page 325 of 486
:
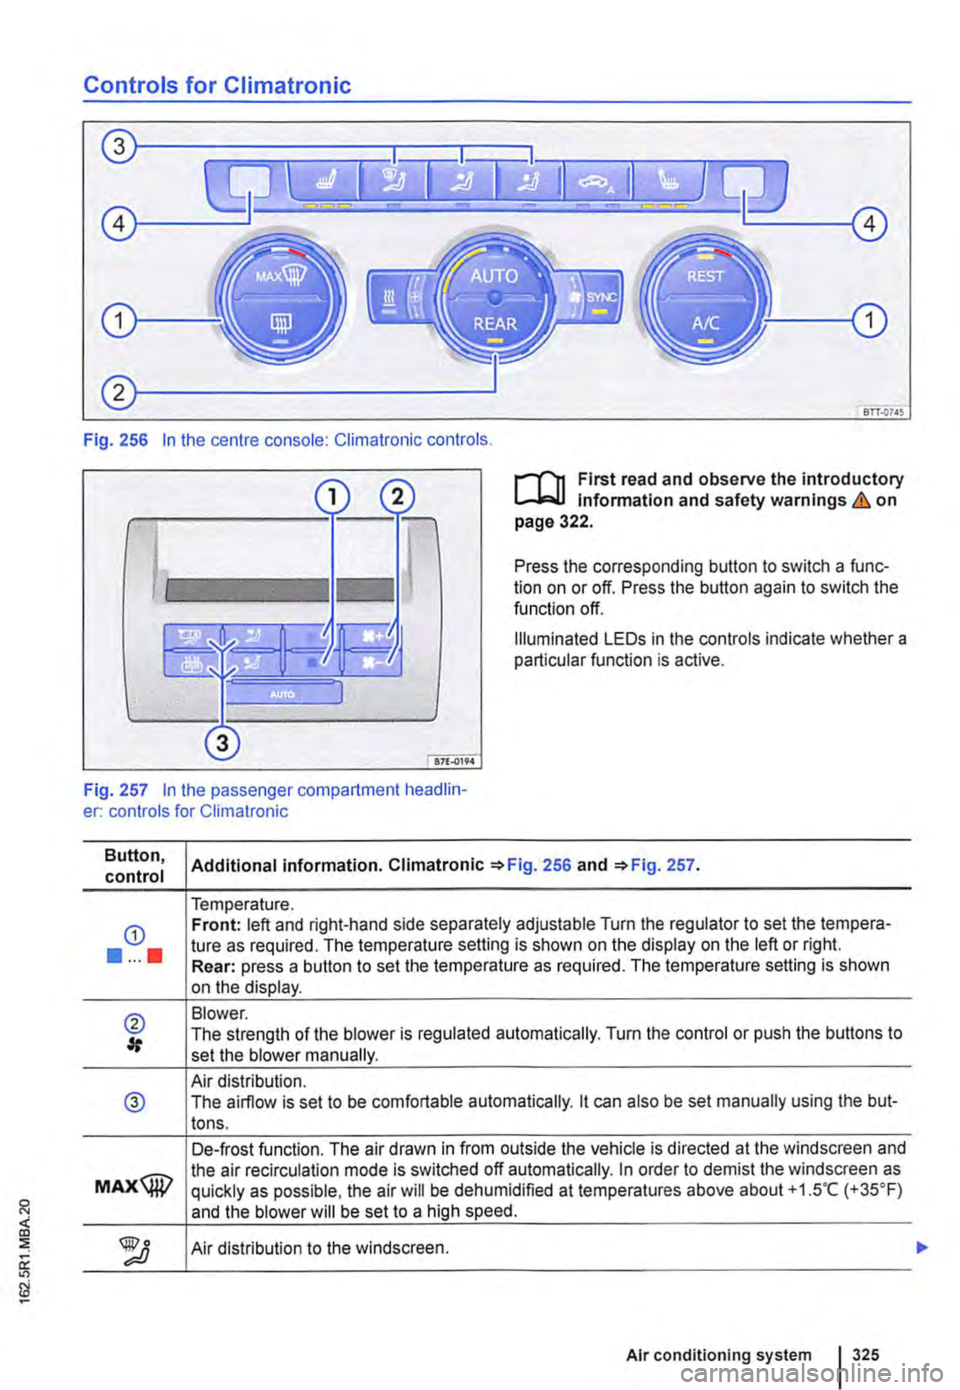
Controls for Climatronic
Fig. 256 In the centre console: Climatronic controls.
l"'"l'"'n First read and observe the introductory l.-Jo:.l.l Information and safety warnings & on page 322.
Press the corresponding button to switch a func-tion on or off. Press the button again to switch the function off.
Illuminated LEDs in the controls indicate whether a particular function is active.
Fig. 257 In the passenger compartment headlin-er: controls for Climatronic
Button, control
G)
•••••
® #
@
MAX@
Additional information. Climatronic =>Fig. 256 and =>Fig. 257.
Temperature. Front: left and right-hand side separately adjustable Turn the regulator to set the tempera-ture as required. The temperature setting is shown on the display on the left or right. Rear: press a button to set the temperature as required. The temperature setting is shown on the display.
Blower. The strength of the blower is regulated automatically. Turn the control or push the buttons to set the blower manually.
Air distribution. The airflow is set to be comfortable automatically. lt can also be set manually using the but-tons.
De-frost function. The air drawn in from outside the vehicle is directed at the windscreen and the air recirculation mode is switched off automatically. In order to demist the windscreen as quickly as possible, the air will be dehumidified at temperatures above about +1.5"C (+35°F) and the blower will be set to a high speed.
Air distribution to the windscreen.
Air conditioning system 325
Page 331 of 486
Windscreen heating
1111 First read and observe the introductory L.-J,::.U information and safety warnings & on page 322.
Windscreen heating helps to de-ice the
windscreen and only works when the en-
gine is running.
Switching on and off
Press the button ®in the centre console or the Climatronic to switch the windscreen heating on and off.
Roof ventilator
BS0-000<
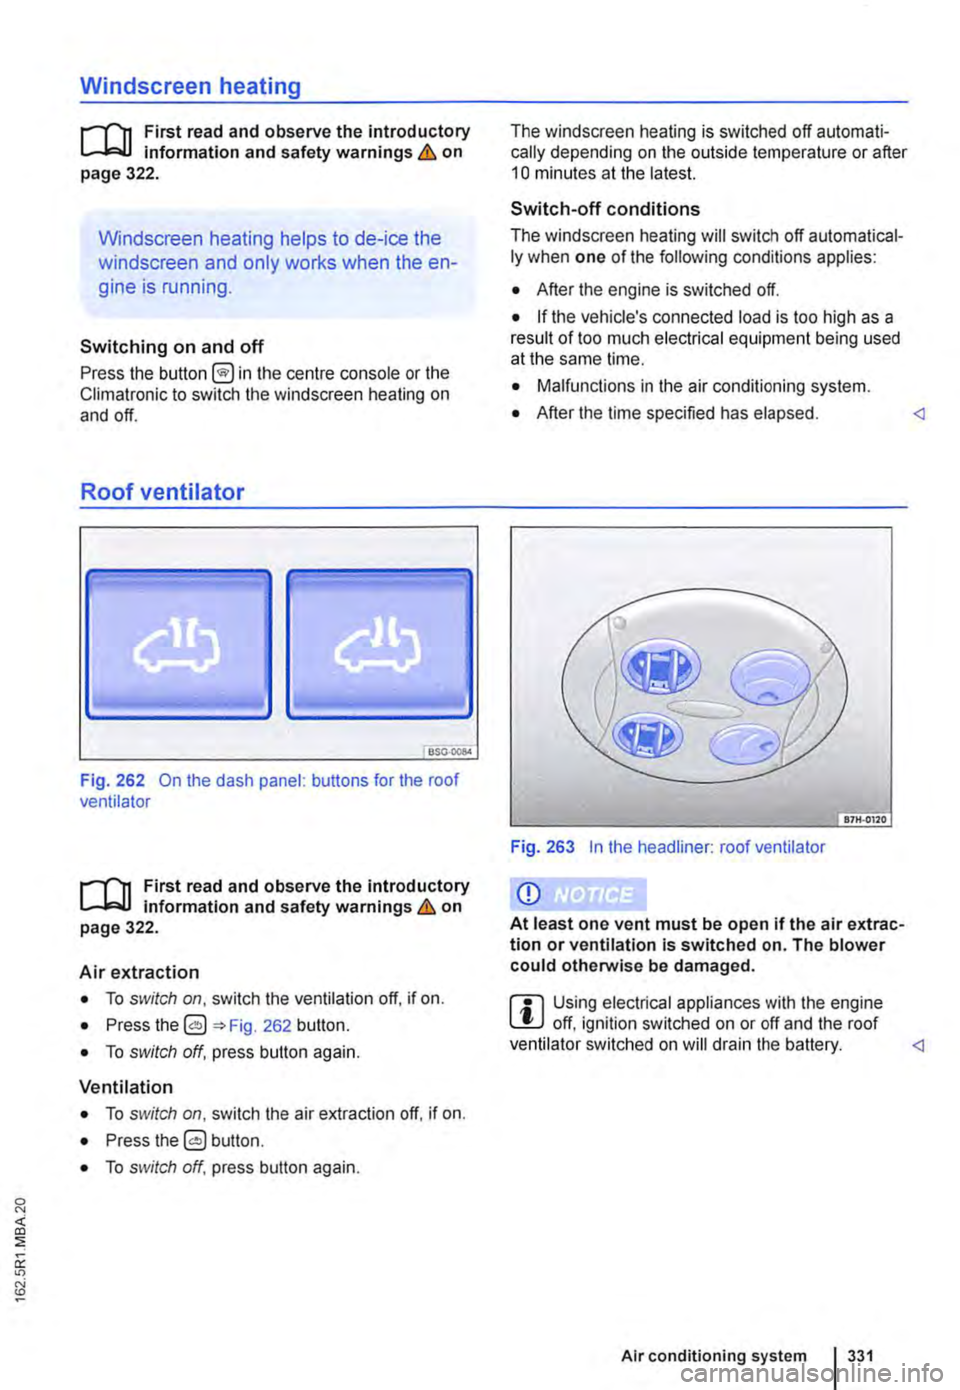
Fig. 262 On the dash panel: buttons for the roof ventilator
1111 First read and observe the introductory L.-J,::.U Information and safety warnings & on page 322.
Air extraction
• To switch on, switch the ventilation off, if on.
• Press the 0 262 button.
• To switch off, press button again.
Ventilation
• To switch on, switch the air extraction off. if on.
• Press the 0 button.
• To switch off, press button again.
The windscreen heating is switched off automati-cally depending on the outside temperature or after 10 minutes at the latest.
Switch-off conditions
The windscreen heating will switch off automatical-ly when one of the following conditions applies:
• After the engine is switched off.
• If the vehicle's connected load is too high as a result of too much electrical equipment being used at the same lime.
• Malfunctions in the air conditioning system.
• After the time specified has elapsed.
Q)
At least one vent must be open if the air extrac-tion or ventilation Is switched on. The blower could otherwise be damaged.
ffi Using electrical appliances with the engine L!J off, ignition switched on or off and the roof ventilator switched on will drain the battery.