2012 VOLKSWAGEN GOLF PLUS lock
[x] Cancel search: lockPage 47 of 541
Warning
Please fir st r ead and note th e introductory in rormatio n and heed the o n page 45.
Lights
Possible cause
u p
the ignition is sw itch ed on, several warning and indica to r ligh ts come o n brierly ror a ru nctio n
c h ec k. They go out a
the rear h a tc h is not clo se d prope rly . wa rnin g light in the i nstrumen t clu ste r o r the hicl e symbol in th e MFD comes o n showin g the ope n r ear hat ch .
D ep en d in g o n the ve hi
cle opti ons, a symbol m ay
b e di splayed in th e in strument clu ster in ste ad or
t h e warnin g lig h t. The ligh t o r symbol
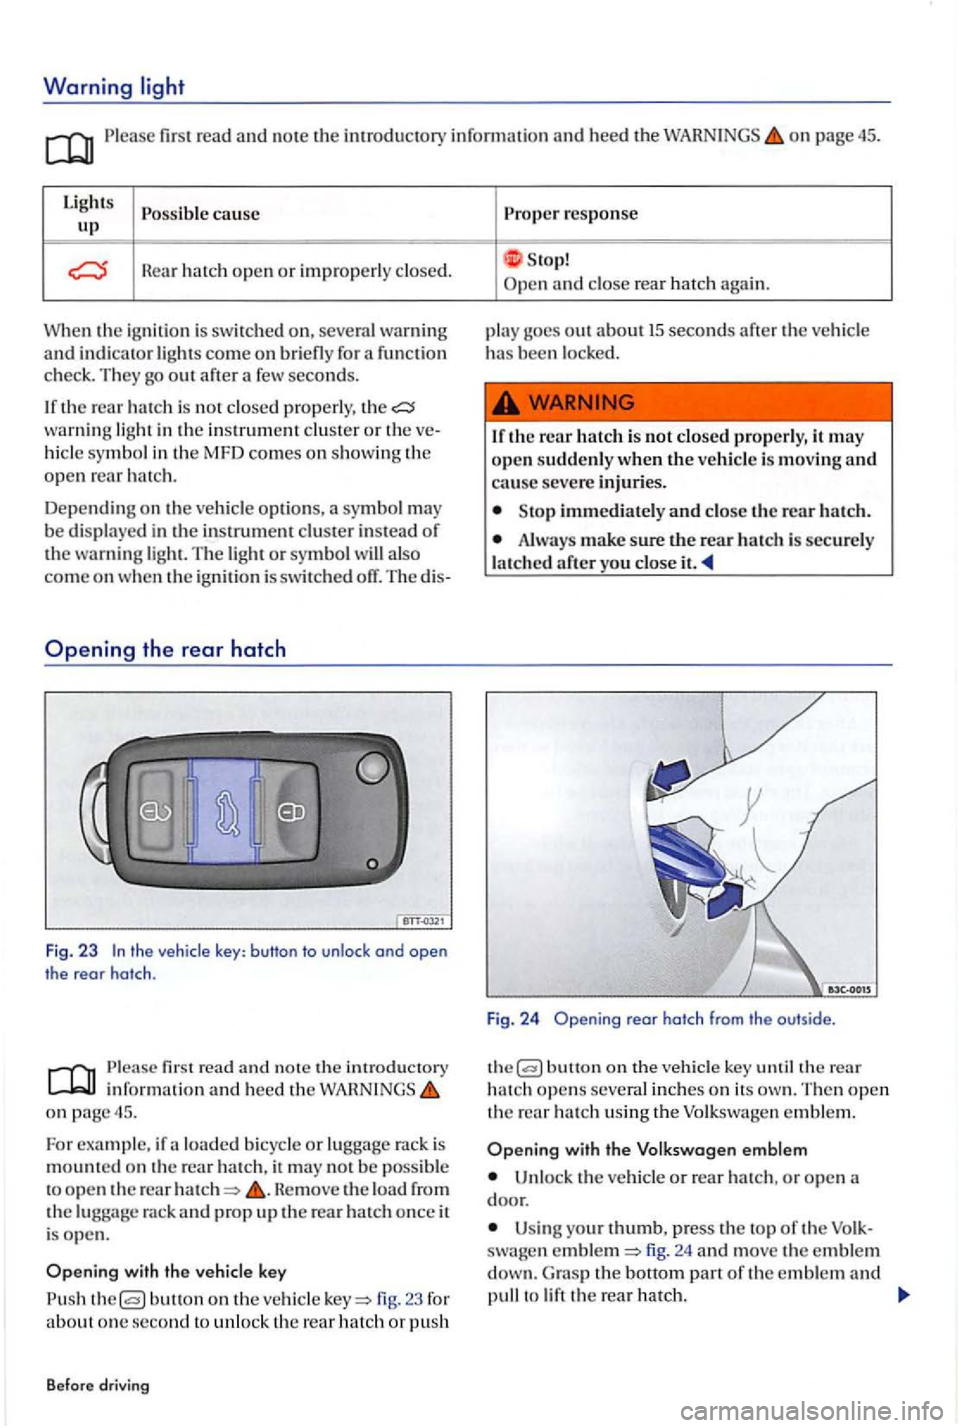
the vehicle key: button to unlock ond open
the rear hatch .
first read a nd n ote th e introducto ry inrorm atio n and heed t he o n page 45.
Fo r example, ir a lo ad ed b icy cle or lu gg age rac k is
m oun te d on the rear ha tc h , it m ay no t b e poss ible
t o o pe n th e rear He move the load rrom the rack and prop u p the rear ha tc h once it
i s ope n .
butto n on th e ve hicle 23 ror about o ne se cond to unl o ck th e re ar hatch or p ush
B efore dr
iving
Prope r response
S top! and close rea r hatc h again.
p la y goes o
ut ab o ut 15 seconds arte r the ve hicl e has been l ocke d.
1 r th e r
ear hatch i s not closed p ro perly, it m ay
o pe n sudde nly w hen the vehicle is movin g and cause seve re injuri es .
Sto p immedi ately and close t h e rear h atc h .
Alwa ys make sure the rear h atc h is sec u re ly
l a tc h ed
butt o n on the ve hicl e key th e rear hatch open s several in ch e s o n its The n open th e rear h a tc h usin g th e Volkswa gen e m ble m .
with the V olk swagen emblem
Un loc k th e ve h icl e or rear hatch , o r o pen
U sin g your thumb, p ress the to p or th e swa gen fig. 24 and move the e mble m G ra s p the bott o m part or th e e mble m and to
Page 48 of 541
Improper and unsuperv ised unl ockin g or openin g of the rear h atc h ca n cause severe ries.
bicycle or luggage rack is ins talle d on the rear hatc h , it may be h ard to se c that th e rear hatch I s unl atc h ed. An unlatch ed rear hatc h may
s ud whe n th e ve hicle Is
first read and note the introdu ctory informa tion and heed the WARNINGS on page 45.
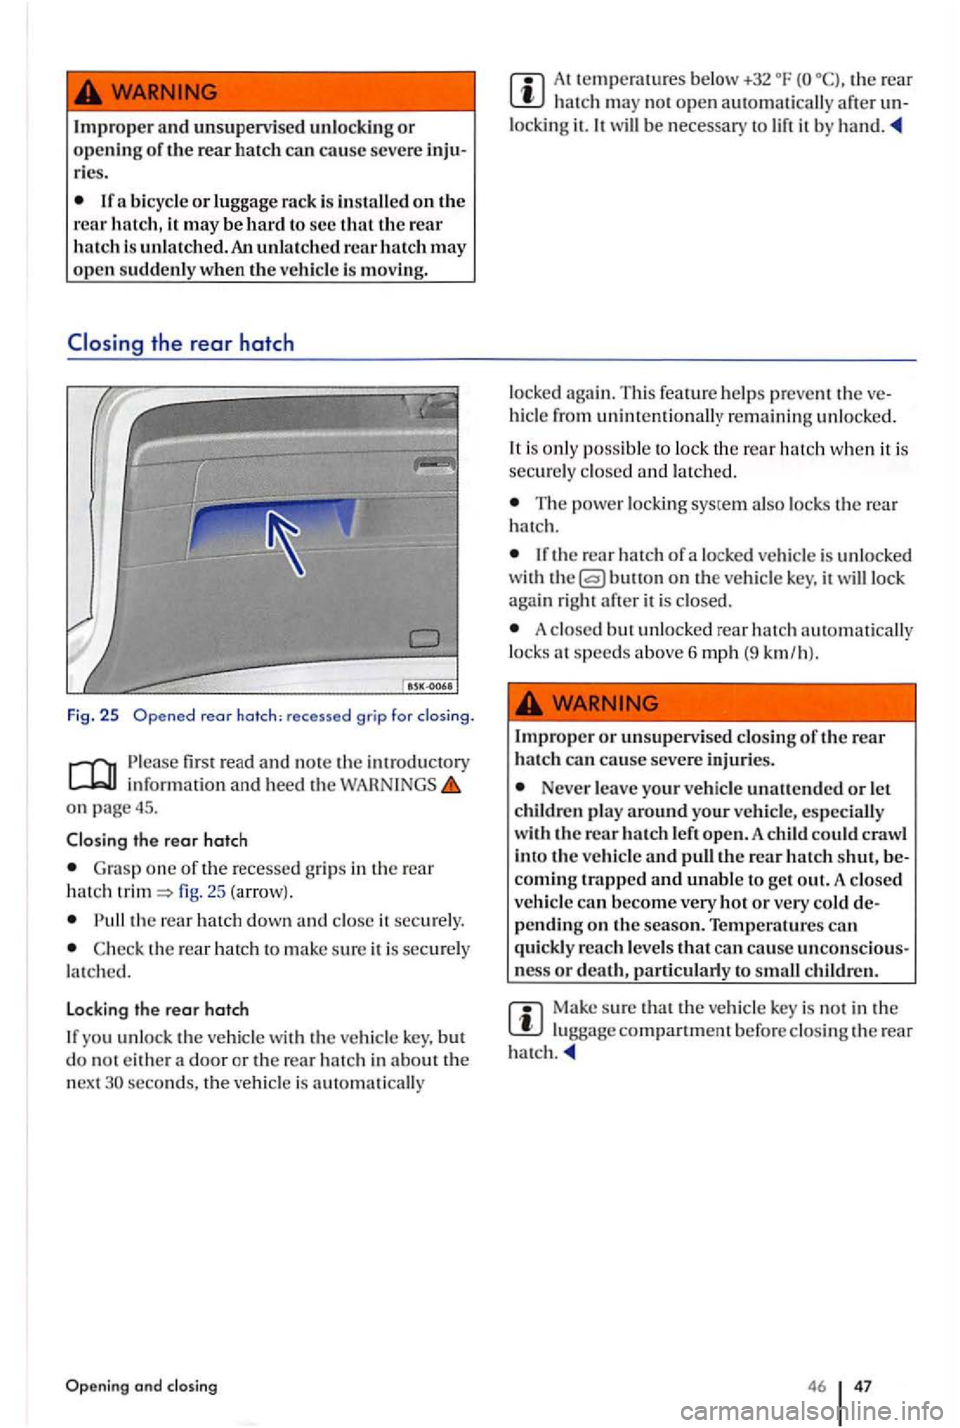
Closin g t he rear hatc h
Grasp one of th e recessed grips in the rear h atc h fig. 25 (a rrow}.
th e rear hatch down and close it securely.
second s, the vehicle is au tomatically
and closing
At t emperatu res below +32 the rear hatch no t o pen automatically after
locked again. Thi s feature helps prevent the hicle from unintentionally re m ain ing unlocke d.
It is onl y poss ible to lock th e rea r hatc h when it is
secur ely closed and latche d.
The power locking system also locks the rear
h atc h.
If th e rear hatch of a locked vehicle is unlocked
w ith button on th e veh icle key, it will lock
agai n right after it is clo sed.
A closed b ut unlocked rear hatch automatically
l ocks at speed s above 6mph (9 k m lh}.
Impro pe r o r unsupervi sed clos ing o f th e rear
h a tc h ca n ca use seve re injuri es.
Never leave your ve hicle unan ended or l et
c h ildren pl ay around your ve hicle, especially
w ilh the re ar ha tc h l eft open. A child could crawl into the ve hicl e and pull the rear h atc h shut,
pending o n the season. Tempe ra tu res can
quickl y re ac h l evels that can ca use unco nscious-ness or death, to sm all child ren.
Make sure tha t compartment b e for e clo sing the rear
46 47
Page 49 of 541
Power windows
In thi s sec tion find lowi ng:
Opening and
windows-functions .. ................. .
Power window pinch protection
More information:
page 21
49
49
so
lockin g and clo sing page 38
Improper use of power windows can resuh in
Neve r let anyone get in the way of a pow er window when clo sing il.
B e for e dri ving
When locking the vehicle from th e outside, make sure that no one, especially children , main s in the ve hicle. The windows will not open in case of an emergency .
Always take the key with you when you l eave
th e vehicle. can still use the power windows
for severa l minutes after the ignition is switched
off as long as the driver or front passe nger d oor has not been opened.
When children are in the back seat, alway s
use th e
Page 57 of 541
Sitting properly and safely
Adjusting the seating position
Introduction
In thi s sect io n you'll find information on th e lowing:
Examples of improper sealing positions . . . . . . . . . 57
Proper seating position . . . . . . . . . . . . . . . . . . . . . . . 58
Manual controls on the driv er and passenger
. . 62
Ad jus ting the s teeri ng wheel positio n . . . . . . . . . . . 63
Center a rmrest . . . . . . . . . . . . . . . . . . . . . . . . . . . . . 64
Number o f
Th e ve hicl e has total of five seating positio ns: in fron t and three in the re ar. Each sea tin g sition saf ety be ll.
More information:
pag e 65
page 67
Airbag page
sa fe ty and child page
Improper se atin g pos itions increase th e risk of severe or fata l injurie s in a cras h or other dent, especially w hen th e a irbag deploys.
All occupants mus t b e properly seate d and properly restra ined at all tim es.
Never lett h e number of people in the veh icle
excee d the number of availabl e seatin g tions with sa fe ty belt s.
Alw ays secure childr en in the ve hicl e with an approve d and suitable restraint system cord ing to t heir he igh t and weight
All vehi cle occupants shou ld alway s keep
th eir fee t in their r espective footwell s. Neve r
a llow veh icle occ upants to place their feet on the scat, in strume nt panel, out of th e w ind ow, etc. The and eve n in crease the risk of inju ry in a cras h.
B efore driving
Always adjust scat, sa fcry belts and head straints properly befo re drivin g and m ake sure that passe nge rs are prope rl y restrai ne d.
the front passenger sc at as
inch es (25 e m) between th e front passenge r's breastbone and the instrument panel.
Alway s adjus t the driver's scat and th e
s teeri ng wheel so that there arc at least
em).
or an authorized Volkswagen Facilit y to sec w hether adaptive equipment is availabl e.
Alwa ys hold the steerin g wheel on the side of th e steering wheel rim with your hand s at the 9 o'clock and 3 o'clock positi ons to help reduce the risk of p ersonal inju ry if th e dri ver's
a ir bag inflates.
Neve r hold the stee ring whee l at the 12 o'clo ck
po siti on or with your hand s at o th er places insid e
the stee ring wheel rim or o n th e stee rin g w hee l hub. the steering w heel the wrong way
ca n ca use serio us in juries to the hands, arms,
and h ea d if th e driver 's airbag inflates.
t h e s teeri ng whee l toward your face
d ec reases the abiliry of the driver's airbag to
h elp prot ect yo u in a co llisio n.
Never drive with backre sts reclin ed or tilt ed
far back . T he farther th e backr ests arc tilted back, the g reater th e r is k of injury caused by
in correc t positioning of th e safet y belt s and
improper seati ng position.
Never drive with a front seat backres t tilted
forward. If the front airbag deploy s, th e front
backres t ca n b e forced backward and injure
p asse ngers on th e rear scat.
far back as possibl e from the s tee ring
whee l a n d the in strument panel.
Page 59 of 541
Prope r sea ting posit ion
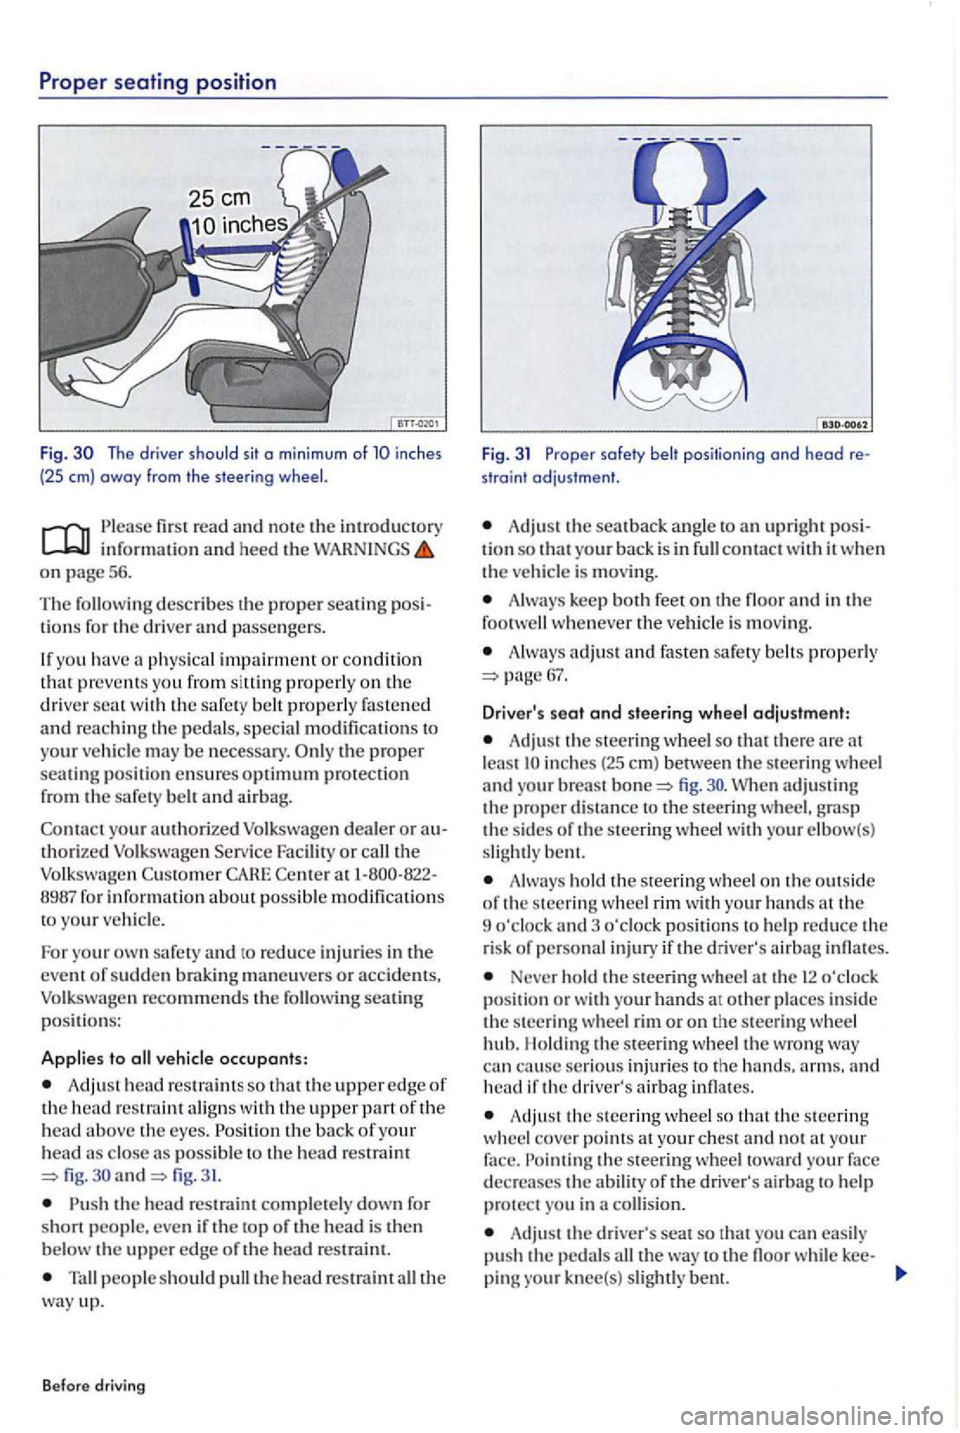
Fig. The driver should sit o min imum of inches
(25 em) away from the steering
first read and note the introductory information an d heed the WARNINGS on page 5 6.
Th e
describes th e proper sea tin g lio ns for the driver and passengers .
If yo u hav e
physical impairment or condition that preve nts you from siltin g properly on the driver wit h the safe ty belt properly fastened and re a ching th e pedals, special modificatio ns to
your ve hicle may be necessary. p roper seating positi on ensures optimum protection from the safety belt and airbag.
Con t
act yo ur authorized Volkswagen dealer o r authorized Volk swage n Serv ice Facility or the Volkswagen Custo m er CAHE Cente r 1-800-822-
8987 fo r informati on about poss ible modification s
t o your ve hicl e.
F o r yo u r
own safety and to reduce inj urie s in the
event of sudde n brakin g maneuve rs or accid ents, Volkswagen recommends the seating p o siti ons:
Applies to vehicle occupants:
Adj ust head re straint s so that the upper edge of the head restraint aligns with the upper part of the head above th e eyes . the ba ck of your head close as poss ible fig. and fig. 31.
the head re straint completely down fo r
short people. eve n if the top of th e head is the n
b elow the uppe r edge o f the head re strai nt.
people s ho uld pull the head restraint the way up.
Before driving
Fig. 31 Proper safety belt positioning ond head re
straint adjustment.
Adjust the sea t back ang le to upri ght posi
tion so that your back is in conta ct w ith it w he n the vehicle is moving.
Alw ays keep both feet on th e floor a nd in the
foot whenever the vehicl e is mov in g.
A lway s adjust a nd fasten safety belt s pro perly
A dju st the steering wheel so that the re are lea st fig .
Always ho ld th e s teering wheel o n the out sid e
o f th e s teerin g wheel rim with your hands the
9 o'cloc k and 3 o'cloc k pos ition s to help re duce the
r is k of personal injury if the driver' s airb ag infl ates.
Never ho ld the steering wheel a t th e 12 o'clock position or w ith your hands at ot her places in side the steerin g wheel rim or o n the steerin g whee l
hub. l lo ldin g the steerin g w hee l the wro ng can cause se rious injurie s to the arms. and head if the driver's airbag infl ates.
Adju st the s teerin g wheel so that the s teerin g
w heel cove r points the ste erin g wh ee l toward your face
d ecrea ses the abilit y of the driver's airba g to help protect you in a collision.
Adju st the driver's seat so that you can easily
pu sh the pedal s the way to th e floo r while kee-
pin g knee(s) slightl y bent.
Page 63 of 541
Removing and head restraints
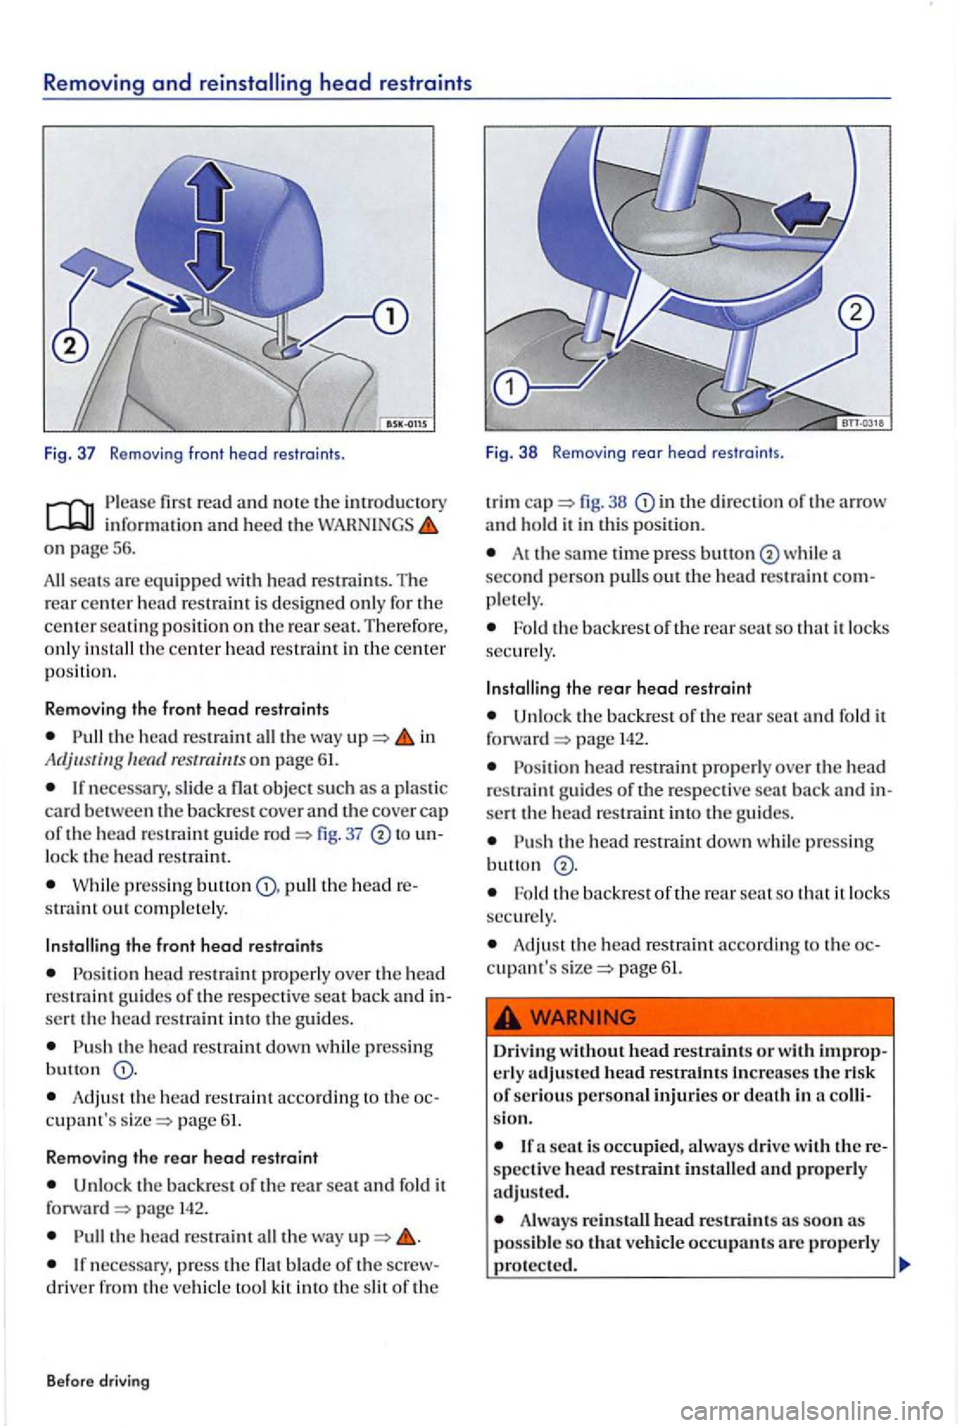
Fig. 37 Removi ng fro nt head restr aints.
read and note the introduc tory informat ion and heed the on page 56 .
scats arc equipped with head restrain ts . The rear c e nt er h ead restrai nt is des igned onl y fo r the ce nter seat ing positi on on th e rear sea t. Th erefo re ,
o nl y
the head re straint the wa y in Adjustin g res traints on page 61.
necessary , slide object su ch a s a pla sti c
ca rd be tween the backre st cover and the co ver cap
of the head restraint g uid e 37
W hil e pres sing pull the head straint out compl ete ly .
the front head restraints
P o sition head restrain t prop erly ove r th e head
r e s tr ain t gu ides of th e respective seat back and sert the head rc s trai m into th e g uid es.
the hea d restraim down whil e pressin g
but to n
Adjust the h ead re strai nt acco rding to the c upant's page 61.
Removing the rear head restraint
Unlock the backrest o f th e re a r seat and fold it
f orward p age
th e head re straint th e wa y
necess ary, pre s s th e flat blade of th e drive r from th e ve hicle too l kit into the s lit of th e
B efore driving Fig
. 38 Remov ing r
ear hea d restra in ts .
trim in the direction o f th e arrow and hold it in thi s posit ion.
At th e same time press bullon second person pull s out th e head restraint
th e backrest of th e rear scat so that it lock s
secure ly.
the rear head restraint
Un lock the backrest of the re a r scat fo ld it
f o rward page 14 2.
h ead restraint prop erly ove r th e head restra int guides of th e re spective sca t back and sert the head restraint into the g uide s.
the head res traint down whil e p ressin g
Fold the backres t of the rear seat so that it lo cks secure ly.
Adju st th e head re straint a ccord in g to the page 61.
Driving without head restraints or wit.h crly adjusted head restra .lnts Increases the ri sk of seriou s personal injuries or death in co
scat is occupied, always drive with
Always reinstall head r estraints as soon possib le so that veh icle occupan ts properl y
Page 64 of 541
Note
When removin g or reinstalling the head restrai nt,
take car e t ha t head restraint does not strik e the headliner or the back of the front seat. T he
headlin er or oth er parts of the vehicle could erw ise be
position
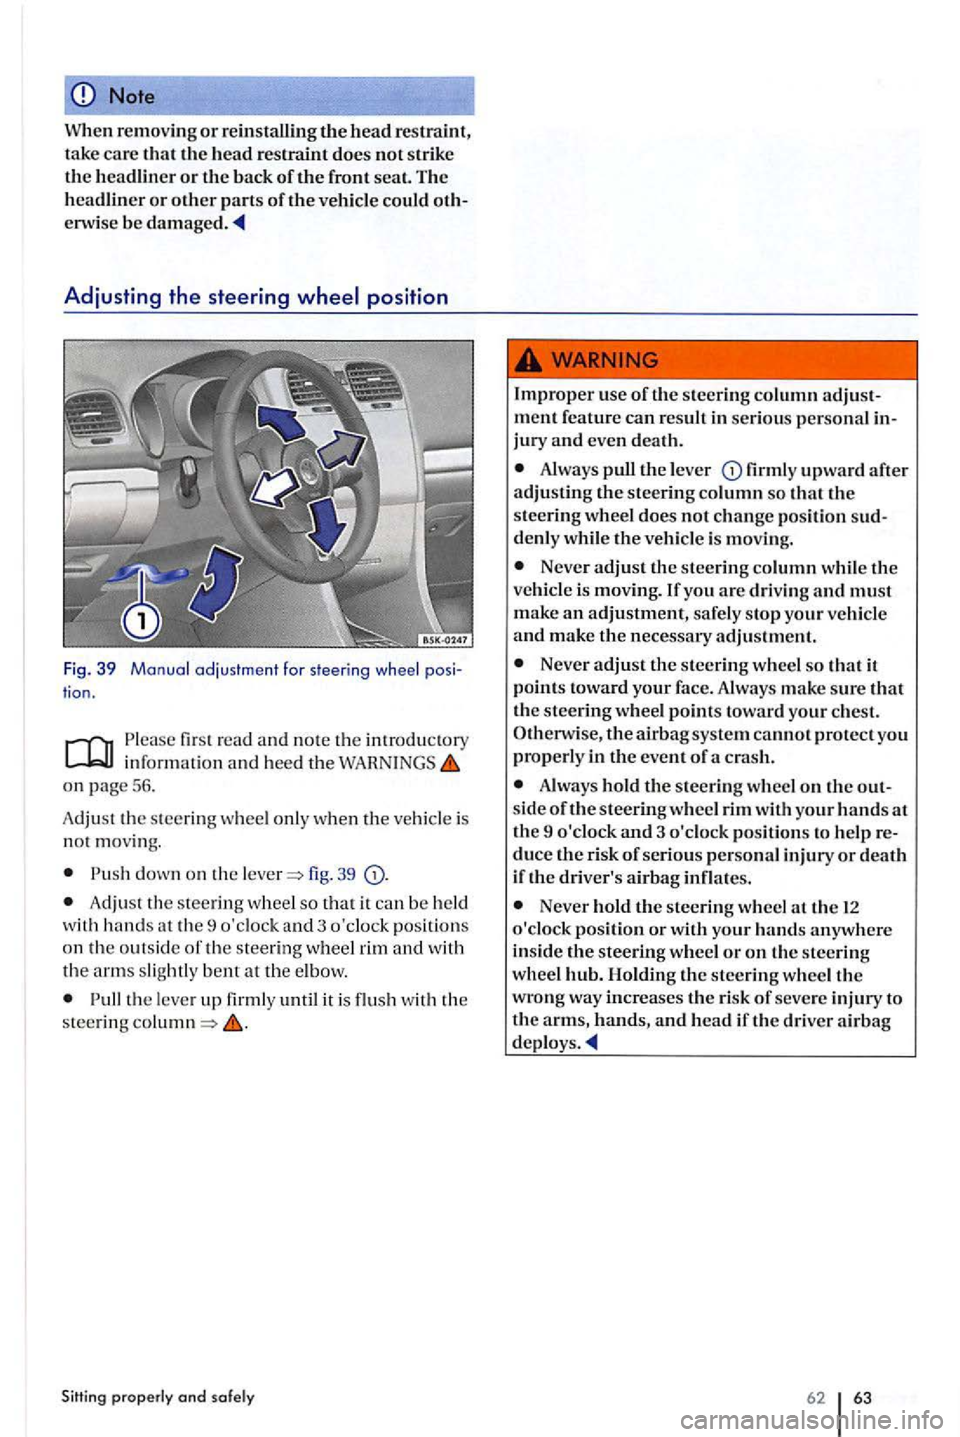
Fig. 39 Manual adjustment far steering whee l pos i
tion.
firs t read and note the introd ucto ry
on page 56.
A dju st th e
steering wheel only when the vehicle is not movin g.
fig. 39
Adju st th e steerin g w hee l so th a t it ca n be held
w ith hands at th e 9 o'clock and 3 o'clock pos itions on the ou ts ide of the stee ring whee l rim and w ith
the arm s slight ly at the e lb ow.
the lever up firmly until it is flu sh with the steering
Always puLl the lever firml y upward after adjustin g th e steering column so that th e
s teering wheel does not ch ange positi on sud
d enl y whil e U1e vehicl e is movin g.
Neve r adjust the stee rin g column w hile the ve hicl e is moving. you are driving and must make an adjustment, safely s top you r vehicle and make the necessary adjustment.
Neve r adjust the steerin g wheel so that it points toward your fac e. Alway s make sure th at
Alwa ys hold U1e steering w hee l o n th e out side of th e steering wheel rim with your hands at
th e 9 o'clo ck and 3 o'clock positions to h elp
Neve r hold the steering w heel at the 12 o'clock position or with your hands anywhere
in side the s teering wheel o r on th e steering
w hee l hub. Holdin g th e stee rin g wheel the wro ng way increases the r isk of seve re injury to the arms, hands, and head if th e driver airb ag
62 63
Page 73 of 541
Using safety
P lease first read and note the introductory information and heed the on page 67.
the condition of all safety belts regul arly .
Keep safety belts clean .
Keep objects and liquid s away from belt webbing, buckle tongue and buckle la tch and opening .
Do not pinch or damage the safety belt or buckle tongue (e.g . w he n closing a door) .
Never modify, disassemble or try to repair safety belt s and safety belt anchorages .
Always faste n your safety belt properly before driving and keep it fastened whenever the ve hicle is moving.
Twisted safety belt
I f it is diffic ult to
pull the safety belt out from th e belt guide. it may be that it is twi sted insi de the side trim because it retracted too q ui ckly when it was take n off.
Holding the safety belt to ng ue, slowl y and fully pull safety belt all the way out.
Fa cility.
Lockable safety belt
Th e re tractors for th e rear seat safety belts and the fron t passenger safety be lt have a swit chable locking feature for child rest raints in addition to the emergency locking fea ture. a c hild
restraint is installed w ith a sa fety belt , the safety belt must be locked so that th e belt webbing cannot unreel. The switchable lockin g feature lets
Bef ore driving
you lock the belt so that a child restra int can be properly installe d and, for example, so that it can't tip to the side when the vehicl e goes around a page
To see whether a safety belt is lockable, pull the
safety belt n llrh e wnyout of the safety belt tr actor. should then hear a
th e switch able locking feature is active, you
s hould no lo nger be able to pull the belt out o f the retractor.
Improper use and care of safety belts increases th e risk of severe personal or death.
Regu larly check safety belt s and rela ted parts for damage.
A lways keep safety belts clean.
Neve r catch, damage or chafe belt webbing on sharp edges.
Always keep objects and liquids away from the belt buckle and buckle opening.