Page 414 of 516

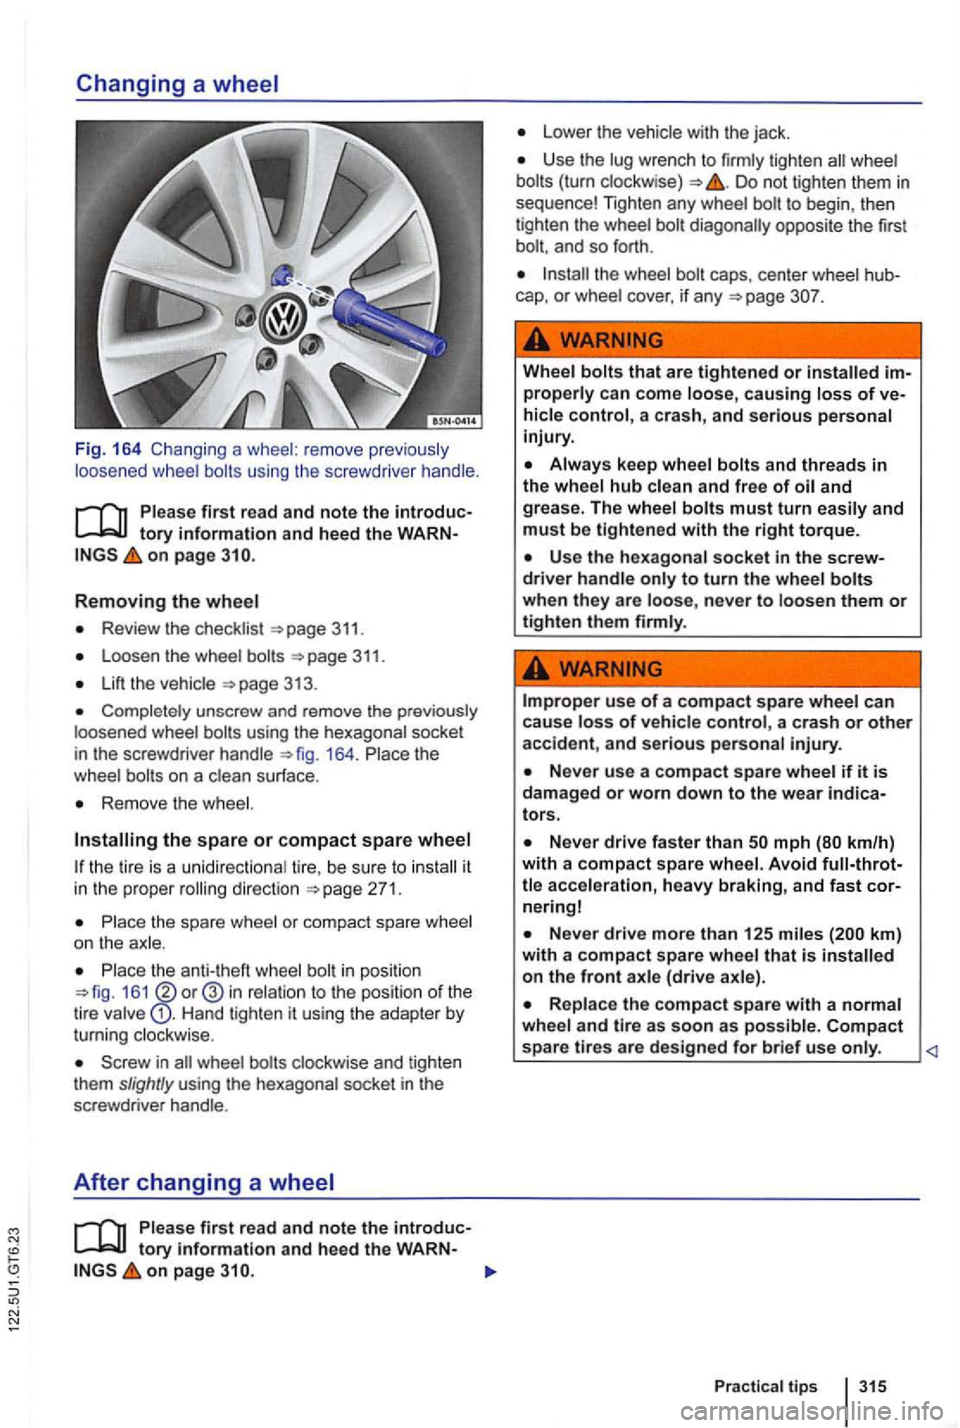
Fig. 164 Chang ing a whee l: remove previous ly
loos ened wheel bolts using the screwdrive r hand le .
on page
Removing the wheel
Review the checklist 311.
Loosen the wheel
Lift the
Completely unscrew and remove the previously
l oosened wheel
164. Place the
wheel
Remove the wheel.
the tire is a unidirectional ti r e , be sure to
Place the spare wheel or compact spare wheel
on the ax le.
in posit ion 161 in relation to the position of the
tire valve Hand tighten it using the adapter by
turning clockwise .
on page
Lower the vehicle with the jack .
Use the lug wrench to firmly tighten wheel Do not tighten them in sequence! Tighten any wheel to begin , then
tighten the wheel
and so forth .
caps , center wheel
Wheel bolts that are tightened or
Always keep wheel bolts and threads in the whee l hub clean and free of
Improper use of a compact s pare wheel can
cause loss o f vehicle control, a crash or other accident , and serious person al injury.
nering!
km ) with a compact spare wheel that is on the front axle (drive axle).
Replace the compact spare with a normal wheel and tire as soon as possible. Compact spa re tires are designed for brief use only.
Practical tip s 3 15
Page 417 of 516

Fuses in the vehicle
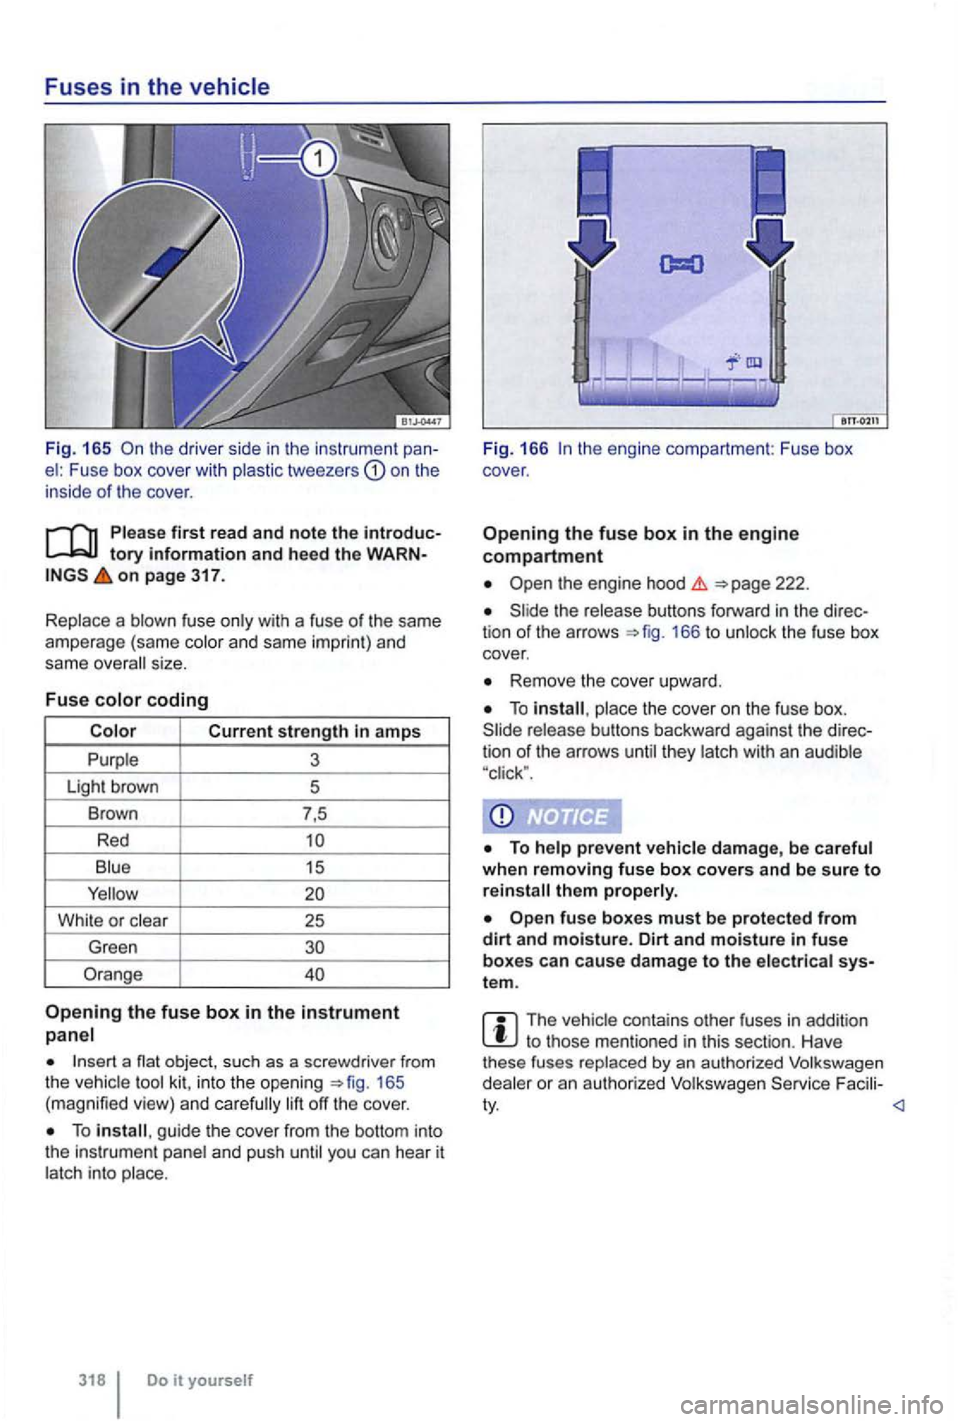
Fig. 165 th e drive r side in the instrument el : Fuse box cove r with plastic tweeze rs on the
inside of t he cover .
on page 317.
Replace a blown fuse only with a fuse
of the same
ampe rage (same color and same impri nt) and
same overa ll size .
Fu
se colo r coding
Blu e
15
Whi te or c lear
25
Green
Orange
Opening the fuse box in t h e instrument
panel
1 65
( m agnified view) and care fully lift off the cover .
To guide the cover from the bottom into
the instrument panel and push until you can hear it
latch int o place .
318 Do it you rself Fi
g. 166
the release buttons forward in the 166 to unlock the fuse box
cover.
Remove the cover upward.
To place the cover on the fuse box.
th em p rope rly.
fuse boxes must be protecte d from dirt an d moisture. Dirt an d moisture in fu se
boxes can cause damage to the elect rica l tem .
The vehic le con tai ns other fu ses in add it ion to those mentioned in this section . H av e
these fuses replaced by an autho rized Volkswage n
dealer or an autho rized Volkswagen Facili -
Page 423 of 516
Please perform the activities
remove the cove r in the wheel house lining from (arrow) .
Release the connecto r
and
171 as far as it goes to the left and
the bulb holder into the headlight and turn as far as it goes to the right.
Attach the connector to the bulb holder The connecto r mus t latch
audibly .
Replace
the cover in the whee l house
F ig. 172 the rear hatch : Removing the bulb
ho lder.
Please first read and note the introductory information and heed the on page
in the order specified:
1 . Review and
the rear hatch
of the screwdriver from the vehicle tool kit 172
Release the latch to remove the bulb holder.
Replace the burned out light bulb with a new bulb
of the same type.
Replace the
bulb holder . The locking lug must latch audib ly .
Attach th e cover . The cover must latch
Do it yourself
Page 424 of 516
Replacing
moving Locking lugs.
on page 320.
Please carry out each step only in the order fied .
Removing the
1. Review and follow the checklist 321.
2 .
17 4) and the trim forwa rd .
4. Squeeze the release of the connector 17 4 together in the direction of the arrows and the connector off.
5. Unsc rew the securing screw by hand 174
6 . remove th e taillight rearward from the body and place it on a clean, smooth surface.
7. To unlock the 175 to in direction of the arrow.
8. Remove the bulb holder from the taillight.
9. R eplace the burned out light bulb with a new of the same type.
Insert the holder into the The locking must latch audibly .
the
11.
174
13.
14 . Attach the connector 174 to the
49.
Due to different versions of the taillight, the location of the light might differ from the
r epresen tation in the illu strat ions . li ght bulbs . These bulbs can be re-
placed .
Practical tips
Page 425 of 516
Changing the
the rear bumper : license plate light. Fig. 177 License plate light: removing the bulb
holder .
P le a se
first read and note the introductory information and heed the on page
in the order s p ecified :
17 6.
3 .
177 ®and disconnec t th e connector.
5. Turn the holder in the direc tion indicated by the arrow 177 @.
6.
the bulb ho lder in the lice nse plate light and turn it co unterc lockw ise in th e direction ind i-
cated by the arrow 177 until it stops.
8. Connect the connector to the bulb holder .
9. the license plate light carefully into the opening in the bumper . Make sure the license
plate light is installed in the correct direction.
Press the license plate
cannot replace the in LED license plate lights. Contact your authorized Volks
wagen dealer or an Author ized Volkswagen ice
Do it yourself
Page 430 of 516

When not to tow your
there is in the tr ansmission be
cause of damage to you r it must be moved
with the drive wheels off the ground . The vehicle
can only be towed if its ignition is switched on and
i ts electrica l system is operating. the following
situat ions, the vehicle cannot be towed at
the front and rear whee ls can not turn .
the vehic le battery is dead {because the elec
troni c steering column lock engages and cannot be
r e leased).
you have to tow an automatic transmission
vehic le more than 30
first read and note the introduc
on page
Towing eye; tow rope or tow bar
A towing eye is included in your vehic le 's tool kit. This can be inserted in a threaded hole in the front
bumper and used when your vehicl e is being tow
ed by ano ther vehicle.
The tow rope should be flexib le enough to he lp
protect both vehicles from damage. Use a synthet
ic fiber rope or similar rope .
Attach the tow rope or tow bar only
to the towing
eye in the vehic le
For the towed vehic le, note the following :
Put the transmission in Neu tral (N) .
Do not tow faster than 30 mph (50 km/h). The
drive rotates while the i
s being towe d with its rear wheels off the ground. This can damage the automatic transmission .
can
Do not tow more than 30 miles (50 km).
When a commerc ial towing truck is being used,
the must be towed with the front
wheels
transmiss ion fluid ha s out of the trans
mission.
the re is in the transmissio n be
cause of damage to your vehicle, it must be moved
w ith the drive whee ls off the ground.
the front and rear whee ls cannot turn.
When the vehicle battery is dead , since the
steering may remain disabl ed, and it may not be
poss ib le to rele ase the electronic steering column
lock.
you have to tow an auto matic transmiss ion
veh icle mor e than 30 miles (50 km).
A veh icle can be towed only if the electronic steer ing column lock is r e leased. case of a
power system,
the engine may have to be jump-started in order to release the electronic steering column lock .
Pract ical tip s 331
Page 431 of 516
right front bumper : Remove cover.
first read and note the introduc
on page
There is a threaded 180.
33 1.
Take the towing eye, the
Push on the cover at the bottom marking =>fig. 179 (arrow ) so that it pops out.
Remove the cover and it hang from the
b um per.
332 Do
F ig .
Screw the towing eye counterclockwise into
the threaded
Use the
When towing is to remove it.
Posit ion the of the cover in the open
ing in the bumper and
Push on the upper part of the cover the
upper i n to
m ake sure the towing eye is screwed the way into threaded s o that it is secure.
Page 432 of 516

N
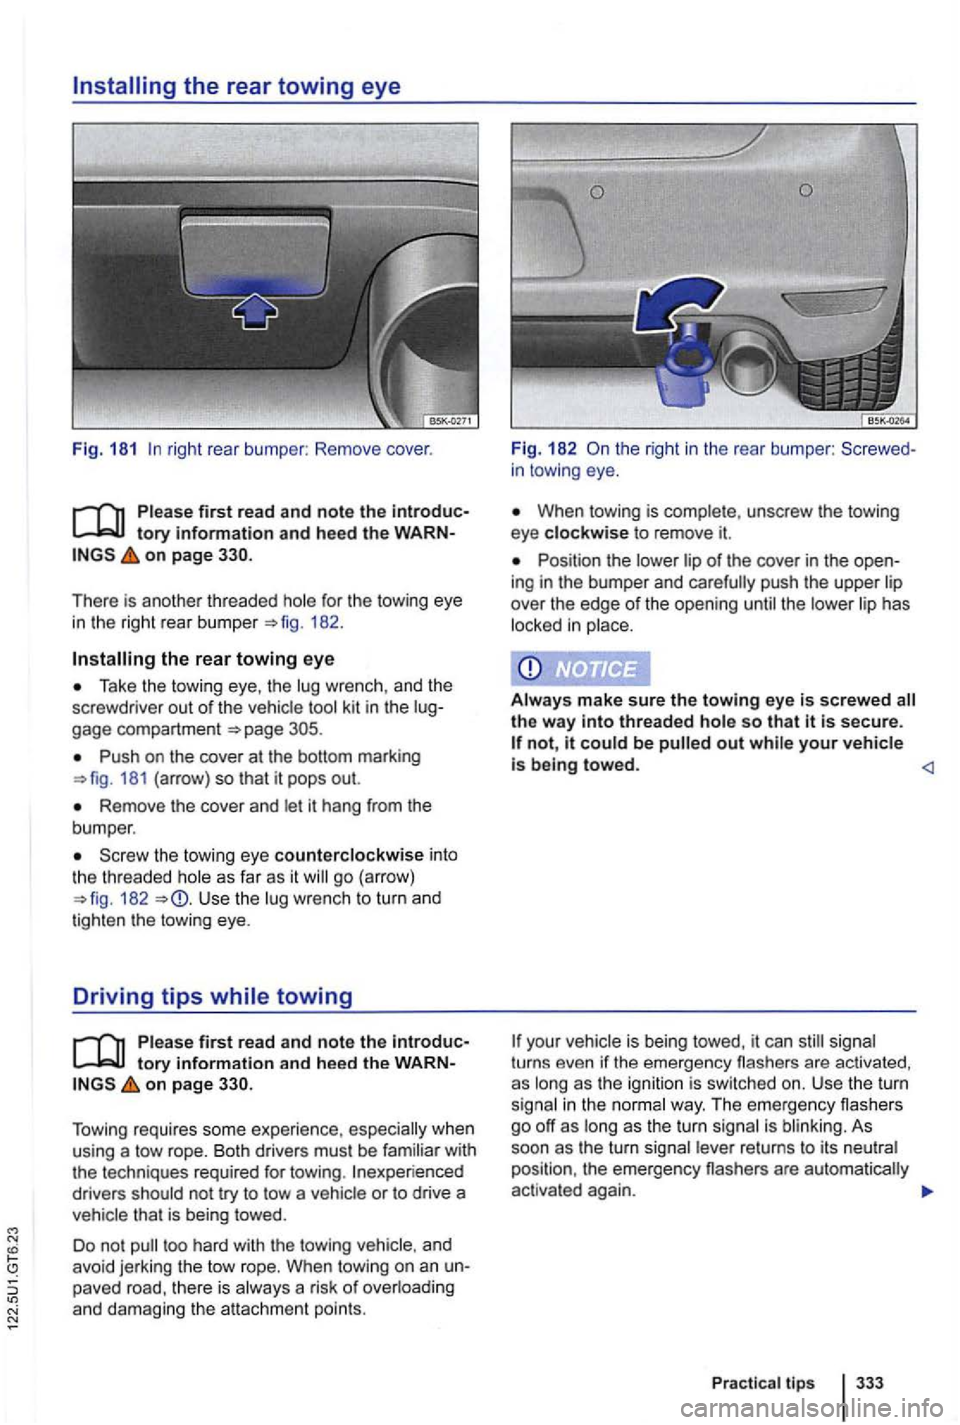
right rear bumper : Remove cover.
on page
for the towing eye
in the right rear bu mper 182 .
the rear towing eye
Take the tow ing eye , th e wrenc h, and the
screwdrive r out of the vehicle gage compartment
Push on the cover at the bottom marking 181 (arrow) so that it pops out.
Remove the cover and let it hang from the
bumper .
the towing eye counterclockwise int o the th readed as far as it go (arrow) 182 Use the lug wrench to turn and
t ighten th e towing eye.
Driving tips while towing
tory information and hee d the on page
Tow ing requires some experie nce , whe n
u sin g a tow rope. Both drivers must be familiar with
the techniques required for towing .
drivers should not try to tow a that is being towed.
Do not
in towing eye.
When towing is complete , unscrew the towing
eye clockwise to remove it.
Position the of the cover in the ing in the bumper and the
Aiways make sure the towing eye is screwed so that is secure. not, it out
your turns even if the eme rgency flashers are activated ,
as
i n the way. The em ergency flashers
go off as long as the turn signal is As soon as the turn re turns to its
Pr actica l tips