Page 26 of 330
BASIC FUNCTIONS
26
When the engine switch is in the “ACC” or
“ON” position, the initial screen will be
displayed and the system will begin oper-
ating.
CAUTION
When the vehicle is stopped with the
engine running, always apply the
parking brake for safety.
After a few seconds, the “CAUTION”
screen will be displayed.
After about 5 seconds, the “CAUTION”
screen automatically switches to the map
screen. When the “MAP/VOICE” button
is also pushed, the map screen is dis-
played.
While the “CAUTION” screen is displayed,
the “DEST” or “SETUP” button cannot be
operated. And if the “Calendar” button on
the “Information” screen is touched, the
screen will change back to the “CAUTION”
screen. In about 5 seconds, or when the
“MAP/VOICE” button is pushed or the
“Show Map” is touched, the “CAUTION”
screen will change to the map screen.
Initial screen
Page 28 of 330
BASIC FUNCTIONS
28
When searching for an address or a name,
or entering, letters and numbers can be in-
put via the touch screen.
INFORMATION
Keyboard layout can be changed.
(See page 239.)
�To input letters and numbers
To display the alphabet keys, touch
“AZ” .
Enter letters by touching the keys directly.
:Touching this button erases one
letter. By holding this button, let-
ters will continue to be erased.
On certain letter entry screens, letters can
be entered in upper or lower case.
: To enter in lower case.
: To enter in upper case.
Inputting letters and
numbers/List screen
operation
Page 31 of 330

BASIC FUNCTIONS
31
You can adjust the contrast, brightness,
color and tone of the screen. You can also
turn the display off, and change the screen
to either day or night mode.
�Contrast, brightness, color and tone
adjustment
The contrast, brightness, color and tone of
the screen can be adjusted depending on
the brightness of your surroundings. You
can also turn the display off.
U003ADNS
1. Push the “DISP” button.
Contrast and brightness adjustment
2. Touch the desired button to adjust
contrast and brightness.
“Contrast” “
+”: Strengthens the contrast
of the screen.
“Contrast” “
–”: Weakens the contrast of
the screen.
“Brightness” “
+”: Brightens the screen.
“Brightness” “
–”: Darkens the screen.
3. After adjusting the screen, touch
“OK”.
The screen goes off when “Screen Off” is
touched. To turn the display screen back
on, push the “DISP” button again, or push
the “DEST” or another screen mode but-
ton.
INFORMATION
When you do not touch any button on
the “Display” screen for 20 seconds,
the previous screen will be displayed.
Screen adjustment
Page 32 of 330
BASIC FUNCTIONS
32
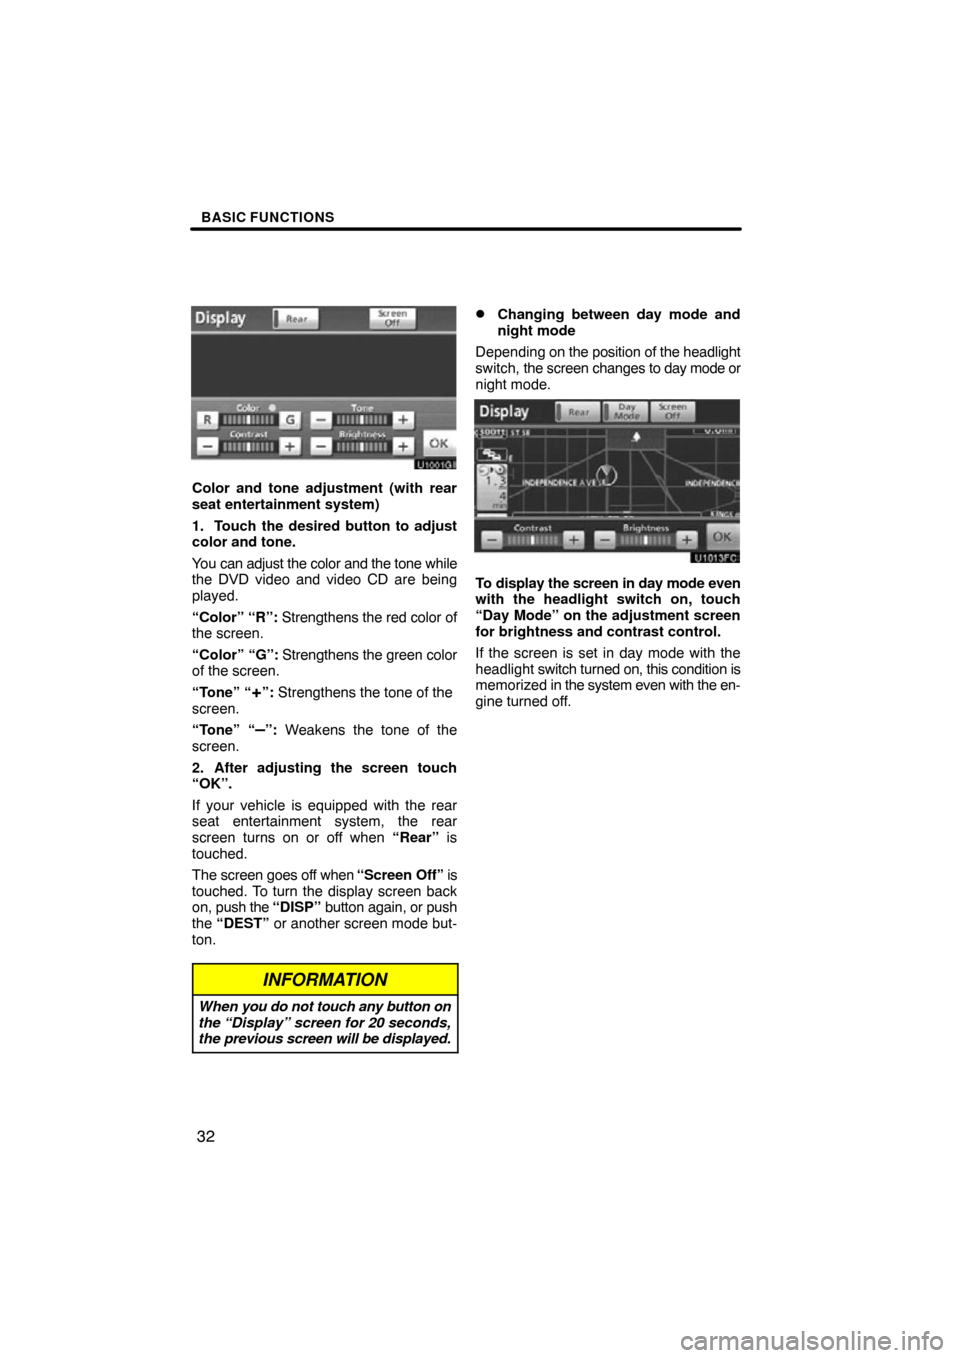
Color and tone adjustment (with rear
seat entertainment system)
1. Touch the desired button to adjust
color and tone.
You can adjust the color and the tone while
the DVD video and video CD are being
played.
“Color” “R”: Strengthens the red color of
the screen.
“Color” “G”: Strengthens the green color
of the screen.
“Tone” “
+”: Strengthens the tone of the
screen.
“Tone” “
–”: Weakens the tone of the
screen.
2. After adjusting the screen touch
“OK”.
If your vehicle is equipped with the rear
seat entertainment system, the rear
screen turns on or off when “Rear” is
touched.
The screen goes off when “Screen Off” is
touched. To turn the display screen back
on, push the “DISP” button again, or push
the “DEST” or another screen mode but-
ton.
INFORMATION
When you do not touch any button on
the “Display” screen for 20 seconds,
the previous screen will be displayed.
�Changing between day mode and
night mode
Depending on the position of the headlight
switch, the screen changes to day mode or
night mode.
To display the screen in day mode even
with the headlight switch on, touch
“Day Mode” on the adjustment screen
for brightness and contrast control.
If the screen is set in day mode with the
headlight switch turned on, this condition is
memorized in the system even with the en-
gine turned off.
Page 34 of 330

BASIC FUNCTIONS
34
When any point on the map is touched,
that point moves to the center of the screen
and is shown by the cursor mark (
1).
Use the scroll feature to move the desired
point to the center of the screen for looking
at a point on the map that is different from
the current position of the vehicle.
If the finger is continuously held on the
screen, the map will continue scrolling in
that direction until the finger is removed.
A street name, city name, etc. of the
touched point will be shown, depending on
the scale of the map (
2). Distance from
the current position to will also be
shown (3).
After the screen is scrolled, the map re-
mains centered at the selected location
until another function is activated. The cur-
rent vehicle position mark will continue to
move along your actual route and may
move off the screen. When the “MAP/
VOICE” button is pushed, the current ve-
hicle position mark returns to the center of
the screen and the map moves as the ve-
hicle proceeds along the designated route.
INFORMATION
When the onetouch scroll feature is
used, the current vehicle position
mark may disappear from the screen.
Move the map with a onetouch scroll
again or push the “MAP/VOICE” but-
ton to return to the current vehicle
position map location display.
�To set the cursor position as a des-
tination
A specific point on the map can be set as
a destination using the one −touch scroll
function.
Touch “Enter ”.
The screen changes and displays the map
location of the selected destination and the
route preference. (See “Starting route
guidance” on page 72.)
— Screen scroll operation
(onetouch scroll)
Page 35 of 330
BASIC FUNCTIONS
35
�
To register the cursor position as an
address book entry
Address book entry registration enables
easy access to a specific point.
Touch “Mark”.
When you touch “Mark” , the following
screen appears for a few seconds, and
then the map screen returns.
The registered point is shown by on the
map. To change the icon or name, etc., see “ (b)
Editing
address book entries” on page 110.
Up to 100 address book entries can be reg-
istered. If there is an attempt to register
more than 100 address book entries, an
error message will appear.
Page 41 of 330

BASIC FUNCTIONS
41
DUAL MAP
A map can be displayed split in two.
While on a different screen, touching
will display the dual map
screen.
The screen shows the dual map. The map
on the left is the main map.
The right side map can be edited by touch-
ing any specific point on the right side map.
This screen can perform the following pro-
cedures:
1. Changing the map scale
2. Displaying the POI icon
3. Show XM� NavTraffic Info. (See page
98.)
4. Changing the orientation of the map
Touch “OK” when you complete edi-
ting.
The screen returns to the dual map screen. COMPASS MODE
Current vehicle position is
indicated with a
compass.
While on a different screen, touching
will display the compass
mode screen.
Information about the destination and cur-
rent position, as well as a compass, is dis-
played on the screen.
The destination mark is displayed in the di-
rection of the destination. When driving re-
fer to the longitude and latitude coordi-
nates, and the compass, to make sure that
your vehicle is headed in the direction of
the destination.
INFORMATION
When the vehicle travels out of the
coverage area, the guidance screen
changes to the compass mode
screen.
Page 42 of 330

BASIC FUNCTIONS
42
Touch or to change the scale
of the map display. The scale bar and indi-
cator at the bottom of the screen indicates
the map scale menu. The scale range is
150 feet (50 m) to 250 miles (400 km).
Touch
or until the scale bar
changes normally. By continuing to touch
the button, the scale bar changes smooth-
ly.
The scale of the map display can be
changed by tou ching the scale bar directly.
It is not available while driving.
The map scale is displayed under the
north−up symbol or heading −up symbol at
the top left of the screen.
INFORMATION
When the map scale is at the maxi-
mum range of 250 miles (400 km),
is not shown. When the map
scale is at the minimum range of 150
feet (50 m), is not shown. In
areas where the foot print map is
available the map scale changes from
to when at the minimum
range.
For the area which is covered by the foot
print map (Some areas in the following
cities: Detroit, Chicago, N.Y., L.A), you can
switch to the foot print map on a scale of 75
feet (25 m).
�To switch to the foot print map
changes into when the map
is scaled down to 150 feet (50 m).
To display the foot print map, touch
.
To delete the foot print map display, touch
.
INFORMATION
� If the map or the current position is
moved to the area which is not cov-
ered by the foot print map, the
screen scale automatically
changes to 150 feet (50 m).
� On the foot print map, a one way
street is displayed by .
� It is not possible to perform scroll-
ing on the foot print map (one
touch scroll) while driving.
Building footprints in the database were
created and provided by MAPMASTER.
— Map scale— Foot print map


