Page 257 of 476
257
3
Interior features
iQ_WE_74014E
3-2. Using the audio system
Audio system type
: If equipped
CD player and AM/FM radio
Audio display
Audio switches
CD slot
TitlePage
Using the radioP. 260
Using the CD playerP. 265
Playing back MP3 and WMA discsP. 272
Optimal use of the audio systemP. 280
Using the AUX portP. 282
Using the steering wheel audio switchesP. 284
Page 284 of 476
284
3-2. Using the audio system
iQ_WE_74014E
Using the steering wheel audio switches
Turning on the power
Press when the audio system is turned off.
The audio system can be turned off by holding the switch down until you
hear two beeps.
Selecting the audio mode
Press when the audio system is turned on. The audio mode
changes as follows each time the button is pressed.
FM1FM2FM3CDAUXAM
Adjusting the volume
Press “ ” on to increase the volume and “ ” to decrease the
volume.
Hold down the button to continue increasing or decreasing the volume.
Audio features can be controlled using the switches on the steering
wheel.
Operation may differ depending on the type of audio system or navi-
gation system. For details, refer to the manual provided with the
audio system or navigation system.
Vo l u m e
Radio: Select radio stations
CD: Select tracks, files
(MP3 and WMA)
Power on, select audio
mode
Page 285 of 476
285 3-2. Using the audio system
3
Interior features
iQ_WE_74014E
Selecting a radio station
Press several times until FM or AM mode is displayed.
Press “” or “” on to select a preset station.
To scan for receivable stations, press and hold the switch until you
hear a beep.
Selecting a track/file
Press several times until “CD”, “MP3” or “WMA” is dis-
played.
Press “” or “” on to select the desired track/file.
Selecting a folder
Press several times until “MP3” or “WMA” is displayed.
Press and hold “” or “” on until you hear a beep.
CAUTION
To reduce the risk of an accident
Exercise care when operating the audio switches on the steering wheel.
Page 368 of 476

368 4-3. Do-it-yourself maintenance
iQ_WE_74014E
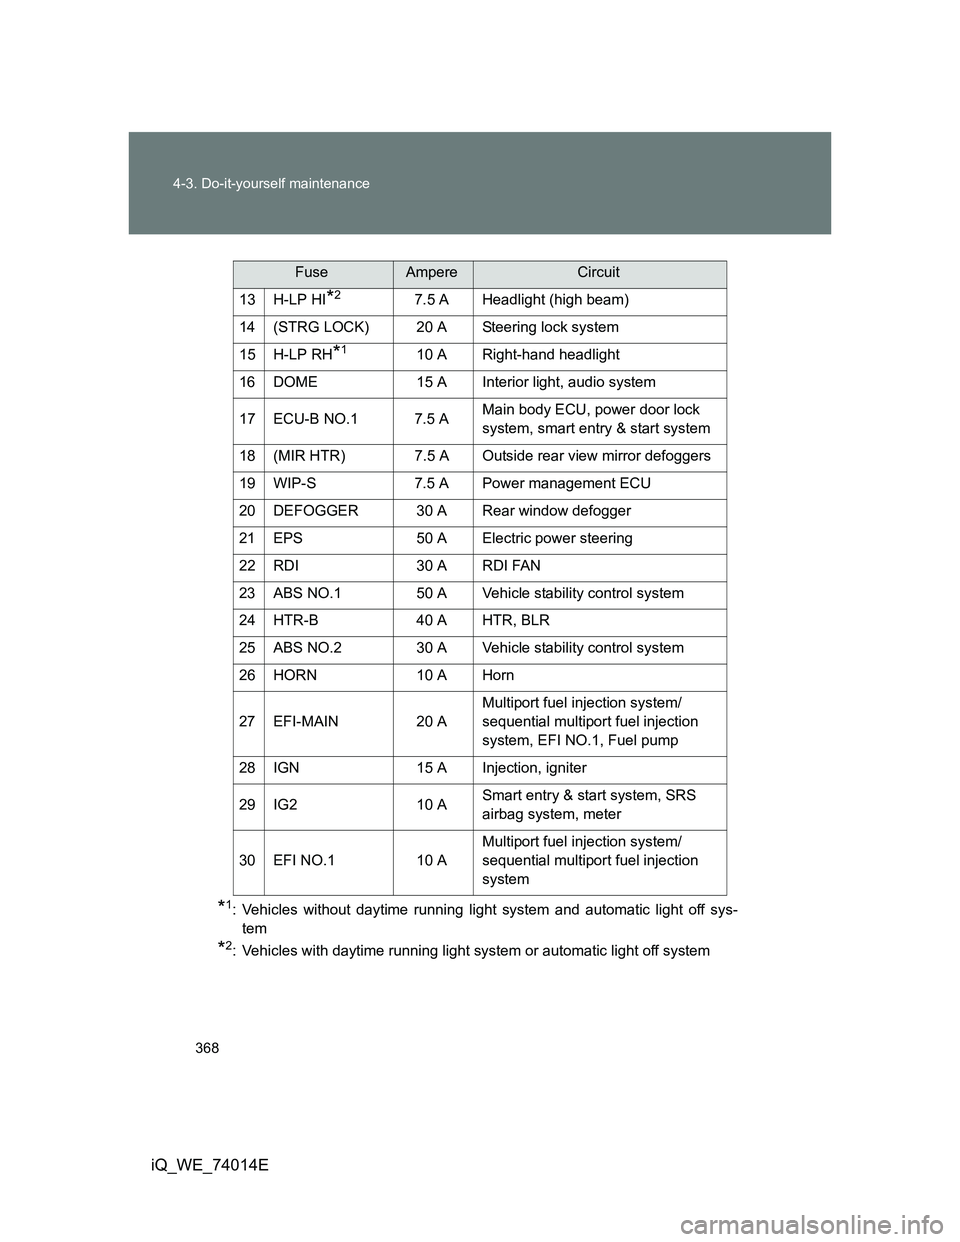
*1: Vehicles without daytime running light system and automatic light off sys-
tem
*2: Vehicles with daytime running light system or automatic light off system13 H-LP HI
*27.5 A Headlight (high beam)
14 (STRG LOCK) 20 A Steering lock system
15 H-LP RH
*110 A Right-hand headlight
16 DOME 15 A Interior light, audio system
17 ECU-B NO.1 7.5 AMain body ECU, power door lock
system, smart entry & start system
18 (MIR HTR) 7.5 A Outside rear view mirror defoggers
19 WIP-S 7.5 A Power management ECU
20 DEFOGGER 30 A Rear window defogger
21 EPS 50 A Electric power steering
22 RDI 30 A RDI FAN
23 ABS NO.1 50 A Vehicle stability control system
24 HTR-B 40 A HTR, BLR
25 ABS NO.2 30 A Vehicle stability control system
26 HORN 10 A Horn
27 EFI-MAIN 20 AMultiport fuel injection system/
sequential multiport fuel injection
system, EFI NO.1, Fuel pump
28 IGN 15 A Injection, igniter
29 IG2 10 ASmart entry & start system, SRS
airbag system, meter
30 EFI NO.1 10 AMultiport fuel injection system/
sequential multiport fuel injection
system
FuseAmpereCircuit
Page 370 of 476
370 4-3. Do-it-yourself maintenance
iQ_WE_74014EUnder the instrument panel
FuseAmpereCircuit
1 ECU-IG NO.1 7.5 AVehicle stability control system,
shift lock control system, electric
power steering, automatic head-
light, main body ECU
2 GAUGE 10 AElectric cooling fan(s), charging
system, emergency flashers, front
passenger’s seat belt reminder
light, back-up lights, multiport fuel
injection system/sequential multi-
port fuel injection system, wind-
shield wiper ECU, auto anti-glare
inside rear view mirror
3 HTR-IG 10 AAir conditioning system, wiper
deicer, rear window defogger
4 WASHER RR 10 A Windshield washer
5 WIPER RR 10 A Rear window wiper
6 WIPER FR 25 A Windshield wipers
7 WASHER FR 10 A Windshield washer
8 OBD 7.5 A On-board diagnosis system
9 (FOG RR) 7.5 A Rear fog light
Page 389 of 476
5
389 5-1. Essential information
When trouble arises
iQ_WE_74014E
Emergency towing
If a tow truck is not available, in an emergency your vehicle may be
temporarily towed using a cable or chain secured to the emergency
towing eyelet. This should only be attempted on hard, surfaced roads
for short distances at low speeds.
A driver must be in the vehicle to steer and operate the brakes. The
vehicle’s wheels, drive train, axles, steering and brakes must be in
good condition.
Towing eyelet
Emergency towing procedure
Start the engine.
Vehicles without smart entry & start system:
If the engine cannot be started, turn the engine switch to the ACC
or ON position.
Vehicles with smart entry & start system:
If the engine cannot be started, press the “ENGINE START STOP”
switch to change to the ACCESSORY or IGNITION ON mode.
Put the shift lever in N.
Release the parking brake.
Page 390 of 476

390 5-1. Essential information
iQ_WE_74014E
Installing towing eyelet
Remove the eyelet cover using a
flathead screwdriver.
To protect the bodywork, place a
rag between the screwdriver and
the vehicle body, as shown in the
illustration.
CAUTION
Caution while towing
Use extreme caution when towing the vehicle.
Avoid sudden starts or erratic driving maneuvers which place excessive
stress on the emergency towing eyelet and the cables or chains. Always
be cautious of the surroundings and other vehicles while towing.
If the engine is not running, the power assist for the brakes and steering
will not function, making steering and braking more difficult.
NOTICE
To prevent serious damage to the transmission
(vehicles with a Multidrive)
Never tow this vehicle from the rear with the front wheels on the ground.
This may cause serious damage to the transmission.
When towing a vehicle without using a towing dolly
(vehicles with a manual transmission)
Vehicles without smart entry & start system:
Do not tow the vehicle with the key removed or in the LOCK position.
Vehicles with smart entry & start system:
Do not tow the vehicle with the “ENGINE START STOP” switch OFF.
Page 394 of 476

394 5-1. Essential information
iQ_WE_74014E
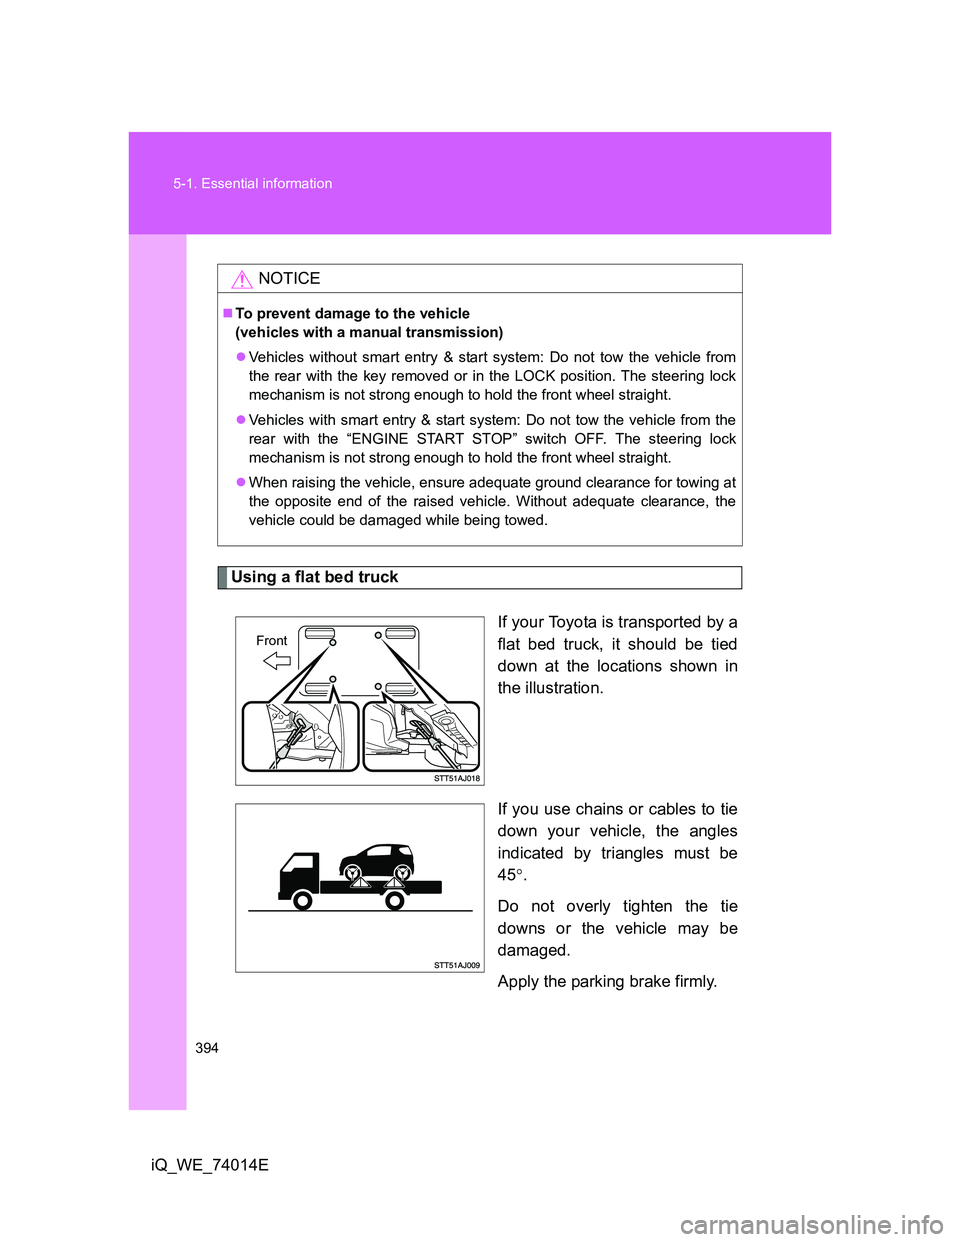
Using a flat bed truck
If your Toyota is transported by a
flat bed truck, it should be tied
down at the locations shown in
the illustration.
If you use chains or cables to tie
down your vehicle, the angles
indicated by triangles must be
45.
Do not overly tighten the tie
downs or the vehicle may be
damaged.
Apply the parking brake firmly.
NOTICE
To prevent damage to the vehicle
(vehicles with a manual transmission)
Vehicles without smart entry & start system: Do not tow the vehicle from
the rear with the key removed or in the LOCK position. The steering lock
mechanism is not strong enough to hold the front wheel straight.
Vehicles with smart entry & start system: Do not tow the vehicle from the
rear with the “ENGINE START STOP” switch OFF. The steering lock
mechanism is not strong enough to hold the front wheel straight.
When raising the vehicle, ensure adequate ground clearance for towing at
the opposite end of the raised vehicle. Without adequate clearance, the
vehicle could be damaged while being towed.
Front