Page 287 of 476
287 3-3. Using the interior lights
3
Interior features
iQ_WE_74014E
Interior light
Door position
Off
On
The interior light angle can be
adjusted.
Interior light
Page 308 of 476

308 4-1. Maintenance and care
iQ_WE_74014E
NOTICE
To prevent paint deterioration and corrosion on the body and compo-
nents (aluminum wheels etc.)
Wash the vehicle immediately in the following cases:
• After driving near the sea coast
• After driving on salted roads
• If you see coal tar or tree sap on the paint surface
• If you see dead insects, insect droppings or bird droppings on the paint
• After driving in an area contaminated with soot, oily smoke, mine dust,
iron powder or chemical substances
• If the vehicle becomes heavily soiled in dust or mud
• If liquids such as benzene and gasoline are spilled on the paint surface
If the paint is chipped or scratched, have it repaired immediately.
To prevent the wheels from corroding, remove any dirt and store in a place
with low humidity when storing the wheels.
Cleaning the exterior lights
Wash carefully. Do not use organic substances or scrub with a hard brush.
This may damage the surfaces of the lights.
Do not apply wax on the surfaces of the lights.
Wax may cause damage to the lenses.
Antenna installation and removal precautions
Before driving, ensure that the antenna is installed.
When the antenna is removed, such as before entering an automatic car
wash, make sure to store it in a suitable place so as not to lose it. Also,
before driving, make sure to reinstall the antenna in its original position.
To prevent damage to the windshield wiper arms
When lifting the wiper arms away from the windshield, pull the driver side
wiper arm upward first, and repeat for the passenger side. When returning
the wipers to their original position, do so from the passenger side first.
Page 367 of 476
367 4-3. Do-it-yourself maintenance
4
Maintenance and care
iQ_WE_74014EEngine compartment (type B)
FuseAmpereCircuit
1 D/C CUT 30 A ECU-B NO.1, DOME
2 IMMOBI 7.5 A Smart entry & start system
3 TURN & HAZ 10 ATurn signal lights, emergency
flashers
4 ETCS 10 A Electronic throttle control system
5 ECU-B NO.2 5 AMeter, power windows, air condi-
tioning system
6 AM2 NO.2 7.5 A Power management ECU
7H-LP LH
*110 A Left-hand headlight
H-LP LO
*220 A Headlight (low beam)
8 (BBC) 40 A No circuit
9 SPARE 30 A Spare fuse
10 SPARE 20 A Spare fuse
11 SPARE 5 A Spare fuse
12 AM2 NO.1 30 A Starting system
Page 370 of 476
370 4-3. Do-it-yourself maintenance
iQ_WE_74014EUnder the instrument panel
FuseAmpereCircuit
1 ECU-IG NO.1 7.5 AVehicle stability control system,
shift lock control system, electric
power steering, automatic head-
light, main body ECU
2 GAUGE 10 AElectric cooling fan(s), charging
system, emergency flashers, front
passenger’s seat belt reminder
light, back-up lights, multiport fuel
injection system/sequential multi-
port fuel injection system, wind-
shield wiper ECU, auto anti-glare
inside rear view mirror
3 HTR-IG 10 AAir conditioning system, wiper
deicer, rear window defogger
4 WASHER RR 10 A Windshield washer
5 WIPER RR 10 A Rear window wiper
6 WIPER FR 25 A Windshield wipers
7 WASHER FR 10 A Windshield washer
8 OBD 7.5 A On-board diagnosis system
9 (FOG RR) 7.5 A Rear fog light
Page 371 of 476

371 4-3. Do-it-yourself maintenance
4
Maintenance and care
iQ_WE_74014E
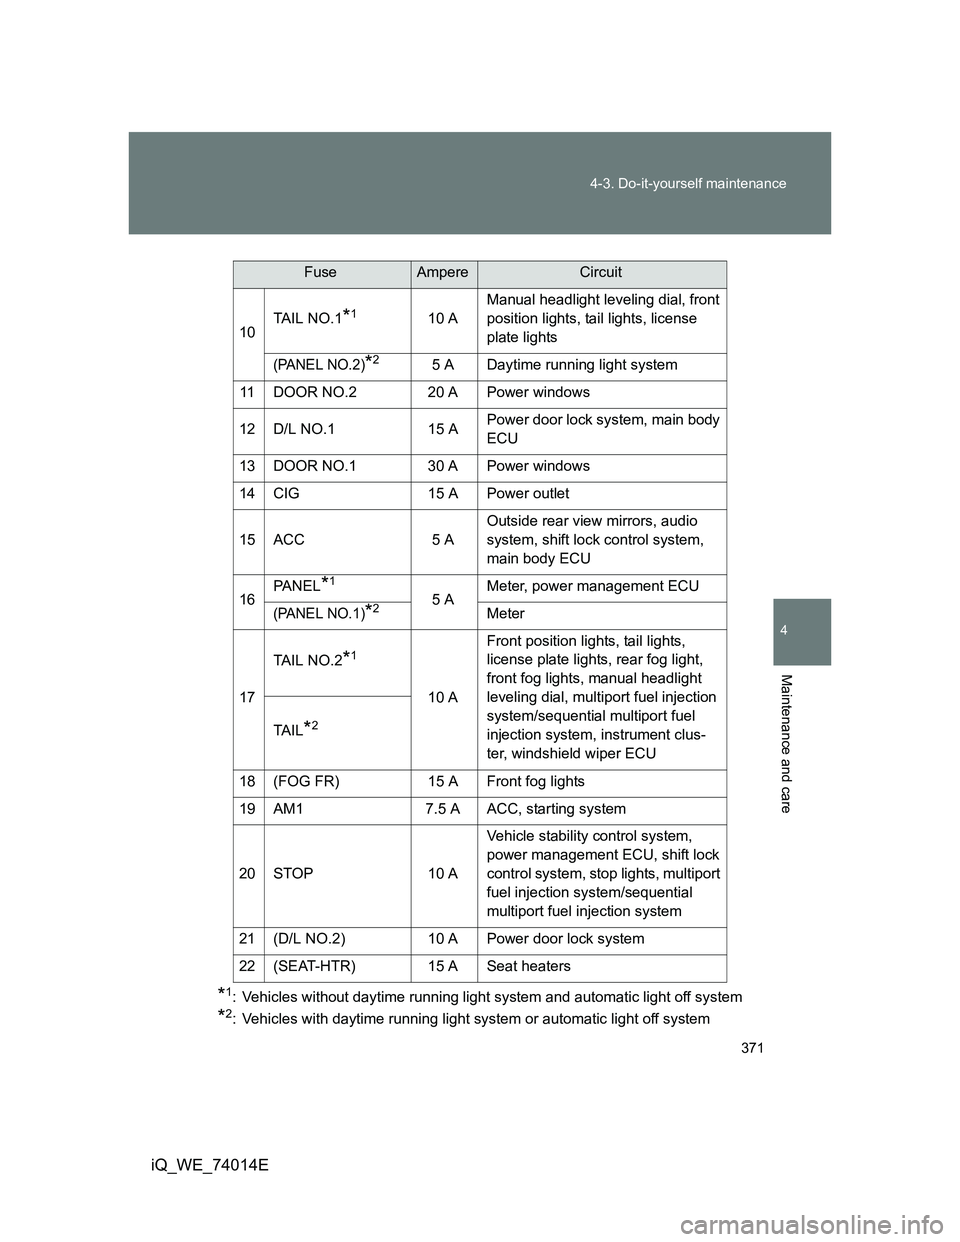
*1: Vehicles without daytime running light system and automatic light off system
*2: Vehicles with daytime running light system or automatic light off system10TAIL NO.1
*110 AManual headlight leveling dial, front
position lights, tail lights, license
plate lights
(PANEL NO.2)*25 A Daytime running light system
11 DOOR NO.2 20 A Power windows
12 D/L NO.1 15 APower door lock system, main body
ECU
13 DOOR NO.1 30 A Power windows
14 CIG 15 A Power outlet
15 ACC 5 AOutside rear view mirrors, audio
system, shift lock control system,
main body ECU
16PA N E L
*1
5 AMeter, power management ECU(PANEL NO.1)*2Meter
17TAIL NO.2
*1
10 AFront position lights, tail lights,
license plate lights, rear fog light,
front fog lights, manual headlight
leveling dial, multiport fuel injection
system/sequential multiport fuel
injection system, instrument clus-
ter, windshield wiper ECU TA I L
*2
18 (FOG FR) 15 A Front fog lights
19 AM1 7.5 A ACC, starting system
20 STOP 10 AVehicle stability control system,
power management ECU, shift lock
control system, stop lights, multiport
fuel injection system/sequential
multiport fuel injection system
21 (D/L NO.2) 10 A Power door lock system
22 (SEAT-HTR) 15 A Seat heaters
FuseAmpereCircuit
Page 372 of 476

372 4-3. Do-it-yourself maintenance
iQ_WE_74014E
After a fuse is replaced
If the lights do not turn on even after the fuse has been replaced, a bulb
may need replacement. (P. 373)
If the replaced fuse blows again, have the vehicle inspected by any
authorized Toyota dealer or repairer, or another duly qualified and
equipped professional.
If there is an overload in the circuits
The fuses are designed to blow, protecting the wiring harness from damage.
CAUTION
To prevent system breakdowns and vehicle fire
Observe the following precautions.
Failing to do so may cause damage to the vehicle, and possibly a fire or
injury.
Never use a fuse of a higher amperage rating than indicated, or use any
other object in place of a fuse.
Always use a genuine Toyota fuse or equivalent.
Never replace a fuse with a wire, even as a temporary fix.
Do not modify the fuse or the fuse box.
NOTICE
Before replacing fuses
Have the cause of electrical overload determined and repaired by any autho-
rized Toyota dealer or repairer, or another duly qualified and equipped pro-
fessional, as soon as possible.
Page 377 of 476
377 4-3. Do-it-yourself maintenance
4
Maintenance and care
iQ_WE_74014ETurn the bulb base counterclock-
wise.
Unplug the connector while
depressing the lock release.
When installing, reverse the steps listed.
Front fog lights (if equipped)
Remove the front spats bolts.
Page 379 of 476
379 4-3. Do-it-yourself maintenance
4
Maintenance and care
iQ_WE_74014EFront position lights
Turn the bulb base counterclock-
wise.
Remove the light bulb.
When installing, reverse the steps listed.