Page 182 of 299
AUDIO SYSTEM
182
(a) Connecting a USB memory or iPod
1. Open the console box.
2. Open the cover and connect a USB
memory or iPod.
Turn on the power of the USB memory or
iPod if it is not turned on.
3. Close the console box. (b) Playing a USB memory or iPod
�Playing and pausing a file or track
�USB memory
�iPod
Push the “AUX” button or push the
“AUDIO” button to display this screen
and touch the “USB” tab to display this
screen if the USB memory or iPod is al-
ready connected.
Touch
and the music will start playing.
Touch
and the music will pause.
Touch
and the music will start playing
again.
Page 184 of 299
AUDIO SYSTEM
184 �
Selecting a desired folder
(USB memory only)
“Folder�”: Touch this touch −screen but-
ton to go to the next folder.
“Folder \b”: Touch this touch −screen but-
ton to go to the previous folder.
“Select” for Folder: The desired folder
can be selected in a list. This function is
available only when the vehicle is not mov-
ing.
Touch “Select” . The folder list is dis-
played.
Touch the desired folder number. The sys-
tem will start playing the first file of the se-
lected folder.
: By touching this touch−screen but-
ton, the list moves up by 5 folder groups.
If this touch−screen button is touched
when the top page of the list is displayed,
the last page is displayed.
: By touching this touch−screen but-
ton, the list moves down by 5 folder
groups. If this touch−screen button is
touched when the last page of the list is
displayed, the top page is displayed.
Page 186 of 299
AUDIO SYSTEM
186
�USB memory
�iPod
“Select” for File or Track: The desired
file or track can be selected in a list. This
function is available only when the vehicle
is not moving.
Touch “Select” . The file or track list is dis-
played.
Touch the desired file or track number. The
changer will start playing the selected file
or track from the beginning.
: By touching this touch−screen but-
ton, the list moves up by 5 file or track
groups. If this touch−screen button is
touched when the top page of the list is dis-
played, the last page is displayed.
: By touching this touch−screen but-
ton, the list moves down by 5 file or track
groups. If this touch−screen button is
touched when the last page of the list is
displayed, the top page is displayed.
Page 195 of 299

AUDIO SYSTEM
195
MP3/WMA FILES
�MP3 (MPEG Audio Layer 3) and WMA
(Windows Media Audio) are audio
compression standards.
�The MP3/WMA player can play MP3
and WMA files on CD−ROM, CD−R
and CD −RW discs.
The unit can play disc recordings com-
patible with ISO 9660 level 1 and level
2 and with the Romeo and Joliet file
system.
�When naming an MP3 or WMA file, add
the appropriate file extension (.mp3 or
.wma).
�The MP3/WMA player plays back files
with .mp3 or .wma file extensions as
MP3 or WMA files. To prevent noise
and playback errors, use the appropri-
ate file extensions.
�The MP3/WMA player can play only
the first session using multi −session
compatible CDs.
�MP3 player — MP3 files are compat-
ible with the ID3 Tag Ver. 1.0, Ver. 1.1,
Ver. 2.2, and Ver. 2.3 formats. The unit
cannot display disc title, track title and
artist name in other formats.
�USB memory — MP3 files are com-
patible with the ID3 Tag Ver. 1.0, Ver.
1.1, Ver. 2.2, Ver. 2.3 and Ver. 2.4 for-
mats. The unit cannot display track title
and artist name in other formats.
�WMA files can contain a WMA tag that
is used in the same way as an ID3 tag.
WMA tags carry information such as
track title, artist name.
�The emphasis function is available
only when playing MP3/WMA files re-
corded at 32, 44.1 and 48 kHz. Sampling frequency
MP3 files for MP3 player:
MPEG 1 LAYER 3 — 32, 44.1, 48 kHz
MPEG 2 LSF LAYER 3 — 16, 22.05, 24
kHz
MP3 files for USB memory:
MPEG 1 AUDIO LAYER 2, 3 — 32,
44.1, 48 kHz
MPEG 2 AUDIO LAYER 2, 3 — 16,
22.05, 24 kHz
MPEG 2.5 — 8, 11.025, 12 kHz
WMA files for WMA player:
Ver. 7, 8, 9 CBR — 32, 44.1, 48 kHz
WMA files for USB memory:
Ver. 9 — HIGH PROFILE 32, 44.1, 48
kHz
�The sound quality of MP3/WMA files
generally
improves with higher bit rate-
s. In order to achieve a reasonable lev-
el of sound quality, discs recorded with
a bit rate of at least 128 kbps are rec-
ommended.
Playable bit rates
MP3 files for MP3 player:
MPEG1 LAYER3 — 64 to 320 kbps
MPEG2 LSF LAYER3 — 64 to 160
kbps
MP3 files for USB memory:
MPEG 1 AUDIO LAYER 2, 3 — 32 to
320 kbps
MPEG 2 AUDIO LAYER 2, 3 — 32 to
160 kbps
MPEG 2.5 — 32 to 160 kbps
WMA files for WMA player:
Ver. 7, 8 CBR — 48 to 192 kbps
Ver. 9 CBR — 48 to 320 kbps
WMA files for USB memory:
Ver. 9 CBR — 32 to 320 kbps
Page 196 of 299

AUDIO SYSTEM
196 �
The MP3/WMA player does not play
back MP3/WMA files from discs re-
corder using packet write data transfer
(UDF format). Discs should be re-
corded using “pre −mastering” software
rather than packet− write software.
�M3u playlists are not compatible with
the audio player.
�MP3i (MP3 interactive) and MP3PRO
formats are not compatible with the au-
dio player.
�The player is compatible with VBR
(Variable Bit Rate).
�When playing back files recorded as
VBR (Variable Bit Rate) files, the play
time will not be correctly displayed if
fast−forward or reverse operations are
used.
�It is not possible to check folders that
do not include MP3/WMA files.
�MP3/WMA files in folders up to 8 levels
deep can be played. However, the
start of playback may be delayed when
using discs containing numerous lev-
els of folders. For this reason, we rec-
ommend creating discs with no more
than two levels of folders.
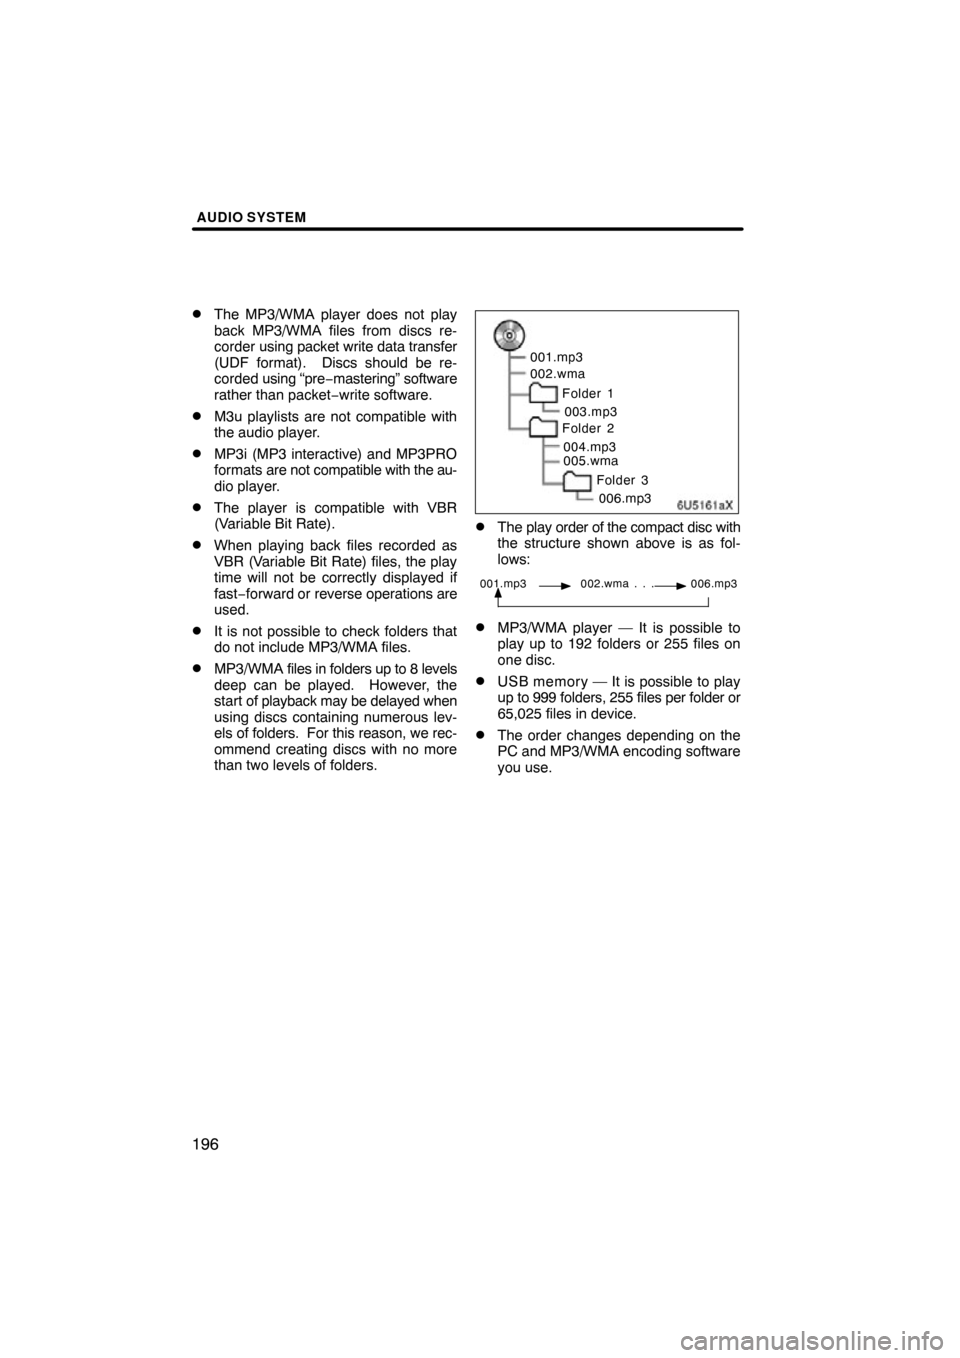
6U5161aX
001.mp3
002.wma
Folder 1003.mp3
Folder 2
004.mp3
005.wma
Folder 3006.mp3
�The play order of the compact disc with
the structure shown above is as fol-
lows:
001.mp3 002.wma . . . 006.mp3
�MP3/WMA player — It is possible to
play up to 192 folders or 255 files on
one disc.
�USB memory — It is possible to play
up to 999 folders, 255 files per folder or
65,025 files in device.
�The order changes depending on the
PC and MP3/WMA encoding software
you use.
Page 200 of 299

REAR VIEW MONITOR SYSTEM
200
The rear view monitor system assists
the driver by displaying an image of the
view behind the vehicle while backing
up. The left and right displayed on the
screen are the same as those of the in-
side rear view mirror.
Vehicles with smart key system —
To display the rear view image on the
screen, place the shift lever in the “R”
position when the “ENGINE START
STOP” switch is in IGNITION ON mode.
Vehicles without smart key system —
To display the rear view image on the
screen, place the shift lever in the “R”
position when the engine switch is in
the “ON” position.
If you move the shift lever out of the “R”
position, the screen returns to the previous
screen. Operating another function of the
navigation system will display another
screen.
The rear view monitor system is a supple-
ment device intended to assist back up.
When backing up, be sure to check behind
and all around the vehicle visually.
CAUTION
�Never depend on the rear view
monitor system entirely when
backing up. Always make sure
your intended path is clear.
Use caution, just as you would
when backing up any vehicle.
�Never back up while looking only at
the screen. The image on the
screen is different from actual
conditions. Depicted distances
between objects and flat surfaces
will differ from actual distance. If
you back up while looking only at
the screen, you may hit a vehicle, a
person or an object. When backing
up, be sure to check behind and all
around the vehicle visually and
with mirrors before proceeding.
�Always check the vehicle sur-
rounding area, because the guide
lines are ancillary lines.
�The guide lines are ancillary lines
and do not change even if the steer-
ing wheel is turned.
�Do not use the system when the
trunk is not completely closed.
�Use your own eyes to confirm the
vehicle’s surroundings, as the dis-
played image may become faint or
dark, and moving images will be
distorted, or not entirely visible
when the outside temperature is
low. When backing up, be sure to
check behind and all around the ve-
hicle visually and with mirror be-
fore proceeding.
�Do not use the system in the follow-
ing cases:
�On icy or slick road surfaces, or
in snow.
�When using tire chains or emer-
gency tires.
�On an uneven road, such as a
slope.
Rear view monitor system —
Page 202 of 299
REAR VIEW MONITOR SYSTEM
202 �
Rear view monitor guide lines
Guide lines are displayed on the screen.
�Guidelines shown differ from those
shown on the actual screen.
1Vehicle width extension guide
lines (blue)
These lines indicate the estimated
vehicle width.
2Distance guide line (blue)
This line indicates a position on the
ground about 3 ft. (1 m) behind the
rear bumper of the vehicle.
3Distance guide line (red)
This line indicates a position on the
ground about 1.5 ft. (0.5 m) behind
the rear bumper of the vehicle.
4Vehicle center guide lines (blue)
These lines indicate the estimated
vehicle center on the ground.
�Area displayed on screen
Image is displayed approximately level
on screen.
On screen
Corners of bumper
The area detected by the camera is limi-
ted. The camera does not detect objects
which are close to either corner of the
bumper or under the bumper.
Page 203 of 299

REAR VIEW MONITOR SYSTEM
203
The area displayed on the screen may
vary according to vehicle orientation or
road conditions.
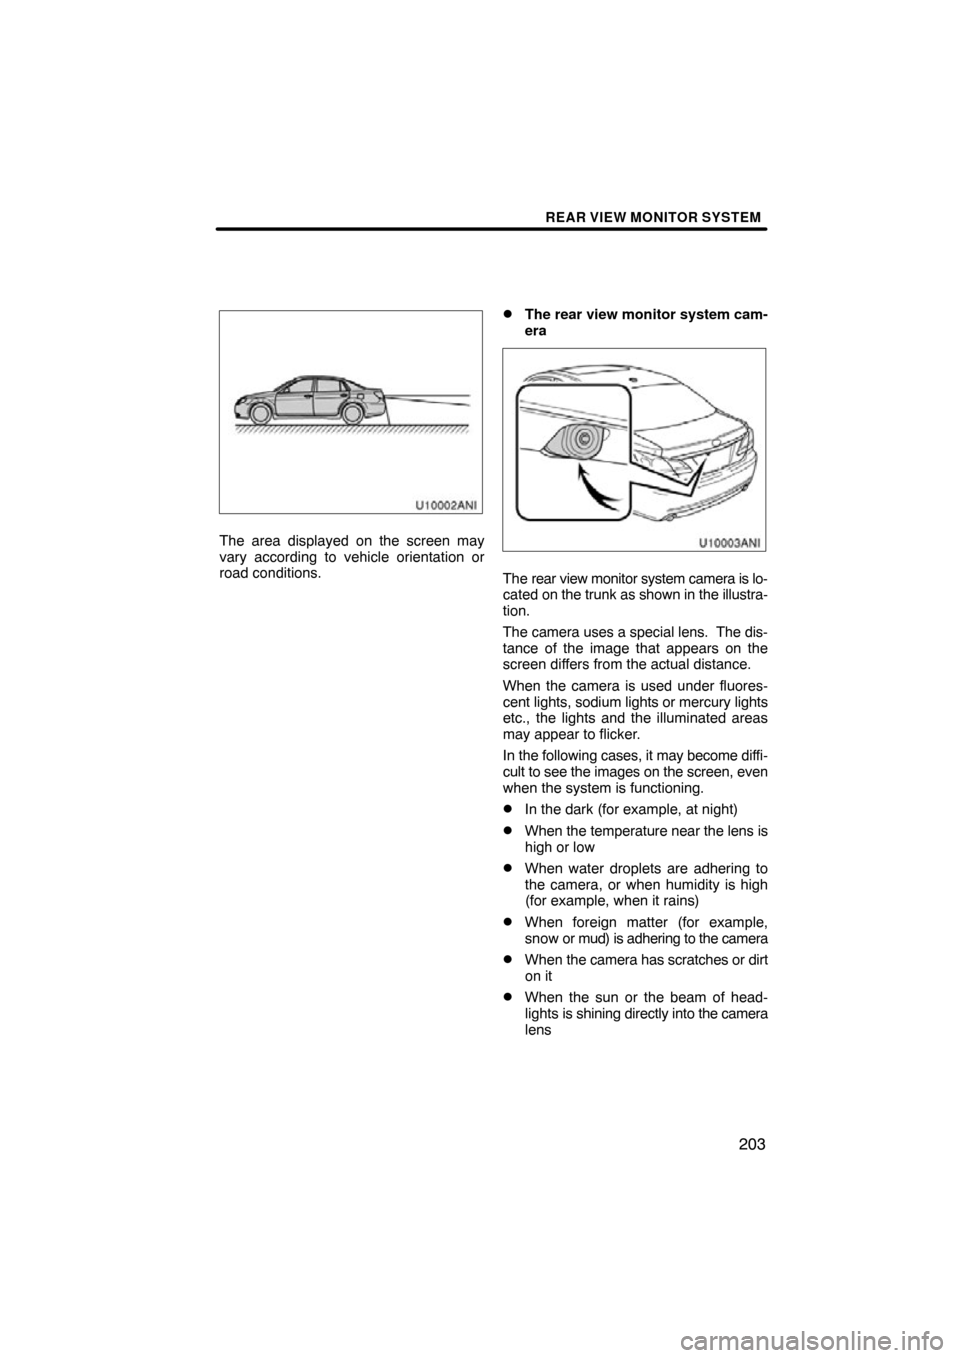
�The rear view monitor system cam-
era
The rear view monitor system camera is lo-
cated on the trunk as shown in the illustra-
tion.
The camera uses a special lens. The dis-
tance of the image that appears on the
screen differs from the actual distance.
When the camera is used under fluores-
cent lights, sodium lights or mercury lights
etc., the lights and the illuminated areas
may appear to flicker.
In the following cases, it may become diffi-
cult to see the images on the screen, even
when the system is functioning.
�In the dark (for example, at night)
�When the temperature near the lens is
high or low
�When water droplets are adhering to
the camera, or when humidity is high
(for example, when it rains)
�When foreign matter (for example,
snow or mud) is adhering to the camera
�When the camera has scratches or dirt
on it
�When the sun or the beam of head-
lights is shining directly into the camera
lens