2012 SUBARU TRIBECA window
[x] Cancel search: windowPage 330 of 420
Cleaning the interior
Use a soft, damp cloth to clean the climate
control panel, audio equipment, instru-
ment panel, center console, combination
meter panel, and switches. (Do not use
organic solvents.) &Seat fabric
Remove loose dirt, dust or debris with a
vacuum cleaner. If the dirt is caked on the
fabric or hard to remove with a vacuum
cleaner, use a soft blush then vacuum it.
Wipe the fabric surface with a tightly
wrung cloth and dry the seat fabric
thoroughly. If the fabric is still dirty, wipe
using a solution of mild soap and luke-
warm water then dry thoroughly.
If the stain does not come out, try a
commercially available fabric cleaner. Use
the cleaner on a hidden place and make
sure it does not affect the fabric adversely.
Use the cleaner according to its instruc-tions. NOTE
When cleaning the seat, do not use
benzine, paint thinner, or any similarmaterials. &
Leather seat materials
The leather used by SUBARU is a high
quality natural product which will retain its
distinctive appearance and feel for many
years with proper care.
Allowing dust or road dirt to build up on the
surface can cause the material to become
brittle and to wear prematurely. Regular
cleaning with a soft, moist, natural fiber
cloth should be performed monthly, taking
care not to soak the leather or allow water
to penetrate the stitched seams.
A mild detergent suitable for cleaning
woolen fabrics may be used to remove
difficult dirt spots, rubbing with a soft, dry
cloth afterwards to restore the luster. If
your SUBARU is to be parked for a long
time in bright sunlight, it is recommended
that the seats and headrests be covered,
or the windows shaded, to prevent fading
or shrinkage.
Minor surface blemishes or bald patches
may be treated with a commercial leather
spray lacquer. You will discover that each
leather seat section will develop soft folds
or wrinkles, which is characteristic of
genuine leather. & Synthetic leather upholstery
The synthetic leather material used on the
SUBARU may be cleaned using mild soap or detergent and water, after first vacuum-
ing or brushing away loose dirt. Allow the
soap to soak in for a few minutes and wipe
off with a clean, damp cloth. Commercial
foam-type cleaners suitable for synthetic
leather materials may be used when
necessary. NOTE
Strong cleaning agents such as sol-
vents, paint thinners, window cleaner
or gasoline must never be used on
leather or synthetic interior materials. &
Climate control panel, audio
panel, instrument panel,
console panel, switches,
combination meter, and other
plastic surface
Use a soft, damp cloth to clean the climate
control panel, audio equipment, instru-
ment panel, center console, combination
meter panel, and switches. NOTE
Do not use organic solvents such as
paint thinners or gasoline, or strong
cleaning agents that contain thosesolvents. Appearance care
10-5
– CONTINUED –
Page 332 of 420
Maintenance schedule....................................... 11-3
Maintenance precautions ................................... 11-3
Before checking or servicing in the engine compartment .................................................... 11-4
When you do checking or servicing in the engine compartment while the engine is running .......... 11-4
Engine hood ....................................................... 11-4
Engine compartment overview .......................... 11-6
Engine oil ............................................................ 11-7
Checking the oil level ......................................... 11-7
Changing the oil and oil filter .............................. 11-8
Recommended grade and viscosity .................... 11-9
Synthetic oil ....................................................... 11-9
Cooling system ................................................ 11-10
Hose and connections ...................................... 11-10
Engine coolant ................................................. 11-11
Air cleaner element .......................................... 11-12
Replacing the air cleaner element ..................... 11-12
Spark plugs ...................................................... 11-13
Recommended spark plugs .............................. 11-13
Drive belts ........................................................ 11-13
Automatic transmission fluid .......................... 11-14
Checking the fluid level .................................... 11-14
Recommended fluid ......................................... 11-15
Front differential gear oil ................................. 11-15
Checking the oil level ....................................... 11-15
Recommended grade and viscosity .................. 11-16
Rear differential gear oil .................................. 11-16
Recommended grade and viscosity .................. 11-16Power steering fluid
........................................ 11-16
Checking the fluid level .................................... 11-16
Recommended fluid ......................................... 11-17
Brake fluid ........................................................ 11-17
Checking the fluid level .................................... 11-17
Recommended brake fluid ............................... 11-18
Brake booster .................................................. 11-18
Brake pedal ...................................................... 11-19
Checking the brake pedal free play .................. 11-19
Checking the brake pedal reserve distance....... 11-19
Replacement of brake pad and lining ............ 11-19
Breaking-in of new brake pads and linings ....... 11-20
Parking brake stroke ....................................... 11-20
Tires and wheels .............................................. 11-21
Types of tires ................................................... 11-21
Tire pressure monitoring system (TPMS) .......... 11-21
Tire inspection ................................................. 11-22
Tire pressures and wear .................................. 11-23
Wheel balance ................................................. 11-25
Wear indicators ............................................... 11-25
Tire rotation direction mark .............................. 11-25
Tire rotation ..................................................... 11-26
Tire replacement .............................................. 11-26
Wheel replacement .......................................... 11-27
Aluminum wheels ............................................ 11-27
Windshield washer fluid .................................. 11-28
Replacement of wiper blades ......................... 11-29
Windshield wiper blade assembly ..................... 11-30
Windshield wiper blade rubber . ........................ 11-30
Rear window wiper blade assembly .................. 11-31
Maintenance and service
11
Page 333 of 420
Maintenance and serviceRear window wiper blade rubber ....................... 11-31
Battery. .............................................................. 11-33
Fuses ................................................................ 11-34
Main fuse .......................................................... 11-35
Installation of accessories ............................... 11-36
Replacing bulbs ............................................... 11-36
Headlights (models with HID headlights) ........... 11-36
Headlights (models without HID headlights) .. .... 11-36
Parking light (right-hand side) ........................... 11-38
Front turn signal light (right-hand side) ............. 11-39Front fog light
.................................................. 11-39
Rear combination lights ................................... 11-39
Back-up light/Tail light ..................................... 11-40
Rear gate light ................................................. 11-41
License plate light ........................................... 11-41
Dome light ....................................................... 11-42
Map light ......................................................... 11-43
Vanity mirror light ............................................ 11-43
Door step light ................................................. 11-43
Cargo area light ............................................... 11-44
Page 360 of 420
side temperature. If the concen-
tration is inappropriate, sprayed
washer fluid may freeze on the
windshield and obstruct your
view, and the fluid may freeze in
the reservoir tank.
. State or local regulations on
volatile organic compounds may
restrict the use of methanol, a
common windshield washer anti-
freeze additive. Washer fluids
containing non-methanol anti-
freeze agents should be used
only if they provide cold weather
protection without damaging
your vehicle ’s paint, wiper blades
or washer system. Replacement of wiper blades
Grease, wax, insects, or other materials
on the windshield or the wiper blade
results in jerky wiper operation and streak-
ing on the glass. If you cannot remove the
streaks after operating the windshield
washer or if the wiper operation is jerky,
clean the outer surface of the windshield
(or rear window) and the wiper blades
using a sponge or soft cloth with a neutral
detergent or mild abrasive cleaner. After
cleaning, rinse the windshield and wiper
blades with clean water. The windshield is
clean if beads do not form when you rinse
the windshield with water.
CAUTION
. Do not clean the wiper blades
with gasoline or a solvent, such
as paint thinner or benzine. This
will cause deterioration of the
wiper blades.
. Whenyouwishtoraisethe
passenger-side wiper arm, first
raise the driver-side wiper arm.
Otherwise, the passenger-side
wiper assembly and driver-side
wiper assembly will touch each
other, possibly resulting inscratches. .
While removing the wiper blades
from the wiper arms, do not
return the wiper arms to the
original positions. Otherwise,
the windshield surface may bescratched.
. When returning the raised wiper
arms to the original positions,
carefully return the wiper arms
on the windshield while support-
ing them with your hands. You
should not return the wiper arms
to the windshield only by the
return spring. Otherwise, the wi-
per arms may be deformed and/
or the windshield surface may bescratched.
. Return the passenger-side wiper
arm to its original position before
returning the driver-side wiper
arm to its original position.
Otherwise, the passenger-side
wiper assembly and driver-side
wiper assembly will touch each
other, possibly resulting inscratches.
If you cannot eliminate the streaking even
after following this method, replace the
wiper blades using the following proce-
dures. Be sure to use genuine SUBARU
wiper blade rubbers as replacements. Maintenance and service
11-29
– CONTINUED –
Page 362 of 420
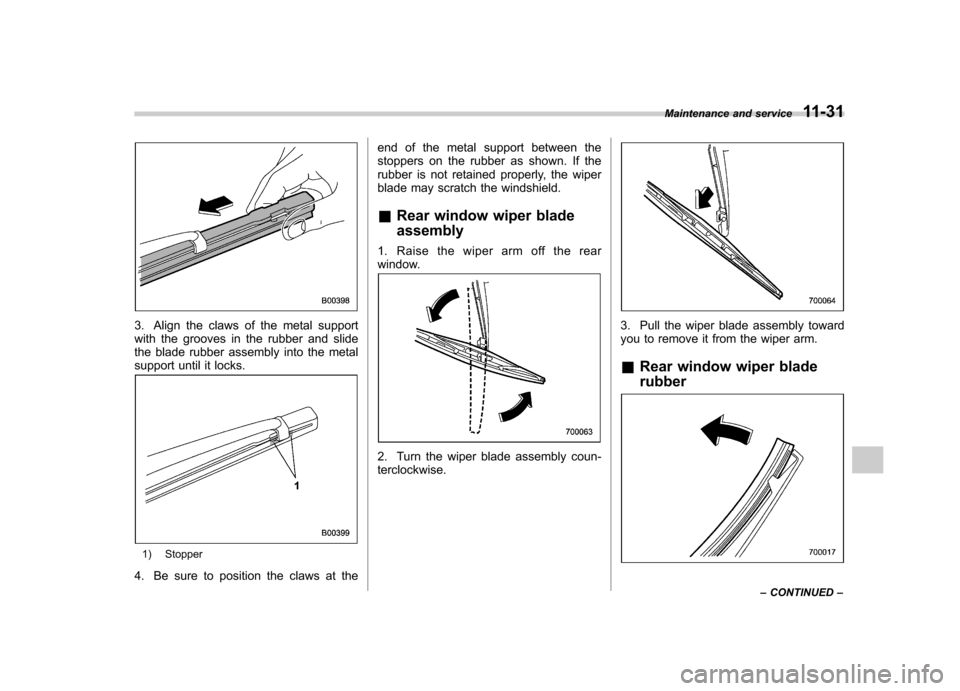
3. Align the claws of the metal support
with the grooves in the rubber and slide
the blade rubber assembly into the metal
support until it locks.
1) Stopper
4. Be sure to position the claws at the end of the metal support between the
stoppers on the rubber as shown. If the
rubber is not retained properly, the wiper
blade may scratch the windshield.
& Rear window wiper blade assembly
1. Raise the wiper arm off the rear
window.
2. Turn the wiper blade assembly coun- terclockwise.
3. Pull the wiper blade assembly toward
you to remove it from the wiper arm. & Rear window wiper blade rubber
Maintenance and service 11-31
– CONTINUED –
Page 363 of 420
11-32Maintenance and service
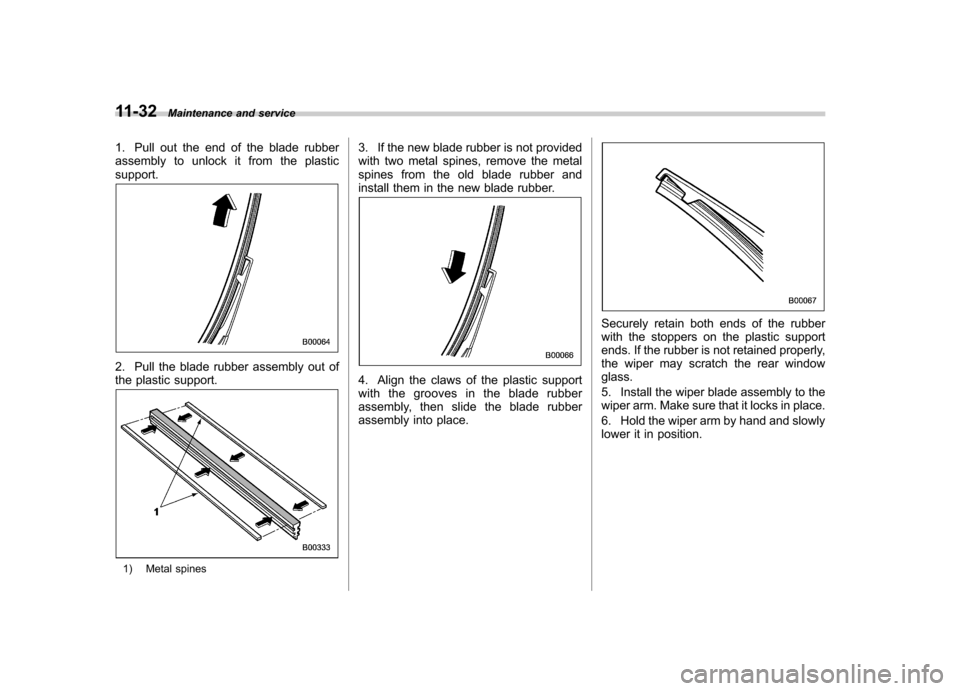
1. Pull out the end of the blade rubber
assembly to unlock it from the plasticsupport.
2. Pull the blade rubber assembly out of
the plastic support.
1) Metal spines 3. If the new blade rubber is not provided
with two metal spines, remove the metal
spines from the old blade rubber and
install them in the new blade rubber.
4. Align the claws of the plastic support
with the grooves in the blade rubber
assembly, then slide the blade rubber
assembly into place.
Securely retain both ends of the rubber
with the stoppers on the plastic support
ends. If the rubber is not retained properly,
the wiper may scratch the rear windowglass.
5. Install the wiper blade assembly to the
wiper arm. Make sure that it locks in place.
6. Hold the wiper arm by hand and slowly
lower it in position.
Page 385 of 420
12-10Specifications
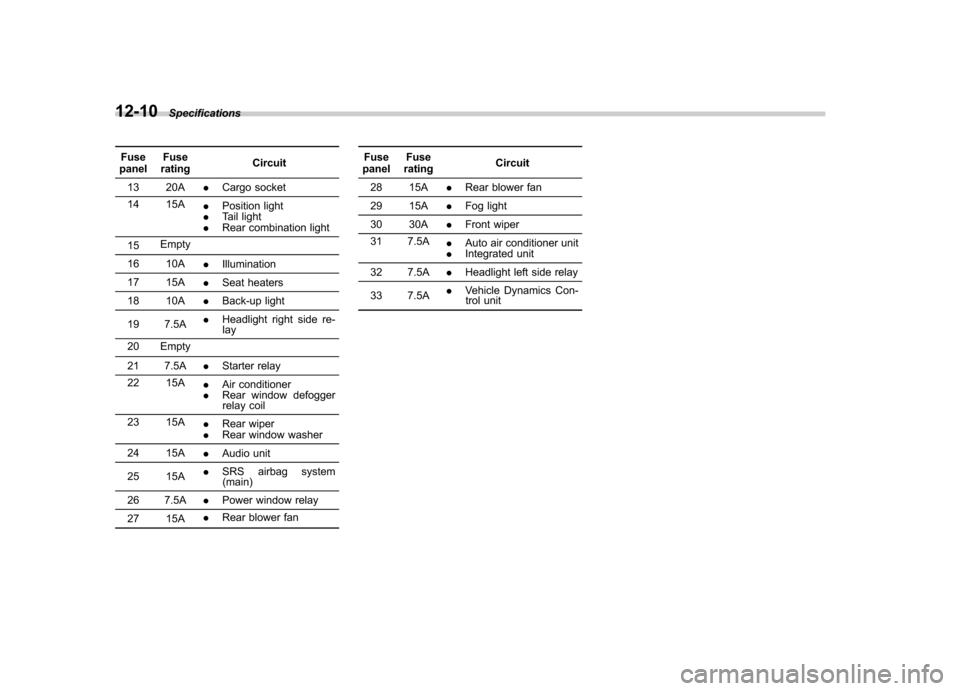
Fuse
panel Fuse
rating Circuit
13 20A .Cargo socket
14 15A .Position light
. Tail light
. Rear combination light
15 Empty
16 10A .Illumination
17 15A .Seat heaters
18 10A .Back-up light
19 7.5A .
Headlight right side re-
lay
20 Empty
21 7.5A .Starter relay
22 15A .Air conditioner
. Rear window defogger
relay coil
23 15A .Rear wiper
. Rear window washer
24 15A .Audio unit
25 15A .
SRS airbag system
(main)
26 7.5A .Power window relay
27 15A .
Rear blower fan Fuse
panel Fuse
rating Circuit
28 15A .Rear blower fan
29 15A .Fog light
30 30A .Front wiper
31 7.5A .Auto air conditioner unit
. Integrated unit
32 7.5A .Headlight left side relay
33 7.5A .
Vehicle Dynamics Con-
trol unit
Page 386 of 420
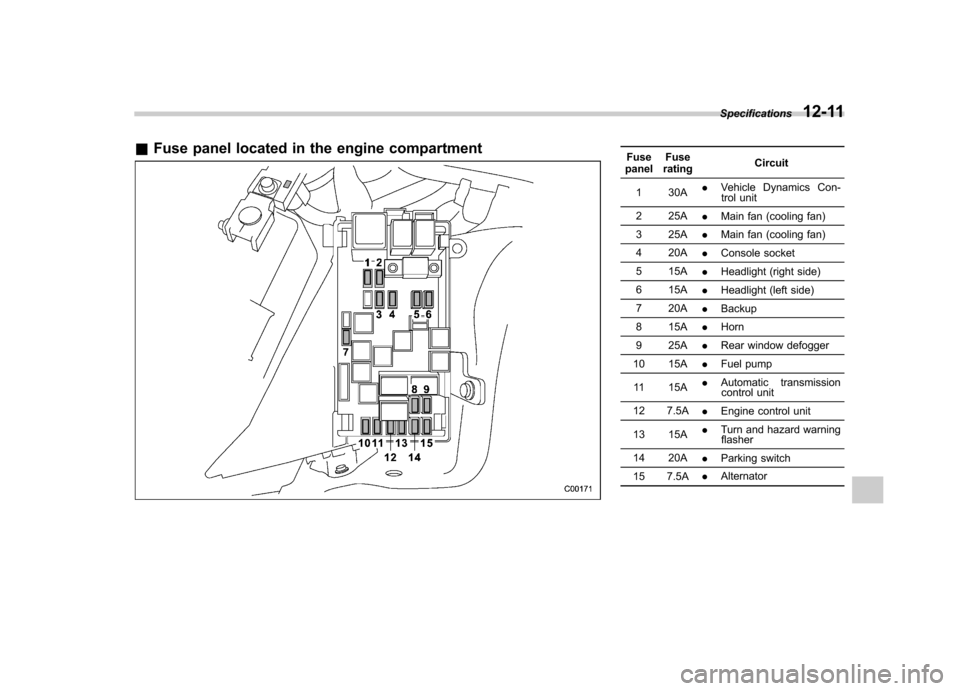
&Fuse panel located in the engine compartmentFuse
panel Fuse
rating Circuit
1 30A .
Vehicle Dynamics Con-
trol unit
2 25A .Main fan (cooling fan)
3 25A .Main fan (cooling fan)
4 20A .Console socket
5 15A .Headlight (right side)
6 15A .Headlight (left side)
7 20A .Backup
8 15A .Horn
9 25A .Rear window defogger
10 15A .Fuel pump
11 15A .
Automatic transmission
control unit
12 7.5A .Engine control unit
13 15A .
Turn and hazard warning
flasher
14 20A .Parking switch
15 7.5A .
Alternator
Specifications
12-11