2012 SUBARU TRIBECA heater
[x] Cancel search: heaterPage 219 of 420
5-30Audio
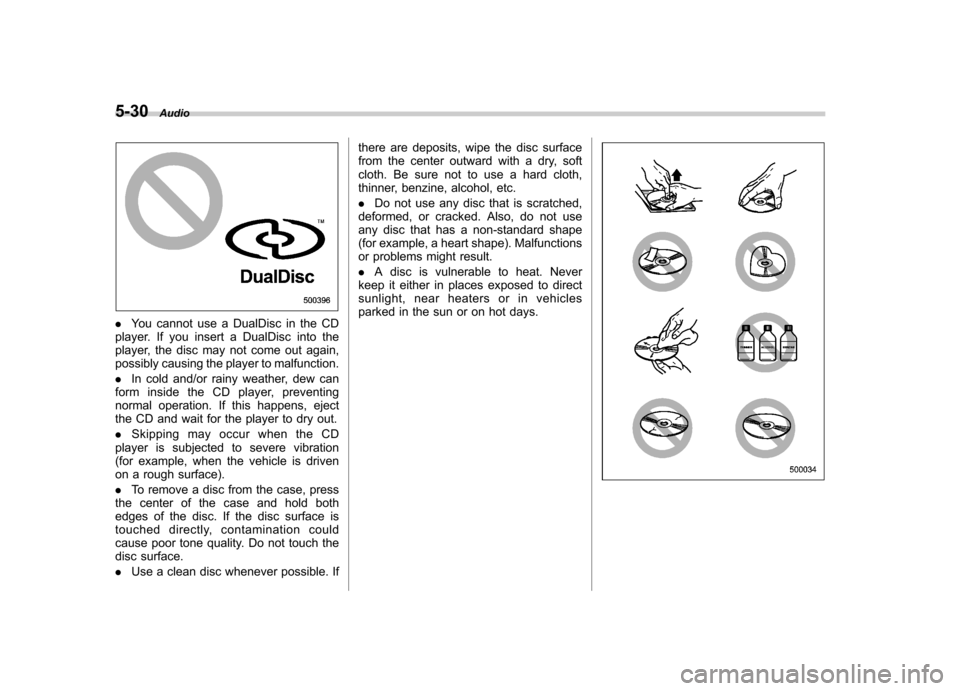
.You cannot use a DualDisc in the CD
player. If you insert a DualDisc into the
player, the disc may not come out again,
possibly causing the player to malfunction. . In cold and/or rainy weather, dew can
form inside the CD player, preventing
normal operation. If this happens, eject
the CD and wait for the player to dry out. . Skipping may occur when the CD
player is subjected to severe vibration
(for example, when the vehicle is driven
on a rough surface). . To remove a disc from the case, press
the center of the case and hold both
edges of the disc. If the disc surface is
touched directly, contamination could
cause poor tone quality. Do not touch the
disc surface. . Use a clean disc whenever possible. If there are deposits, wipe the disc surface
from the center outward with a dry, soft
cloth. Be sure not to use a hard cloth,
thinner, benzine, alcohol, etc. .
Do not use any disc that is scratched,
deformed, or cracked. Also, do not use
any disc that has a non-standard shape
(for example, a heart shape). Malfunctions
or problems might result. . A disc is vulnerable to heat. Never
keep it either in places exposed to direct
sunlight, near heaters or in vehicles
parked in the sun or on hot days.
Page 255 of 420
7-10Starting and operating
transmitter within a few seconds immedi-
ately following remote engine start shut-down. & Pre-heating or pre-cooling
the interior of the vehicle
Before exiting the vehicle, set the tem-
perature controls to the desired setting
and operation. After the system starts the
vehicle, the heater or air-conditioning will
activate and heat or cool the interior to
your setting. & Service mode
In service mode, the remote start function
is temporarily disabled to prevent the
system from unexpectedly starting the
engine while being serviced. ! To engage the service mode
Turn the ignition switch to the “ON ”
position, depress and hold the brake pedal
then, press and release the “
”button on
the remote engine start transmitter three
times. The system will pause for 1 second
and then flash the parking lights and honk
the horn three times indicating that the
system is in service mode. When attempt-
ing to activate the remote start system
while in service mode, the parking lights
will flash and the horn will honk two times
and will not start. !
To disengage the service mode
Turn the ignition switch to the “ON ”
position, depress and hold the brake
pedal, then press and release the “
”
button on the remote engine start trans-
mitter three times. The system will pause
for 1 second and flash the parking lights
one time indicating that the system has
exited service mode. NOTE
When taking your vehicle in for service,
it is recommended that you inform the
service personnel that your vehicle is
equipped with a remote engine startsystem. & Remote engine start trans-
mitter programming and pro-
grammable feature option
New transmitters can be programmed to
the remote engine start system in the
event that remote engine start transmitters
are lost, stolen or damaged. The remote
engine start system also has one pro-
grammable feature that can be adjusted
for user preference.
The remote engine start system can be
programmed to either make an audible
horn chirp upon remote start activation or
not. Remote engine start transmitter pro-
gramming and feature programming can be adjusted using the following procedure.
1. Open the driver
’s door (the driver ’s
door must remain opened throughout the
entire process).
2. Insert the key into the vehicle ’s ignition
switch and turn to the “ON ”position.
3. Locate the small black programming
button behind the fuse box cover, on the
driver ’s side left under the dashboard
panel.
4. Press and hold the black programming
button for 10 to 15 seconds. The horn will
honk and the parking lights will flash three
times to indicate that the system has
entered programming mode. At this point
you can perform either action (step 5 or
step 6).
5. To program a remote transmitter:
press and release the “
”button on each
transmitter. The horn will honk and the
parking lights will flash one time to indicate
a successful transmitter learn each timethe “
”button is pressed. You can
program up to eight transmitters.
6. To toggle the Horn Confirmation chirps
ON/OFF: press and release the brake to
toggle the feature. The horn will chirp and
the parking lights will flash one time to
indicate Confirmation Horn Chirps are“ OFF ”. The horn will honk and the parking
lights will flash 2 times to indicate Con-
firmation Horn Chirps are “ON ”. Depres-
Page 384 of 420
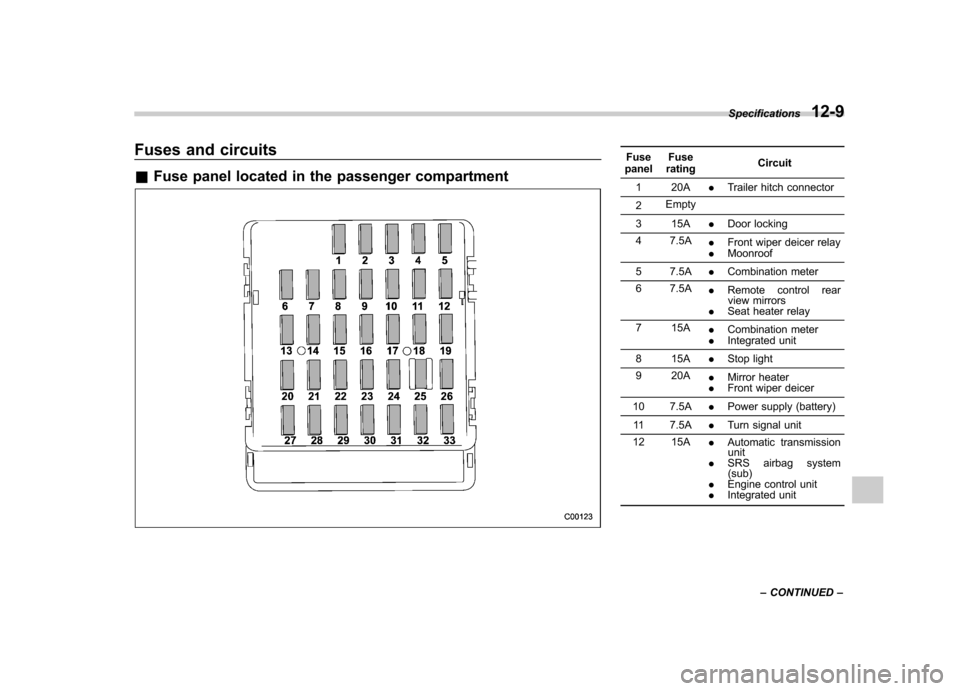
Fuses and circuits &Fuse panel located in the passenger compartmentFuse
panel Fuse
rating Circuit
1 20A .Trailer hitch connector
2 Empty
3 15A .Door locking
4 7.5A .Front wiper deicer relay
. Moonroof
5 7.5A .Combination meter
6 7.5A .Remote control rear
view mirrors
. Seat heater relay
7 15A .Combination meter
. Integrated unit
8 15A .Stop light
9 20A .Mirror heater
. Front wiper deicer
10 7.5A .Power supply (battery)
11 7.5A .Turn signal unit
12 15A .Automatic transmission
unit
. SRS airbag system
(sub)
. Engine control unit
. Integrated unitSpecifications
12-9
– CONTINUED –
Page 385 of 420
12-10Specifications
Fuse
panel Fuse
rating Circuit
13 20A .Cargo socket
14 15A .Position light
. Tail light
. Rear combination light
15 Empty
16 10A .Illumination
17 15A .Seat heaters
18 10A .Back-up light
19 7.5A .
Headlight right side re-
lay
20 Empty
21 7.5A .Starter relay
22 15A .Air conditioner
. Rear window defogger
relay coil
23 15A .Rear wiper
. Rear window washer
24 15A .Audio unit
25 15A .
SRS airbag system
(main)
26 7.5A .Power window relay
27 15A .
Rear blower fan Fuse
panel Fuse
rating Circuit
28 15A .Rear blower fan
29 15A .Fog light
30 30A .Front wiper
31 7.5A .Auto air conditioner unit
. Integrated unit
32 7.5A .Headlight left side relay
33 7.5A .
Vehicle Dynamics Con-
trol unit
Page 396 of 420
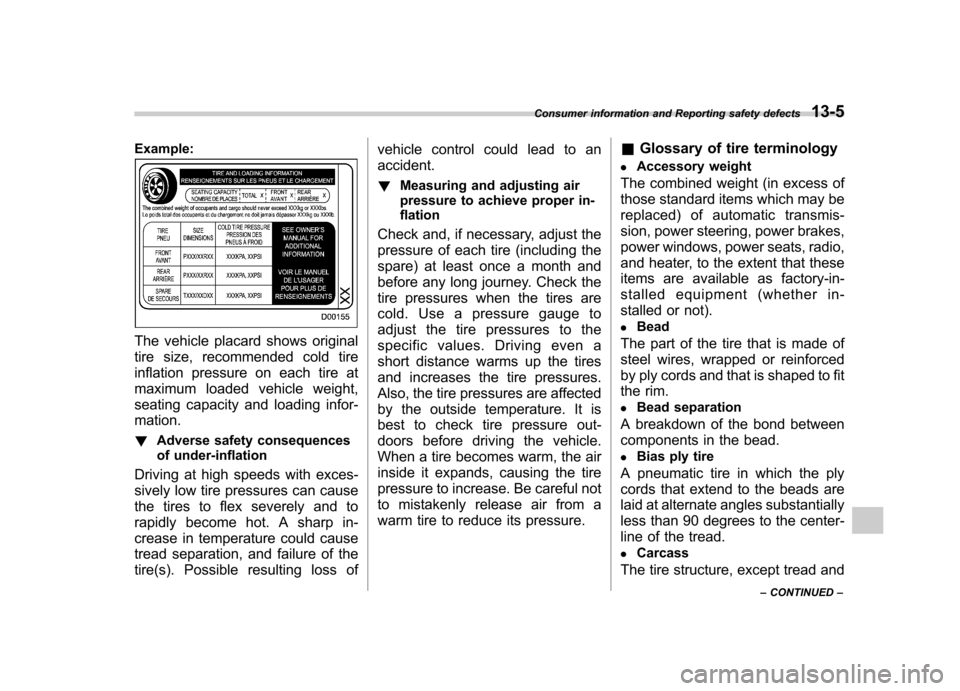
Example:
The vehicle placard shows original
tire size, recommended cold tire
inflation pressure on each tire at
maximum loaded vehicle weight,
seating capacity and loading infor-mation. !Adverse safety consequences
of under-inflation
Driving at high speeds with exces-
sively low tire pressures can cause
the tires to flex severely and to
rapidly become hot. A sharp in-
crease in temperature could cause
tread separation, and failure of the
tire(s). Possible resulting loss of vehicle control could lead to anaccident.
! Measuring and adjusting air
pressure to achieve proper in-
flation
Check and, if necessary, adjust the
pressure of each tire (including the
spare) at least once a month and
before any long journey. Check the
tire pressures when the tires are
cold. Use a pressure gauge to
adjust the tire pressures to the
specific values. Driving even a
short distance warms up the tires
and increases the tire pressures.
Also, the tire pressures are affected
by the outside temperature. It is
best to check tire pressure out-
doors before driving the vehicle.
When a tire becomes warm, the air
inside it expands, causing the tire
pressure to increase. Be careful not
to mistakenly release air from a
warm tire to reduce its pressure. &
Glossary of tire terminology
. Accessory weight
The combined weight (in excess of
those standard items which may be
replaced) of automatic transmis-
sion, power steering, power brakes,
power windows, power seats, radio,
and heater, to the extent that these
items are available as factory-in-
stalled equipment (whether in-
stalled or not). . Bead
The part of the tire that is made of
steel wires, wrapped or reinforced
by ply cords and that is shaped to fit
the rim. . Bead separation
A breakdown of the bond between
components in the bead. . Bias ply tire
A pneumatic tire in which the ply
cords that extend to the beads are
laid at alternate angles substantially
less than 90 degrees to the center-
line of the tread. . Carcass
The tire structure, except tread and
Consumer information and Reporting safety defects
13-5
– CONTINUED –
Page 415 of 420
14-8Index
Brake fluid. ............................................................ 12-7
Engine oil .............................................................. 12-4
Front differential gear oil ......................................... 12-6
Manual transmission oil .......................................... 12-6
Power steering fluid ................................................ 12-7
Rear differential gear oil .......................................... 12-6
Spark plugs ........................................................... 12-7
Refueling .................................................................... 7-3
Remote engine start system .......................................... 7-8
Remote keyless entry system ........................................ 2-8
Replacement Brake pad and lining ............................................. 11-19
Wiper blades ........................................................ 11-29
Replacing Air cleaner element ............................................... 11-12
Battery (remote keyless entry system) ...................... 2-11
Lost transmitters (remote keyless entry system) . ........ 2-12
Replacing bulbs .............................................. 11-36, 12-12
Back-up light (Station wagon) ................................. 11-40
Cargo area light .................................................... 11-44
Dome light ........................................................... 11-42
Door step light ...................................................... 11-43
Front fog light ....................................................... 11-39
Front turn signal light ............................................. 11-39
Headlight ............................................................. 11-36
License plate light ................................................. 11-41
Map light .............................................................. 11-43
Parking light ......................................................... 11-38
Rear combination light ........................................... 11-39
Rear gate light ...................................................... 11-41
Rear turn signal light ............................................. 11-39 Vanity mirror light
.................................................. 11-43
Rocking the vehicle .................................................... 8-11
Roof molding and crossbar .......................................... 8-17
Roof rail and crossbar ................................................. 8-14
S Safety Precautions when driving ............................................. 5
Symbol ...................................................................... 2
Warnings ................................................................... 2
Seat
Fabric ................................................................... 10-5
Front ...................................................................... 1-2
Heater .................................................................... 1-7
Memory function ...................................................... 1-4
Power .................................................................... 1-3
Second-row ............................................................ 1-8
Third-row ............................................................... 1-13
Seatbelt. ................................................................ 5, 1-17
Fastening .............................................................. 1-18
Maintenance .......................................................... 1-26
Pretensioners ......................................................... 1-27
Safety tips ............................................................. 1-17
Warning light and chime .......................................... 3-10
Second-row seats ........................................................ 1-8
Armrest ................................................................. 1-13
Folding down ......................................................... 1-10
Forward and backward adjustment ... ......................... 1-8
Head restraint adjustment ........................................ 1-12
Reclining ................................................................ 1-9