2012 SUBARU TRIBECA rear entertainment
[x] Cancel search: rear entertainmentPage 4 of 420

Warranties &Warranties for U.S.A.
All SUBARU vehicles distributed by
Subaru of America, Inc. and sold at retail
by an authorized SUBARU dealer in the
United States come with the followingwarranties. . SUBARU Limited Warranty
. Emission Control Systems Warranty
. Emissions Performance Warranty
All warranty information, including details
of coverage and exclusions, is in the“ Warranty and Maintenance Booklet ”.
Please read these warranties carefully.
& Warranties for Canada
All SUBARU vehicles distributed by
Subaru Canada, Inc. and sold at retail by
an authorized SUBARU dealer in Canada
come with the following warranties. . SUBARU Limited Warranty
. Anti-Corrosion Warranty
. Emission Control Warranty
All warranty information, including details
of coverage and exclusions, is in the“ Warranty and Service Booklet ”. Please
read these warranties carefully.CAUTION
. If your vehicle is equipped with a
navigation system and/or Rear
Seat Entertainment System, the
displays contain mercury. There-
fore, the displays of the naviga-
tion system and/or Rear Seat
Entertainment System must be
removed before vehicle disposal.
Once the displays have been
removed, please reuse, recycle
or dispose of them as hazardouswaste.
. If your vehicle is equipped with
High Intensity Discharge (HID)
headlights, the HID headlights
contain mercury. Therefore, it is
necessary to remove HID head-
lights before vehicle disposal.
Once removed, please reuse, re-
cycle or dispose of the HID head-
lights as hazardous waste. How to use this Owner
’s
Manual & Using your Owner ’s Manual
Before you operate your vehicle, carefully
read this manual. To protect yourself and
extend the service life of your vehicle,
follow the instructions in this manual.
Failure to observe these instructions may
result in serious injury and damage to yourvehicle.
This manual is composed of fourteen
chapters. Each chapter begins with a brief
table of contents, so you can usually tell at
a glance if that chapter contains the
information you want.
Chapter 1: Seat, seatbelt and SRS airbags
This chapter informs you how to use the
seat and seatbelt and contains precau-
tions for the SRS airbags.
Chapter 2: Keys and doors
This chapter informs you how to operate
the keys, locks and windows.
Chapter 3: Instruments and controls
This chapter informs you about the opera-
tion of instrument panel indicators and
how to use the instruments and otherswitches. 1
– CONTINUED –
Page 190 of 420

Antenna system.................................................. 5-2
Printed antenna ................................................... 5-2
FM reception ....................................................... 5-2
Installation of accessories .................................. 5-2
Audio set ............................................................. 5-3
Type A audio set ................................................. 5-3
Type B audio set ................................................. 5-3
Type A audio set (if equipped) ........................... 5-4
Radio operation. .................................................. 5-4
Compact disc player operation ........................... 5-10Type B audio set (if equipped)
.......................... 5-15
Radio operation ................................................. 5-15
Built in CD changer operation .. .......................... 5-21
Audio control buttons ....................................... 5-26
MODE button ..................................................... 5-26
Auxiliary input jack ............................................ 5-28
Rear Seat Entertainment (RSE) system operation (if equipped) ................................... 5-29
Precautions to observe when handling a compact disc ................................................... 5-29 Audio
5
Page 193 of 420

5-4Audio
Type A audio set (if equipped)
The audio set will operate only when the ignition switch is in the “Acc ”or “ON ”position.
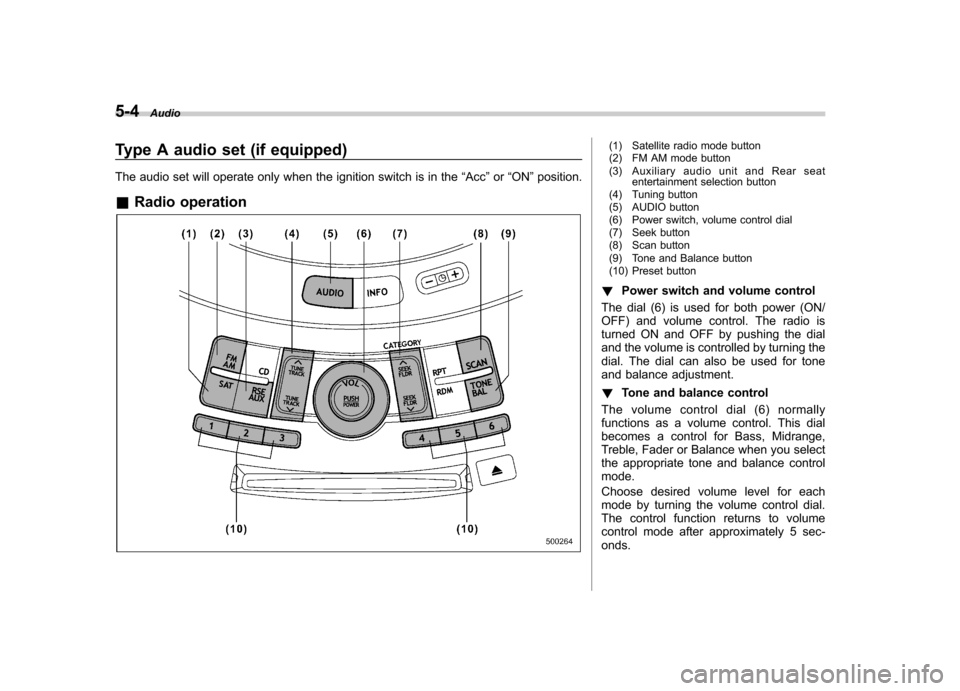
& Radio operation(1) Satellite radio mode button
(2) FM AM mode button
(3) Auxiliary audio unit and Rear seat
entertainment selection button
(4) Tuning button
(5) AUDIO button
(6) Power switch, volume control dial
(7) Seek button
(8) Scan button
(9) Tone and Balance button
(10) Preset button
! Power switch and volume control
The dial (6) is used for both power (ON/
OFF) and volume control. The radio is
turned ON and OFF by pushing the dial
and the volume is controlled by turning the
dial. The dial can also be used for tone
and balance adjustment. ! Tone and balance control
The volume control dial (6) normally
functions as a volume control. This dial
becomes a control for Bass, Midrange,
Treble, Fader or Balance when you select
the appropriate tone and balance controlmode.
Choose desired volume level for each
mode by turning the volume control dial.
The control function returns to volume
control mode after approximately 5 sec-onds.
Page 198 of 420

button is pressed briefly, the preceding
selection will remain in memory. NOTE
If the connection between the radio and
battery is broken for any reason such
as vehicle maintenance or radio re-
moval, all channels stored in the preset
buttons are cleared. If this occurs, it is
necessary to reset the preset buttons. !Display selection
Press the “AUDIO ”button (5) while receiv-
ing satellite radio to change the display as follows.
! Rear seat entertainment
If your vehicle is equipped with a Rear
Seat Entertainment System, you can
enjoy audio outputs from the system
through the vehicle ’s speakers by press-
ing the “RSE AUX ”button (3). Press the
button again to return to the audio setsound.
NOTE
If your vehicle is equipped with a Rear
Seat Entertainment System, refer to the Owner
’s Manual supplement for the
Rear Seat Entertainment System for
further details. Audio
5-9
– CONTINUED –
Page 204 of 420

Type B audio set (if equipped)
The audio set will operate only when the ignition switch is in the“Acc ”or “ON ”positions.
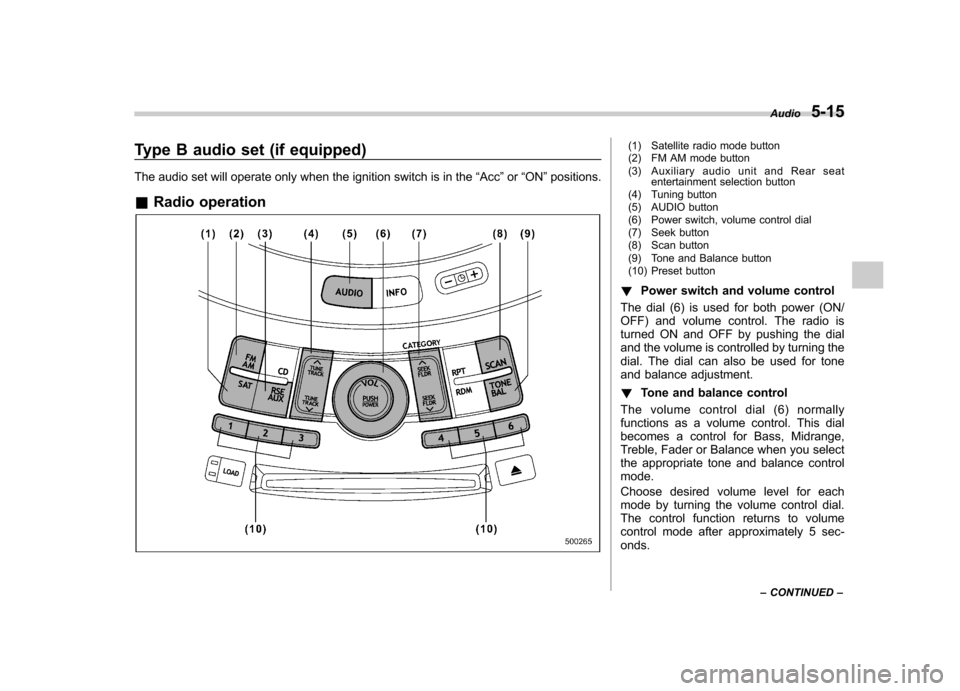
& Radio operation(1) Satellite radio mode button
(2) FM AM mode button
(3) Auxiliary audio unit and Rear seat
entertainment selection button
(4) Tuning button
(5) AUDIO button
(6) Power switch, volume control dial
(7) Seek button
(8) Scan button
(9) Tone and Balance button
(10) Preset button
! Power switch and volume control
The dial (6) is used for both power (ON/
OFF) and volume control. The radio is
turned ON and OFF by pushing the dial
and the volume is controlled by turning the
dial. The dial can also be used for tone
and balance adjustment. ! Tone and balance control
The volume control dial (6) normally
functions as a volume control. This dial
becomes a control for Bass, Midrange,
Treble, Fader or Balance when you select
the appropriate tone and balance controlmode.
Choose desired volume level for each
mode by turning the volume control dial.
The control function returns to volume
control mode after approximately 5 sec-onds. Audio
5-15
– CONTINUED –
Page 208 of 420

should have your satellite radio tuner ID
ready because each tuner is identified by
its unique satellite radio tuner ID.
The satellite radio ID will be needed when
you activate satellite radio and receive
satellite radio customer support.
The satellite radio ID can be found on the
audio display by tuning the channel to“0 ”.
Turn the “TUNE/TRACK ”button (4) to
select the satellite radio channel. ! Band selection button
Push the “SAT ”button (1) when the radio
is off to turn on the radio.
Push the “SAT ”button when the radio is
on to select SAT1, SAT2 or SAT3 recep- tion. ! Channel selection
Press “
”of the “TUNE TRACK ”button
(4) to select the next channel and press “
” of the button to select the previous
channel.
Keep pressing “
”of the button to
change to the next channel continuously
and keep pressing “
”of the button to
change to the previous channel continu-
ously. ! Category selection
Press “
”or “”of the “SEEK FLDR ”
button (7) to display the current category. Press
“
”again to select the next
category, and press “”again to select
the previous category. ! Channel scan
Press the “SCAN ”button (8) to change the
radio to the SCAN mode. In this mode, the
radio scans through the channels until a
station is found. The radio will stop at the
station for 5 seconds while displaying the
channel number, after which scanning will
continue until the entire channel has been
scanned from the low end to the high end.
Also during the category selection, chan-
nel scan can be performed in that cate-
gory.
Press the “SCAN ”button again to cancel
the SCAN mode and to stop on any
displayed channel. ! Selecting preset channels
Presetting a channel with a preset button
(10) allows you to select that channel in a
single operation. Up to six, SAT1, SAT2
and SAT3 channels each may be preset. ! How to preset channels
1. Press the “SAT ”button (1) to select
SAT1, SAT2 and SAT3 reception.
2. Press the “SCAN ”button (8) or the
“ TUNE TRACK ”button (4) to select the
channel. 3. Press and hold one of the preset
buttons (10) to store the channel. If the
button is pressed briefly, the preceding
selection will remain in memory. NOTE
If the connection between the radio and
battery is broken for any reason such
as vehicle maintenance or radio re-
moval, all channels stored in the preset
buttons are cleared. If this occurs, it is
necessary to reset the preset buttons. !
Display selection
Press the “AUDIO ”button (5) while receiv-
ing satellite radio to change the display as follows.
! Rear seat entertainment
If your vehicle is equipped with a Rear
Seat Entertainment System, you can
enjoy audio outputs from the system
through the vehicle ’s speakers by press-
ing the “RSE AUX ”button (3). Press the
button again to return to the audio setsound. Audio
5-19
– CONTINUED –
Page 209 of 420

5-20Audio
NOTE
If your vehicle is equipped with a Rear
Seat Entertainment System, refer to the
Owner ’s Manual supplement for the
Rear Seat Entertainment System for
further details.
Page 216 of 420

waveband will be displayed.
*2: Only when a CD is in the player.
*3: Only vehicle equipped with RSE (Rear Seat Entertainment)
! “
”and “”buttons
! With radio mode selected
Press the “
”button to select the next
channel and press the “”button to select
the previous channel.
That station ’s frequency will be shown on
the audio display. ! With CD mode selected
Press the “
”button to skip forward in the
track order. Pressing the “”button the
first time makes the player go back to the
beginning of the current track; pressing it the second time makes it go back to the
previous track.
The track number will be shown on the
audio display. !
Volume control buttons
Press the “+ ” button to increase the
volume. Press the “� ” button to reduce
the volume.
A number indicating the volume will be
shown on the audio display. !
MUTE button
Press this button if you wish to immedi-
ately cut the volume to zero.
The audio display will show “MUTE ”.
If you press the button again, the original
sound volume will return and “MUTE ”
turns off.
NOTE
If your vehicle is equipped with a
genuine SUBARU navigation system,
the display will show “
”.Audio
5-27