2012 SUBARU TRIBECA automatic transmission
[x] Cancel search: automatic transmissionPage 259 of 420

7-14Starting and operating
is started.
If the select lever does not move from the “P ” position with the brake pedal de-
pressed, the select lever button pushed
in, and the ignition switch in the ON
position, refer to “Shift lock function ”F 7-
14. ! R (Reverse)
This position is for backing the vehicle.
To shift from the “N ” to “R ”position, stop
the vehicle completely then move the
lever to the “R ” position while pushing
the select lever button. ! N (Neutral)
This position is for restarting a stalled engine.
In this position the wheels and transmis-
sion are not locked. In this position, the
transmission is neutral; the vehicle will roll
freely, even on the slightest incline unless
the parking brake or foot brake is applied.
Avoid coasting with the transmission neutral.
During coasting, there is no engine brak-
ing effect.
NOTE
When the ignition switch has been
turned to the “LOCK ”position, move-
ment of the select lever from the “N ” position to the
“R ” position is possible
for a limited time period by depressing
the brake pedal and then becomes
impossible. If the select lever becomes
impossible to be moved after a limited
time period, turn the ignition switch tothe “ON ”position. You will then be able
to move the select lever to the “P ”
position.
WARNING
Do not drive the vehicle with the
select lever in the “N ” (Neutral)
position. Engine braking has no
effect in this condition and the risk
of an accident is consequently in-creased.
! D (Drive)
This position is for normal driving.
The transmission automatically shifts into
a suitable gear from 1st to 5th according to
the vehicle speed and the acceleration
you require.
When more acceleration is required in this
position, depress the accelerator pedal
fully to the floor and hold that position. The
transmission will automatically downshift
to 4th, 3rd, 2nd or 1st gear. When you
release the pedal, the transmission will return to the original gear position.
To use the SPORT mode, move the lever
from this position into the manual gate.
To use the manual mode, move the lever
from this position into the manual gate
then move it toward the
“+ ” and “� ” ends.
! While climbing a grade
When driving up a hill, undesired upshift to
4th or 5th gear is prevented from taking
place when the accelerator is released.
This minimizes the chance of subsequent
downshifting to a lower gear when accel-
erating again. This prevents repeated
upshifting and downshifting resulting in a
smoother operation of the vehicle.
NOTE
The transmission may downshift to 2nd
or 1st gear, depending on the way the
accelerator pedal is depressed to ac-
celerate the vehicle again. & Shift lock function
The shift lock function helps prevent the
improper operation of the select lever. . The select lever cannot be operated
unless the ignition switch is turned to the “ ON ”position and the brake pedal is
depressed. . The select lever cannot be moved from
Page 262 of 420

Gearshifts can be performed using the
select lever.
Shift to the next-higher gear by briefly
pushing the select lever toward the“+ ”
end of the manual gate.
Shift to the next-lower gear by briefly
pulling the select lever toward the “� ”
end of the manual gate. NOTE
Please read the following points care-
fully and bear them in mind when using
the manual mode. . When the temperature of the engine
oil is higher than normal, warning
beeps are emitted and the shift position
indicator shows “� ”. If these warnings
are issued, deselect the manual mode
to protect the engine from damage. .
The transmission does not automa-
tically shift up in the manual mode.
Perform gearshifts in accordance with
road conditions so that the tachometer
needle does not enter the red zone. If
the engine speed reaches a predeter-
mined level, a fuel-cut function will
operate. Shift up if this happens. Also,
the transmission may automatically
shift up to protect the engine.. If you attempt to shift down when
the engine speed is too high, i.e., when
a downshift would push the tachometer
needle beyond the red zone, beeps will
be emitted to warn you that the down-
shift is not possible. . If you attempt to shift up when the
vehicle speed is too low, the transmis-
sion will not respond.. You can perform a skip-shift (for
example, from 4th to 2nd) by operating
the select lever twice in rapid succes-sion.. The transmission automatically se-
lects 1st gear when the vehicle stopsmoving.. If the temperature of the automatic
transmission fluid becomes too high,the “AT OIL TEMP ”warning light will
illuminate and upshifts to 5th gear will
not be possible. Immediately stop the
vehicle in a safe place and let the
engine idle until the warning light turns off.
& Driving tips
. On a road surface where there is a risk
of wheelspin (for example, a snow- or
gravel-covered road), you can pull away
from a standstill safely and easily by first
selecting the 2nd gear of the manualmode. . Always apply the foot or parking brake
when the vehicle is stopped in the “D ”or
“ R ”position.
. Always set the parking brake when
parking your vehicle. Do not hold the
vehicle with only the transmission. . Do not keep the vehicle in a stationary
position on an uphill grade by using the “ D ”position. Use the brake instead.
. The engine may, on rare occasions,
knock when the vehicle rapidly acceler-
ates or rapidly pulls away from a standstill.
This phenomenon does not indicate aproblem. . A slight reduction in output torque may
occur before the engine warms up. Starting and operating
7-17
– CONTINUED –
Page 304 of 420

.Check that the vehicle and trailer are
connected properly. Confirm that
–the trailer tongue is connected
properly to the hitch ball. – the trailer lights connector is con-
nected properly and trailer ’s brake
lights illuminate when the vehicle ’s
brake pedal is pressed, and that the trailer ’s turn signal lights flash when
the vehicle ’s turn signal lever is oper-
ated. – the safety chains are connected
properly.– all cargo in the trailer is secured
safely in position.– the side mirrors provide a good
rearward field of view without a sig-
nificant blind spot.
. Sufficient time should be taken to learn
the “feel ”of the vehicle/trailer combination
before starting out on a trip. In an area free
of traffic, practice turning, stopping and
backing up. ! Driving with a trailer
. You should allow for considerably more
stopping distance when towing a trailer.
Avoid sudden braking because it may
result in skidding or jackknifing and loss ofcontrol. . Avoid uneven steering, sharp turns and
rapid lane changes. .
Slow down before turning. Make a
longer than normal turning radius because
the trailer wheels will be closer than the
vehicle wheels to the inside of the turn. In
a tight turn, the trailer could hit yourvehicle. . Crosswinds will adversely affect the
handling of your vehicle and trailer, caus-
ing sway. Crosswinds can be due to
weather conditions or the passing of large
trucks or buses. If swaying occurs, firmly
grip the steering wheel and slow down
immediately but gradually. . When passing other vehicles, consid-
erable distance is required because of the
added weight and length caused by
attaching the trailer to your vehicle.
1) Left turn
2) Right turn .
Backing up with a trailer is difficult and
takes practice. When backing up with a
trailer, never accelerate or steer rapidly.
When turning back, grip the bottom of the
steering wheel with one hand and turn it to
the left for a left turn, and turn it to the right
for a right turn. . If the ABS warning light illuminates
while the vehicle is in motion, stop towing
the trailer and have repairs performed
immediately by the nearest SUBARU
dealer. ! Driving on grades
. Before going down a steep hill, slow
down and shift into lower gear (if neces-
sary, use 1st gear) in order to utilize the
engine braking effect and prevent over-
heating of your vehicle ’s brakes. Do not
make sudden downshifts. . When driving uphill in hot weather, the
air conditioner may turn off automatically
to protect the engine from overheating. . When driving uphill in hot weather, pay
attention to the water temperature gauge
pointer and AT OIL TEMP warning light
because the engine and transmission are
relatively prone to overheating under
these conditions. If the water temperature
gauge pointer approaches the OVER-
HEAT zone or the AT OIL TEMP warning
light illuminates, immediately turn off the Driving tips
8-27
– CONTINUED –
Page 332 of 420

Maintenance schedule....................................... 11-3
Maintenance precautions ................................... 11-3
Before checking or servicing in the engine compartment .................................................... 11-4
When you do checking or servicing in the engine compartment while the engine is running .......... 11-4
Engine hood ....................................................... 11-4
Engine compartment overview .......................... 11-6
Engine oil ............................................................ 11-7
Checking the oil level ......................................... 11-7
Changing the oil and oil filter .............................. 11-8
Recommended grade and viscosity .................... 11-9
Synthetic oil ....................................................... 11-9
Cooling system ................................................ 11-10
Hose and connections ...................................... 11-10
Engine coolant ................................................. 11-11
Air cleaner element .......................................... 11-12
Replacing the air cleaner element ..................... 11-12
Spark plugs ...................................................... 11-13
Recommended spark plugs .............................. 11-13
Drive belts ........................................................ 11-13
Automatic transmission fluid .......................... 11-14
Checking the fluid level .................................... 11-14
Recommended fluid ......................................... 11-15
Front differential gear oil ................................. 11-15
Checking the oil level ....................................... 11-15
Recommended grade and viscosity .................. 11-16
Rear differential gear oil .................................. 11-16
Recommended grade and viscosity .................. 11-16Power steering fluid
........................................ 11-16
Checking the fluid level .................................... 11-16
Recommended fluid ......................................... 11-17
Brake fluid ........................................................ 11-17
Checking the fluid level .................................... 11-17
Recommended brake fluid ............................... 11-18
Brake booster .................................................. 11-18
Brake pedal ...................................................... 11-19
Checking the brake pedal free play .................. 11-19
Checking the brake pedal reserve distance....... 11-19
Replacement of brake pad and lining ............ 11-19
Breaking-in of new brake pads and linings ....... 11-20
Parking brake stroke ....................................... 11-20
Tires and wheels .............................................. 11-21
Types of tires ................................................... 11-21
Tire pressure monitoring system (TPMS) .......... 11-21
Tire inspection ................................................. 11-22
Tire pressures and wear .................................. 11-23
Wheel balance ................................................. 11-25
Wear indicators ............................................... 11-25
Tire rotation direction mark .............................. 11-25
Tire rotation ..................................................... 11-26
Tire replacement .............................................. 11-26
Wheel replacement .......................................... 11-27
Aluminum wheels ............................................ 11-27
Windshield washer fluid .................................. 11-28
Replacement of wiper blades ......................... 11-29
Windshield wiper blade assembly ..................... 11-30
Windshield wiper blade rubber . ........................ 11-30
Rear window wiper blade assembly .................. 11-31
Maintenance and service
11
Page 337 of 420

11-6Maintenance and service
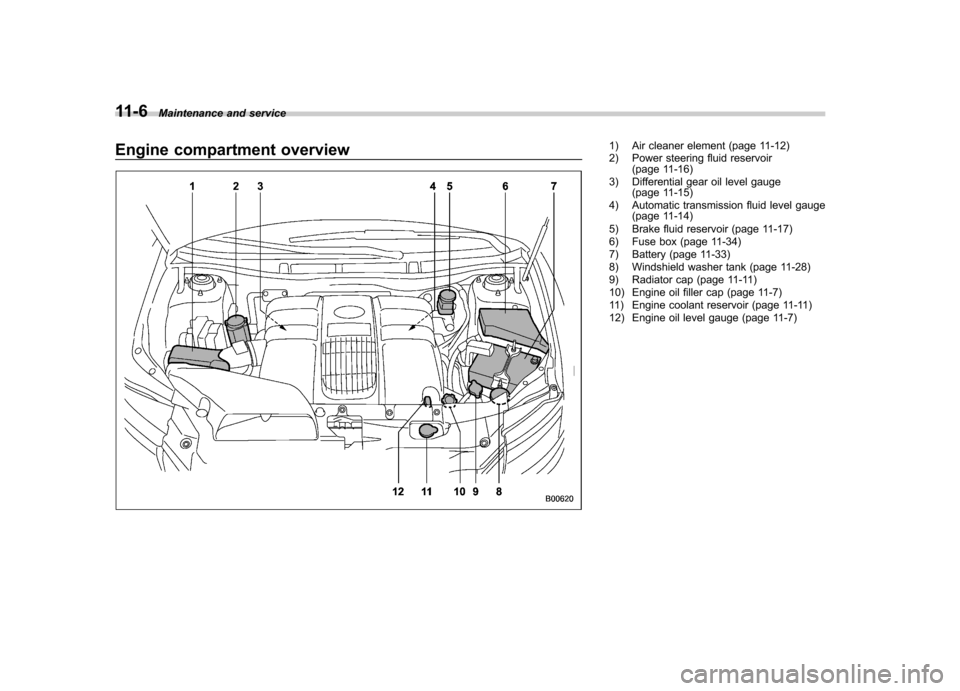
Engine compartment overview1) Air cleaner element (page 11-12)
2) Power steering fluid reservoir
(page 11-16)
3) Differential gear oil level gauge (page 11-15)
4) Automatic transmission fluid level gauge (page 11-14)
5) Brake fluid reservoir (page 11-17)
6) Fuse box (page 11-34)
7) Battery (page 11-33)
8) Windshield washer tank (page 11-28)
9) Radiator cap (page 11-11)
10) Engine oil filler cap (page 11-7)
11) Engine coolant reservoir (page 11-11)
12) Engine oil level gauge (page 11-7)
Page 345 of 420

11-14Maintenance and service
Automatic transmission fluid &Checking the fluid level
The automatic transmission fluid expands
largely as its temperature rises; the fluid
level differs according to fluid temperature.
Therefore, there are two different scales
for checking the level of hot fluid and cold
fluid on the level gauge.
Though the fluid level can be checked
without warming up the fluid on the“ COLD ”range, we recommend checking
the fluid level when the fluid is at operatingtemperature. ! Checking the fluid level when the
fluid is hot
Check the fluid level monthly.
1. Drive the vehicle several miles to raise
the temperature of the transmission fluid
up to normal operating temperature; 158
to 176 8F (70 to 80 8C) is normal.
2. Park the vehicle on a level surface and
set the parking brake.
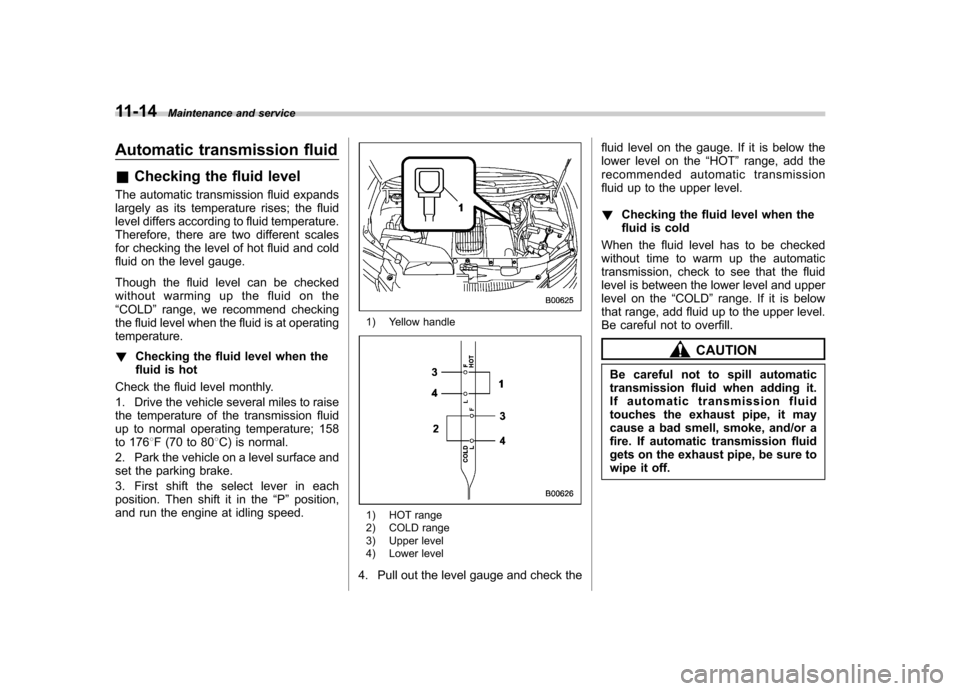
3. First shift the select lever in each
position. Then shift it in the “P ” position,
and run the engine at idling speed.
1) Yellow handle
1) HOT range
2) COLD range
3) Upper level
4) Lower level
4. Pull out the level gauge and check the fluid level on the gauge. If it is below the
lower level on the
“HOT ”range, add the
recommended automatic transmission
fluid up to the upper level. ! Checking the fluid level when the
fluid is cold
When the fluid level has to be checked
without time to warm up the automatic
transmission, check to see that the fluid
level is between the lower level and upper
level on the “COLD ”range. If it is below
that range, add fluid up to the upper level.
Be careful not to overfill.
CAUTION
Be careful not to spill automatic
transmission fluid when adding it.
If automatic transmission fluid
touches the exhaust pipe, it may
cause a bad smell, smoke, and/or a
fire. If automatic transmission fluid
gets on the exhaust pipe, be sure to
wipe it off.
Page 346 of 420

&Recommended fluid
Refer to “Fluids ”F 12-7.
NOTE
Using any non-specified type of auto-
matic transmission fluid could result in
damage inside the transmission. When
replacing the automatic transmission
fluid, be sure to use the specified type. Front differential gear oil &
Checking the oil level
1) Yellow handle
1. Park the vehicle on a level surface and
stop the engine.
2. Pull out the level gauge, wipe it clean,
and insert it again.
1) Upper level
2) Lower level
3. Pull out the level gauge again and
check the oil level on it. If it is below the
lower level, add oil to bring the level up to
the upper level.
CAUTION
Be careful not to spill front differ-
ential gear oil when adding it. If oil
touches the exhaust pipe, it may
cause a bad smell, smoke, and/or a
fire. If oil gets on the exhaust pipe,
be sure to wipe it off. Maintenance and service
11-15
– CONTINUED –
Page 382 of 420

&Fluids
Fluid Fluid type*
1Fluid capacity*2Remarks*3
Automatic transmission fluid· SUBARU ATF
· IDEMITSU ATF HP
10.4 US qt (9.8 liters, 8.6 Imp qt)“
Automatic transmission fluid ”F 11 -
14
Power steering fluid · SUBARU ATF
· IDEMITSU ATF HP ·
“Dexron III ”Type Automatic
Transmission Fluid 0.95 US qt (0.9 liters, 0.79 Imp qt)
·
“Power steering ”F 7-18
· “Power steering fluid ”F 11-16
Brake fluid FMVSS No. 116, fresh DOT 3 or DOT 4
brake fluid –
“
Brake fluid ”F 11-17
*1: Use one of the indicated types of fluid.
*2: The indicated fluid quantity is only a guideline. The necessary quantity for replacement may differ slightly depending on the temperature and otherfactors.
*3: For more details about maintenance and service, refer to the indicated section.
& Engine coolant
Coolant type Coolant capacity
SUBARU Super Coolant 8.0 US qt (7.6 liters, 6.7 Imp qt)
The indicated coolant quantity is only a guideline. The necessary quantity for replacement may differ slightly depending on the temperature and other
factors. For more details about maintenance and service, refer to “Cooling system ”F 11-10.
& Electrical system
Battery type and capacity (5HR) 75D23L (12V-52AH)
Alternator 12V-130A
Spark plugs SILFR6C11 (NGK)Specifications
12-7
– CONTINUED –