2012 SUBARU TRIBECA lock
[x] Cancel search: lockPage 287 of 420
8-10Driving tips
vior can cause the wheels to lock, possibly
leading to loss of vehicle control.
An anti-lock brake system (ABS) en-
hances your vehicle ’s braking perfor-
mance on snowy and icy roads. For
information about braking on slippery
surfaces, refer to “ABS (Anti-lock Brake
System) ”F 7-20 and “Vehicle Dynamics
Control system ”F 7-23.
! Wiper operation when snowing
Before driving in cold weather, make sure
the wiper blades are not frozen to the
windshield or rear window. If the wiper
blades are frozen to the windshield or rear
window, use the defroster with the airflow
control button in the “
”position and the
temperature control dial set for maximum
warmth until the wiper blades are com-
pletely thawed out. The wiper deicer is
helpful to thaw the windshield wiper
blades. To thaw out the rear wiper blade,
use the rear window defogger.
When driving in snow, if frozen snow starts
to stick on the surface of the windshield
despite wiper operation, use the defroster
with the airflow control button in “
”and
the temperature control dial set for max-
imum warmth. After the windshield gets
warmed enough to melt the frozen snow
on it, wash it away using the windshield
washer. Snow stuck on the wiper arm prevents the
wiper from working effectively. If snow is
stuck on the wiper arm, pull off the road to
a safe place, then remove it. If you stop
the vehicle at road side, use the hazard
warning flasher to alert other drivers.
We recommend use of non-freezing type
wiper blades (winter blades) during the
seasons in which you could have snow
and freezing temperatures. Blades of this
type give superior wiping performance in
snowy conditions. Be sure to use blades
that are suitable for your vehicle.
CAUTION
During high-speed driving, non-
freezing type wiper blades may not
perform as well as standard wiper
blades. If this happens, reduce the
vehicle speed.
NOTE
When the season requiring non-freez-
ing type wiper blades is over, replace
them with standard wiper blades. & Corrosion protection
Refer to “Corrosion protection ”F 10-4. &
Snow tires
WARNING
. When replacing original tires with
winter (snow) tires, make sure
you use only tires of the same
size, circumference, construc-
tion, brand (tread pattern), speed
symbol and load index as the
original tires listed on the tire
placard. Using tires of other sizes
or constructions may affect
speedometer/odometer calibra-
tion and clearance between the
body and tires. It also may be
dangerous and lead to loss of
vehicle control.
. You must install four winter tires
that are of the same size, circum-
ferences, construction, manufac-
turer, brand (tread pattern), de-
gree of wear, speed symbol and
load index. Mixing tires of other
sizes, circumferences or con-
structions may result in severe
mechanical damage to the drive
train of your vehicle and may
affect ride, handling, braking and
speedometer/odometer calibra-
tion. It also may be dangerous
and lead to loss of vehicle con-
Page 296 of 420
has safety chains and that each
chain will hold the trailer’s max-
imum gross weight. Towing trai-
lers without safety chains could
create a traffic safety hazard if
the trailer separates from the
hitch due to coupling damage or
hitch ball damage.
. Be sure to check the hitch pin
and safety pin for positive lock-
ing placement before towing a
trailer. If the ball mount comes off
the hitch receiver, the trailer
could get loose and create a
traffic safety hazard.
. Use only the ball mount supplied
with this hitch. Use the hitch only
as a weight carrying hitch. Do not
use with any type of weight
distributing hitch.
The maximum gross trailer weight and
maximum gross tongue weight are indi-
cated in the following table. Maximum
gross trailer weight
Maximum
gross tongue weight
Vehicle with-
out cooling kit 2,000 lbs
(906 kg) 200 lbs
(90 kg)
Vehicle with
cooling kit 3,500 lbs
(1,587 kg) 350 lbs
(158 kg)
When you tow a trailer, follow the instruc-
tions in “Trailer towing ”F 8-21.
& Connecting a trailer
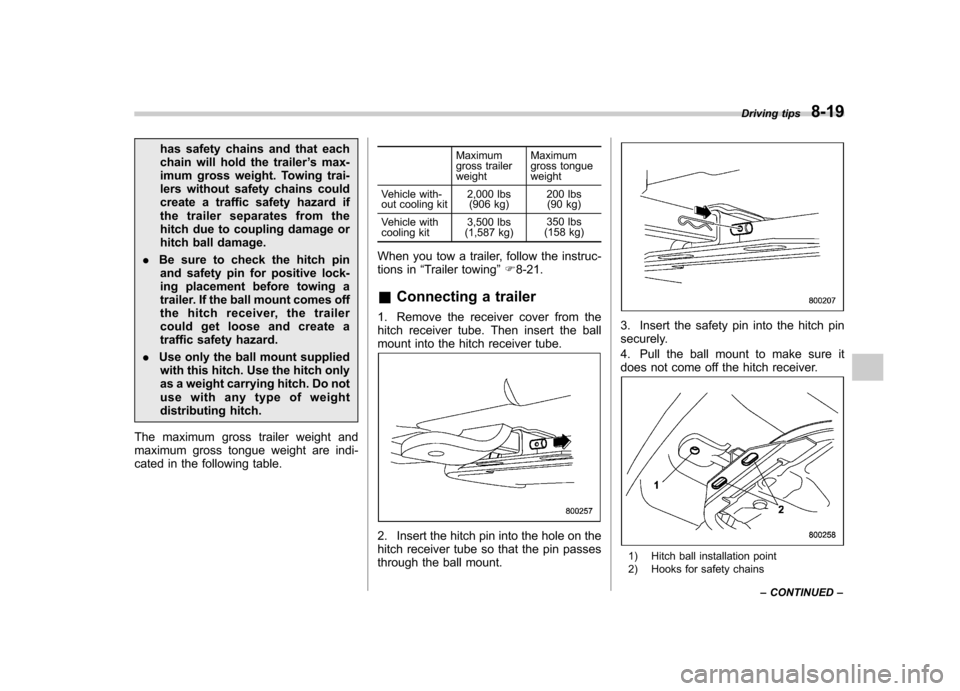
1. Remove the receiver cover from the
hitch receiver tube. Then insert the ball
mount into the hitch receiver tube.
2. Insert the hitch pin into the hole on the
hitch receiver tube so that the pin passes
through the ball mount.
3. Insert the safety pin into the hitch pin
securely.
4. Pull the ball mount to make sure it
does not come off the hitch receiver.
1) Hitch ball installation point
2) Hooks for safety chains Driving tips
8-19
– CONTINUED –
Page 305 of 420

8-28Driving tips
air conditioner and stop the vehicle in the
nearest safe location. For further instruc-
tions and additional information, refer to
the following sections. –“If you park your vehicle in an
emergency ”F 9-2
–“ Engine overheating ”F 9-14
–“ Temperature gauge ”F 3-8
–“ AT OIL TEMP warning light ”F 3-13
NOTE
The temperature of engine coolant is
less likely to rise to the OVERHEAT
zone in the “D ” position than in the
manual mode position. . Avoid using the accelerator pedal to
stay stationary on an uphill slope instead
of using the parking brake or foot brake.
That may cause the transmission fluid tooverheat. ! Parking on a grade
Always block the wheels under both
vehicle and trailer when parking. Apply
the parking brake firmly. You should not
park on a hill or slope. But if parking on a
hill or slope cannot be avoided, you
should take the following steps.
1. Apply the brakes and hold the pedal down.
2. Have someone place wheel blocks
under both the vehicle and trailer wheels. 3. When the wheel blocks are in place,
release the regular brakes slowly until the
blocks absorb the load.
4. Apply the regular brakes and then
apply the parking brake; slowly release
the regular brakes.
5. Shift into
“P ”and shut off the engine.
Page 306 of 420
If you park your vehicle in an emergency......... 9-2
Spare tire ............................................................. 9-2
Removing the spare tire ...................................... 9-3
Re-storage of spare tire ....................................... 9-4
Temporary spare tire ........................................... 9-5
Flat tires ............................................................... 9-6
Changing a flat tire .............................................. 9-6
Tire pressure monitoring system (TPMS) . ........... 9-10
Jump starting ..................................................... 9-11
How to jump start ............................................... 9-12 Engine overheating
........................................... 9-14
If steam is coming from the engine compartment ................................................... 9-14
If no steam is coming from the engine compartment ................................................... 9-14
Towing ................................................................ 9-14
Towing and tie-down hooks. ............................... 9-15
Using a flat-bed truck. ........................................ 9-17
Towing with all wheels on the ground ................. 9-17
Rear gate –if the rear gate cannot be
unlocked .......................................................... 9-18
Maintenance tools ............................................. 9-19
Jack and jack handle ......................................... 9-19
In case of emergency
9
Page 308 of 420

carefully read“Temporary spare tire ”F 9-5
for instructions and precautions. & Removing the spare tire
1. Take the wheel nut wrench and exten-
sion out of the tool bag. Refer to “Main-
tenance tools ”F 9-19.
2. Remove the subfloor storage lid in the
cargo area.
3. Take out the jack.
4. Locate the hex-head hoist shaft end
inside the hole.
5. Fit the extension onto the hex-head
hoist shaft end.
6. Fit the wheel nut wrench onto the extension.
7. Turn the hoist shaft end counterclock-
wise with the wheel nut wrench until the temporary spare tire is on the ground with
enough cable slack to allow you to pull it
out from under the vehicle.
CAUTION
. Be sure to remove (not simply
keep it open) the subfloor sto-
rage lid before turning the wheel
nut wrench, otherwise the lid
may be damaged.
. Do not put your fingers into the
center hole of the temporary
spare tire while you pulling it
out, because they might be
pinched in between the wheel
and the retainer.
8. Tilt the retainer at the end of the cable In case of emergency
9-3
– CONTINUED –
Page 309 of 420
9-4In case of emergency
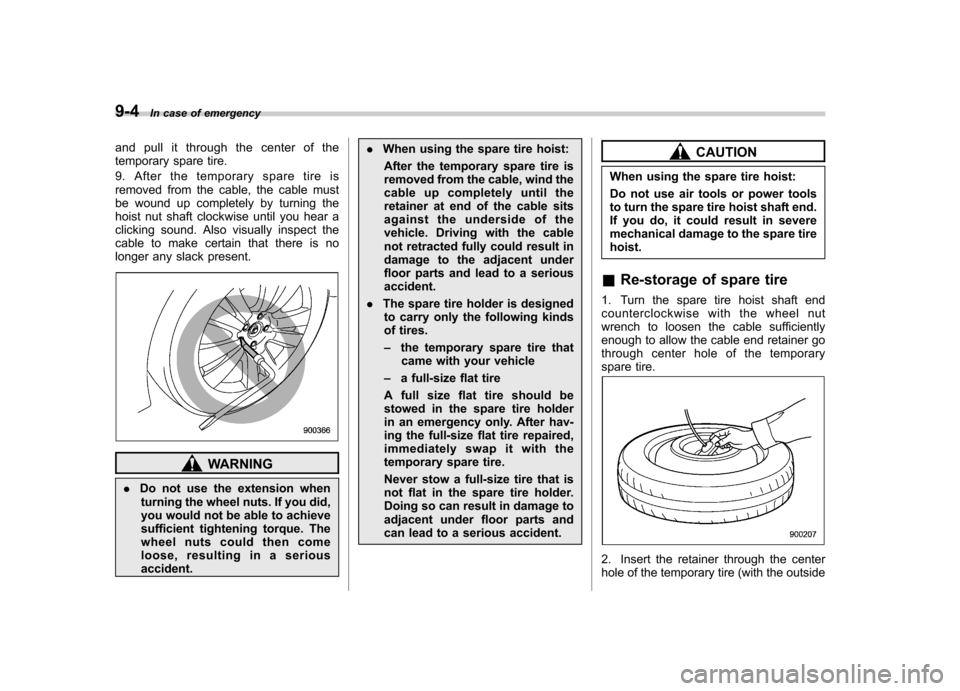
and pull it through the center of the
temporary spare tire.
9. After the temporary spare tire is
removed from the cable, the cable must
be wound up completely by turning the
hoist nut shaft clockwise until you hear a
clicking sound. Also visually inspect the
cable to make certain that there is no
longer any slack present.
WARNING
. Do not use the extension when
turning the wheel nuts. If you did,
you would not be able to achieve
sufficient tightening torque. The
wheel nuts could then come
loose, resulting in a seriousaccident. .
When using the spare tire hoist:
After the temporary spare tire is
removed from the cable, wind the
cable up completely until the
retainer at end of the cable sits
against the underside of the
vehicle. Driving with the cable
not retracted fully could result in
damage to the adjacent under
floor parts and lead to a seriousaccident.
. The spare tire holder is designed
to carry only the following kinds
of tires. – the temporary spare tire that
came with your vehicle
– a full-size flat tire
A full size flat tire should be
stowed in the spare tire holder
in an emergency only. After hav-
ing the full-size flat tire repaired,
immediatelyswapitwiththe
temporary spare tire.
Never stow a full-size tire that is
not flat in the spare tire holder.
Doing so can result in damage to
adjacent under floor parts and
can lead to a serious accident.
CAUTION
When using the spare tire hoist:
Do not use air tools or power tools
to turn the spare tire hoist shaft end.
If you do, it could result in severe
mechanical damage to the spare tirehoist.
& Re-storage of spare tire
1. Turn the spare tire hoist shaft end
counterclockwise with the wheel nut
wrench to loosen the cable sufficiently
enough to allow the cable end retainer go
through center hole of the temporary
spare tire.
2. Insert the retainer through the center
hole of the temporary tire (with the outside
Page 310 of 420
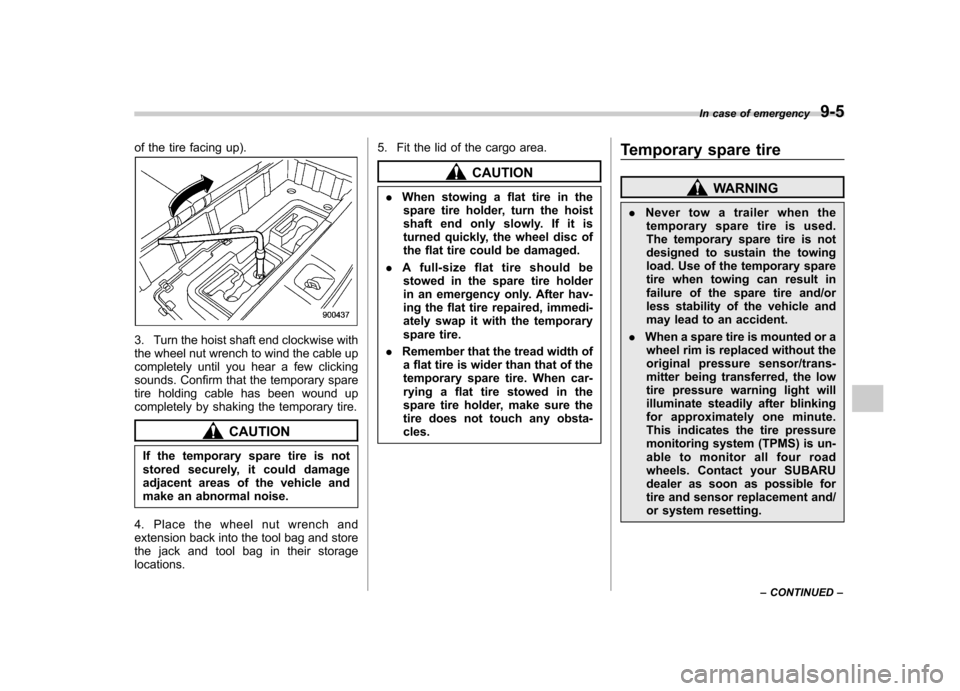
of the tire facing up).
3. Turn the hoist shaft end clockwise with
the wheel nut wrench to wind the cable up
completely until you hear a few clicking
sounds. Confirm that the temporary spare
tire holding cable has been wound up
completely by shaking the temporary tire.
CAUTION
If the temporary spare tire is not
stored securely, it could damage
adjacent areas of the vehicle and
make an abnormal noise.
4. Place the wheel nut wrench and
extension back into the tool bag and store
the jack and tool bag in their storagelocations. 5. Fit the lid of the cargo area.
CAUTION
. When stowing a flat tire in the
spare tire holder, turn the hoist
shaft end only slowly. If it is
turned quickly, the wheel disc of
the flat tire could be damaged.
. A full-size flat tire should be
stowed in the spare tire holder
in an emergency only. After hav-
ing the flat tire repaired, immedi-
ately swap it with the temporary
spare tire.
. Remember that the tread width of
a flat tire is wider than that of the
temporary spare tire. When car-
rying a flat tire stowed in the
spare tire holder, make sure the
tire does not touch any obsta-cles. Temporary spare tire
WARNING
. Never tow a trailer when the
temporary spare tire is used.
The temporary spare tire is not
designed to sustain the towing
load. Use of the temporary spare
tire when towing can result in
failure of the spare tire and/or
less stability of the vehicle and
may lead to an accident.
. When a spare tire is mounted or a
wheel rim is replaced without the
original pressure sensor/trans-
mitter being transferred, the low
tire pressure warning light will
illuminate steadily after blinking
for approximately one minute.
This indicates the tire pressure
monitoring system (TPMS) is un-
able to monitor all four road
wheels. Contact your SUBARU
dealer as soon as possible for
tire and sensor replacement and/
or system resetting. In case of emergency
9-5
– CONTINUED –
Page 312 of 420
.Always turn off the engine before
raising the flat tire off the ground
using the jack. Never swing or
push the vehicle supported with
the jack. The jack can come out
of the jacking point due to a jolt
and this can result in a severeaccident.
1. Park on a hard, level surface, when-
ever possible, then stop the engine.
2. Set the parking brake securely and
shift in the “P ”(Park) position.
3. Turn on the hazard warning flasher
and have everyone get out of the vehicle.
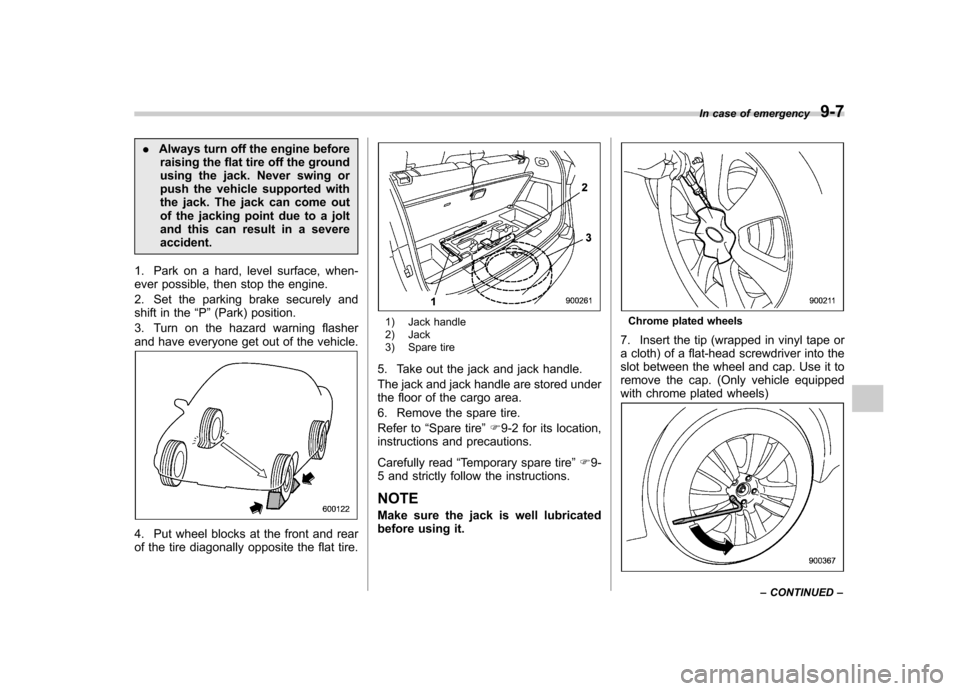
4. Put wheel blocks at the front and rear
of the tire diagonally opposite the flat tire.
1) Jack handle
2) Jack
3) Spare tire
5. Take out the jack and jack handle.
The jack and jack handle are stored under
the floor of the cargo area.
6. Remove the spare tire.
Refer to “Spare tire ”F 9-2 for its location,
instructions and precautions.
Carefully read “Temporary spare tire ”F 9-
5 and strictly follow the instructions.
NOTE
Make sure the jack is well lubricated
before using it.Chrome plated wheels
7. Insert the tip (wrapped in vinyl tape or
a cloth) of a flat-head screwdriver into the
slot between the wheel and cap. Use it to
remove the cap. (Only vehicle equipped
with chrome plated wheels)
In case of emergency 9-7
– CONTINUED –