2012 SUBARU OUTBACK oil type
[x] Cancel search: oil typePage 99 of 474

2-10Keys and doors
NOTE
If the interval between presses is too
short when you press the “
”button
three times, the system may not re-
spond to the signals from the remote
transmitter.
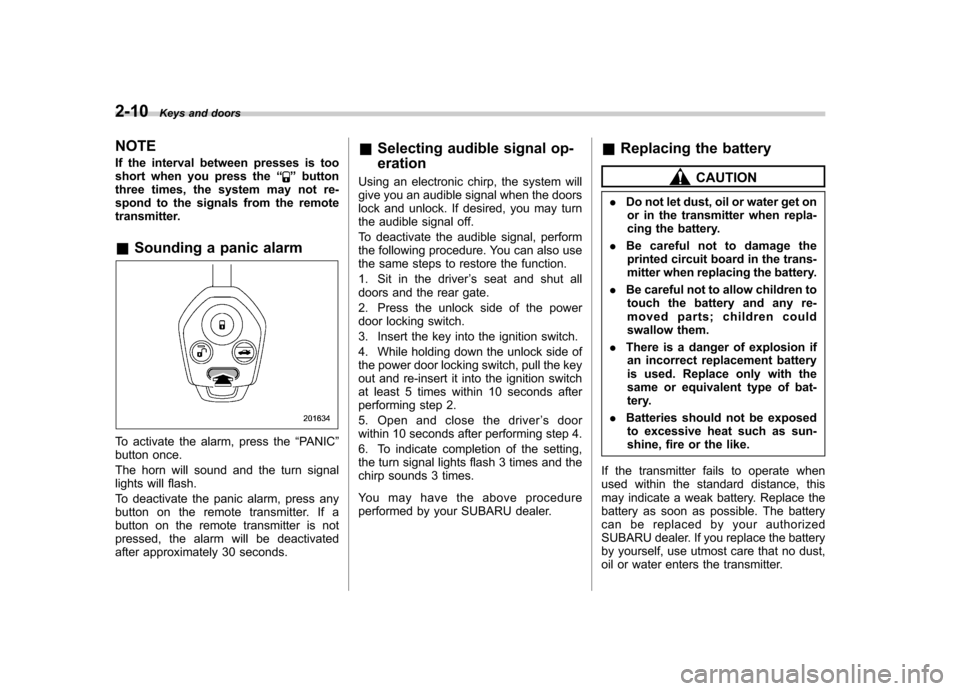
& Sounding a panic alarm
To activate the alarm, press the “PANIC ”
button once.
The horn will sound and the turn signal
lights will flash.
To deactivate the panic alarm, press any
button on the remote transmitter. If a
button on the remote transmitter is not
pressed, the alarm will be deactivated
after approximately 30 seconds. &
Selecting audible signal op- eration
Using an electronic chirp, the system will
give you an audible signal when the doors
lock and unlock. If desired, you may turn
the audible signal off.
To deactivate the audible signal, perform
the following procedure. You can also use
the same steps to restore the function.
1. Sit in the driver ’s seat and shut all
doors and the rear gate.
2. Press the unlock side of the power
door locking switch.
3. Insert the key into the ignition switch.
4. While holding down the unlock side of
the power door locking switch, pull the key
out and re-insert it into the ignition switch
at least 5 times within 10 seconds after
performing step 2.
5. Open and close the driver ’s door
within 10 seconds after performing step 4.
6. To indicate completion of the setting,
the turn signal lights flash 3 times and the
chirp sounds 3 times.
You may have the above procedure
performed by your SUBARU dealer. &
Replacing the battery
CAUTION
. Do not let dust, oil or water get on
or in the transmitter when repla-
cing the battery.
. Be careful not to damage the
printed circuit board in the trans-
mitter when replacing the battery.
. Be careful not to allow children to
touch the battery and any re-
moved parts; children could
swallow them.
. There is a danger of explosion if
an incorrect replacement battery
is used. Replace only with the
same or equivalent type of bat-
tery.
. Batteries should not be exposed
to excessive heat such as sun-
shine, fire or the like.
If the transmitter fails to operate when
used within the standard distance, this
may indicate a weak battery. Replace the
battery as soon as possible. The battery
can be replaced by your authorized
SUBARU dealer. If you replace the battery
by yourself, use utmost care that no dust,
oil or water enters the transmitter.
Page 172 of 474

Ventilator control................................................. 4-2
Center ventilators ................................................ 4-2
Side ventilators ................................................... 4-2
Climate control panel .......................................... 4-3
Type A ................................................................ 4-3
Type B ................................................................ 4-4
Automatic climate control system (type B) ....... 4-5
Temperature sensors ........................................... 4-5
Manual climate control ....................................... 4-6
Airflow mode selection ........................................ 4-6
Temperature control ............................................ 4-7
Fan speed control ............................................... 4-7
Air conditioner control ........................................ 4-7
Air inlet selection ................................................ 4-7
Defrosting ............................................................ 4-8 Operating tips for heater and air
conditioner ........................................................ 4-8
Cleaning ventilator grille ...................................... 4-8
Efficient cooling after parking in direct sunlight ............................................................. 4-8
Lubrication oil circulation in the refrigerant circuit ................................................................ 4-9
Checking air conditioning system before summer season .............................................................. 4-9
Cooling and dehumidifying in high humidity and low temperature weather condition ..................... 4-9
Air conditioner compressor shut-off when engine is heavily loaded ................................................ 4-9
Refrigerant for your climate control system ... ....... 4-9
Air filtration system ............................................. 4-9
Replacing an air filter ......................................... 4-10Climate control
4
Page 243 of 474

5-60Audio
!Voice command system
NOTE
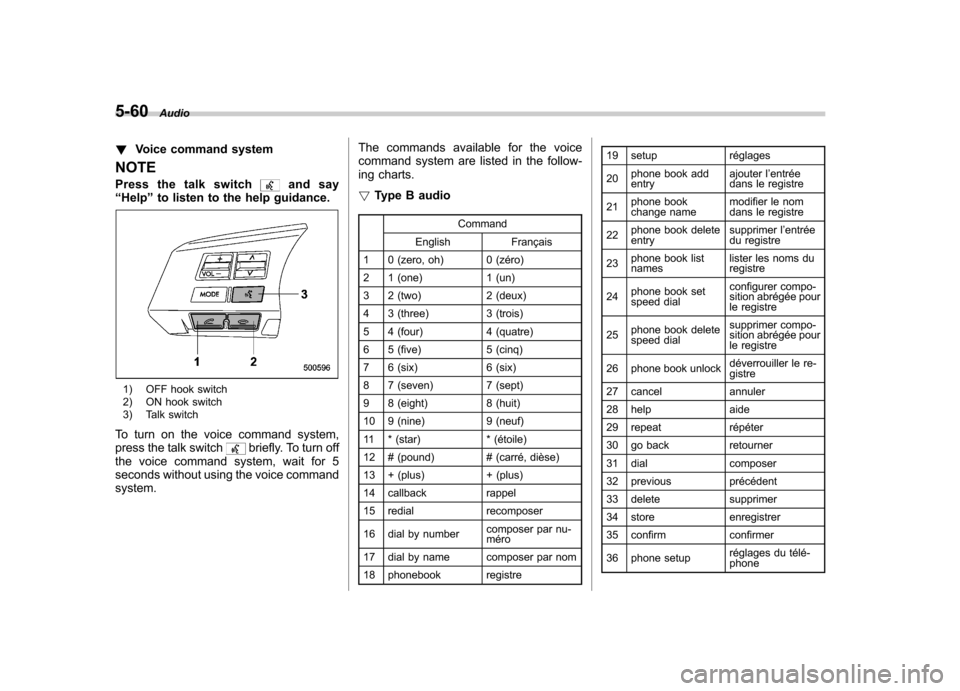
Pressthetalkswitch
and say
“ Help ”to listen to the help guidance.
1) OFF hook switch
2) ON hook switch
3) Talk switch
To turn on the voice command system,
press the talk switch
briefly. To turn off
the voice command system, wait for 5
seconds without using the voice commandsystem. The commands available for the voice
command system are listed in the follow-
ing charts. !
Type B audio
Command
English Français
1 0 (zero, oh) 0 (zéro)
2 1 (one) 1 (un)
3 2 (two) 2 (deux)
4 3 (three) 3 (trois)
5 4 (four) 4 (quatre)
6 5 (five) 5 (cinq)
7 6 (six) 6 (six)
8 7 (seven) 7 (sept)
9 8 (eight) 8 (huit)
10 9 (nine) 9 (neuf)
11 * (star) * (étoile)
12 # (pound) # (carré, dièse)
13 + (plus) + (plus)
14 callback rappel
15 redial recomposer
16 dial by number composer par nu- méro
17 dial by name composer par nom
18 phonebook registre 19 setup réglages 20
phone book add entry ajouter l
’entrée
dans le registre
21 phone book
change name modifier le nom
dans le registre
22 phone book deleteentry supprimer l
’entrée
du registre
23 phone book listnames lister les noms duregistre
24 phone book set
speed dial configurer compo-
sition abrégée pour
le registre
25 phone book delete
speed dial supprimer compo-
sition abrégée pour
le registre
26 phone book unlock déverrouiller le re-gistre
27 cancel annuler
28 help aide
29 repeat répéter
30 go back retourner
31 dial composer
32 previous précédent
33 delete supprimer
34 store enregistrer
35 confirm confirmer
36 phone setup réglages du télé- phone
Page 244 of 474

37 security sécurité
38 pair phonejumeler le télé- phone
39 change name modifier le nom
40 select phone sélectionner le tél- éphone
41 list phones lister les télé-phones
42 set pass key configurer le
passe-partout
43 add entry ajouter l ’entrée
44 delete entry supprimer l ’entrée
45 delete speed dial supprimer compo-
sition abrégée
46 by voice vocalement
47 by phone par téléphone
48 call history historique d ’appels
49 set speed dial configurer compo-
sition abrégée
50 incoming entrant
51 outgoing sortant
52 list names lister les noms
53 set PIN configurer NIP
54 phone book lock verrouiller le regis- tre!
Type C audio
Command
English Français
1 0 (zero, oh) 0 (zéro)
2 1 (one) 1 (un)
3 2 (two) 2 (deux)
4 3 (three) 3 (trois)
5 4 (four) 4 (quatre)
6 5 (five) 5 (cinq)
7 6 (six) 6 (six)
8 7 (seven) 7 (sept)
9 8 (eight) 8 (huit)
10 9 (nine) 9 (neuf)
11 * (star) * (étoile)
12 # (pound) # (dièse)
13 + (plus) + (plus)
14 add entry ajouter entrée 15 Bluetooth Audio setup configuration
Audio Bluetooth
16 BT-A setup configuration
Audio Bluetooth
17 BT-Audio setup configuration
Audio Bluetooth
18 by phone par téléphone
19 by voice par la voix 20 call history
historique des ap- pels
21 call transfer transfert d ’appel
22 callback rappel automatique
23 cancel annuler
24 change name changer nom
25 confirm valider
26 delete supprimer
27 delete audio supprimer audio
28 delete audio player supprimer lecteur audio
29 delete entry supprimer entrée
30 delete phone supprimer télé- phone
31 delete speed dial supprimer compo-
sition rapide
32 dial composer
33 dial by name composer par nom
34 dial by number composer par nu- méro
35 from audio depuis audio
36 from car depuis voiture
37 go back retour
38 hands free power alimentation mains libres
39 help aide
40 incoming appel d ’arrivée
Audio
5-61
– CONTINUED –
Page 291 of 474

7-14Starting and operating
will flash one time.
7. Repeat step 5 for any additional
transmitters (the system will accept up to
eight transmitters).
8. The system will exit the transmitter
learn mode if the key is turned to the“LOCK ”position, the door is closed or
after 2 minutes. & System maintenance
NOTE
In the event that the vehicle ’s battery is
replaced, discharged or disconnected,
it will be necessary to start the vehicle
a minimum of one time using the key
prior to activating the remote engine
start system. This is required to allow
the vehicle electronic systems to re-synchronize. ! Changing the batteries
CAUTION
. Do not let dust, oil or water get on
or in the remote engine start
transmitter when replacing the
battery.
. Be careful not to damage the
printed circuit board in the re-
mote engine start transmitter
when replacing the battery. .
Be careful not to allow children to
touch the battery and any re-
moved parts; children could
swallow them.
. There is a danger of explosion if
an incorrect replacement battery
is used. Replace only with the
same or equivalent type of bat-
tery.
. Batteries should not be exposed
to excessive heat such as sun-
shine, fire or the like.
The two 3-volt lithium batteries (model
CR-2032) supplied in your remote engine
start transmitter should last approximately
one year, depending on usage. When the
batteries begin to weaken, you will notice
a decrease in range (distance from the
vehicle that your remote control operates).
Follow the instructions below to change
the remote engine start transmitter bat-teries.
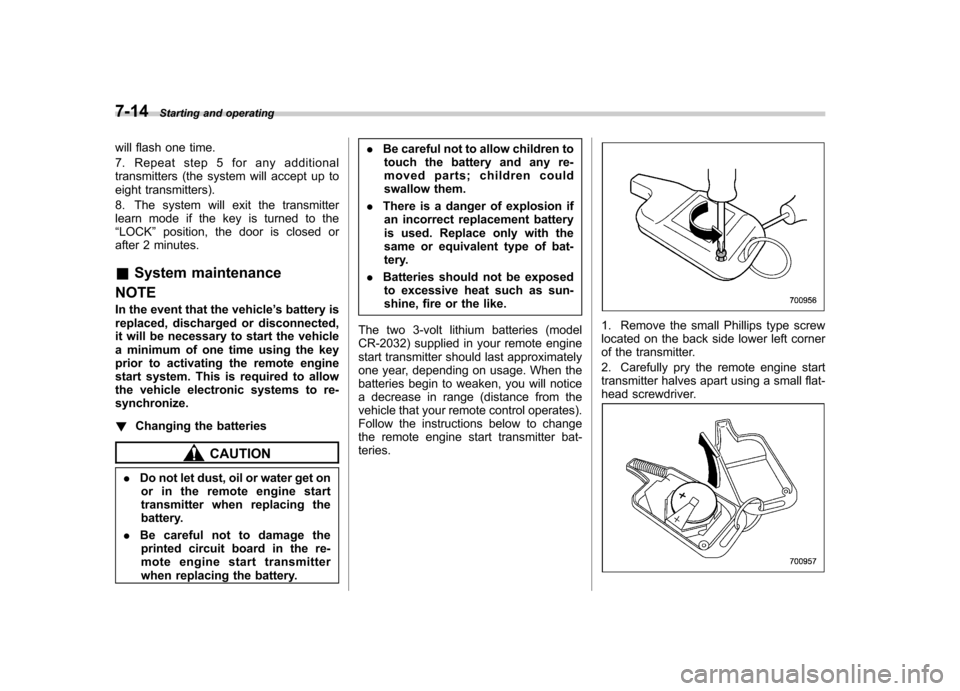
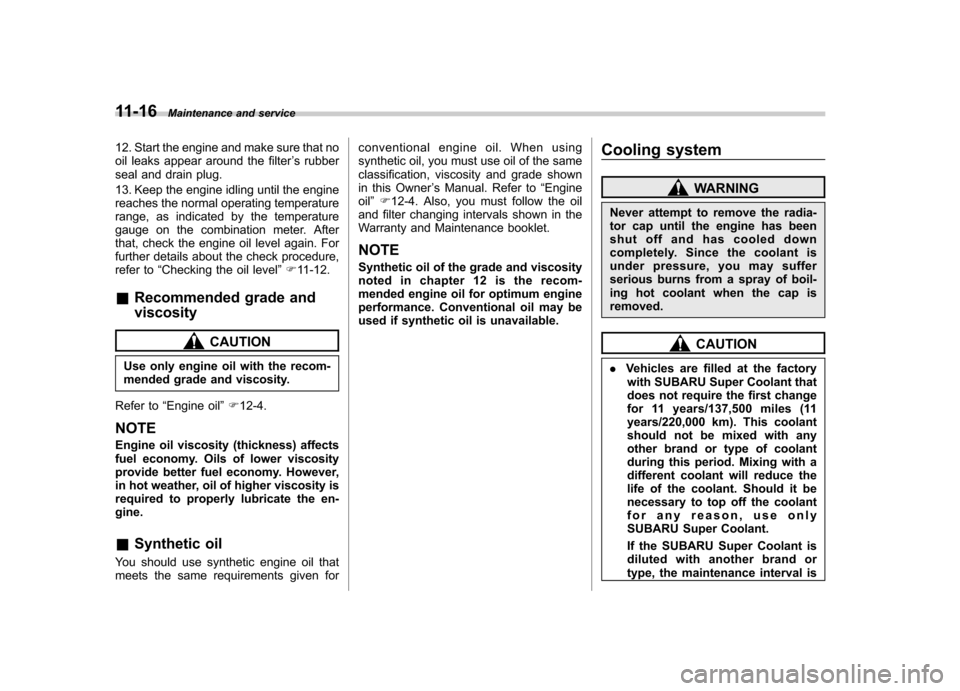
1. Remove the small Phillips type screw
located on the back side lower left corner
of the transmitter.
2. Carefully pry the remote engine start
transmitter halves apart using a small flat-
head screwdriver.
Page 387 of 474

11-16Maintenance and service
12. Start the engine and make sure that no
oil leaks appear around the filter ’s rubber
seal and drain plug.
13. Keep the engine idling until the engine
reaches the normal operating temperature
range, as indicated by the temperature
gauge on the combination meter. After
that, check the engine oil level again. For
further details about the check procedure,
refer to “Checking the oil level ”F 11-12.
& Recommended grade and viscosity
CAUTION
Use only engine oil with the recom-
mended grade and viscosity.
Refer to “Engine oil ”F 12-4.
NOTE
Engine oil viscosity (thickness) affects
fuel economy. Oils of lower viscosity
provide better fuel economy. However,
in hot weather, oil of higher viscosity is
required to properly lubricate the en- gine. & Synthetic oil
You should use synthetic engine oil that
meets the same requirements given for conventional engine oil. When using
synthetic oil, you must use oil of the same
classification, viscosity and grade shown
in this Owner
’s Manual. Refer to “Engine
oil ”F 12-4. Also, you must follow the oil
and filter changing intervals shown in the
Warranty and Maintenance booklet.
NOTE
Synthetic oil of the grade and viscosity
noted in chapter 12 is the recom-
mended engine oil for optimum engine
performance. Conventional oil may be
used if synthetic oil is unavailable. Cooling system
WARNING
Never attempt to remove the radia-
tor cap until the engine has been
shut off and has cooled down
completely. Since the coolant is
under pressure, you may suffer
serious burns from a spray of boil-
ing hot coolant when the cap isremoved.
CAUTION
. Vehicles are filled at the factory
with SUBARU Super Coolant that
does not require the first change
for 11 years/137,500 miles (11
years/220,000 km). This coolant
should not be mixed with any
other brand or type of coolant
during this period. Mixing with a
different coolant will reduce the
life of the coolant. Should it be
necessary to top off the coolant
for any reason, use only
SUBARU Super Coolant.
If the SUBARU Super Coolant is
diluted with another brand or
type, the maintenance interval is
Page 471 of 474

14-10Index
SRS Frontal airbag ........................................................ 1-45
SRS airbag (Supplemental Restraint System airbag) ... 4, 1-36
SRS airbag system Monitors. ............................................................... 1-62
Servicing ............................................................... 1-63
Warning light ......................................................... 3-11
Starting the engine ....................................................... 7-8
State emission testing (U.S. only) .................................. 7-6
Steering wheel Power ................................................................... 7-23
Tilt/telescopic ......................................................... 3-52
Stopping the engine ................................................... 7-10
Storage compartment ................................................... 6-5
Sun shade ................................................................ 2-29
Sun visors ................................................................... 6-4
Supplemental Restraint System airbag (SRS) ................ 1-36
Synthetic leather upholstery ........................................ 10-5
T
Tachometer ................................................................. 3-7
Temperature warning light AT OIL TEMP ........................................................ 3-14
Coolant ................................................................. 3-13
Temporary spare tire .................................................... 9-2
Tether (child restraint system) .............................. 1-30, 1-33
Tie-down hooks ......................................................... 9-14
Tire ................................................................. 11-30, 12-9 Chains .................................................................. 8-12
Inspection ............................................................ 11-32
Pressures and wear .............................................. 11-32 Replacement.
....................................................... 11-36
Rotation .............................................................. 11-35
Size and pressure .................................................. 12-9
Types .................................................................. 11-30
Tire pressure monitoring system (TPMS) ....... 7-29, 9-9, 11-30
Warning light .......................................................... 3-15
Tires and wheels ...................................................... 11-30
Tools .......................................................................... 9-3
Top tether anchorages ........................................ 1-30, 1-33
Towing ...................................................................... 9-13
All wheels on the ground ......................................... 9-16
Flat-bed truck ......................................................... 9-16
Hooks ................................................................... 9-14
Weight .................................................................. 8-20
Trailer Connecting ............................................................ 8-18
Hitch ............................................................. 8-17, 8-23
Towing .................................................................. 8-19
Towing tips ............................................................ 8-25
Trip meter ................................................................... 3-6
Trunk lid ............................................................ 2-23, 9-19
Release handle ...................................................... 2-24
Trunk light ............................................................... 11-55
Turn signal Indicator lights ........................................................ 3-22
Lever .................................................................... 3-29
U
Under-floor storage compartment .................................. 6-18
USB storage device operations .................................... 5-33