2012 SUBARU OUTBACK brake
[x] Cancel search: brakePage 306 of 474

again, turn the ignition switch to the “LOCK ”position and restart the en-
gine.. When the switch is pressed to
deactivate the Vehicle Dynamics Con-
trol system, the vehicle ’s running per-
formance is comparable with that of a
vehicle that does not have a Vehicle
Dynamics Control system. Do not de-
activate the Vehicle Dynamics Control
system except when absolutely neces-
sary.. Even when the Vehicle Dynamics
Control system is deactivated, compo-
nents of the brake control system may
still activate. When the brake control
system is activated, the Vehicle Dy-
namics Control operation indicator
light illuminates. Tire pressure monitoring
system (TPMS) (if equipped)
The tire pressure monitoring system pro-
vides the driver with a warning message
by sending a signal from a sensor that is
installed in each wheel when tire pressure
is severely low.
The tire pressure monitoring system will
activate only when the vehicle is driven at
speeds above 20 mph (32 km/h). Also,
this system may not react immediately to a
sudden drop in tire pressure (for example,
a blow-out caused by running over a
sharp object).
WARNING
If the low tire pressure warning light
illuminates while driving, never
brake suddenly and keep driving
straight ahead while gradually redu-
cing speed. Then slowly pull off the
road to a safe place. Otherwise an
accident involving serious vehicle
damage and serious personal injury
could occur.
Check the pressure for all four tires
and adjust the pressure to the COLD
tire pressure shown on the tire
placard on the door pillar on thedriver ’s side.
Even when the vehicle is driven a
very short distance, the tires get
warm and their pressures increase
accordingly. Be sure to let the tires
cool thoroughly before adjusting
their pressures to the standard
values shown on the tire placard.
Refer to “Tires and wheels ”F 11-30.
The tire pressure monitoring system
does not function when the vehicle
is stationary. After adjusting the tire
pressures, increase the vehicle
speed to at least 20 mph (32 km/h)
to start the TPMS re-checking of the
tire inflation pressures. If the tire
pressures are now above the severe Starting and operating
7-29
– CONTINUED –
Page 308 of 474
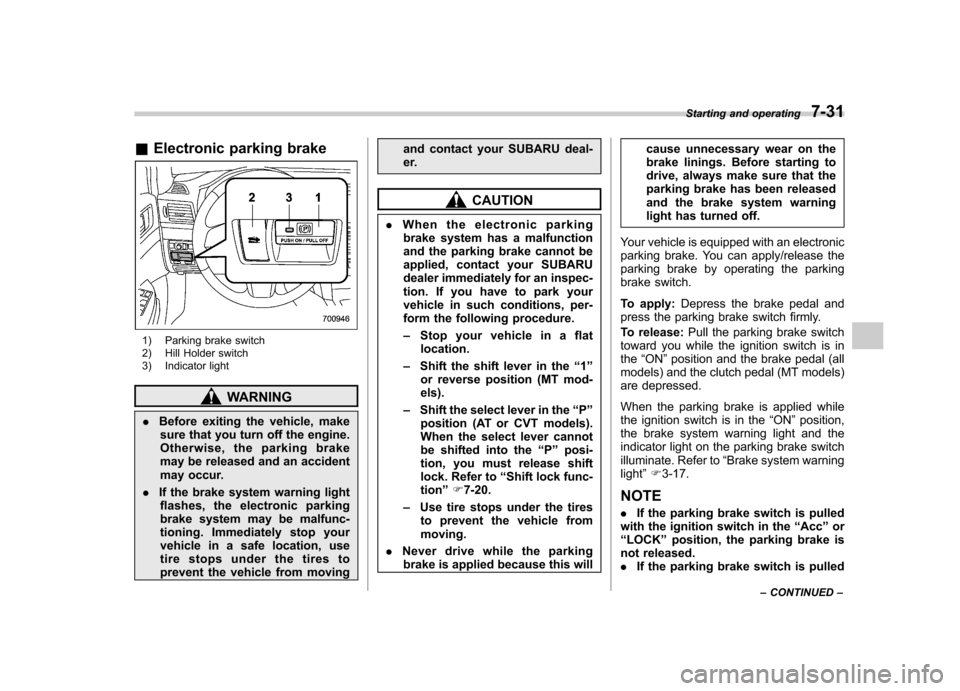
&Electronic parking brake
1) Parking brake switch
2) Hill Holder switch
3) Indicator light
WARNING
. Before exiting the vehicle, make
sure that you turn off the engine.
Otherwise, the parking brake
may be released and an accident
may occur.
. If the brake system warning light
flashes, the electronic parking
brake system may be malfunc-
tioning. Immediately stop your
vehicle in a safe location, use
tire stops under the tires to
prevent the vehicle from moving and contact your SUBARU deal-
er.
CAUTION
. When the electronic parking
brake system has a malfunction
and the parking brake cannot be
applied, contact your SUBARU
dealer immediately for an inspec-
tion. If you have to park your
vehicle in such conditions, per-
form the following procedure. – Stop your vehicle in a flat
location.
– Shift the shift lever in the “1 ”
or reverse position (MT mod- els).
– Shift the select lever in the “P ”
position (AT or CVT models).
When the select lever cannot
be shifted into the “P ” posi-
tion, you must release shift
lock. Refer to “Shift lock func-
tion ”F 7-20.
– Use tire stops under the tires
to prevent the vehicle frommoving.
. Never drive while the parking
brake is applied because this will cause unnecessary wear on the
brake linings. Before starting to
drive, always make sure that the
parking brake has been released
and the brake system warning
light has turned off.
Your vehicle is equipped with an electronic
parking brake. You can apply/release the
parking brake by operating the parking
brake switch.
To apply: Depress the brake pedal and
press the parking brake switch firmly.
To release: Pull the parking brake switch
toward you while the ignition switch is in the “ON ”position and the brake pedal (all
models) and the clutch pedal (MT models)
are depressed.
When the parking brake is applied while
the ignition switch is in the “ON ”position,
the brake system warning light and the
indicator light on the parking brake switch
illuminate. Refer to “Brake system warning
light ”F 3-17.
NOTE . If the parking brake switch is pulled
with the ignition switch in the “Acc ”or
“ LOCK ”position, the parking brake is
not released. . If the parking brake switch is pulled Starting and operating
7-31
– CONTINUED –
Page 309 of 474
7-32Starting and operating
without depressing the brake pedal or
the clutch pedal, the parking brake is
not released..When the parking brake is being
applied or released, noise may be
noticed. However, this is not a malfunc-tion.. When the electronic parking brake
system has a malfunction or the elec-
tronic parking brake operation is pro-
hibited temporarily, if the parking brake
switch is operated, a chirp sound is
heard and the brake system warning
light flashes.. When you cannot release the park-
ing brake due to, for example, a system
malfunction, you can release it by
using the parking brake release tool.
Refer to “Electronic parking brake –if
the electronic parking brake cannot bereleased ”F 9-17.
! Automatic release function by ac-
celerator pedal
The electronic parking brake system has
an automatic release function. The park-
ing brake will be automatically released by
depressing the accelerator pedal. How-
ever, the automatic release function does
not operate under the following conditions. . Any door (other than the trunk lid or
rear gate) is open. .
The driver ’s seatbelt is not fastened.
If the parking brake is automatically
released, the brake system warning light
and the indicator light on the parking brake
switch turn off.
NOTE
Even if you have applied the parking
brake by pressing the parking brake
switch, the parking brake will be auto-
matically released when the accelera-
tor pedal is depressed. ! Hill Holder function
The electronic parking brake system has a
Hill Holder function. If the Hill Holder
function is activated, the parking brake
will be automatically applied when stop-
ping on an uphill slope with the brake
pedal depressed. In this case, the brake
system warning light and the indicator light
on the parking brake switch illuminate. NOTE . The Hill Holder function may not
activate on a gentle uphill slope. In this
case, manually apply the electronic
parking brake.. If you do not depress the brake
pedal sufficiently, the Hill Holder func-
tion may not operate properly. How-
ever, this is not a malfunction. When stopping on an uphill slope, depress
the brake pedal firmly and release it
after the brake system warning lightilluminates..
Depending on the condition of the
road surface and braking force, the
brakes operate temporarily and feel
different than usual.. When the electronic parking brake
system has a malfunction while the Hill
Holder function is activated, a chirp
sound is heard, the Hill Holder indica-
tor light turns off and the brake system
warning light flashes.. The Hill Holder function does not
reactivate when parking with the elec-
tronic parking brake released after the
Hill Holder function is activated. If
necessary, manually apply the electro-
nic parking brake.. If the seatbelt is not fastened when
the Hill Holder function is activated, the
vehicle may not start moving smoothly
from a stop, or a noise may be heard
from the brake components. ! Hill Holder switch
WARNING
When stopping on an uphill slope
with the Hill Holder function acti-
vated, release the brake pedal after
Page 310 of 474
the brake system warning light has
illuminated. Otherwise, the Hill
Holder function may not operate
properly and an accident may occur.
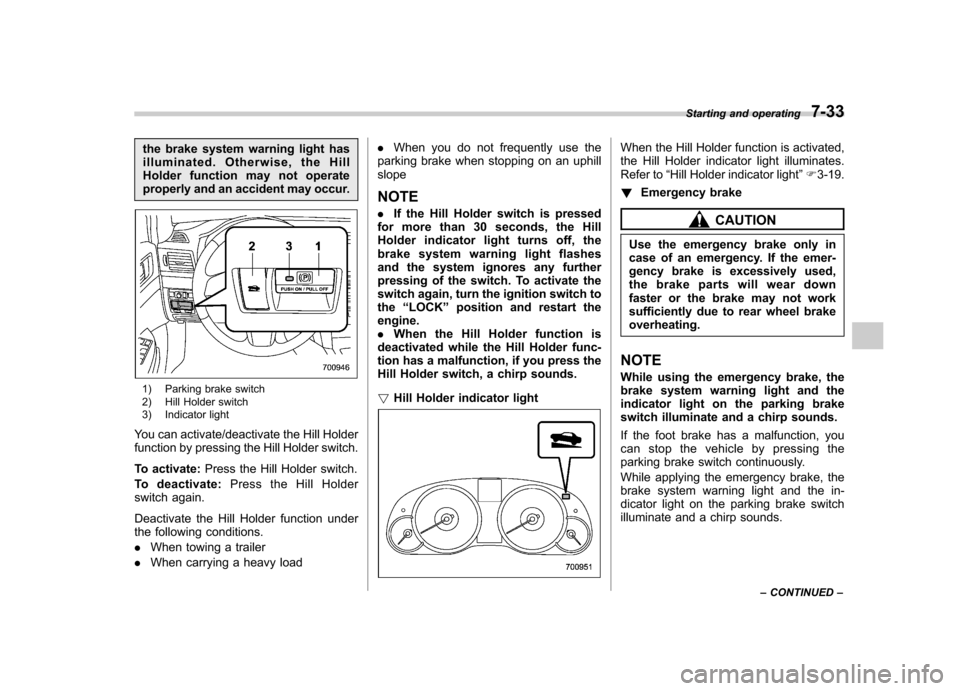
1) Parking brake switch
2) Hill Holder switch
3) Indicator light
You can activate/deactivate the Hill Holder
function by pressing the Hill Holder switch.
To activate: Press the Hill Holder switch.
To deactivate: Press the Hill Holder
switch again.
Deactivate the Hill Holder function under
the following conditions. . When towing a trailer
. When carrying a heavy load .
When you do not frequently use the
parking brake when stopping on an uphill slope NOTE . If the Hill Holder switch is pressed
for more than 30 seconds, the Hill
Holder indicator light turns off, the
brake system warning light flashes
and the system ignores any further
pressing of the switch. To activate the
switch again, turn the ignition switch tothe “LOCK ”position and restart the
engine.. When the Hill Holder function is
deactivated while the Hill Holder func-
tion has a malfunction, if you press the
Hill Holder switch, a chirp sounds. ! Hill Holder indicator light
When the Hill Holder function is activated,
the Hill Holder indicator light illuminates.
Refer to “Hill Holder indicator light ”F 3-19.
! Emergency brake
CAUTION
Use the emergency brake only in
case of an emergency. If the emer-
gency brake is excessively used,
the brake parts will wear down
faster or the brake may not work
sufficiently due to rear wheel brakeoverheating.
NOTE
While using the emergency brake, the
brake system warning light and the
indicator light on the parking brake
switch illuminate and a chirp sounds.
If the foot brake has a malfunction, you
canstopthevehiclebypressingthe
parking brake switch continuously.
While applying the emergency brake, the
brake system warning light and the in-
dicator light on the parking brake switch
illuminate and a chirp sounds. Starting and operating
7-33
– CONTINUED –
Page 311 of 474
7-34Starting and operating
!Electronic parking brake system warning
CAUTION
If the brake system warning light
flashes, the electronic parking brake
system may be malfunctioning. Im-
mediately stop your vehicle in the
nearest safe location and contact
your SUBARU dealer.
If a malfunction occurs in the electronic
parking brake system, the brake system
warning light flashes. Refer to “Electronic
parking brake system warning ”F 3-18. &
Parking tips
When parking your vehicle, always per-
form the following items. . Apply the parking brake.
. For MT models, put the shift lever in the
“ 1 ” (1st) for upgrade or “R ”(Reverse) for a
downgrade.. For AT and CVT models, put the select
lever in the “P ”(Park) position.
Never rely on the transmission alone to
hold the vehicle.
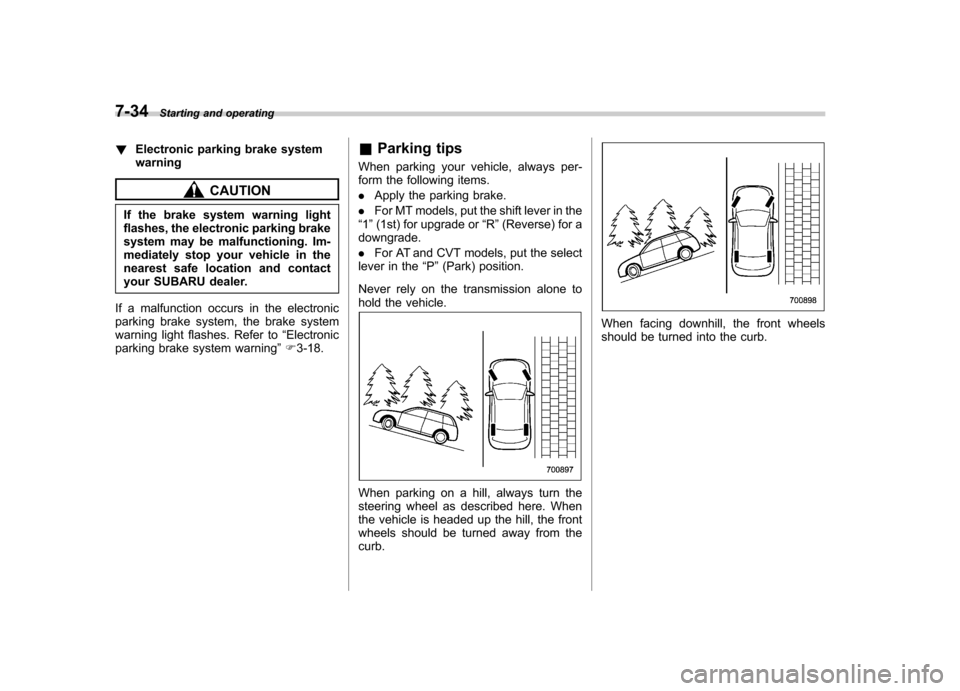
When parking on a hill, always turn the
steering wheel as described here. When
the vehicle is headed up the hill, the front
wheels should be turned away from the curb.
When facing downhill, the front wheels
should be turned into the curb.
Page 313 of 474
7-36Starting and operating
the accelerator pedal.
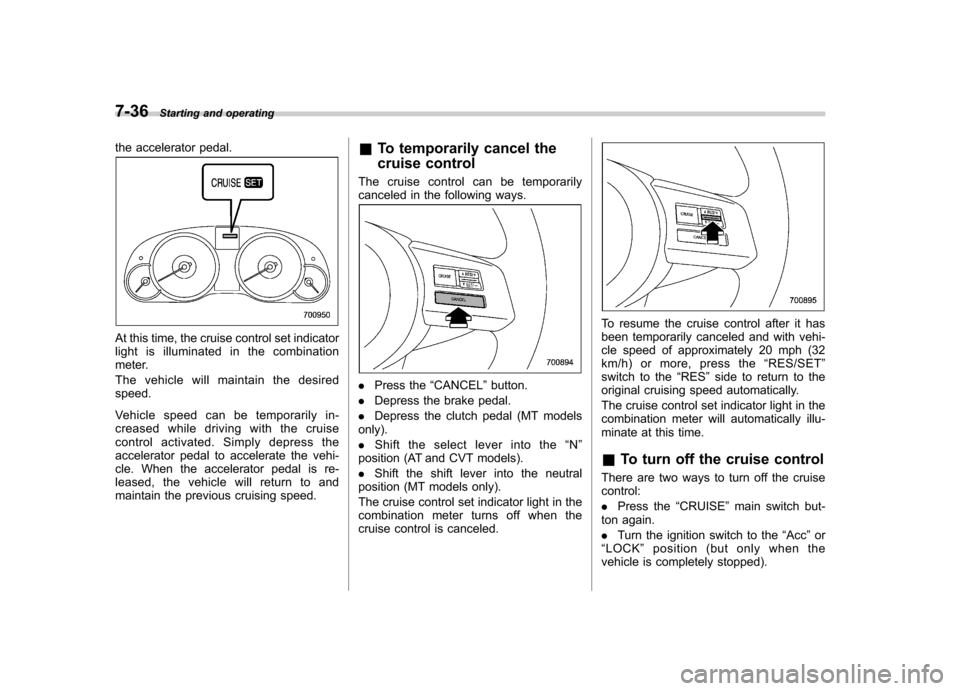
At this time, the cruise control set indicator
light is illuminated in the combination
meter.
The vehicle will maintain the desired speed.
Vehicle speed can be temporarily in-
creased while driving with the cruise
control activated. Simply depress the
accelerator pedal to accelerate the vehi-
cle. When the accelerator pedal is re-
leased, the vehicle will return to and
maintain the previous cruising speed. &
To temporarily cancel the
cruise control
The cruise control can be temporarily
canceled in the following ways.
. Press the “CANCEL ”button.
. Depress the brake pedal.
. Depress the clutch pedal (MT models
only). . Shift the select lever into the “N ”
position (AT and CVT models).. Shift the shift lever into the neutral
position (MT models only).
The cruise control set indicator light in the
combination meter turns off when the
cruise control is canceled.
To resume the cruise control after it has
been temporarily canceled and with vehi-
cle speed of approximately 20 mph (32
km/h) or more, press the “RES/SET ”
switch to the “RES ”side to return to the
original cruising speed automatically.
The cruise control set indicator light in the
combination meter will automatically illu-
minate at this time. & To turn off the cruise control
There are two ways to turn off the cruise control: . Press the “CRUISE ”main switch but-
ton again.. Turn the ignition switch to the “Acc ”or
“ LOCK ”position (but only when the
vehicle is completely stopped).
Page 315 of 474

7-38Starting and operating
vehicle speed and the set speed is less
than 4 mph (6.8 km/h), the set speed can
be lowered 1 mph (1.6 km/h) each time by
pressing the “RES/SET ”switch to the
“ SET ”side quickly.
Except U.S. spec. models
When the difference between the actual
vehicle speed and the set speed is less
than 4.4 km/h, the set speed can be
lowered 1 km/h each time by pressing the“ RES/SET ”switch to the “SET ”side
quickly. ! To decrease the speed (by brake pedal)
1. Depress the brake pedal to release
cruise control temporarily.
2. When the speed decreases to the
desired speed, press the “RES/SET ”
switch to the “SET ”side once. Now the
desired speed is set and the vehicle will
keep running at that speed without de-
pressing the accelerator pedal. &
Cruise control indicator light
Refer to “Cruise control indicator light ”
F 3-23.
& Cruise control set indicator light
Refer to “Cruise control set indicator light ”
F 3-23.
Page 317 of 474

8-2Driving tips
New vehicle break-in driving –the first 1,000 miles (1,600
km)
The performance and long life of your
vehicle are dependent on how you handle
and care for your vehicle while it is new.
Follow these instructions during the first
1,000 miles (1,600 km): . Do not race the engine. And do not
allow engine speed to exceed 4,000 rpm
except in an emergency. . Do not drive at one constant engine or
vehicle speed for a long time, either fast or
slow. . Avoid starting suddenly and rapid
acceleration, except in an emergency.. Avoid hard braking, except in an
emergency.
The same break-in procedures should be
applied to a newly installed or overhauled
engine or when brake pads or brake
linings are replaced with new ones. Fuel economy hints
The following suggestions will help to save
your fuel. .
Select the proper gear position for the
speed and road conditions.. Avoid sudden acceleration or decelera-
tion. Always accelerate gently until you
reach the desired speed. Then try to
maintain that speed for as long aspossible. . Do not pump the accelerator and avoid
racing the engine.. Avoid unnecessary engine idling.
. Keep the engine properly tuned.
. Keep the tires inflated to the correct
pressure shown on the tire placard, which
is located under the door latch on thedriver ’s side. Low pressure will increase
tire wear and fuel consumption. . Use the air conditioner only when
necessary.. Keep the front and rear wheels in
proper alignment.. Avoid carrying unnecessary luggage or
cargo.. The indication of the ECO gauge
shows a reference for saving fuel. For
details, refer to “ECO gauge ”F 3-8. Engine exhaust gas (carbon
monoxide)
WARNING
. Never inhale engine exhaust gas.
Engine exhaust gas contains
carbon monoxide, a colorless
and odorless gas which is dan-
gerous, or even lethal, if inhaled.
. Always properly maintain the en-
gine exhaust system to prevent
engine exhaust gas from enter-
ing the vehicle.
. Never run the engine in a closed
space, such as a garage, except
for the brief time needed to drive
the vehicle in or out of it.
. Avoid remaining in a parked
vehicle for a long time while the
engine is running. If that is
unavoidable, then use the venti-
lation fan to force fresh air into
the vehicle.
. Always keep the front ventilator
inlet grille free from snow, leaves
or other obstructions to ensure
that the ventilation system al-
ways works properly.
. If at any time you suspect that