2012 SUBARU OUTBACK CD player
[x] Cancel search: CD playerPage 213 of 474
5-30Audio
your SUBARU dealer. !When “No audio file ”is displayed
(type C audio)
Press the
button to eject the disc.
This message appears when a CD has
been loaded that does not contain any
playable files. Insert a CD that contains
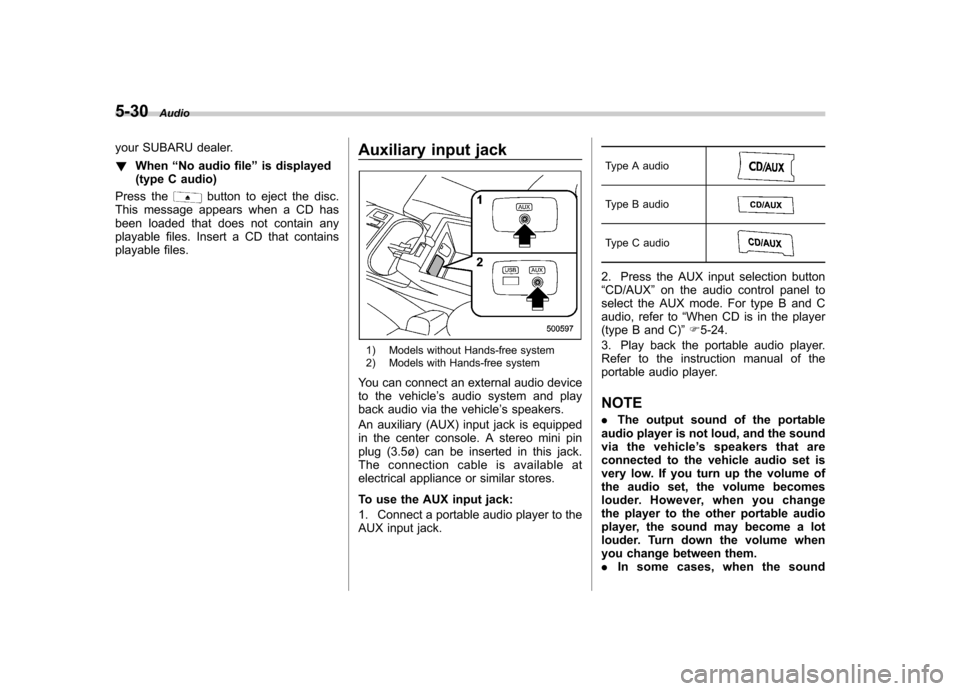
playable files. Auxiliary input jack
1) Models without Hands-free system
2) Models with Hands-free system
You can connect an external audio device
to the vehicle ’s audio system and play
back audio via the vehicle ’s speakers.
An auxiliary (AUX) input jack is equipped
in the center console. A stereo mini pin
plug (3.5ø) can be inserted in this jack.
The connection cable is available at
electrical appliance or similar stores.
To use the AUX input jack:
1. Connect a portable audio player to the
AUX input jack. Type A audio
Type B audio
Type C audio
2. Press the AUX input selection button “
CD/AUX ”on the audio control panel to
select the AUX mode. For type B and C
audio, refer to “When CD is in the player
(type B and C) ”F 5-24.
3. Play back the portable audio player.
Refer to the instruction manual of the
portable audio player. NOTE . The output sound of the portable
audio player is not loud, and the sound
via the vehicle ’s speakers that are
connected to the vehicle audio set is
very low. If you turn up the volume of
the audio set, the volume becomes
louder. However, when you change
the player to the other portable audio
player, the sound may become a lot
louder. Turn down the volume when
you change between them.. In some cases, when the sound
Page 214 of 474

volume of the portable audio player is
low, the sound quality may become
impaired when you turn up the volume
of the vehicle audio system. In this
case, adjust the sound volume of the
portable audio player..In some cases, noise occurs be-
cause of a bad connection between the
portable player and the audio system.
Try cleaning the stereo jack and audioplug.. If noise is not reduced, check for
disconnection of the cord or a malfunc-
tion of the portable player. Precautions to observe when
handling a compact disc
Use only compact discs (CDs, CD-Rs and
CD-RWs) that have the mark shown in the
following illustration. Also, some compact
discs cannot be played.
Audio
5-31
– CONTINUED –
Page 215 of 474
5-32Audio
.You cannot use a DualDisc in the CD
player. If you insert a DualDisc into the
player, the disc may not come out again,
possibly causing the player to malfunction. . In cold and/or rainy weather, dew can
form inside the CD player, preventing
normal operation. If this happens, eject
the CD and wait for the player to dry out. . Skipping may occur when the CD
player is subjected to severe vibration
(for example, when the vehicle is driven
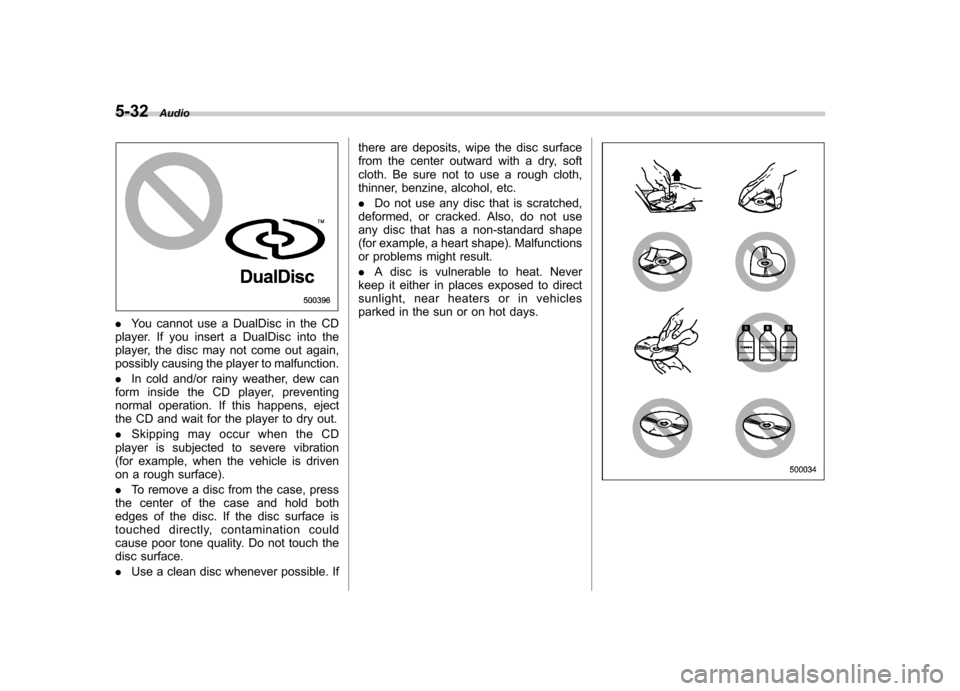
on a rough surface). . To remove a disc from the case, press
the center of the case and hold both
edges of the disc. If the disc surface is
touched directly, contamination could
cause poor tone quality. Do not touch the
disc surface. . Use a clean disc whenever possible. If there are deposits, wipe the disc surface
from the center outward with a dry, soft
cloth. Be sure not to use a rough cloth,
thinner, benzine, alcohol, etc. .
Do not use any disc that is scratched,
deformed, or cracked. Also, do not use
any disc that has a non-standard shape
(for example, a heart shape). Malfunctions
or problems might result. . A disc is vulnerable to heat. Never
keep it either in places exposed to direct
sunlight, near heaters or in vehicles
parked in the sun or on hot days.
Page 218 of 474
operation, disconnect the connection
cable from the iPod®and reset it. For
the resetting procedure, see the User ’s
Guide of the iPod
®.
. If an iPod®and the connection cable
are connected improperly, the iPod®
cannot be powered on or will not be
recognized by in-vehicle equipment. In
this case, disconnect the connection
cable from the iPod
®, and then connect
it again.
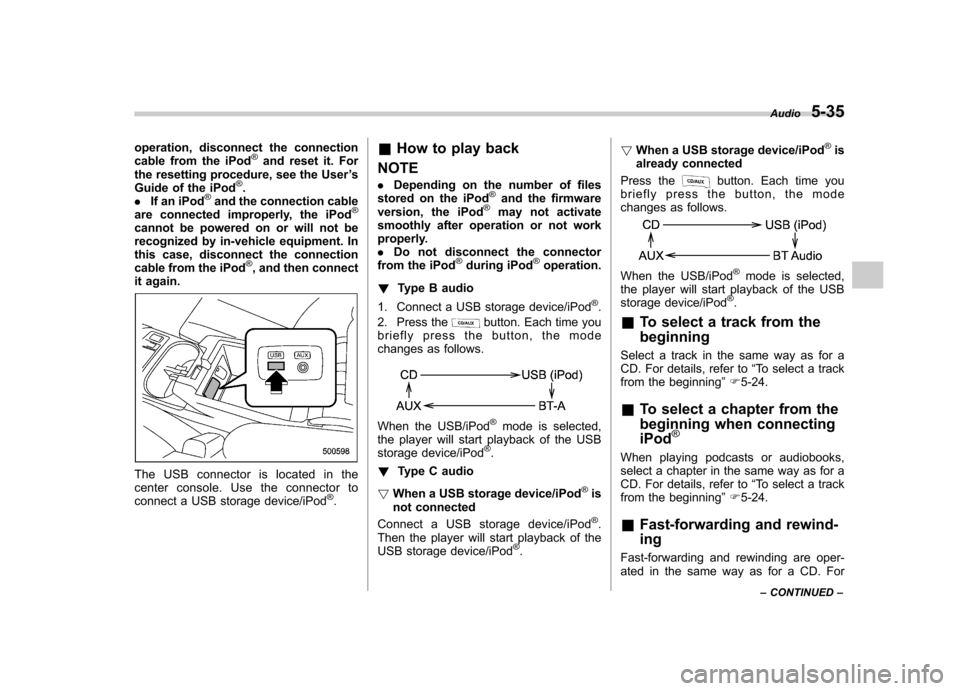
The USB connector is located in the
center console. Use the connector to
connect a USB storage device/iPod
®. &
How to play back
NOTE . Depending on the number of files
stored on the iPod
®and the firmware
version, the iPod®may not activate
smoothly after operation or not work
properly.. Do not disconnect the connector
from the iPod
®during iPod®operation.
! Type B audio
1. Connect a USB storage device/iPod
®.
2. Press the
button. Each time you
briefly press the button, the mode
changes as follows.
When the USB/iPod®mode is selected,
the player will start playback of the USB
storage device/iPod
®.
! Type C audio
! When a USB storage device/iPod
®is
not connected
Connect a USB storage device/iPod
®.
Then the player will start playback of the
USB storage device/iPod
®. !
When a USB storage device/iPod
®is
already connected
Press the
button. Each time you
briefly press the button, the mode
changes as follows.
When the USB/iPod®mode is selected,
the player will start playback of the USB
storage device/iPod
®.
& To select a track from the beginning
Select a track in the same way as for a
CD. For details, refer to “To select a track
from the beginning ”F 5-24.
& To select a chapter from the
beginning when connectingiPod
®
When playing podcasts or audiobooks,
select a chapter in the same way as for a
CD. For details, refer to “To select a track
from the beginning ”F 5-24.
& Fast-forwarding and rewind- ing
Fast-forwarding and rewinding are oper-
ated in the same way as for a CD. For Audio
5-35
– CONTINUED –
Page 224 of 474
Audio control buttons NOTE
For models with the genuine SUBARU
navigation system, refer to the Owner’s
Manual supplement for the navigationsystem.
Models without Hands-free system
Models with Hands-free system
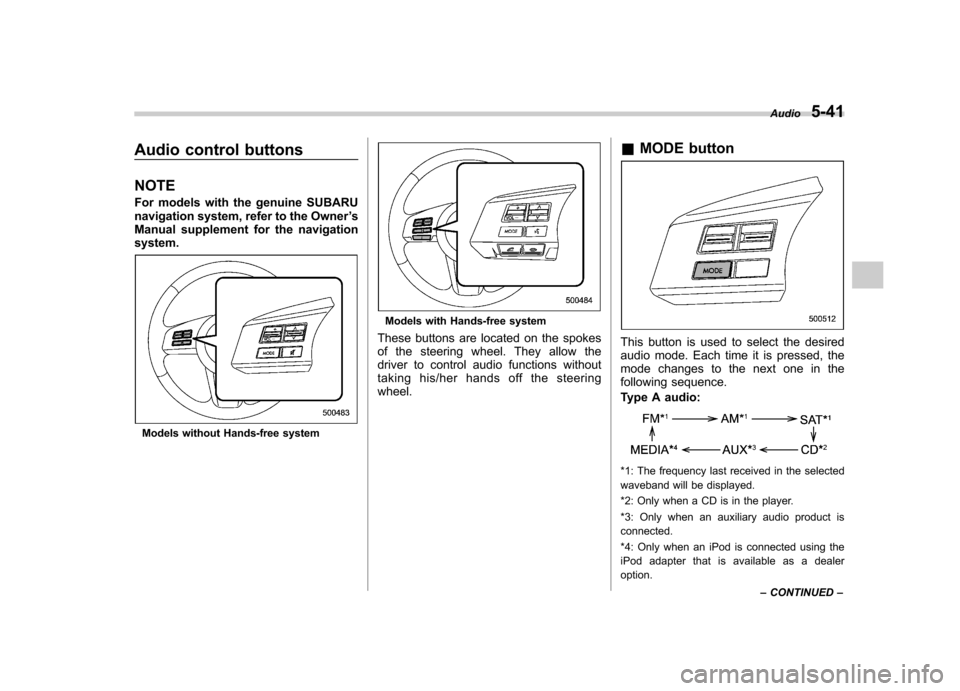
These buttons are located on the spokes
of the steering wheel. They allow the
driver to control audio functions without
taking his/her hands off the steeringwheel. &
MODE button
This button is used to select the desired
audio mode. Each time it is pressed, the
mode changes to the next one in the
following sequence.
Type A audio:
*1: The frequency last received in the selected
waveband will be displayed.
*2: Only when a CD is in the player.
*3: Only when an auxiliary audio product is connected.
*4: Only when an iPod is connected using the
iPod adapter that is available as a dealer option. Audio
5-41
– CONTINUED –
Page 225 of 474

5-42Audio
Type B audio:
*1: The frequency last received in the selected
waveband will be displayed.
*2: Only when a CD is in the player.
*3: Only when the device is connected.
Type C audio:
*1: The frequency last received in the selected
waveband will be displayed.
*2: Only when a CD is in the player.
*3: Only when the device is connected. ! Type B audio
Press and hold this button if you wish to
immediately cut the volume to zero.
The audio display will show “MUTE ”.
If you press and hold the button again, the
original sound volume will return and “
MUTE ”turns off.
& “
”and “”switch
! With radio mode selected
Press the switch to the “
”or “”side
briefly to skip to a preset channel. Press
and hold the switch to the “
”or “”side
to seek the next receivable station and
stop at it.
That station ’s frequency will be indicated
on the audio display. ! With CD/USB/Bluetooth
®audio
mode selected
Press the switch to the “
”side briefly to
skip forward in the track/file order. Press
the switch to the “
”side briefly to skip
backward in the track/file order. The track/file number will be shown on the
audio display.
For type B and C audio, when the MP3/
WMA/AAC format track is playing, press
and hold the switch to the
“
”side to
select the next folder. Press and hold the
switch to the “
”side to go back to the
previous folder. ! With iPod
®mode selected (type B
and C audio)
Press the switch to the “
”side to skip
forward in the track/file order. Press the
switch to the “
”side to skip backward in
the track/file order. The track/file number
will be shown on the audio display. ! With SAT mode selected (type C audio)
Press the switch to the “
”or “”side
briefly. The radio will seek the next preset
channel and stop at it.
Press and hold the switch to the “
”or
“” side. The radio will seek the next
receivable channel and stop at it.
The channel will be shown on the audio
display.
Page 228 of 474

entered.
2. Input the new passkey (a 4 - 8 digit
number) by operating the “TUNE ”dial.
3. Select the “CONFIRM ”menu.
– The new passkey is displayed, the
passkey is changed and the mode
changes to the Bluetooth
®audio
setting mode.
! Deleting device
1. Select the “DELETE AUDIO ”menu.
– If no devices are registered,
“ EMPTY ”is displayed and the mode
changes to the Bluetooth
®audio
setting mode.
2. Select the “CONFIRM ”menu.
–“ DELETED ”is displayed and the
mode changes to the Bluetooth
®
audio setting mode.
& Setting Bluetooth
®audio
(type C audio)
1. Press the
button to select the
“ BT Audio ”mode.
Talk switch
2. Press the talk switch
.
NOTE
If a device and a cell phone are already
registered, “BT ”menu will be dis-
played. Then perform the followingprocedure.
(1) Press the talk switch
and
say “Setup ”.
(2) Press the talk switch
again
and say “Bluetooth audio setup ”.
The “BT Audio Setup ”will then be
displayed.
3. After the “BT Audio Setup ”menu is
displayed, select the following menus by
using the voice command system or by
operating the “TUNE ”dial. NOTE .
You cannot set Bluetooth
®audio
while driving. . After the ignition switch is turned to
the “LOCK ”position, the registered
device/cell phone may be automatically
connected to the system if the ignition
switch is turned to the “Acc ”or “ON ”
position.. When a cell phone is already con-
nected, the system will disconnect the
phone to setup a new device. You may
need to reconnect the phone after
setup is complete.. Up to 2 devices (excluding cell
phones for Hands-free system) can beregistered.. Up to 6 devices (including cell
phones for Hands-free system) can beregistered. ! By using voice command system
NOTE
If no devices are registered, you can
only select from the following menu. . “Pair audio player ”(refer to “Regis-
tering (paring) device ”F 5-46)
. “Set passkey ”(refer to “Selecting
device ”F 5-46) Audio
5-45
– CONTINUED –
Page 229 of 474
5-46Audio
! Registering (paring) device
1. Press the talk switch
and say “Pair
audio player ”.
2. Press the talk switch
and say the
name of the device to be registered.
3. Press the talk switch
.
4. Say “Confirm ”to register the device, or
say “Go back ”to go back.
5. After saying “Confirm ”, the passkey
will be shown on the display. Then input
the passkey into the device.
–If the registering procedure is fin-
ished, “Audio Players Paired. ”will be
displayed. – If the registering procedure was not
successful, “Unable to pair audio
players. ”will be displayed.
! Selecting device
1. Press the talk switch
and say
“ Select audio player ”.
2. Press the talk switch
.
3. Say the name of the registered device, or “List audio players ”and select the
registered device (for details, refer to “List
audio player function ”F 5-46).
4. Press the talk switch
and say
“ Confirm ”.
5. Press the talk switch
and say
“ From car ”or “From audio ”. 6. Press the talk switch
.
7. Say “Confirm ”to select the device, or
say “Go back ”to go back.
– If the device is connected, “Se-
lected ”will be displayed.
– If the device cannot be connected,
“ Failed ”will be displayed.
! Changing the registered name
1. Press the talk switch
and say
“ Change name ”.
2. Press the talk switch
.
3. Say the name of the registered device, or “List audio players ”and select the
registered device (for details, refer to “List
audio player function ”F 5-46).
4. Press the talk switch
.
5. Say “Confirm ”to select the device, or
say “Go back ”to go back.
6. After saying “Confirm ”, press the talk
switch
.
7. Say a new name to be registered.
8. Press the talk switch
.
9. Say “Confirm ”to change the name, or
say “Go back ”to go back.
– If the name is changed, “Name
changed. ”will be displayed.
! List audio player function
The names of the registered devices are spoken by using the list audio player
function. To use the list audio player
function, perform the following procedure.
1. Press the talk switch
and say
“List
audio player ”.
– The names will then be spoken.
2. Press the talk switch
while the
name is being spoken to select the device.
–After the talk switch is pressed,
“ Audio player selected. ”will be dis-
played.
3. Press the talk switch
and say the
following words.
.“Select audio player ”(refer to “Se-
lecting device ”F 5-46)
. “Change name ”(refer to “Changing
the registered name ”F 5-46)
. “Delete audio player ”(refer to “De-
leting device ”F 5-47)
! Setting passkey
1. Press the talk switch
and say “Set
passkey ”.
2. Press the talk switch
and say the
new passkey (a 4 - 8 digit number).
3. Press the talk switch
.
4. Say “Confirm ”to set the passkey, or
say “Go back ”to go back.
– If the passkey is set, the new
passkey will be displayed.