2012 SUBARU IMPREZA WRX transmission
[x] Cancel search: transmissionPage 259 of 416
7-16Starting and operating
&Driving tips
Do not drive with your foot resting on the
clutch pedal and do not use the clutch to
hold your vehicle at a standstill on an
upgrade. Either of those actions may
cause clutch damage.
Do not drive with your hand resting on the
shift lever. This may cause wear on the
transmission components.
When it is necessary to reduce vehicle
speed due to slow traffic, turning corners,
or driving up steep hills, downshift to a
lower gear before the engine starts to
labor.
On steep downgrades, downshift the
transmission to 5th, 4th, 3rd or 2nd gear
as necessary; this helps to maintain a safe
speed and to extend brake pad life.
In this way, the engine provides a braking
effect. Remember, if you “ride ”(over use)
the brakes while descending a hill, they
may overheat and not work properly.
The engine may, on rare occasions, knock
when the vehicle rapidly accelerates or
rapidly pulls away from a standstill. This
phenomenon does not indicate a malfunc-tion. Manual transmission
–5
speeds (except STI)
The manual transmission is a fully syn-
chromeshed, 5-forward-speed and 1-re-
verse-speed transmission.
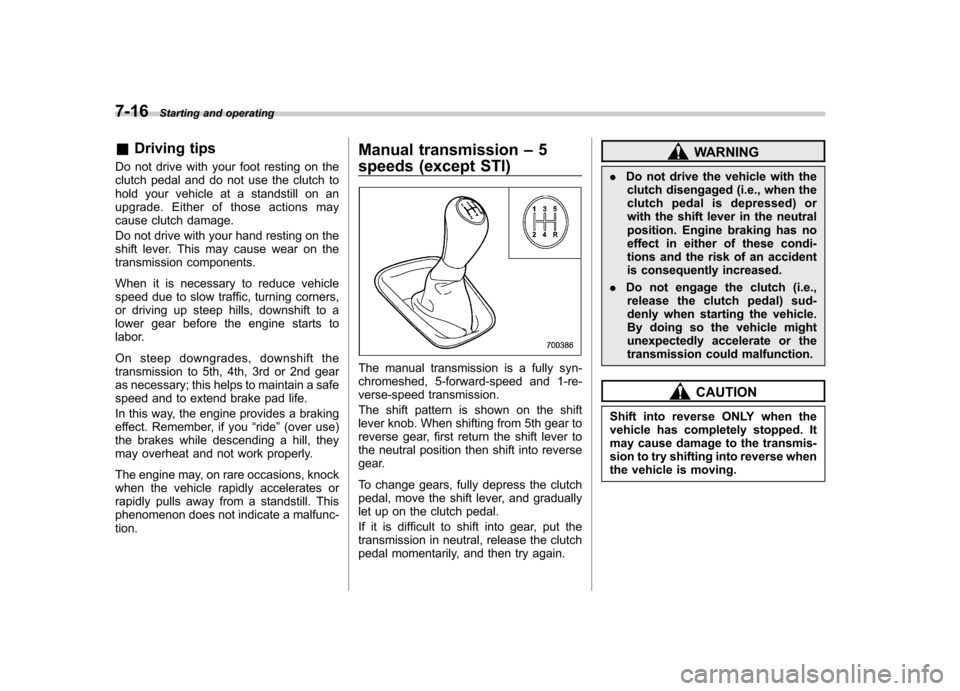
The shift pattern is shown on the shift
lever knob. When shifting from 5th gear to
reverse gear, first return the shift lever to
the neutral position then shift into reverse
gear.
To change gears, fully depress the clutch
pedal, move the shift lever, and gradually
let up on the clutch pedal.
If it is difficult to shift into gear, put the
transmission in neutral, release the clutch
pedal momentarily, and then try again.
WARNING
. Do not drive the vehicle with the
clutch disengaged (i.e., when the
clutch pedal is depressed) or
with the shift lever in the neutral
position. Engine braking has no
effect in either of these condi-
tions and the risk of an accident
is consequently increased.
. Do not engage the clutch (i.e.,
release the clutch pedal) sud-
denly when starting the vehicle.
By doing so the vehicle might
unexpectedly accelerate or the
transmission could malfunction.
CAUTION
Shift into reverse ONLY when the
vehicle has completely stopped. It
may cause damage to the transmis-
sion to try shifting into reverse when
the vehicle is moving.
Page 260 of 416
&Shifting speeds
! Recommended shifting speeds
The best compromise between fuel econ-
omy and vehicle performance during
normal driving is ensured by shifting up
at the speeds listed in the following table.
Shift up mph (km/h)
1st to 2nd 15 (24)
2nd to 3rd 25 (40)
3rd to 4th 40 (64)4th to 5th 45 (72)
! Maximum allowable speeds
The following table shows the maximum
speeds that are possible with each differ-
ent gear. The tachometer ’s needle will
enter the red area if these speeds areexceeded.
With the exception of cases where sudden
acceleration is required, the vehicle
should not be driven with the tachometer ’s
needle inside the red area. Failure to
observe this precaution can lead to
excessive engine wear and poor fuel
economy. mph (km/h)
1st 37 (61)
2nd 64 (104)
WARNING
When shifting down a gear, ensure
that the vehicle is not travelling at a
speed exceeding the Maximum Al-
lowable Speed for the gear which is
about to be selected. Failure to
observe this precaution can lead to
engine over-revving and this in turn
can result in engine damage.
In addition, sudden application of
engine brakes when the vehicle is
travelling on a slippery surface can
lead to wheel locking; as a conse-
quence, control of the vehicle may
be lost and the risk of an accidentincreased.
NOTE
Never exceed the posted speed limit. & Driving tips
Do not drive with your foot resting on the
clutch pedal and do not use the clutch to
hold your vehicle at a standstill on an
upgrade. Either of those actions may
cause clutch damage. Do not drive with your hand resting on the
shift lever. This may cause wear on the
transmission components.
When it is necessary to reduce vehicle
speed due to slow traffic, turning corners,
or driving up steep hills, downshift to a
lower gear before the engine starts to
labor.
On steep downgrades, downshift the
transmission to 4th, 3rd or 2nd gear as
necessary; this helps to maintain a safe
speed and to extend brake pad life.
In this way, the engine provides a braking
effect. Remember, if you
“ride ”(over use)
the brakes while descending a hill, they
may overheat and not work properly.
The engine may, on rare occasions, knock
when the vehicle rapidly accelerates or
rapidly pulls away from a standstill. This
phenomenon is not an indication of a
problem in your vehicle. Starting and operating
7-17
Page 276 of 416

CAUTION
. Do not place metal film or any
metal parts in the cargo area/
trunk. This may cause poor re-
ception of the signals from the
tire pressure sensors, and the
tire pressure monitoring system
will not function properly.
. FCC WARNING
Changes or modifications not
expressly approved by the party
responsible for compliance
could void the user ’s authority
to operate the equipment.
NOTE
This device complies with Part 15 of
the FCC Rules and RSS-Gen of IC
Rules. Operation is subject to the
following two conditions: (1) this de-
vice may not cause harmful interfer-
ence, and (2) this device must accept
any interference received, including
interference that may cause undesiredoperation. Parking your vehicle &
Parking brake
To set the parking brake, depress the
brake pedal firmly and hold it down until
the parking brake lever is fully pulled up.
To release the parking brake, pull the lever
up slightly, press the release button, then
lower the lever while keeping the button pressed.
When the parking brake is set while the
engine is running, the parking brake
warning light illuminates. After starting
the vehicle, be sure that the warning light
has turned off before the vehicle is driven.
Refer to “Parking brake warning ”F 3-19.
CAUTION
Never drive while the parking brake
is set because this will cause un-
necessary wear on the brake lin-
ings. Before starting to drive, always
make sure that the parking brake
has been fully released.
& Parking tips
When parking your vehicle, always per-
form the following items. . Apply the parking brake firmly.
. Put the shift lever in “1 ” (1st) for an
upgrade or “R ” (Reverse) for a down-
grade.
Never rely on the transmission alone to
hold the vehicle. Starting and operating
7-33
– CONTINUED –
Page 288 of 416
lead to loss of vehicle control.
. You must install four tires that are
of the same size, circumferences,
construction, manufacturer,
brand (tread pattern), degree of
wear, speed symbol and load
index. Mixing tires of other sizes,
circumferences or constructions
may result in severe mechanical
damage to the drive train of your
vehicle and may affect ride,
handling, braking and speed-
ometer/odometer calibration. It
also may be dangerous and lead
to loss of vehicle control.
CAUTION
If you use a temporary spare tire to
replace a flat tire, be sure to use the
original temporary spare tire stored
in the vehicle. Using other sizes may
result in severe mechanical damage
to the drive train of your vehicle.
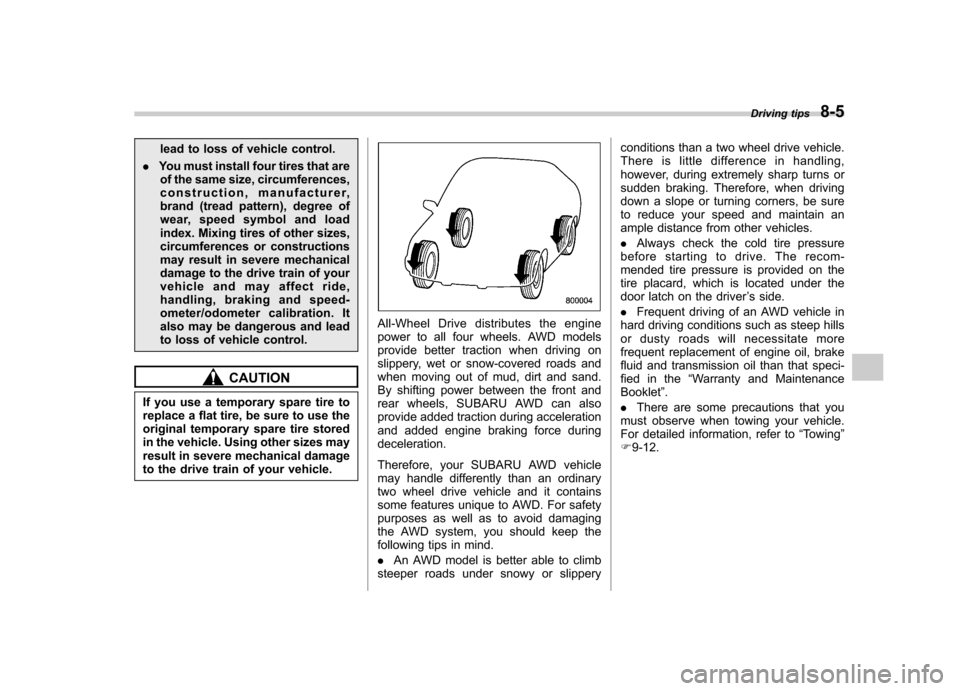
All-Wheel Drive distributes the engine
power to all four wheels. AWD models
provide better traction when driving on
slippery, wet or snow-covered roads and
when moving out of mud, dirt and sand.
By shifting power between the front and
rear wheels, SUBARU AWD can also
provide added traction during acceleration
and added engine braking force duringdeceleration.
Therefore, your SUBARU AWD vehicle
may handle differently than an ordinary
two wheel drive vehicle and it contains
some features unique to AWD. For safety
purposes as well as to avoid damaging
the AWD system, you should keep the
following tips in mind. . An AWD model is better able to climb
steeper roads under snowy or slippery conditions than a two wheel drive vehicle.
There is little difference in handling,
however, during extremely sharp turns or
sudden braking. Therefore, when driving
down a slope or turning corners, be sure
to reduce your speed and maintain an
ample distance from other vehicles. .
Always check the cold tire pressure
before starting to drive. The recom-
mended tire pressure is provided on the
tire placard, which is located under the
door latch on the driver ’s side.
. Frequent driving of an AWD vehicle in
hard driving conditions such as steep hills
or dusty roads will necessitate more
frequent replacement of engine oil, brake
fluid and transmission oil than that speci-
fied in the “Warranty and Maintenance
Booklet ”.
. There are some precautions that you
must observe when towing your vehicle.
For detailed information, refer to “Towing ”
F 9-12. Driving tips
8-5
Page 292 of 416
.You must install four winter tires
that are of the same size, circum-
ference, construction, manufac-
turer, brand (tread pattern), de-
gree of wear, speed symbol and
load index. Mixing tires of other
sizes or constructions may result
in severe mechanical damage to
the drive train of your vehicle and
may affect ride, handling, braking
and speedometer/odometer cali-
bration. It also may be dangerous
and lead to loss of vehicle con-trol.
. Do not use a combination of
radial, belted bias or bias tires
since it may cause dangerous
handling characteristics and lead
to an accident.
Your vehicle is equipped with “summer
tires ”as original equipment, which are
inadequate for driving on slippery roads
such as on snow-covered or icy roads.
Compared with winter and all-season
tires, summer tires give significantly less
grip on snowy and icy road surfaces.
Therefore, use of winter tires is strongly
recommended when driving with such
road conditions.
When you choose to install winter tires on
your vehicle, be sure to use the correct tire size and type. You must install four winter
tires that are of the same size, construc-
tion, brand and load range and you should
never mix radial, belted bias or bias tires
since this may result in dangerous hand-
ling characteristics. When you choose a
tire, make sure that there is enough
clearance between the tire and vehicle
body.
Remember to drive with care at all times
regardless of the type of tires on yourvehicle.
& Tire chains
CAUTION
Tire chains cannot be used on your
Impreza, WRX and STI because of
the lack of clearance between the
tires and vehicle body.
& Rocking the vehicle
If you must rock the vehicle to free it from
snow, sand, or mud, depress the accel-
erator pedal slightly and move the shift
lever back and forth between “1 ” and “R ”
repeatedly. Do not race the engine. For
the best possible traction, avoid spinning
the wheels when trying to free the vehicle. When the road surface is extremely
slippery, you can obtain better traction by
starting the vehicle with the transmission
in 2nd than 1st.
Driving tips
8-9
Page 312 of 416
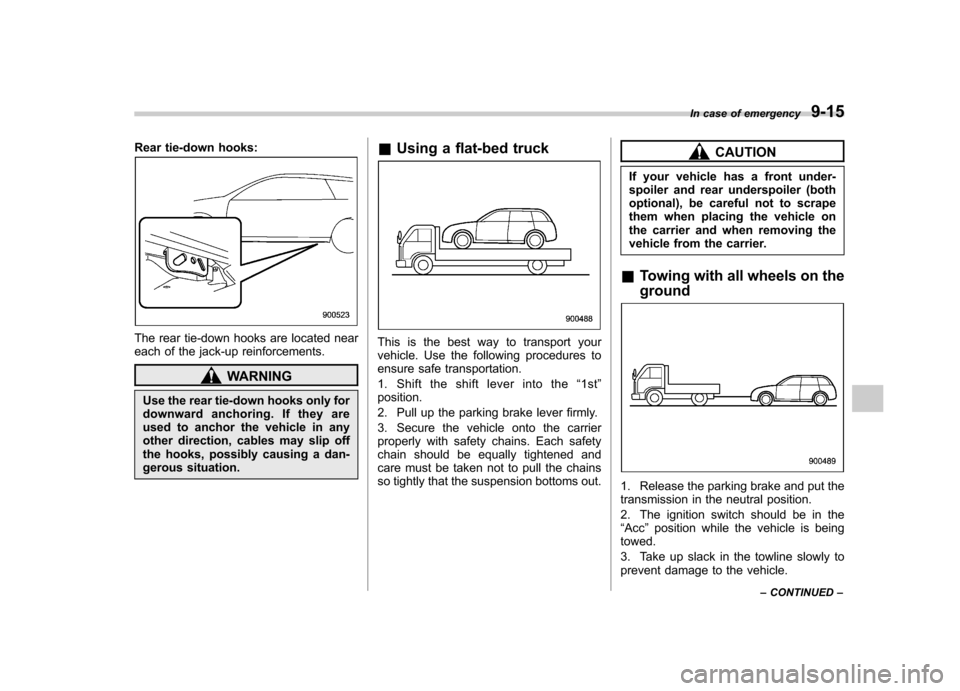
Rear tie-down hooks:
The rear tie-down hooks are located near
each of the jack-up reinforcements.
WARNING
Use the rear tie-down hooks only for
downward anchoring. If they are
used to anchor the vehicle in any
other direction, cables may slip off
the hooks, possibly causing a dan-
gerous situation. &
Using a flat-bed truck
This is the best way to transport your
vehicle. Use the following procedures to
ensure safe transportation.
1. Shifttheshiftleverintothe “1st ”
position.
2. Pull up the parking brake lever firmly.
3. Secure the vehicle onto the carrier
properly with safety chains. Each safety
chain should be equally tightened and
care must be taken not to pull the chains
so tightly that the suspension bottoms out.
CAUTION
If your vehicle has a front under-
spoiler and rear underspoiler (both
optional), be careful not to scrape
them when placing the vehicle on
the carrier and when removing the
vehicle from the carrier.
& Towing with all wheels on the ground
1. Release the parking brake and put the
transmission in the neutral position.
2. The ignition switch should be in the “Acc ”position while the vehicle is being
towed.
3. Take up slack in the towline slowly to
prevent damage to the vehicle. In case of emergency
9-15
– CONTINUED –
Page 313 of 416
9-16In case of emergency
WARNING
. Never turn the ignition switch to
the “LOCK ”position while the
vehicle is being towed because
the steering wheel and the direc-
tion of the wheels will be locked.
. Remember that the brake booster
and power steering do not func-
tion when the engine is not
running. Because the engine is
turned off, it will take greater
effort to operate the brake pedal
and steering wheel.
CAUTION
. If transmission failure occurs,
transport your vehicle on a flat-
bed truck.
. Do not run the engine while being
towed using this method. Trans-
mission damage could result if
the vehicle is towed with the
engine running. Rear gate
–if the rear gate
cannot be unlocked
In the event that you cannot unlock the
rear gate by operating the power door
locking switches or the remote keyless
entry system, you can unlock it from inside
the cargo area.
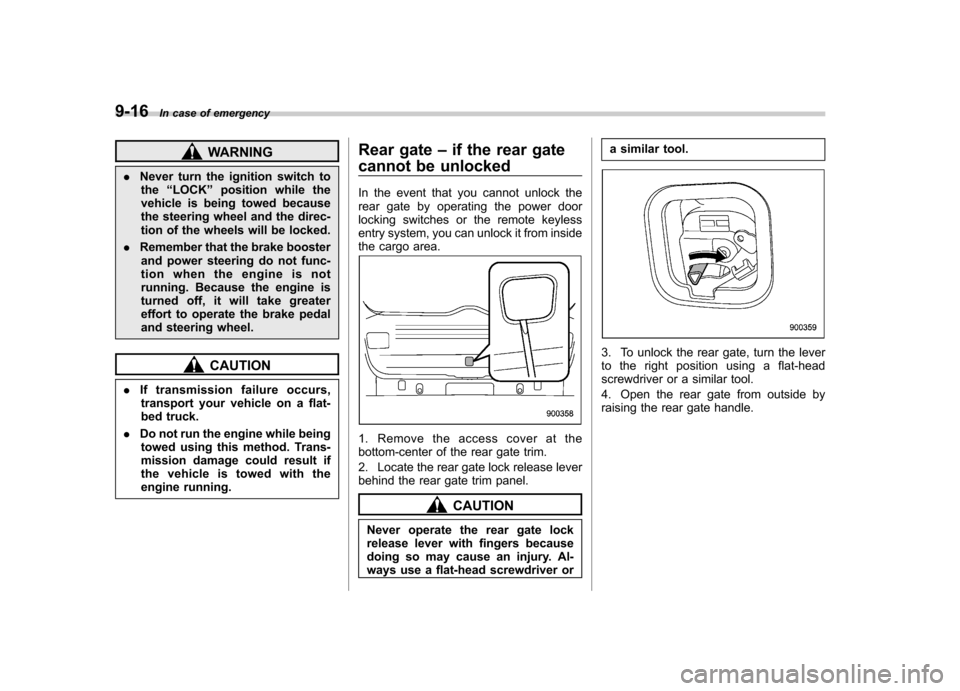
1. Remove the access cover at the
bottom-center of the rear gate trim.
2. Locate the rear gate lock release lever
behind the rear gate trim panel.
CAUTION
Never operate the rear gate lock
release lever with fingers because
doing so may cause an injury. Al-
ways use a flat-head screwdriver or a similar tool.
3. To unlock the rear gate, turn the lever
to the right position using a flat-head
screwdriver or a similar tool.
4. Open the rear gate from outside by
raising the rear gate handle.
Page 322 of 416

Maintenance schedule....................................... 11-3
Maintenance precautions ................................... 11-3
Before checking or servicing in the engine compartment .................................................... 11-4
When checking or servicing in the engine compartment .................................................... 11-4
When checking or servicing in the engine compartment while the engine is running .......... 11-5
Engine hood ....................................................... 11-5
Engine compartment overview .......................... 11-6
Turbo models except STI .................................... 11-6
STI..................................................................... 11-7
Engine oil ............................................................ 11-8
Checking the oil level ......................................... 11-8
Changing the oil and oil filter .............................. 11-9
Recommended grade and viscosity .................. 11-10
Synthetic oil ..................................................... 11-10
Cooling system ................................................ 11-11
Cooling fan, hose and connections ................... 11-11
Engine coolant ................................................. 11-12
Air cleaner element .......................................... 11-13
Replacing the air cleaner element ..................... 11-13
Spark plugs ...................................................... 11-14
Recommended spark plugs .............................. 11-14
Drive belts ........................................................ 11-15
Manual transmission oil .................................. 11-15
Checking the oil level ....................................... 11-15
Recommended grade and viscosity .................. 11-16
Rear differential gear oil .................................. 11-16
Recommended grade and viscosity .................. 11-16Power steering fluid
........................................ 11-17
Checking the fluid level .................................... 11-17
Recommended fluid ......................................... 11-17
Brake fluid ........................................................ 11-18
Checking the fluid level .................................... 11-18
Recommended brake fluid ............................... 11-18
Clutch fluid ....................................................... 11-19
Checking the fluid level .................................... 11-19
Recommended clutch fluid ............................... 11-19
Brake booster .................................................. 11-20
Brake pedal ...................................................... 11-20
Checking the brake pedal free play .................. 11-20
Checking the brake pedal reserve distance....... 11-21
Clutch pedal ..................................................... 11-21
Checking the clutch function ............................ 11-21
Checking the clutch pedal free play .................. 11-21
Hill start assist system .................................... 11-22
Replacement of brake pad and lining ............ 11-22
Breaking-in of new brake pads and linings ....... 11-22
Parking brake stroke ....................................... 11-23
Tires and wheels .............................................. 11-23
Types of tires ................................................... 11-23
Tire pressure monitoring system (TPMS) (if equipped) ...................................................... 11-24
Tire inspection ................................................. 11-25
Tire pressures and wear .................................. 11-25
Wheel balance ................................................. 11-27
Wear indicators ............................................... 11-28
Tire rotation direction mark .............................. 11-28
Tire rotation ..................................................... 11-29
Maintenance and service
11