2012 SUBARU IMPREZA WRX run flat
[x] Cancel search: run flatPage 303 of 416

9-6In case of emergency
.Always turn off the engine before
raising the flat tire off the ground
using the jack. Never swing or
push the vehicle supported with
the jack. The jack can come out
of the jacking point due to a jolt
and this can result in a severeaccident.
1. Park on a hard, level surface, when-
ever possible, then stop the engine.
2. Set the parking brake securely and
shift the shift lever in reverse.
3. Turn on the hazard warning flasher
and have everyone get out of the vehicle.
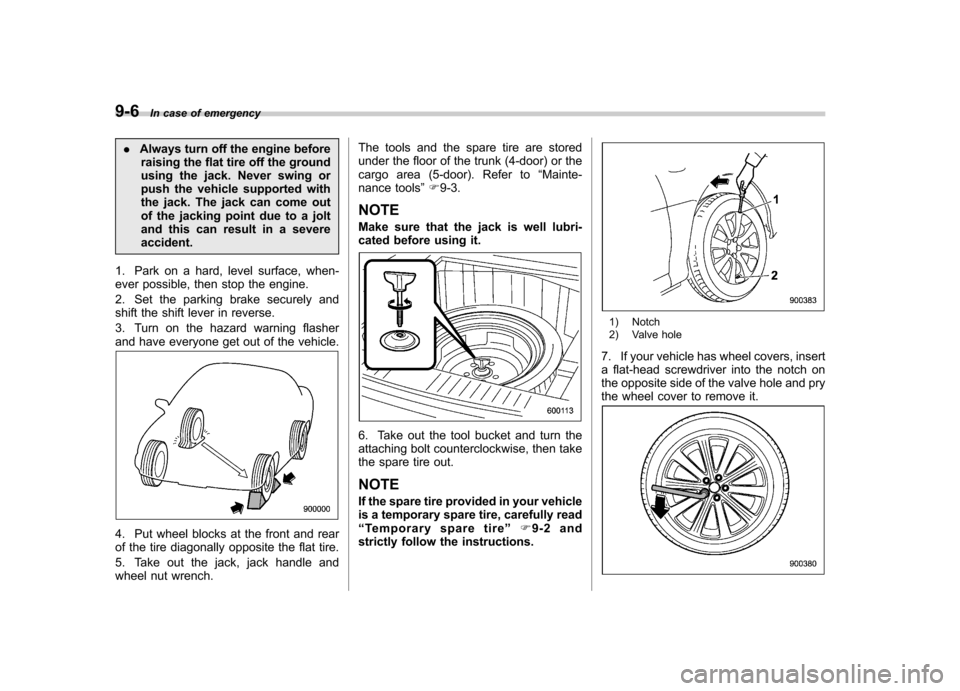
4. Put wheel blocks at the front and rear
of the tire diagonally opposite the flat tire.
5. Take out the jack, jack handle and
wheel nut wrench. The tools and the spare tire are stored
under the floor of the trunk (4-door) or the
cargo area (5-door). Refer to
“Mainte-
nance tools ”F 9-3.
NOTE
Make sure that the jack is well lubri-
cated before using it.
6. Take out the tool bucket and turn the
attaching bolt counterclockwise, then take
the spare tire out. NOTE
If the spare tire provided in your vehicle
is a temporary spare tire, carefully read“ Temporary spare tire ”F9-2 and
strictly follow the instructions.
1) Notch
2) Valve hole
7. If your vehicle has wheel covers, insert
a flat-head screwdriver into the notch on
the opposite side of the valve hole and pry
the wheel cover to remove it.
Page 305 of 416

9-8In case of emergency
WARNING
Do not use oil or grease on the
wheel studs or nuts when the spare
tire is installed. This could cause the
nuts to become loose and lead to anaccident.
14. Turn the jack handle counterclockwise
to lower the vehicle.
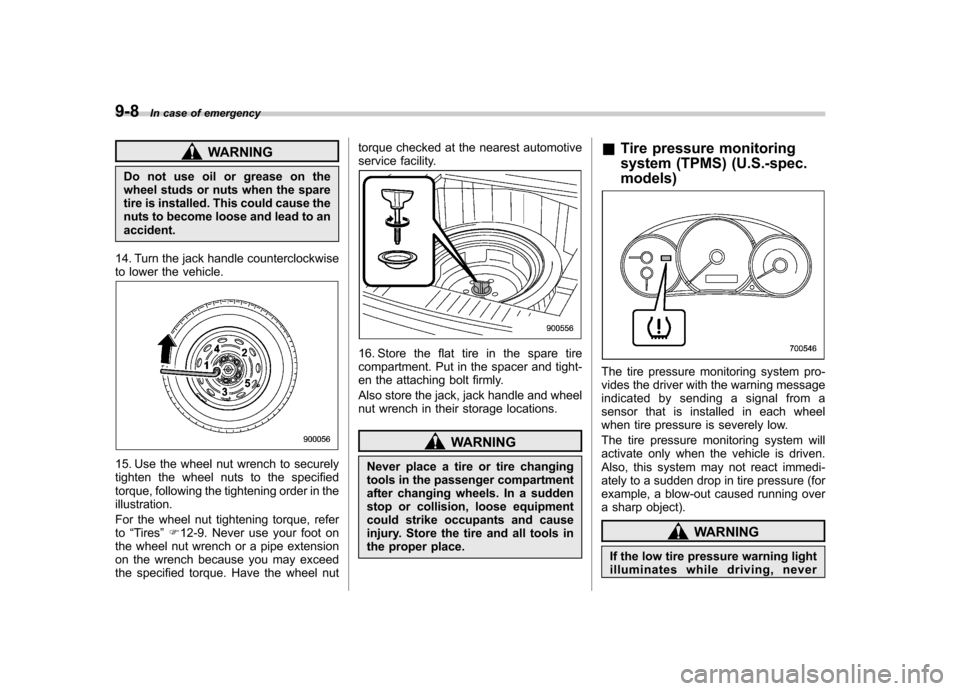
15. Use the wheel nut wrench to securely
tighten the wheel nuts to the specified
torque, following the tightening order in theillustration.
For the wheel nut tightening torque, refer to “Tires ”F 12-9. Never use your foot on
the wheel nut wrench or a pipe extension
on the wrench because you may exceed
the specified torque. Have the wheel nut torque checked at the nearest automotive
service facility.
16. Store the flat tire in the spare tire
compartment. Put in the spacer and tight-
en the attaching bolt firmly.
Also store the jack, jack handle and wheel
nut wrench in their storage locations.
WARNING
Never place a tire or tire changing
tools in the passenger compartment
after changing wheels. In a sudden
stop or collision, loose equipment
could strike occupants and cause
injury. Store the tire and all tools in
the proper place. &
Tire pressure monitoring
system (TPMS) (U.S.-spec. models)
The tire pressure monitoring system pro-
vides the driver with the warning message
indicated by sending a signal from a
sensor that is installed in each wheel
when tire pressure is severely low.
The tire pressure monitoring system will
activate only when the vehicle is driven.
Also, this system may not react immedi-
ately to a sudden drop in tire pressure (for
example, a blow-out caused running over
a sharp object).
WARNING
If the low tire pressure warning light
illuminates while driving, never
Page 313 of 416

9-16In case of emergency
WARNING
. Never turn the ignition switch to
the “LOCK ”position while the
vehicle is being towed because
the steering wheel and the direc-
tion of the wheels will be locked.
. Remember that the brake booster
and power steering do not func-
tion when the engine is not
running. Because the engine is
turned off, it will take greater
effort to operate the brake pedal
and steering wheel.
CAUTION
. If transmission failure occurs,
transport your vehicle on a flat-
bed truck.
. Do not run the engine while being
towed using this method. Trans-
mission damage could result if
the vehicle is towed with the
engine running. Rear gate
–if the rear gate
cannot be unlocked
In the event that you cannot unlock the
rear gate by operating the power door
locking switches or the remote keyless
entry system, you can unlock it from inside
the cargo area.
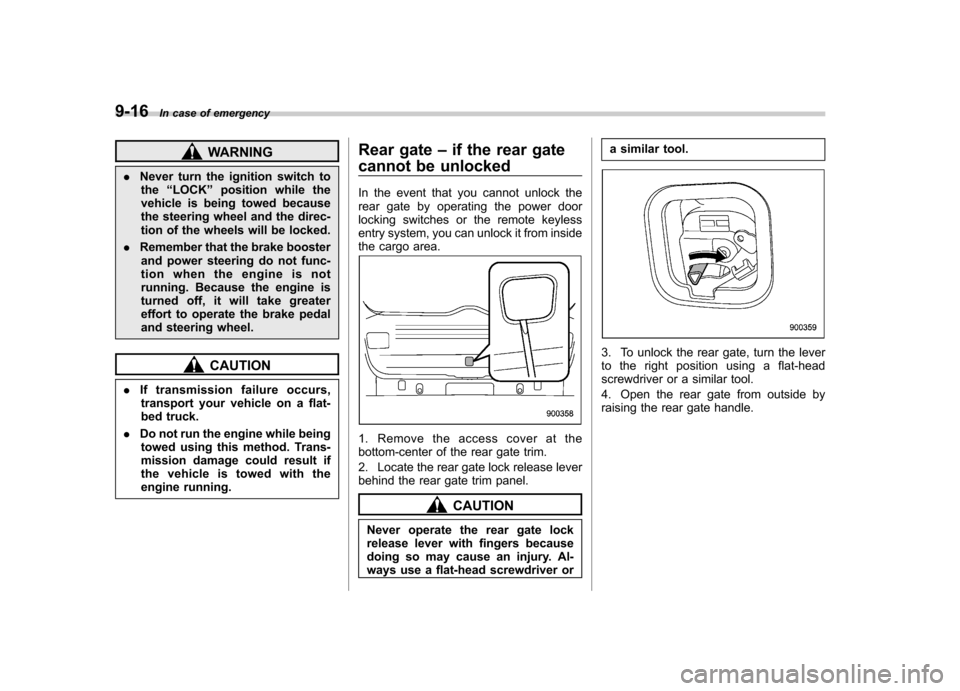
1. Remove the access cover at the
bottom-center of the rear gate trim.
2. Locate the rear gate lock release lever
behind the rear gate trim panel.
CAUTION
Never operate the rear gate lock
release lever with fingers because
doing so may cause an injury. Al-
ways use a flat-head screwdriver or a similar tool.
3. To unlock the rear gate, turn the lever
to the right position using a flat-head
screwdriver or a similar tool.
4. Open the rear gate from outside by
raising the rear gate handle.
Page 345 of 416

11-24Maintenance and service
!Winter (snow) tires
Winter tires are best suited for driving on
snow-covered and icy roads. However
winter tires do not perform as well as
summer tires and all season tires on roads
other than snow-covered and icy roads. & Tire pressure monitoring
system (TPMS) (if equipped)
The tire pressure monitoring system pro-
vides the driver with a warning message
by sending a signal from a sensor that is
installed in each wheel when tire pressure
is severely low. The tire pressure monitor-
ing system will activate only when the
vehicle is driven. Also, this system may
not react immediately to a sudden drop in
tire pressure (for example, a blow-out
caused by running over a sharp object).
If you adjust the tire pressures in a warm
garage and will then drive the vehicle in
cold outside air, the resulting drop in tire
pressures may cause the low tire pressure
warning light to illuminate. To avoid this
problem when adjusting the tire pressures
in a warm garage, inflate the tires to
pressures higher than those shown on the
tire placard. Specifically, inflate them by an
extra 1 psi (6.9 kPa, 0.07 kgf/cm
2) for
every difference of 10 8F (5.6 8C) between
the temperature in the garage and the temperature outside. By way of example,
the following table shows the required tire
pressures that correspond to various out-
side temperatures when the temperature
in the garage is 60
8F (15.6 8C).
Example:
Tire size: P205/55R16 89V and
P205/50R17 88V
Standard tire pressures:
Front: 33 psi (230 kPa, 2.3 kgf/cm
2)
Rear: 32 psi (220 kPa, 2.2 kgf/cm2)
Garage temperature: 60 8F (15.6 8C)
Outside
temperature Adjusted pressure
[psi (kPa, kgf/cm
2)]
Front Rear
30 8F( �18C) 36 (250, 2.5) 35 (240, 2.4)
10 8F( �12 8C) 38
(265, 2.65) 37
(255, 2.55)
� 10 8F( �23 8C) 40 (280, 2.8) 39 (270, 2.7)
If the low tire pressure warning light
illuminates when you drive the vehicle in
cold outside air after adjusting the tire
pressures in a warm garage, re-adjust the
tire pressures using the method described
above. Then, increase the vehicle speed
to at least 20 mph (32 km/h) and check to
see that the low tire pressure warning light
turns off a few minutes later. If the low tire
pressure warning light does not turn off, the tire pressure monitoring system may
not be functioning normally. In this event,
go to a SUBARU dealer to have the
system inspected as soon as possible.
While the vehicle is driven, friction be-
tween tires and the road surface causes
the tires to warm up. After illumination of
the low tire pressure warning light, any
increase in the tire pressures caused by
an increase in the outside air temperature
or by an increase in the temperature in the
tires can cause the low tire pressure
warning light to turn off.
System resetting is necessary when the
wheels are changed (for example, a
switch to snow tires) and new TPMS
valves are installed on the newly fitted
wheels. Have this work performed by a
SUBARU dealer following wheel replace-ment.
It may not be possible to install TPMS
valves on certain wheels that are on the
market. Therefore, if you change the
wheels (for example, a switch to snow
tires), use wheels that have the same part
number as the standard-equipment
wheels. Without four operational TPMS
valve/sensors on the wheels, the TPMS
will not fully function and the warning light
on the combination meter will illuminate
steadily after blinking for approximately
Page 346 of 416

one minute.
When a tire is replaced, adjustments are
necessary to ensure continued normal
operation of the tire pressure monitoring
system. As with wheel replacement, there-
fore, you should have the work performed
by a SUBARU dealer.
WARNING
If the low tire pressure warning light
does not illuminate briefly after the
ignition switch is turned ON or the
light illuminates steadily after blink-
ing for approximately one minute,
you should have your Tire Pressure
Monitoring System checked at a
SUBARU dealer as soon as possi-ble.
If this light illuminates while driving,
never brake suddenly and keep
driving straight ahead while gradu-
ally reducing speed. Then slowly
pull off the road to a safe place.
Otherwise an accident involving
serious vehicle damage and serious
personal injury could occur.
If this light still illuminates while
driving after adjusting the tire pres-
sure, a tire may have significant
damage and a fast leak that causes
the tire to lose air rapidly. If you have a flat tire, replace it with a spare tire
as soon as possible.
When a spare tire is mounted or a
wheel rim is replaced without the
original pressure sensor/transmitter
being transferred, the low tire pres-
sure warning light will illuminate
steadily after blinking for approxi-
mately one minute. This indicates
the TPMS is unable to monitor all
four road wheels. Contact your
SUBARU dealer as soon as possible
for tire and sensor replacement and/
or system resetting. If the light
illuminates steadily after blinking
for approximately one minute,
promptly contact a SUBARU dealer
to have the system inspected.
& Tire inspection
Check on a daily basis that the tires are
free from serious damage, nails, and
stones. At the same time, check the tires
for abnormal wear.
Contact your SUBARU dealer immedi-
ately if you find any problem. NOTE . When the wheels and tires strike
curbs or are subjected to harsh treat-
ment as when the vehicle is driven on a rough surface, they can suffer damage
that cannot be seen with the naked eye.
This type of damage does not become
evident until time has passed. Try not
to drive over curbs, potholes or on
other rough surfaces. If doing so is
unavoidable, keep the vehicle
’s speed
down to a walking pace or less, and
approach the curbs as squarely as
possible. Also, make sure the tires are
not pressed against the curb when you
park the vehicle.. If you feel unusual vibration while
driving or find it difficult to steer the
vehicle in a straight line, one of the
tires and/or wheels may be damaged.
Drive slowly to the nearest authorized
SUBARU dealer and have the vehicleinspected.
& Tire pressures and wear
Maintaining the correct tire pressures
helps to maximize the tires ’service lives
and is essential for good running perfor-
mance. Check and, if necessary, adjust
the pressure of each tire (including the
spare) at least once a month (for example,
during a fuel stop) and before any long
journey. Maintenance and service
11-25
– CONTINUED –
Page 368 of 416

&Dome light and cargo area light
Dome light
Cargo area light
1. Remove the lens by prying the edge of the lens with a flat-head screwdriver.
2. Pull the bulb out of the socket.
3. Install a new bulb.
4. Reinstall the lens.
& Trunk light
1. Remove the cover by squeezing its
sides and pulling it.
2. Pull the bulb out of the socket.
3. Install a new bulb.
4. Reinstall the cover. &
High mount stop light (4-
door) (except LED [Light
Emitting Diode] type)
1. Remove the high mount stop light
cover by prying the edge with a screw-
driver.
2. Remove the bulb socket from the high
mount stop light assembly by turning itcounterclockwise.
3. Pull the bulb out of the socket.
4. Install a new bulb.
5. Reinstall the cover. &Other bulbs
It may be difficult to replace the bulbs.
Have the bulbs replaced by your
SUBARU dealer if necessary. Maintenance and service
11-47
Page 407 of 416

14-4Index
Coolant ............................................................ 11-12, 12-8
Cooling system ......................................................... 11-11
Corrosion protection ................................................... 10-4
Cruise control ............................................................ 7-37
Indicator light ......................................................... 3-24
Set indicator light ................................................... 3-24
Cup holder .................................................................. 6-5
Front passenger ’s .................................................... 6-5
Rear passenger ’s..................................................... 6-7
D
Daytime running light system ....................................... 3-30
Defogger ................................................................... 3-45
Deicer ...................................................................... 3-45
Differential gear oil Front .................................................................... 12-6
Rear ............................................................ 11-16, 12-6
Dimensions ............................................................... 12-2
Disarming the alarm system ........................................ 2-17
Disc brake pad wear warning indicators ........................ 7-25
Dome light ........................................................ 6-2, 11-47
Door Locks ..................................................................... 2-4
Open warning light ................................................. 3-20
Drive belts. ............................................................... 11-15
Driver ’s Control Center Differential ............................... 7-18
Auto indicator light ................................................. 3-24
Indicator light ......................................................... 3-25
Driving AWD vehicles .......................................................... 8-4
Car phone/cell phone .................................................. 8 Drinking.
.................................................................... 7
Drugs ........................................................................ 7
Foreign countries ..................................................... 8-4
Pets .......................................................................... 8
Snowy and icy roads ............................................... 8-7
Tips ................................................. 7-16, 7-17, 8-2, 8-4
Tired or sleepy ........................................................... 8
Winter .................................................................... 8-6
E
Electrical system ........................................................ 12-3
Electronic Brake Force Distribution (EBD) system... 3-19, 7-26
Emergency Locking Retractor (ELR) ............................. 1-12
Engine Compartment overview ............................................ 11-6
Coolant ....................................................... 11-12, 12-8
Exhaust gas (carbon monoxide) ............................. 6, 8-2
Hood .................................................................... 11-5
Oil ................................................................ 11-8, 12-5Overheating ........................................................... 9-12
Starting .................................................................. 7-9
Stopping ................................................................ 7-10
Exterior care .............................................................. 10-2
F
Flat tires ..................................................................... 9-5
Floor mat ................................................................... 6-10
Fluid level
Brake .................................................................. 11-18
Clutch ................................................................. 11-19
Power steering ..................................................... 11-17
Page 413 of 416

14-10Index
Tools .......................................................................... 9-3
Top tether anchorages ........................................ 1-29, 1-31
Towing ...................................................................... 9-12
All wheels on the ground ........................................ 9-15
Flat-bed truck ........................................................ 9-15
Hooks ................................................................... 9-13
Trailer Towing .................................................................. 8-13
Trip meter ................................................................... 3-7
Trunk lid ................................................................... 2-23
Release handle ..................................................... 2-24
Trunk light ................................................................ 11-47
Turn signal
Indicator lights ....................................................... 3-24
Lever .................................................................... 3-30
U
Under-floor storage compartment ................................. 6-14
USB storage device operations .................................... 5-26
V
Valet mode ................................................................ 2-17
Vanity mirror ................................................................ 6-4
Vehicle Capacity weight ..................................................... 8-10
Identification ........................................................ 12-17
Symbols .................................................................... 3
Vehicle Dynamics Control Mode switch .......................................................... 7-29
OFF indicator light .................................................. 3-21
OFF switch ........................................................... 7-30 Operation indicator light
................................... 3-20, 3-21
System .................................................................. 7-28
Warning light .......................................................... 3-20
Ventilator .................................................................... 4-2
W
Warning and indicator lights ......................................... 3-12
Warning light ABS...................................................................... 3-18
Brake system ......................................................... 3-19
Charge .................................................................. 3-16
CHECK ENGINE .................................................... 3-15
Door open ............................................................. 3-20
Driver ’s Control Center Differential ............................ 3-25
Hill start assist ....................................................... 3-20
Low fuel ................................................................ 3-20
Low tire pressure .................................................... 3-16
Oil pressure ........................................................... 3-16
Rear differential oil temperature ................................ 3-16
Seatbelt. ................................................................ 3-13
SRS airbag system ................................................. 3-14
Vehicle Dynamics Control ........................................ 3-20
Warranties ..................................................................... 1
Washing .................................................................... 10-2
Waxing and polishing .................................................. 10-3
Wear indicators ........................................................ 11-28
Wheel
Aluminum ............................................................ 11-30
Balance ............................................................... 11-27
Nut tightening torque ........................................ 9-5, 12-9
Replacement. ....................................................... 11-30