2012 SUBARU FORESTER navigation
[x] Cancel search: navigationPage 25 of 438

22
Function settings
A SUBARU dealer can change the settings of the functions shown in the following table to meet your personal requirements. Contact
the nearest SUBARU dealer for details. If your vehicle is equipped with the genuine SUBARU DVD navigation system, the settings for
some of these functions can be changed using the navigation monitor. For details, please refer to the Owner’s Manual supplement for
the navigation system.
Item Function Possible settings Default setting
Alarm system Alarm system Operation/Non-operation Operation
Monitoring start delay time (after closure of doors) 0 second/30 seconds 30 seconds
Impact sensor operation (only models with
shock sensors [dealer option]) Operation/Non-operation Non-operation
Passive arming Operation/Non-operation Non-operation
Dome light/map lights illumination ON/OFF OFF
Remote keyless entry system Hazard warning flasher Operation/Non-operation Operation
Audible signal Operation/Non-operation Operation
Key lock-in prevention Key lock-in prevention Operation/Non-operation Operation
Remote engine start system
(dealer option) Horn chirp confirmation ON/OFF ON
Defogger and deicer system for
models with the automatic cli-
mate control system Rear window defogger, outside mirror de-
fogger and windshield wiper deicer
Operation for 15 minutes/
Continuous operationOperation for 15 minutes
Map light/Dome light Operation of map light/dome light OFF delay timer OFF/Short/Normal/Long Long
Battery drainage prevention function Battery drainage prevention function* Operation/Non-operation Operation
Seatbelt warning Sounds a chime while driving Operation/Non-operation Operation
*: The setting can only be changed at a SUBARU dealer.
Page 203 of 438

5-30Audio
Type A and B audio
Type C and D audio
2. Press the “CD/AUX ”button on the
audio control panel to turn on the auxiliary
audio input.
3. Play back the portable audio player.
Refer to the instruction manual for the
portable audio player. NOTE . The AUX input jacks of the models
with the genuine SUBARU navigation
system are the 3.5 mm stereo jack type.
For detailed information, refer to the
Owner ’s Manual supplement for the
navigation system.. The output sound of the portable
audio player is not loud, and the sound
via the vehicle ’s speakers that are
connected to the vehicle audio set
may be very low. If you turn up the
volume of the audio set, the volume
becomes louder. However, when you
change from one portable audio player
to another one, the volume levels via
the vehicle ’s speakers may be signifi-
cantly louder compared to the prior device. To avoid a large volume differ-
ence, turn down the volume when you
change between portable audioplayers..
In some cases, when the sound
volume of the portable audio player is
low, the sound quality may become
impaired when you turn up the volume
of the vehicle audio system. In this
case, adjust the sound volume of the
portable audio player.. In some cases, noise occurs be-
cause of a bad connection between the
portable player and the vehicle audio
system. Try cleaning the stereo jack
and audio plug. . If the noise is not reduced, check for
disconnection of the cord or a malfunc-
tion of the portable player. Precautions to observe when
handling a compact disc
Use only compact discs (CDs, CD-Rs and
CD-RWs) that have the mark shown in the
following. Also, some compact discs
cannot be played.
Page 215 of 438

5-42Audio
button, the indication changes in the
following sequence.
!Folder selection
Select a folder in the same way as for a
CD. Refer to “Folder selection ”F 5-28. Hands-free system (if equipped) NOTE .
For models with the genuine
SUBARU navigation system, refer to
the Owner ’s Manual supplement for the
navigation system.. When selling your vehicle, make
sure that you initialize the Hands-free
system to prevent personal data from
being improperly accessed.
The Hands-free system operates while the
ignition switch is in the “Acc ”or “ON ”
position. &
Tips for the Hands-free sys- tem
! Bluetooth
®
It is possible to connect a cell phone to the
in-vehicle equipment through the Blue-
tooth
®format (wireless) to make a phone
call from the in-vehicle equipment or take
an incoming phone call.
Since the Bluetooth
®format is wireless, a
connection between the in-vehicle equip-
ment and the cell phone can be made
without placing them in close proximity of
each other. The cell phone can be used
with it left in the breast pocket or bag. NOTE . The Hands-free system may not
operate properly under the following conditions.
–The cell phone is turned off.
– The cell phone is not in the
phone call area. – The battery of the cell phone has
run down.– The cell phone is not connected
to the Hands-free system.– The cell phone is behind the seat
or in the glove box.– A metal material covers or
touches the cell phone.
. Depending on the type of cell phone
Page 246 of 438

Rear view camera (if equipped)
A rear view camera is attached to the rear
gate. When the ignition switch is“ON ”and
the shift lever (MT models) or select lever
(AT models) is set to “R ”, the rear view
camera automatically displays the rear
view image behind the vehicle on the
navigation monitor or the display of the
type D audio (if equipped).
WARNING
. Since the rear view camera uses
a wide-angle lens, the image on
the monitor is different from the
actual view in terms of distance.
. Since the range of the image on the monitor is limited, you should
always check the rear view and
the surrounding area with your
eyes and mirrors, and move
backward at a slow speed. Mov-
ing backward only by checking
the rear view image from the
camera could cause an accident.
. Do not disassemble or modify the
camera, switch or wiring. If
smoke comes out or you smell
a strange odor, stop using the
rear view camera immediately.
Contact your SUBARU dealer
for an inspection. Continued use
may result in accident, fire or
electric shock.
CAUTION
. If your vehicle is washed with a
high-pressure washer, do not
allow water to contact the camera
directly. Entry of water in the
camera lens may result in con-
densation, malfunction, fire or
electric shock.
. Since the camera is a precision
device, do not subject it to strong
impacts. Otherwise, malfunction,
fire or electric shock may occur. .
If mud or snow sticks to or is
frozen on the camera, you must
be very careful removing it.
Otherwise, damage to the camera
may cause a fire or electric
shock. Pour water or lukewarm
water over the camera to remove
mud and ice, and wipe it with a
soft, dry cloth.
. Do not put a flame close to the
camera or wiring. Otherwise, da-
mage or fire may occur.
. When replacing the fuse, be sure
to use a fuse with the specified
rating. Use of a fuse with a
different rating may result in amalfunction.
. If the rear view camera is used for
a long time while the engine is
not operated, the battery may
become completely discharged.
NOTE . Do not wipe the camera with alcohol,
benzine or paint thinner. Otherwise,
discoloration may occur. To remove
contamination, wipe the camera with a
cloth moistened with a diluted neutral
detergent and then wipe it with a soft,
dry cloth.. When waxing the vehicle, be careful Interior equipment
6-17
– CONTINUED –
Page 247 of 438

6-18Interior equipment
not to apply the wax to the camera. If it
comes in contact with the camera,
moisten a clean cloth with a diluted
neutral detergent to remove the wax..The camera lens has hard coating to
help prevent scratches. However, when
washing the vehicle or cleaning the
camera lens, be careful not to scratch
the camera lens. Do not use a washing
brush directly on the camera lens. The
image quality of the rear view camera
may deteriorate.. Strong light shined on the camera
lens may develop vertical lines around
the light source. This is not a malfunc-tion. . Under fluorescent light, the display
may flicker. However, this is not a malfunction.. The image of the rear view camera
may be slightly different from the
actual color of the objects. & How to use the rear view camera
When the shift lever or select lever is set to “R ”, the rear view camera automatically
displays the rear view image from the
vehicle. When the lever is set to other
positions, the image before setting to “R ”
is displayed.
1. Set the ignition switch to “ON ”. 2. Set the shift lever or select lever to
“R ”.
NOTE . For models with the genuine
SUBARU navigation system, the image
of the rear view camera has priority
over other screen displays. Therefore,
while the rear view camera is in opera-
tion, the operations of other screens
are disabled. To operate other screens,
set the shift lever or select lever to a
position other than “R ”.
. The image of the rear view camera is
horizontally reversed as is the case
with the vehicle rearview mirror or the
side view mirror.. It may be difficult to see the image of
the rearview camera in the following
cases. This is not a malfunction of thecamera.
–The vehicle is in a dark place (at
night, in a tunnel, etc.). – The vehicle is in an extremely hot
or cold place.– An object (such as raindrops,
snow, dirt, etc.) that disturbs the
view of the rear view camera sticks
to the lens of the camera. – Strong light shined directly on
the camera lens (occasionally, there
are vertical lines on the screen). &
Viewing range on the screen
CAUTION
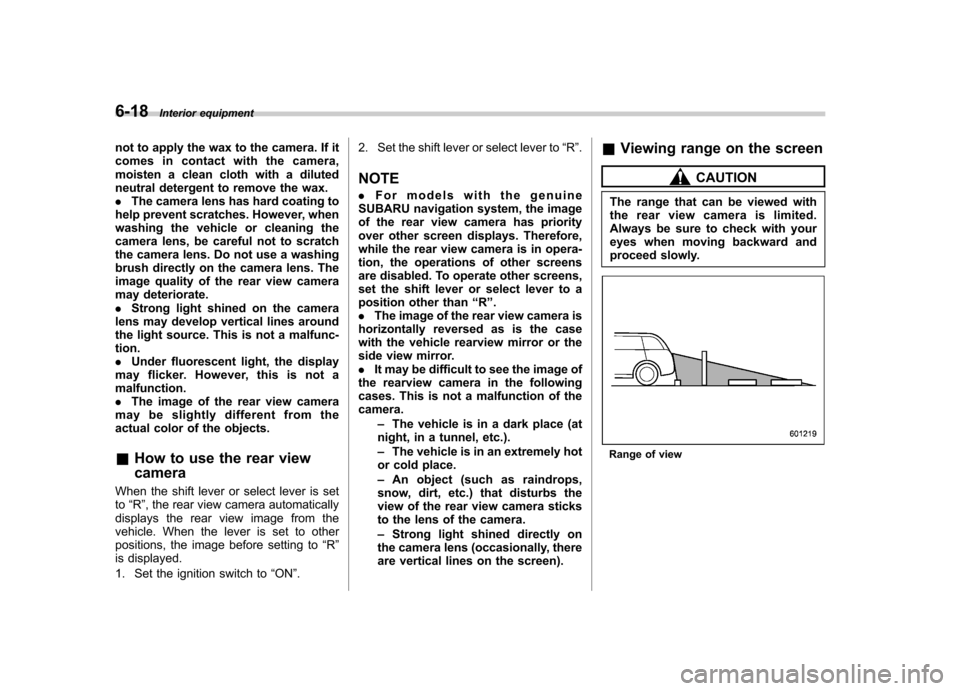
The range that can be viewed with
the rear view camera is limited.
Always be sure to check with your
eyes when moving backward and
proceed slowly.
Range of view
Page 339 of 438

10-6Appearance care
& Monitor (if equipped)
To clean the audio/navigation monitor,
wipe it with a silicone cloth or with a soft
cloth. If the monitor is extremely dirty,
clean it with a soft cloth moistened with
neutral detergent then carefully wipe off
any remaining detergent. NOTE . Do not spray neutral detergent di-
rectly onto the monitor. Doing so could
damage the monitor ’s components.
. Do not wipe the monitor with a hard
cloth. Doing so could scratch the
monitor.. Do not use cleaning fluid that con-
tains thinner, gasoline, or any other
volatile substance. Such cleaning fluid
could erase the lettering on the
switches at the bottom of the monitor. &
Cargo tray (if equipped)
The cargo tray is provided to protect the
cargo area carpet. This cargo tray is
removable to facilitate easy clean up.
Clean with a cloth when necessary using
mild soap and water. It is important that
the bottom of the liner is dry before placing
it back in the cargo area, as mildew mayresult.
Do not install the cargo tray if the cargo
area carpet is damp or wet, as mildew
may result. Dry the carpet completely
before the cargo tray is installed.
Upon installation after prolonged storage,
you may notice that the tray does not
completely lay flat. This is only temporary.
To help return the tray to its original shape,
place the tray on the floor of the vehicle
with a weight on each corner.