Page 382 of 438

Battery
WARNING
. Before beginning work on or near
any battery, be sure to extinguish
all cigarettes, matches, and light-
ers. Never expose a battery to an
open flame or electric sparks.
Batteries give off a gas which is
highly flammable and explosive.
. For safety, wear eye protection
when working near any battery in
case an explosion does occur.
Never lean over a battery.
. Do not let battery fluid contact
eyes, skin, fabrics, or paint be-
cause battery fluid is a corrosive
acid. If battery fluid gets on your
skin or in your eyes, immediately
flush the area with water thor-
oughly. Seek medical help imme-
diately if acid has entered theeyes.
If battery fluid is accidentally
swallowed, immediately drink a
large amount of milk or water,
and seek medical attention im-
mediately.
. To lessen the risk of sparks,
remove rings, metal watchbands, and other metal jewelry. Never
allow metal tools to contact the
positive battery terminal and any-
thing connected to it WHILE you
are at the same time in contact
with any other metallic portion of
the vehicle because a short cir-
cuit will result.
. Keep everyone particularly chil-
dren away from the battery.
. Charge the battery in a well-
ventilated area.
. Battery posts, terminals and re-
lated accessories contain lead
and lead compounds, chemicals
known to the State of California
to cause cancer and reproductive
harm. Batteries also contain
other chemicals known to the
State of California to cause can-
cer.
Wash hands after handling.
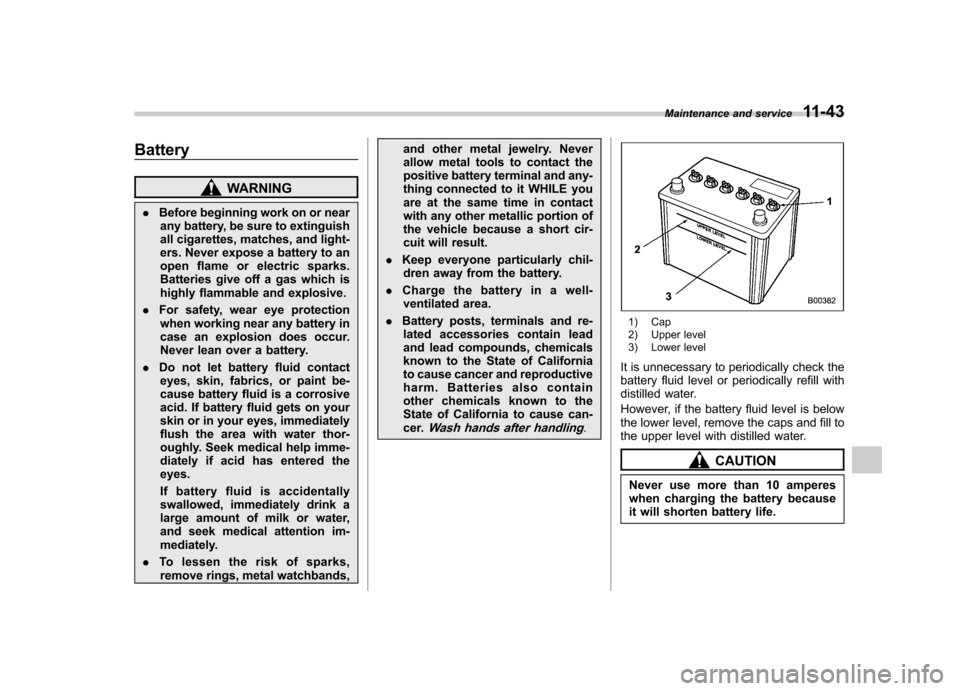
1) Cap
2) Upper level
3) Lower level
It is unnecessary to periodically check the
battery fluid level or periodically refill with
distilled water.
However, if the battery fluid level is below
the lower level, remove the caps and fill to
the upper level with distilled water.
CAUTION
Never use more than 10 amperes
when charging the battery because
it will shorten battery life. Maintenance and service
11-43
Page 383 of 438
11-44Maintenance and service
Fuses
CAUTION
Never replace a fuse with one hav-
ing a higher rating or with material
other than a fuse because serious
damage or a fire could result.
The fuses are designed to melt if an
overload occurs to prevent damage to the
wiring harness and electrical equipment.
The fuses are located in two fuse boxes.
One is located under the instrument panel
behind the fuse box cover on the driver ’s
seat side. To remove the cover, pull it out.
The other one (main fuse box) is in the
engine compartment.
The spare fuses are stored in the main
fuse box cover in the engine compart-ment.
The fuse puller is stored in the main fuse
box in the engine compartment.
1) Good
2) Blown
If any lights, accessories or other electrical
controls do not operate, inspect the
Page 384 of 438

corresponding fuse. If a fuse has blown,
replace it.
1. Turn the ignition switch to the“LOCK ”
position and turn off all electrical acces- sories.
2. Remove the cover.
3. Determine which fuse may be blown.
Look at the back side of each fuse box
cover and refer to “Fuses and circuits ”
F 12-11.
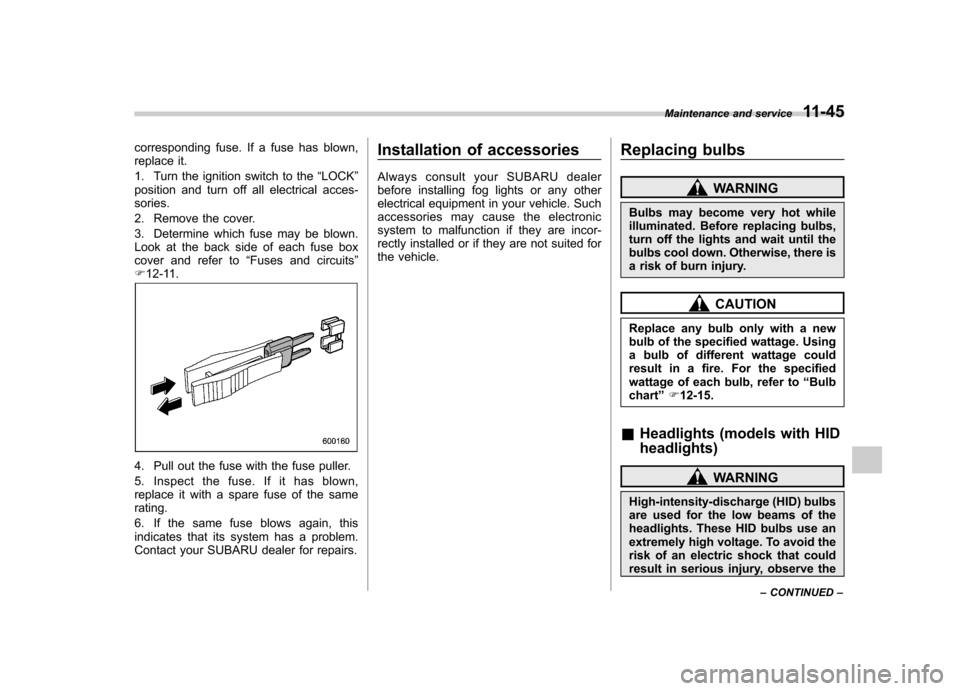
4. Pull out the fuse with the fuse puller.
5. Inspect the fuse. If it has blown,
replace it with a spare fuse of the samerating.
6. If the same fuse blows again, this
indicates that its system has a problem.
Contact your SUBARU dealer for repairs. Installation of accessories
Always consult your SUBARU dealer
before installing fog lights or any other
electrical equipment in your vehicle. Such
accessories may cause the electronic
system to malfunction if they are incor-
rectly installed or if they are not suited for
the vehicle.
Replacing bulbs
WARNING
Bulbs may become very hot while
illuminated. Before replacing bulbs,
turn off the lights and wait until the
bulbs cool down. Otherwise, there is
a risk of burn injury.
CAUTION
Replace any bulb only with a new
bulb of the specified wattage. Using
a bulb of different wattage could
result in a fire. For the specified
wattage of each bulb, refer to “Bulb
chart ”F 12-15.
& Headlights (models with HID headlights)
WARNING
High-intensity-discharge (HID) bulbs
are used for the low beams of the
headlights. These HID bulbs use an
extremely high voltage. To avoid the
risk of an electric shock that could
result in serious injury, observe the Maintenance and service
11-45
– CONTINUED –
Page 385 of 438

11-46Maintenance and service
following precautions. .Do not replace any headlight
bulbs (both low beam and high
beam) by yourself.
. Do not remove/restore the head-
light assemblies by yourself.
. Do not remove any headlight-
assembly components by your-self.
For replacement, contact your
SUBARU dealer.
& Headlights (models without
HID headlights)
CAUTION
Halogen headlight bulbs become
very hot while in use. If you touch
the bulb surface with bare hands or
greasy gloves, fingerprints or
grease on the bulb surface will
develop into hot spots, causing the
bulb to break. If there are finger
prints or grease on the bulb surface,
wipe them away with a soft cloth
moistened with alcohol. NOTE .
If headlight aiming is required, con-
sult your SUBARU dealer for proper adjustment.. It may be difficult to replace the
bulbs. Have the bulbs replaced by your
SUBARU dealer if necessary. !
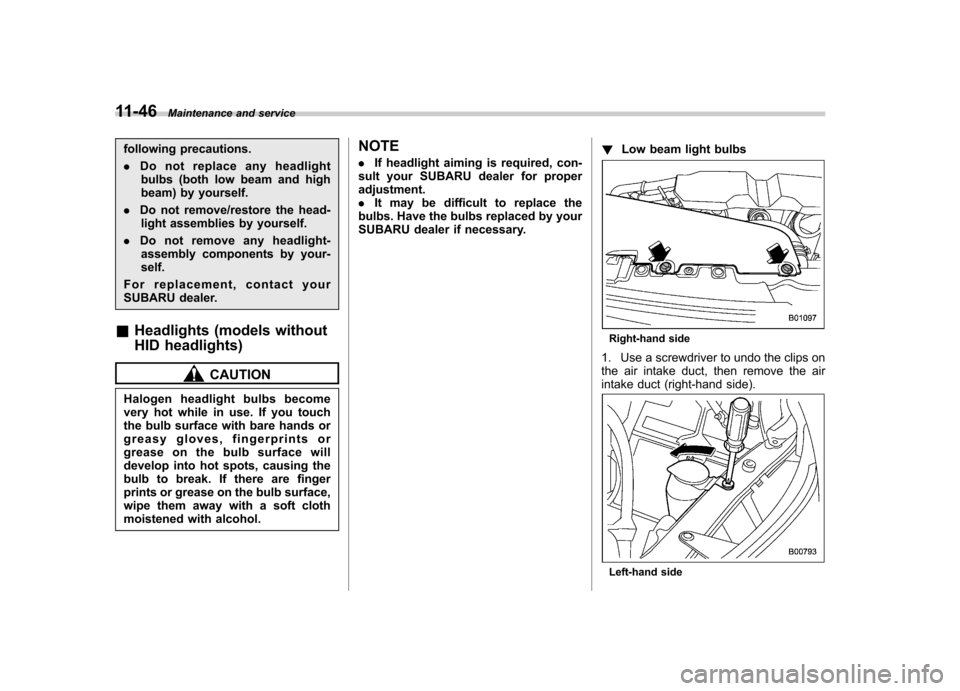
Low beam light bulbs
Right-hand side
1. Use a screwdriver to undo the clips on
the air intake duct, then remove the air
intake duct (right-hand side).
Left-hand side
Page 386 of 438
2. Use a Phillips screwdriver to remove
the secured clip of the washer tank. To
make it easy to access the bulb, move the
washer tank to the horizontal direction
(left-hand side).
3. Remove the bulb cover by turning it counterclockwise.
4. Disconnect the electrical connector
from the bulb.
5. Remove the bulb from the headlight
assembly by turning it counterclockwise.
6. Replace the bulb with a new one. At
this time, do not touch the bulb surface.7. To install the bulb to the headlight
assembly, turn it clockwise until it clicks.
8. Reconnect the electrical connector.
9. Install the bulb cover.
10. Install the air intake duct with clips
(right-hand side).
11. Set the washer tank to the original
place and secure it by clip (left-hand side). !
High beam light bulbs
Right-hand side
1. Use a screwdriver to undo the clips on
the air intake duct, then remove the air
intake duct (right-hand side). Maintenance and service
11-47
– CONTINUED –
Page 387 of 438
11-48Maintenance and service
2. Disconnect the electrical connector
from the bulb.
3. Remove the bulb from the headlight
assembly by turning it counterclockwise.
4. Replace the bulb with new one. At this
time, be careful not to touch the bulb surface. Turn the bulb clockwise until itclicks.
5. Reconnect the electrical connector.
6. Install the air intake duct with clips
(right-hand side).
& Position light
1. Turn the bulb socket counterclockwise
and pull out the socket.
2. Pull the bulb out of the socket.
3. Install a new bulb.
4. Install the bulb socket by turning it clockwise. &
Front turn signal light
It may be difficult to replace the bulbs.
Have the bulbs replaced by your SUBARU
dealer if necessary. & Rear combination lights1. Using a Phillips screwdriver, remove
the upper and lower screws that secure
the rear combination light assembly.
Page 388 of 438
2. Slide the rear combination light as-
sembly rearward and remove it from thevehicle.
1) Brake/tail light
2) Rear turn signal light
3) Back-up light3. Remove the bulb socket from the rear
combination light assembly by turning itcounterclockwise.
4. Pull the bulb out of the bulb socket and
replace it with a new one.
5. Set the bulb socket into the rear
combination light assembly and turn it
clockwise until it locks.
6. Put the rear combination light assem-
bly into place while aligning the clip with
the guide on the vehicle.
7. Tighten the upper and lower screws. &
License plate light
1. Remove the mounting screws using a
Phillips screwdriver. Maintenance and service
11-49
– CONTINUED –
Page 389 of 438
11-50Maintenance and service
2. Remove the cover and lens.
3. Pull the bulb out of the socket.
4. Install a new bulb.
5. Reinstall the lens and cover.
6. Tighten the mounting screws. &Dome light, map light, cargo
area light and door step light
CAUTION
When the door or the rear gate is
opened, the lights may illuminate
and the bulbs may become very hot.
Observe the following precautions
in order to avoid burning yourself. . When replacing the bulb of the
door step light, always wear gloves.
. When replacing the other bulb,
close the door and the rear gate,
and wait until the bulb becomes
cool enough.
Dome light (type A)
Dome light (type B)
Map light
Cargo area light