2012 SUBARU FORESTER battery
[x] Cancel search: batteryPage 137 of 438

3-26Instruments and controls
CAUTION
To ensure safety, do not attempt to
set the time while driving, as an
accident from inadequate attention
to the road could result.
NOTE
If the battery is disconnected, the time
will be erased. After reconnecting the
battery, set the correct time. Information display
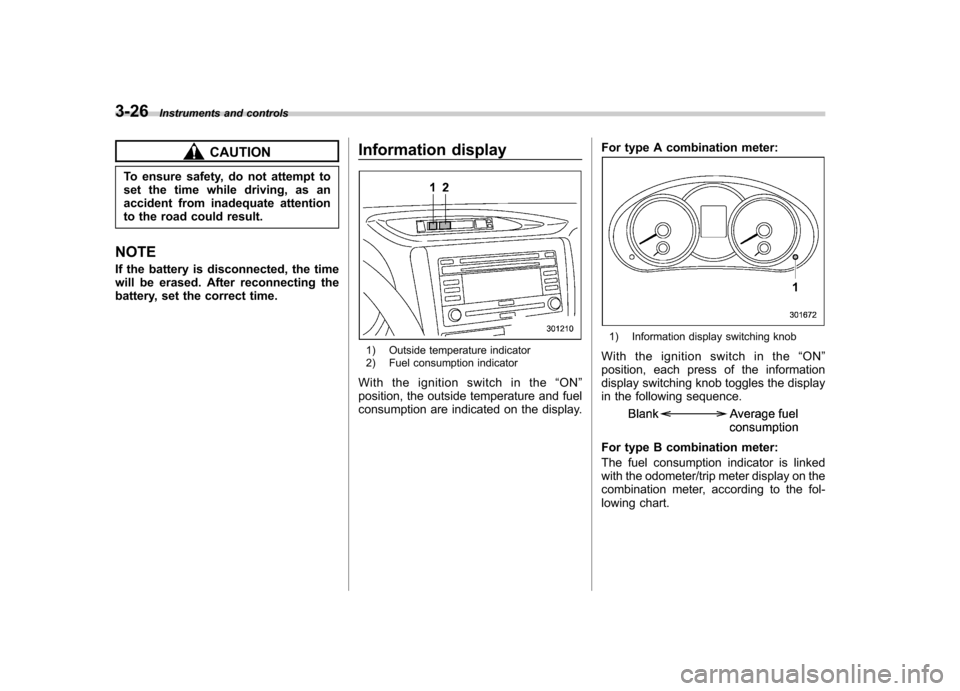
1) Outside temperature indicator
2) Fuel consumption indicator
Withtheignitionswitchinthe “ON ”
position, the outside temperature and fuel
consumption are indicated on the display. For type A combination meter:
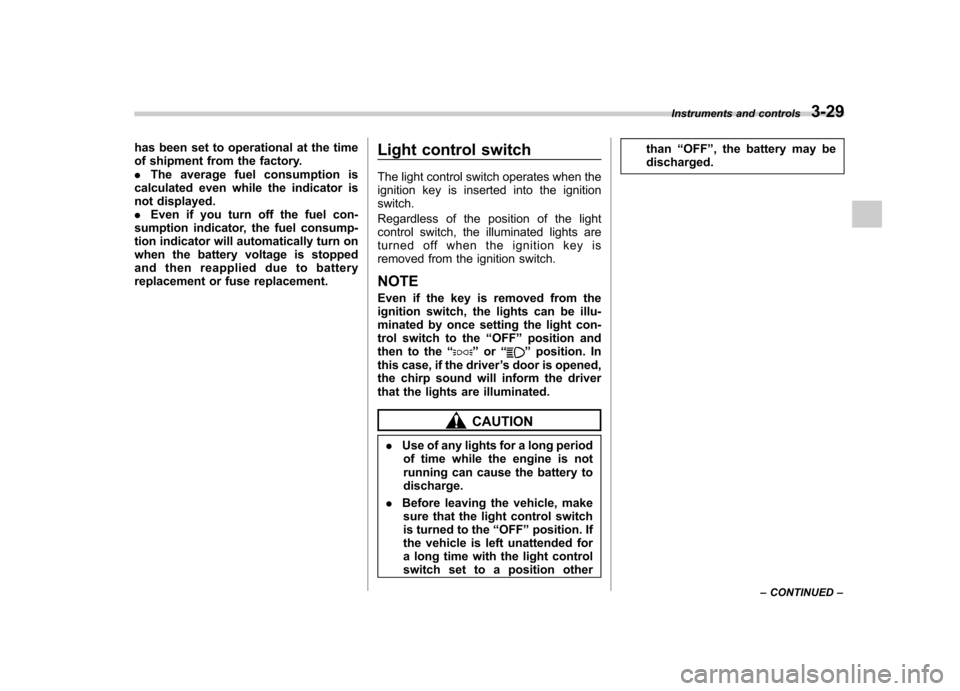
1) Information display switching knob
With the ignition switch in the “ON ”
position, each press of the information
display switching knob toggles the display
in the following sequence.
For type B combination meter:
The fuel consumption indicator is linked
with the odometer/trip meter display on the
combination meter, according to the fol-
lowing chart.
Page 140 of 438

has been set to operational at the time
of shipment from the factory..The average fuel consumption is
calculated even while the indicator is
not displayed.. Even if you turn off the fuel con-
sumption indicator, the fuel consump-
tion indicator will automatically turn on
when the battery voltage is stopped
and then reapplied due to battery
replacement or fuse replacement. Light control switch
The light control switch operates when the
ignition key is inserted into the ignitionswitch.
Regardless of the position of the light
control switch, the illuminated lights are
turned off when the ignition key is
removed from the ignition switch. NOTE
Even if the key is removed from the
ignition switch, the lights can be illu-
minated by once setting the light con-
trol switch to the
“OFF ”position and
then to the “
”or “”position. In
this case, if the driver ’s door is opened,
the chirp sound will inform the driver
that the lights are illuminated.
CAUTION
. Use of any lights for a long period
of time while the engine is not
running can cause the battery todischarge.
. Before leaving the vehicle, make
sure that the light control switch
is turned to the “OFF ”position. If
the vehicle is left unattended for
a long time with the light control
switch set to a position other than
“OFF ”, the battery may be
discharged. Instruments and controls
3-29
– CONTINUED –
Page 151 of 438

3-40Instruments and controls
www.homelink.com or call 1-800-355- 3515.
Note the following information about this system.
If your vehicle is equipped with the HomeLink
®Wireless Control System, it
complies with Part 15 of the Federal
Communications Commission Rules in
the U.S. and the RSS-210 of Industry
Canada in Canada. Its operation is subject
to the following two conditions:
(1) this device may not cause harmful
interference, and (2) this device must
accept any interference received, includ-
ing interference that may cause undesiredoperation.
Changes and modifications to this system
by anyone other than an authorized
service facility could void authorization to
use this equipment. HomeLink
®and the HomeLink®house are
registered trademarks of Johnson Con-
trols, Inc.
WARNING
. When programming the
HomeLink
®Wireless Control Sys-
tem, you may be operating a
garage door opener or other
device. Make sure that people and objects are out of the way of
the garage door or other device
to prevent potential harm ordamage.
. Do not use the HomeLink
®Wire-
less Control System with a gar-
age door opener that lacks the
safety stop and reverse feature
as required by applicable safety
standards. A garage door opener
which cannot detect an object,
signaling the door to stop and
reverse, does not meet these
safety standards. Using a garage
door opener without these fea-
tures increases risk of serious
injury or death. For more infor-
mation, consult the HomeLink
®website at www.homelink.com or
call 1-800-355-3515.
CAUTION
When programming the HomeLink
®Wireless Control System to operate
a garage door opener or an entrance
gate, unplug the device ’s motor
from the outlet during programming
to prevent motor burnout. NOTE .
After programming your HomeLink
®Wireless Control System for the de-
sired devices, retain the hand-held
transmitters for further programming
or device testing in the event of aproblem..It is recommended that you insert a
new battery in the hand-held transmit-
ter of a device to ensure correctprogramming. ! Garage door opener programming in
the U.S.A.
NOTE
When programming the HomeLink
®Wireless Control System for a garage
door opener, it is suggested that you
park the vehicle outside the garage.
1. Unplug the motor of the garage door
opener from the outlet. NOTE
If any of the HomeLink
®buttons are
already programmed for other devices,
skip step 2 because it clears the
memory of all three buttons.
Page 157 of 438

3-46Instruments and controls
defogger and windshield wiper deicer are
activated simultaneously. The indicator
light on the control switch illuminates while
the defogger and deicer system is acti-vated.
To turn them off, push the control switch
again. They also turn off when the ignition
switch is turned to the “Acc ”or “LOCK ”
position.
The defogger and deicer system will
automatically shut off after approximately
15 minutes. If the rear window and the
outside mirrors have been cleared and the
windshield wiper blades have been deiced
completely before that time, push the
control switch to turn them off. If defrost-
ing, defogging or deicing is not complete,
you have to push the control switch to turn
them on again.
For models with the automatic climate
control system, it is possible to custo-
mize the defogger and deicer system
operation mode by a SUBARU dealer.
Contact your SUBARU dealer for details.
CAUTION
. To prevent the battery from being
discharged, do not operate the
defogger and deicer system con-
tinuously for any longer than necessary.
. Do not use sharp instruments or
window cleaner containing abra-
sives to clean the inner surface
of the rear window. They may
damage the conductors printed
on the window.
NOTE . Turn on the defogger and deicer
system if the wipers are frozen to the windshield.. If the windshield is covered with
snow, remove the snow so that the
windshield wiper deicer works effec-
tively.. While the defogger and deicer sys-
tem is in the continuous operation
mode, if the vehicle speed remains at
9 mph (15 km/h) or less for 15 minutes,
the windshield wiper deicer automati-
cally stops operating, though the rear
window defogger and outside mirror
defogger maintain continuous opera-
tion in this condition.. While the defogger and deicer sys-
tem is in the continuous operation
mode, if the battery voltage drops
below the permissible level, continu-
ous operation of the defogger and
deicer system is canceled and the system stops operating.
Page 190 of 438

&Station preset
! How to preset stations
1. Press the “FM/AM ”button to select the
preferred reception mode.
2. Select the preferred station.
3. Press and hold one of the preset
buttons (from
to) for more
than 1.5 seconds to store the frequency. If
the button is pressed and held for less
than 1.5 seconds, the preceding selection
will remain in memory. NOTE . Up to six stations for each reception
mode may be preset. . If the connection between the radio
and battery is broken for any reason
such as vehicle maintenance or radio
removal, all stations stored in the
preset buttons are cleared. If this
occurs, it is necessary to reset the
preset buttons.. If a cell phone is placed near the
radio, it may cause the radio to emit
noise when it receives calls. This noise
does not indicate a radio malfunction. ! Selecting preset stations
1. Press the “FM/AM ”button to select the
preferred reception mode. 2. Press the preferred preset button (from
to) briefly.
! Auto-store (type D audio)
Using the Auto-store function, you can
automatically store 6 stations on the
current waveband (FM-AS or AM-AS) by
pressing and holding the
button for
1.5 seconds or longer. Use Auto-store to
quickly find the strongest stations, for
example when traveling through different
reception areas. NOTE . When the HD Radio function is
turned on, Auto-store cannot be used
while receiving the broadcasting sta-
tion with SPS (Supplemental ProgramService).. When you use Auto-store, the new
stations replace any stations pre-
viously stored.. Interrupting Auto-store: If you acci-
dentally press the
(Auto-store)
button, you can cancel the Auto-store
function before it has been completed
as follows.
–Switching to the other source
mode – Pressing the
button
– Switching to the other band
– Turning the “TUNE/TRACK/CH ”dial –
Pressing the “SCAN ”button
! Displaying and selecting preset
stations (type D audio)
1. Press and hold the
button for 1.5
seconds or longer during AM/FM recep-
tion to display the radio screen.
2. Operate the “TUNE/TRACK/CH ”dial
to select the stations. Audio
5-17
Page 194 of 438

Type A and B audio:Category up by one step
Category down by
one step
Type C audio:Category up by one step
Category down by
one step
When a category is selected, turning the “ TUNE/TRACK/CH ”dial selects channels
only within the selected category.
The control function returns to the normal
mode after approximately 10 seconds. ! Type D audio
When in the SAT mode, press the
button to change the category search mode.
When in the category search mode, press
the following button to change the cate-
gory up or down. Category up by one step
Category down by
one step
When a category is selected, turning the “
TUNE/TRACK/CH ”dial selects channels
only within the selected category. The
control function returns to the normal
mode after approximately 10 seconds. ! Channel scan
Type A and B audio*
1
Type C audio*1
Type D audio*2
*1: Press the button briefly.
*2: Press and hold the button.
Press the “SCAN ”button to change the
radio to the SCAN mode. In this mode,
under the selected category, the radio
scans through the channel until a station
is found. The radio will stop at the station
for 5 seconds while displaying the channel
number, after which scanning will continue until the entire channel has been scanned
from the low end to the high end.
Press the
“SCAN ”button again to cancel
the SCAN mode and to stop on any
displayed channel. & Channel preset
! How to preset channels
1. Press the “SAT ”button to select SAT1,
SAT2 or SAT3 reception mode.
2. Select the desired channel.
3. Press and hold one of the preset
buttons (from
to) for more
than 1.5 seconds to store the channel. If
the button is pressed and held for less
than 1.5 seconds, the preceding selection
will remain in memory. NOTE . Up to six SAT1, SAT2 and SAT3
channels each may be preset. . If the connection between the radio
and battery is broken for any reason
such as vehicle maintenance or radio
removal, all channels stored in the
preset buttons are cleared. If this
occurs, it is necessary to reset the
preset buttons. Audio
5-21
– CONTINUED –
Page 206 of 438

&Connectable iPod®models
Model Firmware version
iPod
®
with video 1.3
classic 2.0.4
nano 1G 1.3.1
nano 2G 1.1.3
nano 3G 1.1.3
nano 4G 1.0.4
nano 5G 1.0.2
nano 6G 1.0
touch 1G 3.1.3
touch 2G 3.1.3
touch 3G 4.1
touch 4G 4.1
iPhone
®
1G 3.1.3
3G 3.1.3
3G S 3.1.3 4G 4.1
CAUTION
Do not connect an iPod
®other than
the previously stated models. Doing
so may result in a malfunction or,
depending on conditions, cause a fire.
NOTE . iPod
®is a registered trademark of
Apple Inc. . You are only permitted to personally
copy and play copyright-free material
or material that is legally permitted to
be copied and played by using aniPod
®and iTunes. Copyright infringe-
ment is prohibited by law.. To check the firmware version of an
iPod
®, connect it to a computer and
check the device manager. For further
information, see the User ’s Guide that
comes with the iPod
®
. To update the firmware version of an
iPod®, visit the Apple Inc. website.
& Connecting USB storage de-
vice / iPod
®
WARNING
Do not operate an iPod
®while
driving. Doing so may distract your
attention from driving and could
lead to an accident.
CAUTION
. If the data stored on an iPod
®is
deleted while it is connected to
the in-vehicle system, the data
cannot be recovered.
. Do not store an iPod
®in the
vehicle. If an iPod®is left in the
vehicle for a long period of time,
it may be deformed, discolored
or damaged by high temperature.
NOTE . Even if a USB storage device or
iPod
®is connected, it cannot be played
unless the USB/iPod®mode is se-
lected. . A movie cannot be played while a
USB storage device or an iPod
®is
connected.. While an iPod
®is connected, the
iPod®cannot be operated using the
click wheel on the iPod®(except some
models).. When using an iPod
®by connecting
it to in-vehicle equipment, the order of
the list items displayed on the in-
vehicle equipment may be different
from that on the iPod
®. However, this
does not indicate a malfunction.. An iPod
®battery that is connected Audio
5-33
– CONTINUED –
Page 207 of 438

5-34Audio
to in-vehicle equipment will be charged
when the ignition switch is in the “ON ”
or “Acc ”position. However, activation
of the iPod
®may be delayed if the
battery charge of the iPod®is low.
. If an iPod®does not activate after
operation, disconnect the connection
cable from the iPod
®and reset it. For
the resetting procedure, see the User ’s
Guide that comes with the iPod
®.
. If an iPod®and the connection cable
are connected improperly, the iPod®
cannot be powered on or will not be
recognized by in-vehicle equipment. In
this case, disconnect the connection
cable from the iPod
®, and then connect
it again.
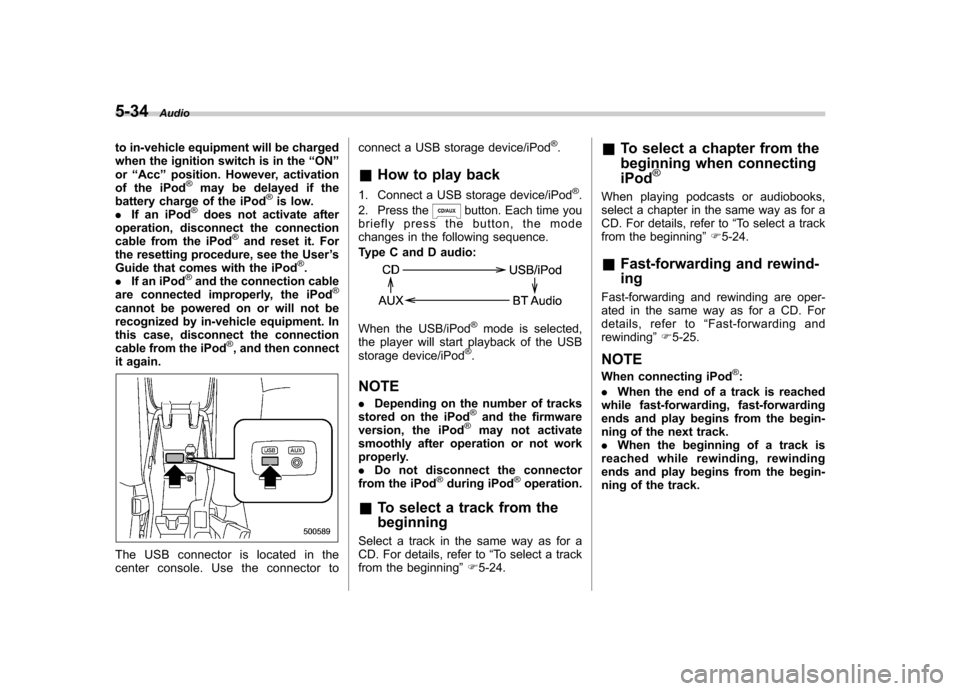
The USB connector is located in the
center console. Use the connector to connect a USB storage device/iPod
®.
& How to play back
1. Connect a USB storage device/iPod
®.
2. Press the
button. Each time you
briefly press the button, the mode
changes in the following sequence.
Type C and D audio:
When the USB/iPod®mode is selected,
the player will start playback of the USB
storage device/iPod
®.
NOTE . Depending on the number of tracks
stored on the iPod
®and the firmware
version, the iPod®may not activate
smoothly after operation or not work
properly.. Do not disconnect the connector
from the iPod
®during iPod®operation.
& To select a track from the beginning
Select a track in the same way as for a
CD. For details, refer to “To select a track
from the beginning ”F 5-24. &
To select a chapter from the
beginning when connecting iPod
®
When playing podcasts or audiobooks,
select a chapter in the same way as for a
CD. For details, refer to “To select a track
from the beginning ”F 5-24.
& Fast-forwarding and rewind- ing
Fast-forwarding and rewinding are oper-
ated in the same way as for a CD. For
details, refer to “Fast-forwarding and
rewinding ”F 5-25.
NOTE
When connecting iPod
®:
. When the end of a track is reached
while fast-forwarding, fast-forwarding
ends and play begins from the begin-
ning of the next track.. When the beginning of a track is
reached while rewinding, rewinding
ends and play begins from the begin-
ning of the track.