Page 17 of 44

- Pause: the play function is stopped in the current position and the symbol
changes to - after pressing, the play function will continue in this position.
Note
If the volume is reduced to 0 during playback from a CD, the hard drive or another
audio source, the symbol changes to
and playback is interrupted.
ÐIntroductory information about CD/DVD mode
Insert CD/DVD
› Insert a CD/DVD, with the labelled side facing up, into the CD/DVD slot 11
until
it is automatically drawn in. The play function will start automatically.
Remove CD/DVD
› Press the button
– die CD/DVD is ejected.
If the ejected CD /DVD is not taken out within 10 seconds, it will be retracted
again for safety reasons.
CD not legible
If you insert a CD/DVD which cannot be read by the unit, a pop-up window is dis-
played with a note. The CD/DVD is moved to the eject position again after a few
seconds.
If the CD/DVD is not taken out within 10 seconds, it is drawn in again for safety
reasons.
CD to jump
Uneven road surfaces and strong vibrations may cause the CD to jump.
Formation of condensation
When it is cold and after rain showers, moisture can deposit in the CD/DVD drive
(condensation). This can effect the CD jump or impair the play function. In such
cases, wait until the moisture has dissipated.
Notes for the care of the CD/DVDs
If a CD/DVD is soiled, never clean it in a circular motion but rather from inside to
outside with a soft lint-free cloth. In case of severe layers of dirt we recommend
to clean the CD/DVD with a commercially available CD/DVD cleaner. Also in this
case, do not clean the CD/DVD in a circular motion but rather from inside to out-
side, and then let it dry. MP3 and WMA Data (Windows Media Audio)
Playable MP3 and WMA data can also be stored on the hard disk of the
unit
» page 18, Hard drive (HDD) .
The copyright of audio data compressed by Windows Media Audio, can also be
protected by the DRM procedure ( Digital Rights Management). Such WMA data is
not supported by the unit. WARNING
The CD/DVD player is a 1st class laser product. There is a risk of injury from in-
visible laser beams if you open the CD/DVD player. CAUTION
■ Audio-CDs (CD-A) and Audio-DVDs, MP3-CDs and MP3-DVDs as well as Video-
DVDs can be played in the internal CD/DVD drive.
■ Never insert CDs with the designation “Do not insert in drives without a drawer”
or Eco Disc into the internal drive.
■ Inserting a second CD/DVD while a CD/DVD is being ejected can damage the
CD/DVD drive in the unit. After pressing the Eject button , there is a delay of a
few seconds before the CD is ejected. During this time the lock in front of the CD/
DVD case is open. It is essential that you wait until the CD/DVD has been fully
ejected before you try to insert a new CD/DVD. ■ If the CD/DVD drive becomes mechanically defective or a CD/DVD has been in-
serted incorrectly or not fully, “CD fault will be displayed. Please check CD. ” and
then the “DVD drive fault ” indicated on the touch-screen. Check the CD/DVD
check and insert it again correctly and completely into the drive. If a “CD/DVD
drive fault ” is indicated again, please contact your ŠKODA Service Partner.
■ If the inside temperature of the unit is too high, no CDs/DVDs will be accepted.
The unit switches into the last active operating mode.
■ Never use liquids such as benzine, paint thinner or record cleaner, otherwise
the surface of the CD/DVD may be damaged!
■ Never expose the CD/DVD to direct sun light!
■ Only write on the CD/DVD with appropriate writing tools.
■ Do not affix anything to the CD/DVD! Note
■ If the function key CD is inactive, no new Audio CD/DVD has been inserted or an
inserted Audio CD/DVD is not readable. ■ It is possible that CDs/DVDs protected by copyright and non-original CD-R, CD-
RW and DVD-RWs are not returned at all or only in certain circumstances.
15
MEDIA mode
Page 18 of 44
 can also be replayed by the unit and
stored on the hard disk (HDD) providing this has not been protected by the DRM
procedure copyright (Digital Rights Managem")
■
WMA audio data (Windows Media Audio) can also be replayed by the unit and
stored on the hard disk (HDD) providing this has not been protected by the DRM
procedure copyright (Digital Rights Management). The operation and behaviour of
the unit complies with MP3 compressed audio files and will not be described here
further.
■ Please also note the additional information for MP3 mode » page 16, Introduc-
tory information about the MP3 mode .
■ The national copyright laws that apply in your country must be observed.
■ The CD/DVD player contains no parts that need servicing or that can be re-
paired. If the CD player is defective, contact a specialist garage.
■ The DVD drive installed into this unit uses a Dolby Digital ®
Audio coding system
and MLP Lossless ®
for highest reproduction quality even with standard Audio
DVDs. “
Dolby ®
”, “MLP Lossless ®
” and the Double-D-Symbol are trademarks of Dol-
by Laboratories ®
.
■ “DTS ®
”
and “DTS 2.0 ®
” transforms the Surround Sound of a DVD and replays it in
best stereo quality. “DTS ®
” and “DTS 2.0 ®
” are registered trademarks of DTS, Inc.
■ Dirt or damage of a CD/DVD can lead to difficulties when “reading” the informa-
tion. The severity of the reading error depends on the dirt or on the severity of
the mechanical damage. Severe scratches cause reading errors which can make
the CD jump or
“get stuck”. All CDs/DVDs must be treated carefully and always be
stored in a protective case. ÐIntroductory information about the MP3 mode
Requirements for the MP3 data and data carrier
› CD-ROM, CD-R, CD-RW with a capacity of 650 MB and 700 MB.
› 4.7 GB DVDs and up to 8.5 GB Double Layer DVDs.
› The CDs/DVDs must correspond to the ISO 9660 Level 2 standard as well as the
Joliet data system (single and multi-session).
› Data names must be no longer than 64 characters.
› The list structure is restricted to a depth of 8 list levels.
› The name of the artist, the album and the title of the played MP3 data can be
displayed if such information is available as so-called ID3 tags. The list and data
name will be displayed if there is no ID3 tag.
› WMA data (Windows Media
Audio) can also be played even if the copyright is
additionally protected by the DRM procedure ( Digital Rights Management). Such
WMA data is not supported by the unit.
› The operation and behaviour of playable WMA files conform to those of the MP3
files and will not be described here further. Bit rate (data flow per time unit)
› The system supports MP3 data with bit rates of 32 to 320 KB/s as well as MP3
data with variable bit rates.
› The indicated playing time data with variable bit rates is not reliable. Ð Memory card
Insert memory card
› Push the memory card into the memory card lose 16
with the trimmed edge to
the front right until it
“locks into place”. The play function will start automatical-
ly.
Remove memory card
› Press the inserted memory card. The memory card “jumps” into the initial posi-
tion.
Memory card empty or data not readable
If a memory card is inserted, on which no data or no legible data has been stored,
it will not be switched over into the memory card mode after the loading proce-
dure.
Requirements of the memory card
› Memory cards measuring 32 mm x 24 mm x 2.1 mm or 1.4 mm can be inserted
into the memory card case.
› SD (Secure Digital Memory Cards) and MMC (Multimedia Cards) memory cards
with a capacity up to 4
GB.
› SDHC (Secure Digital High-Capacity Memory Cards) memory cards with a capaci-
ty up to 32 GB.
› It is possible that some of the files on the memory cards cannot be reproduced
and have limited playback. Due to differing quality requirements from different
card manufacturers, it is not possible to guarantee the playback of memory
cards under all circumstances. Note
■ Only MP3 data and unprotected WMA data can be read from the SD card. All
other data is ignored. ■ Playable MP3 and WMA data can also be stored on the hard disk of the
unit » page 18 , Hard drive (HDD) . Ð
16 MEDIA mode
Page 19 of 44

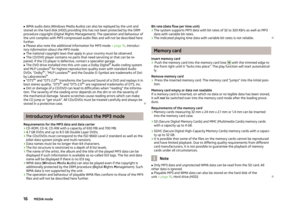
External sources
AUX and MDI input
AUX input
Press the button MEDIA →
AUX .
External audio sources connected to the AUX socket cannot be operated via the
radio navigation system. Only the volume can be controlled from the radio naviga-
tion system.
Use the standard jack plug 3.5
mm for the AUX jack. If the external audio source
does not have this jack plug, you must use an adapter .
MDI input- multimedia socket
Press the button MEDIA →
MDI .
Audio files in MP3, WMA, OGG Vorbis and AAC format from the external data stick-
ers, connected to the multimedia socket, can be played via the radio navigation
system.
External audio sources connected to the MDI socket can
be operated via the radio
navigation system.
You can select another audio source on the radio at any time. As long as the ex-
ternal audio source is not switched off, it remains always active in the back-
ground.
See the owner's manual of the specific manufacturer for operating the external
audio source.
To connect external audio sources via the MDI input, a special adapter is to be
used.
iPod
If an iPod is connected to the MDI input, a menu opens in which you can select
the folders of the iPod (playlists, artists, albums, titles, etc.).
Adjust the play volume of the external audio source
The play volume of the external audio source can be adjusted via the volume con-
trol on the radio navigation system 1
.
Depending on the connected audio source, the output volume on the external au-
dio source can be changed. You can also change the input sensitivity of the external audio source, in order to
adapt the play volume of the external audio source to that of the other audio
sources or to avoid distortions
» page 9, Media Set-Up.
Conditions for proper connection › Only USB devices with the specification 2.0 can be connected.
› The version of the file allocation table FAT (File Allocation Table) of the connec-
ted device must be FAT16 ( <2
GB) or FAT32 (> 2 GB).
› In order to replay from a unit with a hard disk (HDD) which includes a large data
volume, it can lead to a time delay when reading in the overview of the music
data.
› In order to replay from a unit, which includes a complicated folder structure, it
can lead to a time delay when scanning the audio files.
› The folder structure in the connected unit must not exceed a depth of 8 levels.
One folder must not contain more than 1000°data.
› A USB extension cable or USB distributor (HUB) must not be used to connect
the unit. WARNING
■ On no account place an external audio source on the dash panel. It could be
thrown into the passenger compartment during sudden driving manoeuvres,
injuring the occupants.
■ On no account place an external audio source close to the airbags. It could
be thrown into the passenger compartment when the airbags are deployed,
injuring the occupants.
■ Never hold the external audio source in your hand or on your knees while
driving. You could make sudden manoeuvres in the passenger compartment
and injure the occupants.
■ Always route the connection cable of the external audio source such that is
does not restrict you when driving. CAUTION
The AUX socket must only be used for audio sources! Note
■ The external audio source, which is connected via AUX-IN, can only be used if
no other unit is connected via MDI at the same time. ■ If an external audio source is connected via AUX, which is equipped with an
adapter for external power supply, it can occur that the audio signal is interrup-
ted. This depends on the quality of the adapter which is used. Ð
17
MEDIA mode
Page 20 of 44

Store MP3 and WMA data on the hard disk (HDD)
If the unit is switched off during the saving process, the saving process will be
terminated with the last fully saved title.
Select, sav")
Hard drive (HDD)
Store MP3 and WMA data on the hard disk (HDD)
If the unit is switched off during the saving process, the saving process will be
terminated with the last fully saved title.
Select, save and edit title name and folder
On the memory card, choose the title or folder you want to save on the hard drive.
You can also select the complete contents of an installed data carrier in the selec-
tion window of the available audio sources for storing on the hard disk . ■ Press the button MEDIA →
Selection .
■ - open menu for the folder editing
■ Play - automatic playback
■ Copy - saves title or folder to the hard drive
■ Insert file/folder here - saves directly to the current folder of the hard drive
■ New folder - creates a new folder
■ cancel). - cancels save
■ Rename - opens input display for changing the title or folder name
■ Delete - deletes the selected title or folder
A folder can have a max. of 7 sub-folders. Press on the function key to open
the corresponding parent folder.
You can continue listening to this or another audio source while storing other au-
dio data. Note
Saving 100 music titles of average length of time (3 - 5 minutes) will take approxi-
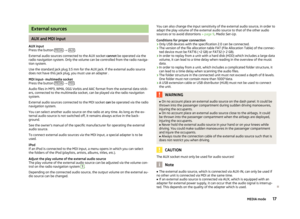
mately 40 minutes. Ð Video mode
Insert Video-DVD and start
Fig. 6
Operating the DVD/Film menu
Insert a Video-DVD into the CD/DVD slot with the printed side facing up until it is
automatically drawn in.
The Video-DVD playback will start automatically. The readout of the data from
the Video-DVD can take a few seconds, during which time the touch-screen turns
dark.
The TV picture will only be displayed when the vehicle is stationary. The touch-
screen is switched off while driving, but the sound can still be heard.
Briefly touch the screen to display the menu DVD. Touch the empty area of the
screen to close the menu DVD. The DVD menu will automatically fade out after
about 15 seconds if not used.
Aspect ratio
The video starts with the preset aspect ratio. The aspect ratio can be changed in
the menu Setup video » page 11, Setup Video.
The Video-DVD menu ■ AV - changes over to a connected external video source
■ TV - changes to the TV mode.
■ DVD - changes to a CD/DVD drive inserted in the Video DVD drive
■ Audio - changes to the
Audio menu
■ Menu - changes to the Film menu
» Fig. 6
■ Display - change the brightness, contrast and colour settings of the display
■ Chapter - changes to the chapter list
18 MEDIA mode
Page 21 of 44
■
- pressing briefly changes to the beginning of the current chapter, repeated
pressing changes to the beginning of the previous chapter.
■ - briefly pressing changes to the next chapter.
■ - the play function is stopped in the current position and the symbol changes
to - after pressing
the play function continues in this position.
Ð 19
MEDIA mode
Page 22 of 44

TV mode
Main menu TV
Fig. 7
TV menu
The TV picture will only be displayed when the vehicle is stationary. The touch-
screen is switched off while driving, but the sound can still be heard.
DVB-T (Digital Video Broadcasting-Terrestrial)
With DVB-T, the TV signal is transmitted terrestrially. DVB-T allows reception in
high quality.
The supply of DVB-T is currently limited in particular to industrial areas and urban
centres. It is for this reason that a Hybrid tuner was developed for the unit, which
consists of a common analog TV receiver and a DVB-T receiver.
The TV stations which can be received are indicated in the information display
and when switching over and calling up the TV menu on the display. Analogue
and digital TV stations are displayed differently and are marked on the touch-
screen with
“Analog.” or “DVB-T ”.
Press the button MEDIA .
■ TV - The last set TV channel will be displayed in the pre-set aspect ratio in full
picture mode » page 11, Setup TV The TV
menu opens when you touch the
screen.
■ or
- changes to the next TV stations on the station list, analogous to the
arrow keys on the unit.
■ Audio - changes to the
Audio menu and plays the last selected audio source.
■ Station list - opens the station list of the presently receivable analog TV sta-
tions as well as the digital TV and radio stations. ■
Memory - opens the preset list of the manually receivable analog TV stations
as well as the digital TV and radio stations.
■ Save - saves the current TV station
■ →
Delete - deletes the stored TV station
■ Extras - opens menu with additional functions
■ T-TXT - opens the video text page of the currently received station if video
text is available for the received TV station
■ Display - shows menu for changing display settings
■ EPG - opens the overview of the electronic program guide if digital TV sta-
tions can be received at the location via DVB-T.
■ Manual - changes to manual set-up of a TV channel via the arrow keys on
the unit or in the display of the TV main menu
Turn Set button 1
to manually adjust a TV channel or digital TV station.
Displays in TV mode
Some television stations offer bilingual programmes in so-called
“dual channel
sound”. The audio channel is selected in the Setup TV » page 11, Setup TV menu.
In this case “ Channel A” or “Channel B ” will be displayed at the top left on the
touch-screen.
A program in stereo will also be indicated by the symbol “ ” on the right on the
touch-screen under the function key . A programme in dual channel sound will
be indicated by the symbol
“ ”.
If a TV station also transmits Video text , “VT” will be displayed at the top right on
the touch-screen. If video text is not available for the current station, the video
text function “ ” will be indicated after call up.
If the set digital TV station supports the electronical program guide it will be indi-
cated accordingly by “EPG” (Electronic Program Guide) at the top right in the
touch-screen. If EPG is not generally available at the location, only “ ” will be dis-
played after call-up of the EPG function via the function key Extras .
Display video text
Press the button MEDIA →
TV →
Extras →
T-TEXT .
Press function key or
to change over to the next or previously available
page.
If you press on the display of the video text page on the touch-screen, the TV pic-
ture will also be displayed in the background of the video text page. If you press
again on the touch-screen, the display of the TV picture in the background of the
video text page will close.
20 MEDIA mode
Page 23 of 44

Stop
- freezes the display of the video text page on the current bottom page. This
is because some video text pages consist of several subpages, which otherwise
are displayed in automatic change-over form.
Zoom - enlarges the display of the current video text page. Pressing once will dis-
play the top half, pressing twice the bottom half of the current video text page
over the full screen. Repeated pressing changes back to the normal display of the
video text page.
In some countries, the corresponding language coding for the video text and the
EPG of the Tv tuners must be set by a
ŠKODA Service Partner.
Electronic program guide EPG
■ Press the button MEDIA →
TV →
Extras .
■ EPG - Electronic Program Guide
■ Info - information on the selected programme and on the next programme
that will be transmitted
■ Selection - the electronic program guide is closed and the selected TV station
in shown in TV mode.
The electronic programme guide is only available via DVB-T-received digital TV
stations and only if they support EPG.
It is not possible to select the programs indicated in the list directly by pressing a
key. The programs in the list can only be marked, displayed and called up via the
right function keys. Ð 21
MEDIA mode
Page 24 of 44

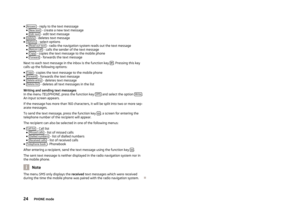
PHONE mode
Main menu TELEPHONE
Fig. 8
Main menu TELEPHONE
Before connecting the mobile phone for the first time, it is necessary to pair the
phone with the radio navigation system – detailed information about this can be
found in your vehicle's Owner's Manual and you phone operating guide.
Press the button TELEPHONE .
■ - Accept a call, dial the entered number. After pressing, the call list is dis-
played in the main menu TELEPHONE.
■ SOS - Emergency
■ Mobile box - set up your mobile box
■ Name - enter name
■ Number - enter phone number
■ Call list - select phone number from a call list
■ Telephone book - select phone number from the telephone book
■ - delete entry
■ OK - saves entry
■ Preset 2 to
Preset 6 - presets
■ - Dial number
■ - delete numbers
■ - Dial number
■ - Telephone book » page 22, Telephone book
■ Call list - call list
■ Missed calls - list of missed calls
■ Dialled numbers - list of dialled numbers
■ Received calls - list of received calls ■
SMS - displays text messages (SMS) menu
» page 23, SMS menu
■ Inbox - displays received text messages
■ Write - writes text messages
■ Extras - opens menu with additional functions
■ Switch off/on micro - switches microphone on/off during a call
■ Switch off/on ring tone - switches on/off ring tone via the vehicle speakers
■ Swit. off hands-free - calls playback over phone only
■ Swit. on hands-free - calls playback over vehicle speakers
■ Conference details - connects/disconnects individual callers during a conference
call » page 23, Conference call WARNING
Concentrate fully at all times on your driving! As the driver you are fully re-
sponsible for road safety. Only use the system so that you are in full control of
your vehicle in every traffic situation - risk of accident! Ð Telephone book
Call a call number from the telephone book
Press the button TELEPHONE - to view further entries
in telephone book,
pull the
slider down.
■ - calls up the telephone book
■ - calls up information about the telephone book entry (pressing the phone
number display dials that number)
■ - calls up the input screen display for number entry
■ - DTMF key tones » page 23
, DTMF key tones
■ Create - creates a voice entry. After saving, the following symbols appears
near the position
■ Delete - deletes voice entry
■ Play - play voice entry
■ Search - searches for an entry in the telephone book
Searching for an entry in the phone book
■ Press the button TELEPHONE .
■ - calls up the telephone book
■ Search – calls up the input screen
■ - Dial number
■ OK - change to the entry selected in the entry line
■ - closes the input screen without accepting the entries
■ - calls up the telephone book
Ð
22 PHONE mode