Page 49 of 194

Seats and Stowage
Front seats
ä
Introduction
This chapter contains information on the following subjects:
Adjusting the front seats 47
Front seat heating 48
The driver's seat should be adjusted in such a way that the pedals can be fully
pressed to the floor with slightly bent legs.
The seat backrest on the driver's seat should be adjusted in such a way that the
upper point of the steering wheel can be easily reached with slightly bent arms.
Correct adjustment of the seats is particularly important for:
› safely and quickly reaching the controls;
› a relaxed, fatigue-free body position;
› achieving the maximum protection offered by the seat belts and the airbag
system. WARNING
■ Only adjust the driver's seat when the vehicle is stationary - risk of accident!
■ Caution when adjusting the seat! You may suffer injuries or bruises as a re-
sult of adjusting the seat without paying proper attention. ■ The seat backrests must not be angled too far back when driving otherwise
this will affect proper operation of the seat belts and of the airbag system -
risk of injury! ■ Never carry more people than the number of seats in the vehicle.
■ Each occupant must correctly fasten the seat belt belonging to the seat.
Children must be fastened » page 115, Transporting children safely with a
suitable restraint system.
■ The front seats and the head restraints must always be adjusted to match
the body size of the seat occupant as well as the seat belts must always be
correctly fastened in order to provide an optimal protection for you and your
occupants. WARNING (Continued)
■ Always keep your feet in the footwell when the car is being driven - never
place your feet on the instrument panel, out of the window or on the surfaces
of the seats. This is particularly important for the front seat passenger. You
will be exposed to increased risk of injury if it becomes necessary to apply the
brake or in the event of an accident. If an airbag is deployed, you may suffer
fatal injuries when adopting an incorrect seated position!
■ It is important for the driver and front passenger to maintain a distance of at
least 25 cm from the steering wheel or dash panel. Not maintaining this mini-
mum distance will mean that the airbag system will not be able to properly
protect you - hazard!
■ Ensure that there are no objects in the footwell as they may get caught be-
hind the pedals when driving or applying the braking. You would then no lon-
ger be able to operate the clutch, brake or accelerate.
■ Do not transport any objects on the front passenger seat except objects
(e.g. child safety seat) provided for this purpose - risk of accident! Note
After a certain time, play can develop within the adjustment mechanism of the
backrest angle. Ð Adjusting the front seats
Fig. 35
Control elements at the seat
First read and observe the introductory information and safety warn-
ings on page 47.
Adjusting a seat in a forward/back direction
›
Pull the lever 1
» Fig. 35 up and push the seat into the desired position.
› Release the lever 1
and push the seat until the lock clicks into place.
£
ä
47
Seats and Stowage
Page 50 of 194

Adjusting height of seat
›
To lift the seat, pull or pump the lever 2
» Fig. 35 upwards.
› To lower the seat, push or pump the lever 2
downwards.
Adjusting the angle of the seat backrest
› To adjust the angle of the backrest, relieve any pressure from the seat backrest
(do not lean on it) and turn the handwheel 3
» Fig. 35.
ÐFront seat heating
Fig. 36
Rocker switch for front seat
heating
First read and observe the introductory information and safety warn-
ings on page 47.
The seat backrests and seats can be heated electrically.
›
By pressing the rocker switch in the position
1 or 2 switch on the front seat
heating to 25 % or 100 % of its power output » Fig. 36.
› To switch off the heating shift the rocker switch into the horizontal position. WARNING
If, as an occupant, you have a subdued pain and/or temperature sensitivity,
e.g. through medication, paralysis or because of chronic illness (e.g. diabetes),
we recommend not to use the seat heating. This can lead to burns on the
back, the posterior and the legs which are difficult to heal. If the seat heating
is used, we recommend to make regular breaks in your journey when driving
long distances, so that the body can recuperate from the stress of the jour-
ney. Please consult your doctor, who can evaluate your specific condition.
ä CAUTION
■ Do not kneel on the seats or otherwise apply pressure at specific points to
avoid damaging the heating elements for the seat heaters.
■ Do not use the seat heaters if the seats are not occupied by persons or if ob-
jects, such as a child seat, bag, etc., are fastened or stored on them. A fault of the
heating elements in the seat heating can occur.
■ Do not clean the seats using moisture » page 132, Fabric covers on electrically
heated seats. Note
■ The seat heating should only be switched on when the engine is running. This
has a significant effect of saving on the battery capacity. ■ If the on-board voltage drops, the seat heating is switched off automatically, in
order to provide sufficient electrical energy for the engine control » page 147,
Automatic load deactivation . Ð Head restraints
Fig. 37
Head restraint: adjusting/removing
Setting height
› Grasp the side of the head restraint with both hands and push it upwards as
required » Fig. 37 - .
› To move the head restraint downwards, press and hold the safety but-
ton » Fig. 37 -
with one hand and press the head restraint downwards with
the other hand.
Removing/installing
› Pull the head restraint out of the seat backrest as far as the stop.
£
48 Using the system
Page 51 of 194

›
Press the locking button in direction of the arrow
» Fig. 37 - and pull the
head restraint out.
› To re-insert the head restraint, push it far enough down into the seat backrest
until the locking button clicks into place.
Best protection is achieved if the top edge of the head restraint is at the same
level as the upper part of your head.
The head restraints must be adjusted to match the size of the seat occupant. Cor-
rectly adjusted head restraints together with the seat belts offer effective protec-
tion for the occupants » page 101.WARNING
■ The head restraints must be correctly adjusted in order to offer effective
protection for the occupants in the event of an accident.
■ Never drive with the head restraints removed - risk of injury!
■ If the rear seats are occupied, the rear head restraint must not be in the
lower position. ÐRear seats
Adjusting seats in forward/back direction
Fig. 38
Releasing at the front/rear
› Pull the lever A
» Fig. 38 up in the direction of arrow 1
or on the release loop
in direction of arrow 2
and move the seat into the desired position 3
. WARNING
The following guidelines must be observed » page 102, Correct seated posi-
tion for the occupants on the rear seats . Ð Adjusting the angle of the seat backrest
Fig. 39
Adjusting the seat backrest
› Pull the lever 1
» Fig. 39 and adjust the required inclination of the seat back-
rest. WARNING
Check for yourself that the seat backrest is engaged by pulling on it. Ð Folding the seat backrest forwards and folding the seat fully
forwards
Fig. 40
Fold seat fully forwards/lock folded forward seats £
49
Seats and Stowage
Page 52 of 194

Folding the seat backrest forwards
›
Put the belt tongue into the opening on the respective side of the vehicle -
safety position.
› Remove the head restraint from the rear middle seat
» page 48, Head re-
straints.
› Push the outer rear seats towards the rear as far as they will go
» page 49,
Adjusting seats in forward/back direction .
› Pull the lever 1
» Fig. 39 on page 49 and fold the seat backrest completely for-
wards.
› Pull the lever
» Fig. 40 up before folding the seat forwards fully.
Folding seats fully forwards and locking them
› If the outer rear seat is fully folded forward, push it towards the rear as far as it
can go.
› Pull the lever A
» Fig. 40 up and fold the seat forwards fully.
› Secure the folded forward seat with the aid of the fixing belt B
to a guide rod
of the head restraint for the front seat » Fig. 40. WARNING
■ Immediately lock the folded forward seat with the aid of the fixing belt to a
guide rod of the head restraint for the front seat - risk of injury.
■ The following guidelines must be observed » page 102, Correct seated posi-
tion for the occupants on the rear seats .CAUTION
If the outer seat is not in the rear end position when folding forward, damage can
occur to the locking bolts when unlocking the seat. Ð Unlocking and removing seats
Fig. 41
Unlocking the folded forward seat/carrying handles on the seat
cushion
› Fold the seat forward
» page 49, Folding the seat backrest forwards and fold-
ing the seat fully forwards .
› Unlock the folded forward seat by pressing the seat locks A
»
Fig. 41
in direc-
tion of arrow 1
.
› Remove the seat using the carrying handles B
or C
.
WARNING
The following guidelines must be observed » page 102. Note
The outer seats are not mutually interchangeable. In the rear area the left seat is
marked with the letter L and the right seat with the letter R.Ð
50 Using the system
Page 53 of 194

Adjusting seats in crosswise direction
Fig. 42
Locking seats
› Remove the middle seat
» page 50, Unlocking and removing seats .
› Fold the outer seat forward
» page 49, Folding the seat backrest forwards and
folding the seat fully forwards and unlock » Fig. 41 on page 50.
› Move the folded forward and unlocked seat on the guide towards the middle of
the vehicle up to the stop.
› Lock the folded forward seat by pressing the seat locks A
» Fig. 42 in the di-
rection of arrow. ÐMove seats into the initial position
Fig. 43
Folding the seat backrest back
into position
› If the seat is removed, first of all position it on the guide and lock the
seat » Fig. 42 on page 51. Pull the seat upwards to ensure that the seat is
locked correctly.
› Fold the seat in the horizontal position until it can be heard to click. Check for
yourself that the seat can no longer be lifted by pulling it up.
› Press the lever
» Fig. 43 and fold back the seat backrest. Check for yourself that
the seat backrest is engaged by pulling on it.
› Remove the tongue of the lock from the safety position. WARNING
■ The belt locks must be in their original position after folding back the seat
cushions and backrests - they must be ready to use.
■ The seat backrests must be securely interlocked in position so that no ob-
jects in the luggage compartment can slide into the passenger compartment if
there is sudden braking - risk of injury! ■ When folding the seat backrest always make sure that it has safely locked
into position, this is confirmed by the position and a visible marking on the
cover of the lever. Ð Boot
ä
Introduction
This chapter contains information on the following subjects:
Class
N1 vehicles 52
Fastening elements 52
Folding hooks 53
Fixing nets 53
Fixing floor covering of the luggage compartment 53
Boot cover 53
Net partition 54
Please observe the following for the purpose of maintaining good handling char-
acteristics of your vehicle:
› Distribute loads as evenly as possible.
› Place heavy objects as far forward as possible.
› Attach the items of luggage to the lashing eyes or using the fixing
net »
page 52 .
In the event of an accident, there is such a high kinetic energy which is produced
by small and light objects that they can cause severe injuries. The magnitude of
the kinetic energy is dependent on the speed at which the vehicle is travelling
and the weight of the object. The speed at which the vehicle is travelling is in this
case the more significant factor. £
51
Seats and Stowage
Page 54 of 194

Example: In the event of a frontal collision at a speed of 50 km/h, an unsecured
object with a weight of 4.5 kg produces an energy, which corresponds to 20 times
its own weight. This means that it results in a weight of approx. 90 kg
“ ”. You can
imagine the injuries that can occur, if this “object” flies through the interior com-
partment and hits an occupant. WARNING
■ Store the objects in the boot and attach them to the lashing eyes.
■ Loose objects in the passenger compartment can be thrown forward during
a sudden manoeuvre or in case of an accident and can injure the occupants or
other oncoming traffic. This risk is still increased, if the objects which are fly-
ing around are hit by a deployed airbag. In this case, the objects which are
thrown back can injure the occupants - hazard. ■ Please note that the handling properties of the vehicle may be affected
when transporting heavy objects as the centre of gravity can be displaced -
risk of accident! The speed and style of driving must be adjusted accordingly.
■ If the items of luggage or objects are attached to the lashing eyes with un-
suitable or damaged lashing straps, injuries can occur in the event of braking
manoeuvres or accidents. To prevent items of luggage from being thrown for-
ward, always use suitable lashing straps which must be firmly attached to the
lashing eyes. ■ The items carried in the boot must be stored in such a way that no objects
are able to slip forward if any sudden driving or braking manoeuvres are un-
dertaken - risk of injury!
■ When transporting fastened objects which are sharp and dangerous in the
boot that has been enlarged by folding the rear seats forward, ensure the
safety of the passengers transported on the other rear seats » page 102, Cor-
rect seated position for the occupants on the rear seats .
■ If the rear seat next to the folded forward seat is occupied, ensure maxi-
mum safety, e.g. by placing the goods to be transported in such a way that the
seat is prevented from folding back in case of a rear collision.
■ Never drive with the boot lid fully opened or slightly ajar otherwise exhaust
gases may get into the interior of the vehicle - risk of poisoning!
■ Under no circumstances, should the permissible axle loads and permissible
gross weight of the vehicle be exceeded - risk of accident!
■ Never transport people in the boot! CAUTION
Please ensure that the heating elements for the rear window heater are not dam-
aged as a result of abrasive objects. Note
Tyre pressure must be adjusted to the load »
page 149, Service life of tyres. Ð Class N1 vehicles
First read and observe the introductory information and safety warn-
ings on page 51.
On class N1 vehicles, which are not fitted with a protective grille, a lashing set
which complies with the standard EN
12195 (1 - 4) must be used for fastening the
load. Ð Fastening elements
Fig. 44
Boot: Lashing eyes and fasten-
ing elements
First read and observe the introductory information and safety warn-
ings on page 51.
The boot provides the following fastening elements
»
Fig. 44.
Lashing eyes for fastening items of luggage and fixing nets.
Fastening elements for fastening fixing nets. CAUTION
The maximum permissible load of the lashing eyes is 3.5 kN (350 kg). Ð
ä
ä
A
B
52
Using the system
Page 55 of 194

Folding hooks
Fig. 45
Boot: folding hooks
First read and observe the introductory information and safety warn-
ings on page 51.
Folding hooks
» Fig. 45 for attaching small items of luggage, such as bags etc., are
provided on both sides of the luggage compartment. CAUTION
The maximum permissible load of the hook is 7.5 kg. ÐFixing nets
Fig. 46
Fixing net: double horizontal pocket, floor fixing net/double vertical
pockets
First read and observe the introductory information and safety warn-
ings on page 51.ä
ä Fixing examples of the fixing net as a double horizontal pocket, floor fixing
net
» Fig. 46 - and double vertical pockets » Fig. 46 - . WARNING
Do not exceed the maximum permissible load of the fixing nets. Heavy objects
are not secured sufficiently - risk of injury! CAUTION
■ The maximum permissible load of the fixing nets is 1.5 kg.
■ Do not place any sharp objects in the nets - risk of damaging the net. Ð Fixing floor covering of the luggage compartment
First read and observe the introductory information and safety warn-
ings on page 51.
You can fix the raised floor cover between the backrests and the luggage com-
partment cover, if one needs to reach the spare wheel. Ð Boot cover
Fig. 47
Removing the luggage compartment cover/luggage compartment
cover in the lower position
First read and observe the introductory information and safety warn-
ings on page 51.
The boot cover can be removed if you wish to transport bulky goods.
£
ä
ä
53
Seats and Stowage
Page 56 of 194

›
Unhook the support straps 1
» Fig. 47.
› Fold the luggage compartment cover forwards a little.
› Remove the cover from the holders 2
by pulling towards the rear, or by lightly
knocking on the underside of the cover in the area between the holders.
› To reinstall, first of all push the luggage compartment cover into the holders 2
and then hook the support straps 1
on the boot lid.
The luggage compartment cover can also be put into the lower position on the
supporting elements » Fig. 47 - .
The procedure of installing or removing is identical.
In this position you can store smaller objects up on the luggage compartment
cover up to a total weight of 2.5 kg. WARNING
No objects should be placed on the boot cover, the vehicle occupants could be
endangered if there is sudden braking or the vehicle collides with something. CAUTION
Please ensure that the heating elements for the rear window heater are not dam-
aged as a result of objects placed in this area. Note
When opening the boot lid, the luggage compartment cover is lifted up at the
same time- risk that objects placed in this area can slip forward! Ð Net partition
Fig. 48
Using the net partition behind the front/rear seats
First read and observe the introductory information and safety warn-
ings on page 51.
The net partition can either be installed behind the rear seats or behind the front
seats.
Installing the net partition behind the rear seats
›
Remove the boot cover » page 53, Boot cover.
› Remove the net partition from the bag.
› Unfold both parts of the cross rod until they are heard to engage.
› First of all insert the cross rod into the mount B
» Fig. 48
on one side and push
it forward. In the same way, insert the cross rod into the mount B
on the other
side of the vehicle.
› Hang the carabines C
at the ends of the belt into the lashing eyes behind the
rear seats.
› Pull the belt through the tensioning clasp on both sides- first of all on the one
side and then on the other side.
Removing the net partition
› Undo the belts on both sides and unhook the carabines C
» Fig. 48.
› Push the cross rod first of all on the one side and then on the other side to-
wards the rear.
› Remove the cross rod from the mounts B
.
Packing the net partition
› Press the red button of the joint A
» Fig. 48
- the joint becomes loose.
› Put the net partition folded together in the bag and close it.
› Attach the bag with the aid of the plastic carabines to the eyes on the left and
right boot trim panel. £
ä
54 Using the system
 1
1 2
2 3
3 4
4 5
5 6
6 7
7 8
8 9
9 10
10 11
11 12
12 13
13 14
14 15
15 16
16 17
17 18
18 19
19 20
20 21
21 22
22 23
23 24
24 25
25 26
26 27
27 28
28 29
29 30
30 31
31 32
32 33
33 34
34 35
35 36
36 37
37 38
38 39
39 40
40 41
41 42
42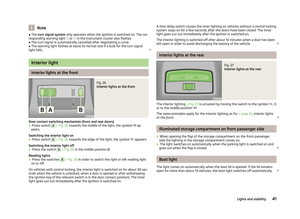 43
43 44
44 45
45 46
46 47
47 48
48 49
49 50
50 51
51 52
52 53
53 54
54 55
55 56
56 57
57 58
58 59
59 60
60 61
61 62
62 63
63 64
64 65
65 66
66 67
67 68
68 69
69 70
70 71
71 72
72 73
73 74
74 75
75 76
76 77
77 78
78 79
79 80
80 81
81 82
82 83
83 84
84 85
85 86
86 87
87 88
88 89
89 90
90 91
91 92
92 93
93 94
94 95
95 96
96 97
97 98
98 99
99 100
100 101
101 102
102 103
103 104
104 105
105 106
106 107
107 108
108 109
109 110
110 111
111 112
112 113
113 114
114 115
115 116
116 117
117 118
118 119
119 120
120 121
121 122
122 123
123 124
124 125
125 126
126 127
127 128
128 129
129 130
130 131
131 132
132 133
133 134
134 135
135 136
136 137
137 138
138 139
139 140
140 141
141 142
142 143
143 144
144 145
145 146
146 147
147 148
148 149
149 150
150 151
151 152
152 153
153 154
154 155
155 156
156 157
157 158
158 159
159 160
160 161
161 162
162 163
163 164
164 165
165 166
166 167
167 168
168 169
169 170
170 171
171 172
172 173
173 174
174 175
175 176
176 177
177 178
178 179
179 180
180 181
181 182
182 183
183 184
184 185
185 186
186 187
187 188
188 189
189 190
190 191
191 192
192 193
193