2012 SKODA CITIGO brake light
[x] Cancel search: brake lightPage 94 of 157
WARNING
■ In view of the high temperatures which can be produced in the catalytic con-
verter, the vehicle should be parked in such a way that the catalytic converter
cannot come into contact with easily flammable materials under the vehicle –
risk of fire!
■ Never use additional underbody protection or anti-corrosion agents for ex-
haust pipes, catalytic converters or heat shields – risk of fire! CAUTION
■ Never drive until the fuel tank is completely empty! The irregular supply of fuel
can cause misfiring, which can result in considerable damage to parts of the en-
gine and exhaust system. ■ Just filling the tank with leaded petrol once will damage the exhaust system! ÐEconomical and environmentally friendly driving
Introductory information
Your fuel consumption, any pollution of the environmental and the wear-and-tear
to the engine, brakes and tyres, depend essentially on three factors:
› your personal style of driving;
› the conditions under which your vehicle is operated;
› technical aspects.
The fuel economy by can be improved by 10
-15 % by always looking ahead and
driving in an economical way.
Fuel consumption is also be influenced by external factors which are beyond the
driver's control. Consumption increases during the winter or under difficult condi-
tions, on poor roads, etc.
Fuel consumption can vary considerably from the manufacturer's data, as a result
of outside temperatures, the weather and driving style.
The technical requirements for low fuel usage and economic efficiency of the ve-
hicle have already been built into the vehicle at the works. ŠKODA places a partic-
ular emphasis on minimising negative effects on the environment. It is necessary
to take note of the guidelines given in this chapter in order to make best use of
these characteristics and to maintain their effectiveness. The optimal engine speed should be obtained when accelerating, in order to
avoid a high fuel consumption and resonance of the vehicle.
Ð Looking ahead when driving
A vehicle's highest fuel consumption occurs when accelerating, therefore unnec-
essary accelerating and braking should be avoided. If looking ahead when driving,
less braking and consequently less accelerating are required. If possible, let your
vehicle coast to a stop, or use the engine brake, if you can see that the next set
of traffic lights is on red, for example. Ð Shifting to save energy
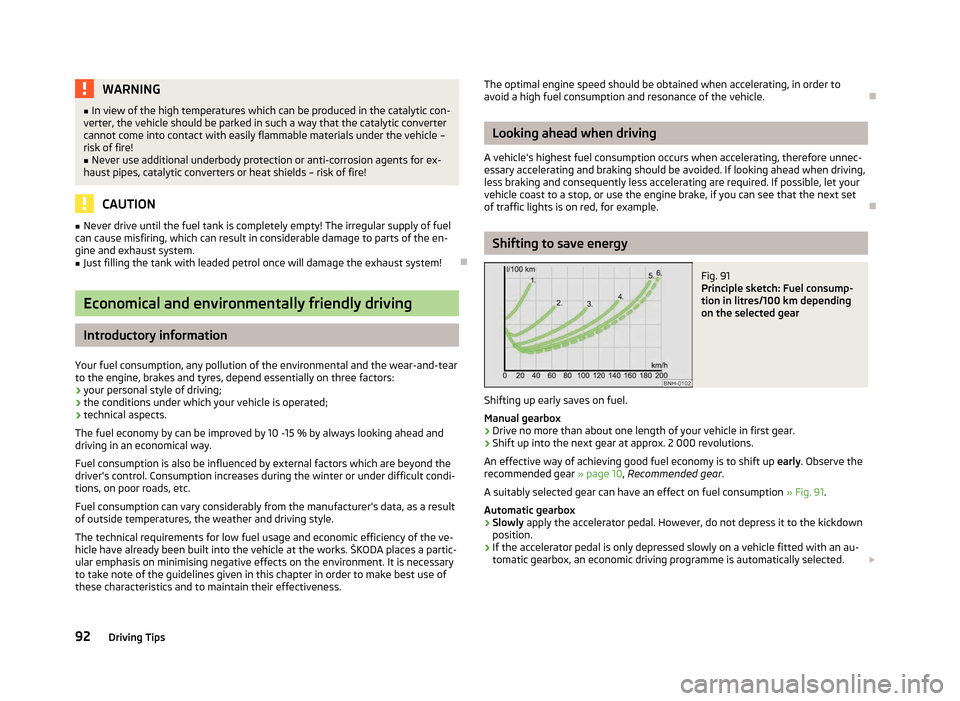
Fig. 91
Principle sketch: Fuel consump-
tion in litres/100 km depending
on the selected gear
Shifting up early saves on fuel.
Manual gearbox › Drive no more than about one length of your vehicle in first gear.
› Shift up into the next gear at approx. 2
000 revolutions.
An effective way of achieving good fuel economy is to shift up early. Observe the
recommended gear » page 10, Recommended gear .
A suitably selected gear can have an effect on fuel consumption » Fig. 91.
Automatic gearbox › Slowly
apply the accelerator pedal. However, do not depress it to the kickdown
position.
› If the accelerator pedal is only depressed slowly on a vehicle fitted with an au-
tomatic gearbox, an economic driving programme is automatically selected.
£
92 Driving Tips
Page 99 of 157
General Maintenance
Taking care of and cleaning the vehicle
Taking care of your vehicle
ä
Introduction
This chapter contains information on the following subjects:
Washing the vehicle 98
Automatic car wash systems 98
Washing by hand 98
Washing with a high-pressure cleaner 98
Preserving and polishing the vehicle paintwork 99
Chrome parts 99
Paint damage 99
Plastic parts 99
De-icing windows and exterior mirrors 100
Radio reception 100
Headlight lenses 100
Rubber seals 100
Door lock cylinders 100
Wheels 101
Underbody protection 101
Protection of hollow spaces 101
Artificial leather and materials 101
Fabric covers on electrically heated seats 102
Natural leather 102
Seat belts 103
Regular and proper care help to retain the efficiency and value of your vehicle. It
may also be one of the requirements for the acceptance of warranty claims relat-
ing to corrosion damage and paint defects on the bodywork.
We recommend using care products from
ŠKODA Original Accessories that are
available from ŠKODA Service Partners. The instructions for use on the package
must be observed. WARNING
■ Care products may be harmful to your health if not used according to the in-
structions.
■ Always store care products in a safe place, out of the reach of children – risk
of poisoning! ■ When washing your vehicle in the winter: Water and ice in the brake system
can affect the braking efficiency – risk of accident! ■ Only wash the vehicle when the ignition is switched off – risk of accident!
■ Protect your hands and arms from sharp-edged metal parts when cleaning
the underfloor, the inside of the wheel housings or the wheel trims – risk of
cuts!
■ Air fresheners and scents can be hazardous to heath when the temperature
inside the vehicle is high. CAUTION
■ Be sure to check clothing for colourfastness to avoid any damage or visible
stains on the material (leather), panels and textiles.
■ Cleaners containing solvents can damage the material being cleaned.
■ Do not wash your vehicle in bright sunlight – risk of paint damage.
■ If washing the vehicle in the winter using a hose or high-pressure cleaner, en-
sure that the jet of water is not aimed directly at the locking cylinders or the
door/panel joints – risk of freezing!
■ Do not use any insect sponges, rough kitchen sponges or similar cleaning prod-
ucts – risk of damaging the surface of paintwork. ■ Do not stick any stickers on the inside of the rear windows, in the vicinity of the
heating elements. These may get damaged.
■ Do not clean the inside of the rear window with sharp-edged objects or corro-
sive and acidic cleaning agents – risk of damaging the heating elements.
■ Do not attach scents and air fresheners to the dashboard – risk of damage to
the dashboard.
■ To avoid damaging the parking aid sensors while cleaning with high-pressure
cleaners or steam jets, the sensors must only be directly sprayed for short periods
while a minimum distance of 10
cm must be observed.
■ Do not clean the roof trim with a brush – risk of damage to the trim surface. For the sake of the environment
■ Used cans of vehicle care products represent a special type of hazardous waste.
These must be disposed of in accordance with national legal regulations. ■ Only wash the vehicle at washing bays intended for this purpose. £
97
Taking care of and cleaning the vehicle
Page 103 of 157
Wheels
First read and observe the introductory information and safety warn-
ings on page 97.
Wheel rims
Also thoroughly wash the wheel rims when washing the vehicle on a regular ba-
sis. Regularly remove salt and brake abrasion from the wheel rims otherwise the
material will be affected. Damage to the paint layer on the wheel rims must be
touched up immediately.
Light alloy wheels
After washing thoroughly and treat the wheel rims with a protective product for
light alloy wheels. Products which cause abrasion must not be used to treat the
wheel rims. WARNING
Water, ice and grit in the brake system can affect the braking efficiency – risk
of accident! CAUTION
Severe layers of dirt on the wheels can also result in wheel imbalance. This may
show itself in the form of a wheel vibration which is transmitted to the steering
wheel which, in certain circumstances, can cause premature wear of the steering.
This means it is necessary to remove the dirt. Note
We recommend that any repairs to damaged paintwork are carried out by a
ŠKODA Service Partner. ÐUnderbody protection
First read and observe the introductory information and safety warn-
ings on page 97.
The underside of your vehicle is protected for life against chemical and mechani-
cal influences.ä
ä As damage to the
protective layer when driving cannot be ruled out completely,
we recommend that you inspect the protective layer on the underside of your ve-
hicle and on the chassis at specific intervals – preferably at the beginning and end
of the winter.
ŠKODA Service Partners have suitable spray products and the necessary equip-
ment available, and are familiar with the instructions for use. We therefore rec-
ommend that touch-up work or additional corrosion protection measures are car-
ried out by a ŠKODA Service Partner. WARNING
Never use additional underbody protection or anti-corrosion agents for ex-
haust pipes, catalytic converters or heat shields. When the engine reaches its
operating temperature, these substances might ignite – risk of fire! Ð Protection of hollow spaces
First read and observe the introductory information and safety warn-
ings on page 97.
All the cavities of your vehicle which are at risk from corrosion are protected for
life by a layer of protective wax applied in the factory.
This wax protection does not require to be inspected or re-treated. If any small
amount of wax flow out of the cavities at high temperatures, these must be re-
moved with a plastic scraper and the stains cleaned using a petroleum cleaner. WARNING
Safety regulations should be observed when using petroleum cleaner to re-
move wax – risk of fire! Ð Artificial leather and materials
First read and observe the introductory information and safety warn-
ings on page 97.
The artificial leather can be cleaned using a damp cloth. If this does not prove to
be adequate, these parts can only be treated with special
solvent-free plastic
cleaning and care products . £
ä
ä
101
Taking care of and cleaning the vehicle
Page 112 of 157

Opening and closing the bonnet
Fig. 97
Unlocking the bonnet Fig. 98
Securing the bonnet
First read and observe the introductory information and safety warn-
ings on page 108.
Opening
›
Pull the release lever under the dash panel 1
» Fig. 97 in the direction of the
arrow.
Before opening the bonnet, ensure that the arms of the windscreen wipers are
correctly in place against the windscreen otherwise the paintwork could be dam-
aged.
› Press the release lever in the direction of the arrow 2
» Fig. 97 and the bonnet
is unlocked.
› Grab hold of the bonnet and lift.
ä ›
Take the bonnet support out of its holder 3
in the direction if the ar-
row » Fig. 98 and secure the opened bonnet by inserting the end of the support
in the opening 4
designed for it.
Closing
› Lift the bonnet slightly and unhook the bonnet support. Press the bonnet sup-
port into the holder 3
designed to hold it.
› Let the bonnet drop into the lock carrier lock from a height of around 20
cm –
do not push it in .
› Check that the bonnet is closed properly. Ð Engine compartment overview
Fig. 99
1.0 ltr./55 kW MPI Petrol engine
First read and observe the introductory information and safety warn-
ings on page 108.
Engine oil dipstick 111
Engine oil filler opening 111
Coolant expansion reservoir 112
Brake fluid reservoir 113
Vehicle battery 115
Windscreen washer fluid reservoir 114
Ð
ä 1
2
3
4
5
6
110
General Maintenance
Page 115 of 157

Loss of coolant
A loss of coolant is first and foremost an
indication of a leak in the system. Do
not merely top up the coolant. Have the cooling system checked by a
ŠKODA spe-
cialist garage immediately. CAUTION
If a fault causes the engine to overheat, we recommend visiting a ŠKODA Service
Partner immediately, otherwise serious engine damage may occur. ÐReplenishing the coolant
First read and observe the introductory information and safety warn-
ings on page 108.
›
Switch off the engine.
› Allow the engine to cool.
› Place a cloth over the cap of the coolant expansion reservoir
» Fig. 101 on
page 112 and unscrew the cap carefully.
› Replenish the coolant.
› Turn the cap until it clicks into place.
Do not use an alternative additive if the specified coolant is not available in an
emergency. In this case, just use water and have the correct mixing ratio of water
and the coolant additive restored by a ŠKODA
specialist garage as soon as possi-
ble.
Only use new coolant to top up the system.
Do not fill the coolant above the mark “MAX” » Fig. 101 on page 112! Excess cool-
ant heats up and then is forced out of the cooling system through the pressure
relief valve in the cap. WARNING
■ The coolant additive and thus all of the coolant is harmful to your health.
Avoid contact with the coolant. Coolant vapours are also harmful to health.
Therefore always safely store the coolant additive in its original container out
of the reach of children – risk of poisoning!
■ If any coolant splashes into your eyes, immediately rinse out your eyes with
clear water and contact a doctor as soon as possible.
■ You should also consult a doctor without delay if you have inadvertently
swallowed coolant.
ä CAUTION
Do not continue your journey, if it is not possible to top up the coolant under
the prevailing conditions . Contact a
ŠKODA Service Partner to avoid the risk of
serious engine. Ð Radiator fan
First read and observe the introductory information and safety warn-
ings on page 108.
The radiator fan is driven by an electric motor and controlled according to the
coolant temperature.
After switching off the ignition, the radiator fan can intermittently continue to op-
erate for approx. 10 minutes.
Ð Checking the brake fluid
Fig. 102
Engine compartment: Brake fluid
reservoir
First read and observe the introductory information and safety warn-
ings on page 108.
The brake fluid reservoir is located in the engine compartment.
›
Switch off the engine.
› Open the bonnet
» page 110.
› Check the level of brake fluid in the reservoir
» Fig. 102. The level must be be-
tween the
“MIN” and “MAX” markings.
When driving, a slight drop in the fluid level is caused by the wear-and-tear and
automatic adjustment of the brake pads, and is therefore perfectly normal. £
ä
ä
113
Inspecting and replenishing
Page 116 of 157
There may be an indication of a leak in the brake system, however, if the fluid lev-
el drops significantly within a short time or if it drops below the
“MIN” marking. If
the brake fluid level is too low, this is indicated by the warning light lighting up
in the instrument cluster » page 15, Brake system .WARNING
If the fluid level has dropped below the MIN marking, do not continue your
journey – risk of accident! Seek help from a
ŠKODA specialist garage.ÐChanging the brake fluid
First read and observe the introductory information and safety warn-
ings on page 108.
Brake fluid absorbs moisture. Over time it therefore absorbs moisture from the
environment. Excessive water in the brake fluid may be the cause of corrosion in
the brake system. The water content also lowers the boiling point of the brake
fluid.
The brake fluid must comply with the following standards or specifications:
› VW 50114;
› FMVSS 116 DOT4. WARNING
Using old brake fluid can result in severe stress on the brakes because of the
formation of vapour bubbles in the brake system. This greatly impairs the
braking efficiency and thus also the safety of your vehicle. CAUTION
Brake fluid damages the paintwork of the vehicle. Ð
ä Windscreen washer system
Fig. 103
Engine compartment: Wind-
screen washer fluid reservoir
First read and observe the introductory information and safety warn-
ings on page 108.
The windscreen washer reservoir contains the cleaning fluid for the windscreen
or rear window. The reservoir is located in the engine compartment .
The capacity
of the windscreen washer fluid reservoir is approximately 3
litres.
Clear water is not sufficient to intensively clean the windscreen and headlights.
We therefore recommend using clean water with a screen cleaner (including anti-
freeze in the winter) that is able to remove stubborn dirt.
Under exceptional circumstances, methylated spirits can also be used if no screen
cleaner with antifreeze is available. The concentration of methylated spirits must
not be more than 15 %. The freeze protection at this concentration is sufficient
only to -5 °C. CAUTION
Under no circumstances must radiator antifreeze or other additives be added to
the windscreen washer fluid. Note
Do not remove the filter from the windscreen washer fluid reservoir when replen-
ishing it with liquid otherwise the liquid transportation system can be contamina-
ted, which can cause the windscreen washer system to malfunction. Ð
ä
114 General Maintenance
Page 125 of 157

CAUTION
■ Use the pressure of your hand, do not knock the full wheel trim! Heavy knocks
mainly on the points where the full wheel trim has not been inserted into the
wheel, can result in damage to the guide and centring elements of the full wheel
trim.
■ First of all check that the theft-deterrent wheel bolt is located in the hole near
the valve before fitting the full wheel trim onto a steel wheel which is attached
with a theft-deterrent wheel bolt » page 131, Securing wheels against theft .
■ If wheel trims are retrofitted it must be ensured that an adequate flow of air is
assured to cool the brake system. ÐWheel bolts
Fig. 108
Remove the cap
First read and observe the introductory information and safety warn-
ings on page 119.
Pulling off
›
Push the plastic clip sufficiently far onto the cap until the inner catches of the
clip are positioned at the collar of the cap and detach the cap » Fig. 108.
Install
› Push the caps onto the wheel bolts up to the stop.
The wheel bolt caps are housed in a plastic box in the spare wheel or in the stor-
age space for the spare wheel. Ð
ä Wheel bolts
First read and observe the introductory information and safety warn-
ings on page 119.
Wheels and
wheel bolts are matched to each other in terms of design. Each time
you fit other wheels, e.g. light alloy wheels or wheels with winter tyres, you must
therefore also use the matching wheel bolts of the correct length and shape of
spherical cap. This is essential to ensure that the wheels are tightly fitted and
that the brake system operates properly. Ð Winter tyres
First read and observe the introductory information and safety warn-
ings on page 119.
The handling of your vehicle will be significantly improved when driving on wintry
roads if you fit winter tyres. Summer tyres do not offer the same grip on ice, snow
and at temperatures below 7 °C because of their construction (width, rubber
blend, tread pattern).
To achieve the best possible handling properties, winter tyres must be fitted on
all 4 wheels, the minimum tread depth must be 4
mm and tyres must be no older
than 4 years.
Winter tyres of a lower speed category can be used provided that the permissible
maximum speed of these tyres is not exceeded even if the possible maximum
speed of the vehicle is higher. For the sake of the environment
Fit the summer tyres on again in good time as they provide better handling prop-
erties, a shorter braking distance, less tyre noise, and reduced tyre wear on roads
which are free of snow and ice as well as at temperatures above 7
°C. The fuel
consumption is also lower. Ð Snow chains
First read and observe the introductory information and safety warn-
ings on page 119.
Snow chains must only be mounted on the front wheels.
£
ä
ä
ä
123
Wheels and Tyres
Page 131 of 157

›
Let all of the occupants get out.
While changing a tyre, the occupants of the
vehicle should not stand on the road (instead they should remain behind a crash
barrier).
› Switch off the engine and move the gearshift lever into
Neutral or move the
selector lever for the automatic gearbox into position N.
› Firmly apply the
handbrake.
› Remove the vehicle tool kit
» page 127 and the spare wheel » page 122, Spare
wheel from the luggage compartment. ÐChanging a wheel
First read and observe the introductory information and safety warn-
ings on page 128.
Always change a wheel on a level surface as far as possible.
›
Remove the full wheel trim
» page 122 or caps »
page 123.
› First of all slacken the anti-theft wheel bolt and then the other wheel
bolts » page 130.
› Jack up the vehicle until the wheel that needs changing is clear of the
ground » page 131 .
› Unscrew the wheel bolts and place them on a clean surface (cloth, paper, etc.).
› Remove the wheel.
› Attach the spare wheel and slightly screw on the wheel bolts.
› Lower the vehicle.
› Alternately tighten the wheel bolts opposite each other using the wheel
wrench (crosswise) and then tighten the anti-theft wheel bolt » page 130.
› Reinstall the wheel trim/wheel trim cap or the caps. Note
■ All bolts must be clean and must turn easily.
■ Under no circumstances grease or oil the wheel bolts!
■ When fitting unidirectional tyres, ensure that the direction of rotation is cor-
rect »
page 121, Unidirectional tyres . ÐSubsequent steps
First read and observe the introductory information and safety warn-
ings on page 128.
The following steps must also be performed after changing the wheel.ä
ä ›
Stow and attach the replaced wheel in the spare wheel well using a special
screw » page 122, Spare wheel.
› Stow the vehicle tool kit in the space provided.
› Check
the tyre pressure
on the installed spare wheel as soon as possible.
› Have the
tightening torque of the wheel bolts checked with a torque wrench
as soon as possible.
› Change the damaged wheel or consult a ŠKODA specialist garage about repair
possibilities. Note
■ If it is determined that the wheel bolts are corroded and difficult to turn when
changing the wheel, the bolts must be replaced before checking the tightening
torque. ■ Drive cautiously and only at a moderate speed until the tightening torque has
been checked. Ð
129
Do-it-yourself