2012 Seat Exeo battery
[x] Cancel search: batteryPage 6 of 167
Overview5
Operating
RADIO, MEDIA (audiovisual
systems)
NAME, TEL
NAV, INFO
CAR, SETUP
– Press and hold the ON/OFF button to switch the navigation
system off.The navigation system can also be turned on and off manually if necessary. If
the navigation system was switched on in this way with the ignition key
removed, it will remain available for about thirty minutes.
If the system was switched off manually, it will not be switched on again auto-
matically the next time the ignition is turned on.
Note
To avoid discharging the battery, the navigation system should not be left
switched on for unnecessary long periods with the engine off.
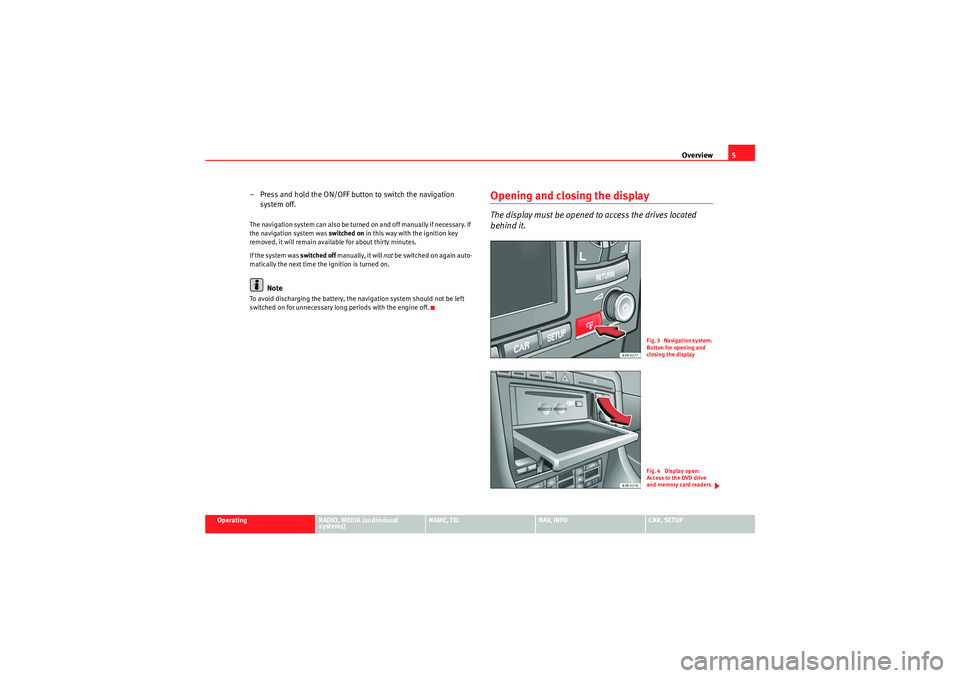
Opening and closing the displayThe display must be opened to access the drives located
behind it.
Fig. 3 Navigation system:
Button for opening and
closing the displayFig. 4 Display open:
Access to the DVD drive
and memory card readers
media_systemE_EN.book Seite 5 Montag, 21. September 2009 1:48 13
Page 31 of 167
Drives
30•Make sure that the iPod is fixed in place with one of the adapters
supplied.Note
•Your Dealer also offers appropriate adapters for iPods that are not latest
generation.•For further information on adapter adaptation, please see the information
enclosed with the adapters supplied.Inserting the iPod into the iPod interface– Switch on the navigation system ⇒ page 4.
– With the display facing upwards and the contact towards the front, slide the iPod into the bay until you hear it engages. The
iPod will switch on automatically and the battery will be charged.
– If the navigation system does not detect the iPod after you insert it, please “reset” the iPod (refer to the iPod operating instruc-
tions).To start the iPod, press the button ⇒page 48.
The iPod is switched off automatically when you switch off the navigation
system or the ignition.
Note
•To ensure optimum sound quality, you should enable the “sound check”
setting on the iPod and disable the “EQ” (equaliser) before inserting the iPod
(please refer to the iPod operating instructions).•Slight scoring marks may occur on the iPod when used with the adapter.
Functions
The iPod is operated using the navigation system controls.– To start the iPod, press the button.The following functions are available:•Play all tracks stored on the iPod•Select directly and play up to five track lists•Switch between the different track lists•Fast forward and rewind within a track•Change tracks within a playlist•Play tracks in shuffle mode ("shuffle")•SCAN function
For further information on handling, please refer to the “MEDIA” chapter
⇒ page 48.TipsHere are some tips and points to remember when using the iPod in the
vehicle:•Track numbers appear with a maximum of two digits in the navigation
system display. The first digit is suppressed if you select a track with a three-
digit number, i.e. track 125 and track 25 are both displayed as track “25”. For
this reason we do not recommend allocating more than 99 tracks to each
playlist.•If you reach the end of a playlist when selecting a track directly
(forward/reverse), the count is resumed at track “1”.
MEDIA
MEDIA
media_systemE_EN.book Seite 30 Montag, 21. September 2009 1:48 13
Page 35 of 167

Drives
34
WARNING
Today's driving conditions require your full attention. As the driver, you
bear the responsibility for road safety. Never operate a portable player
while driving, as this could result in an accident.
Note
•We recommend setting the output level of the portable player to about
70 percent of maximum. Before adjusting the volume using the sound system
in your vehicle, you should first use the volume adjuster of the portable
player.•Using a portable player with the engine switched off will drain the
battery.
media_systemE_EN.book Seite 34 Montag, 21. September 2009 1:48 13
Page 69 of 167
Mobile phone system*
68Mobile phone system*IntroductionA mobile phone can be connected to the on-board phone
system and operated via the navigation system, the multi-
function steering wheel*, the telephone speech control
system* or the speech dialogue system*.The mobile phone adapter is located either on the centre console or in the
centre armrest. A special mobile phone adapter ⇒page 69 is needed in
order to connect your mobile phone to this adapter. Mobile phone adapters
are available from your Dealer or specialist retailers.
You can then operate your mobile phone using the navigation system, the
multi-function steering wheel* ⇒page 12 or the speech dialogue system*
⇒ page 86. You can also use the talk button * on the mobile phone
adapter to answer and end a call.
When your mobile phone is in the mobile phone adapter, call signals are sent
and received via the external car aerial. This ensures good transmission
quality and keeps the mobile phone battery charged.
WARNING
•According to the health authorities, mobile phones may interfere with
the function of pacemakers. A minimum distance of 20 cm should therefore
be kept between the mobile phone aerial and the pacemaker.
−Do not carry a mobile phone in your breast pocket directly over the
pacemaker when the phone is switched on.
− If you suspect interference, switch the mobile phone off immedi-
ately.
•Please direct your full attention to the road at all times! As the driver,
you bear the responsibility for road safety. Therefore, you should only use
the functions in a manner that allows you to maintain control of the vehicle
in all situations.Caution
•Always obey the laws controlling the use of telephones in vehicles!•Always switch off your mobile phone in areas where using mobile phones
is prohibited!•Switch off the telephone in all areas where there may be a risk of explo-
sion. Remember that these areas may not always be adequately marked.
Such places are filling stations, fuel and chemical storage facilities or trans-
port vehicles and other places where fumes, chemicals (e.g. from leaking
propane or fuel vapours in vehicles or buildings) or large quantities of dust
particles (e.g. from flour or wood) could accumulate in the air. This warning
also applies to all other places where you would normally switch off your
engine.Note
•In order to use the mobile phone functions, your mobile phone must be
compatible with the mobile phone adapter in the vehicle and the functions
must be supported by your service provider.•The range of the handset may be affected in isolated areas (such as a
tunnel or underground garage).•Some places have no range at all. You will not be able to use the tele-
phone in these places.
WARNING (continued)
media_systemE_EN.book Seite 68 Montag, 21. September 2009 1:48 13
Page 71 of 167
Mobile phone system*
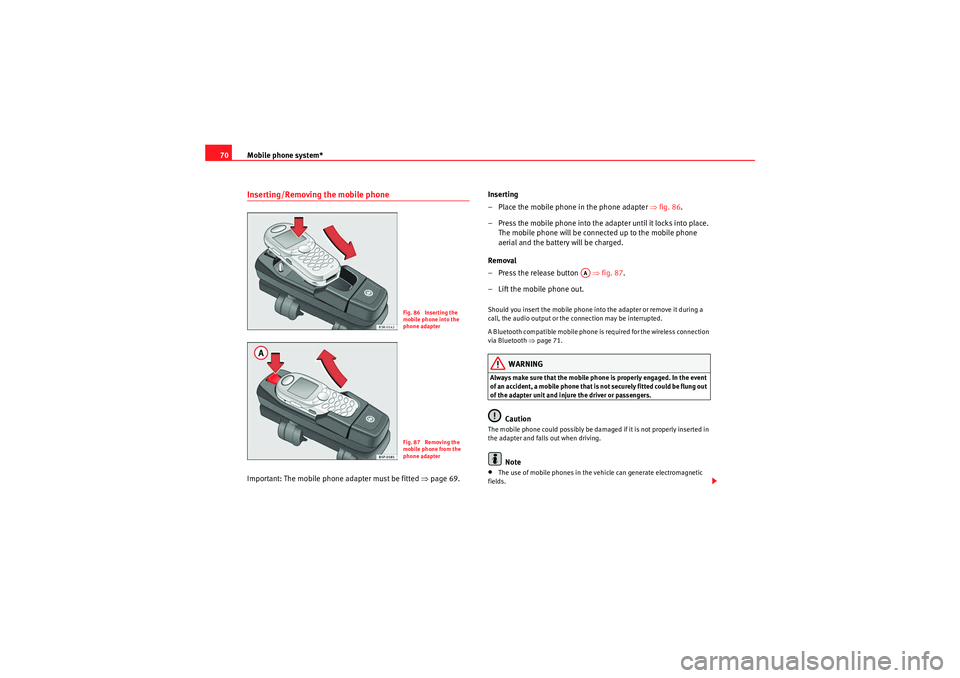
70Inserting/Removing the mobile phoneImportant: The mobile phone adapter must be fitted ⇒page 69. Inserting
– Place the mobile phone in the phone adapter ⇒
fig. 86.
– Press the mobile phone into the adapter until it locks into place. The mobile phone will be connected up to the mobile phone
aerial and the battery will be charged.
Removal
– Press the release button ⇒fig. 87.
– Lift the mobile phone out.
Should you insert the mobile phone into the adapter or remove it during a
call, the audio output or the connection may be interrupted.
A Bluetooth compatible mobile phone is required for the wireless connection
via Bluetooth ⇒page 71.
WARNING
Always make sure that the mobile phone is properly engaged. In the event
of an accident, a mobile phone that is not securely fitted could be flung out
of the adapter unit and injure the driver or passengers.
Caution
The mobile phone could possibly be damaged if it is not properly inserted in
the adapter and falls out when driving.
Note
•The use of mobile phones in the vehicle can generate electromagnetic
fields.
Fig. 86 Inserting the
mobile phone into the
phone adapterFig. 87 Removing the
mobile phone from the
phone adapter
AA
media_systemE_EN.book Seite 70 Montag, 21. September 2009 1:48 13
Page 150 of 167
INFO (Traffic information)149
Operating
RADIO, MEDIA (audiovisual
systems)
NAME, TEL
NAV, INFO
CAR, SETUP
Setting timer start time
–Select Timer 1 or Timer 2 ⇒ page 148, fig. 190 .
– Press the control knob. The hour display for the corresponding timer will then be highlighted white.
– Rotate the control knob to set the hour.
– Press the control knob. The minute display for the corresponding timer will then be highlighted white.
– Rotate the control knob to set the minutes.
– Press the control knob to confirm your selection.With this function you can set the start time of two separate timers for
recording traffic news announcements.
From the time set in Timer 1 or Timer 2 , the navigation system can store traffic
announcements for approx. two hours.
Use the Timer status option to activate the times you have set. e.g. in the
timer status function, if you select timer 1, the traffic announcements are
stored for approx. two hours as of the time set by you.
You can access the recorded traffic announcements using the TP memo
control button ⇒ page 146.
When you park your vehicle, the timers will remain on for a total of 72 hours.
During these 72 hours the system will record the traffic announcements it
receives at the times you have specified. If you have not used your vehicle for
longer than 72 hours the timers will be deactivated to avoid draining the
battery.
Recorded traffic announcements will be deleted after about six hours.
Note
•Traffic announcements can only be recorded if the Traffic programme
option in Radio Setup is set to on.•All incoming traffic news announcements will be recorded. As the system
has a limited memory capacity, all old traffic announcements are overwritten
by new ones.•To avoid draining the battery we recommend that you only activate the
timers when necessary.TMC announcements
When the route guidance is activated, you can switch the TMC
announcement option on or off as desired.TMC stands for “Traffic Message Channel”.
– Starting from any one of the INFO menus, press the ⇒page 9 button.
– Select TMC announcement ⇒ page 148, fig. 188 .
– Select on to activate the option for TMC announcements, or
– Select off to deactivate the option for TMC announcements.If there is an obstruction, but your route cannot be adapted, you will hear a
TMC announcement.
Whenever there is an obstruction, you will hear two TMC announcements (if
applicable). The first announcement will be made about 30 km before you
reach the traffic obstruction and a second announcement will follow about
two km before the obstruction.
SETUP
media_systemE_EN.book Seite 149 Montag, 21. September 2009 1:48 13
Page 153 of 167
CAR (vehicle settings)
152
– Press the button ⇒ page 151, fig. 191 to fold open the
display.
– Check whether there is already a DVD or CD in the drive. If there is a DVD or CD in the drive, press the eject button and remove it
⇒page 24.
– Insert the up-to-date navigation DVD into the drive, keeping it level (printed side faces up). Hold the navigation DVD at the
centre hole and at the outer ri m. The navigation DVD will be
drawn into the drive automatically. The update will start automat-
ically ⇒page 151, fig. 192 .
– Switch the navigation system on manually ⇒page 4 once the
update has been completed.When it is inserted the navigation DVD will first be checked. When the check
has been completed you can monitor the progress of the software update by
means of the graph shown in the display ⇒ page 151, fig. 192. The graph will
show approx. 10% ⇒ page 151, fig. 192 while it is deleting the old software.
Once the software update has been completed the navigation system will re-
start automatically. If necessary the audio software will then also be updated.
The display will show a message. When the complete software update has
been finalised the navigation system will be switched off. Switch the naviga-
tion system on manually ⇒ page 4.
Note
•Switch on the engine before you start the update in order to avoid
draining the battery.•When you insert the DVD for the first time, new software for the navigation
system will automatically be installed.
A2
media_systemE_EN.book Seite 152 Montag, 21. September 2009 1:48 13