2012 RENAULT FLUENCE handle
[x] Cancel search: handlePage 147 of 241

glove box ............................................................... (current page)
JauneNoirNoir texte
3.19
ENG_UD21431_2
Rangements / aménagements habitacle (L38 - X38 - Renault)
ENG_NU_891_892-7_L38-B32_Renault_3
P ASSENgER coMPARTMENT ST oRAgE SPAcE AND FITTINgS (3/3)
Rear armrest storage
Lower armrest 9.
9
10
11
clothes hooks 10
grab handle 11
This offers support and can be held
when the vehicle is being driven.
Do not use it for getting into or out of
the vehicle.
W h e n t u r n i n g c o r n e r s ,
accelerating or braking,
ensure that the recepta -
cle being held by the cup
holder is not dislodged.
There is a risk of burning if hot liquid
escapes.
12
Front seat storage
compartments 12
Page 150 of 241

tailgate .................................................. (up to the end of the DU)
tailgate .................................................. (up to the end of the DU)
3.22
ENG_UD21356_2
Coffre à bagages (L38 - X38 - Renault)
ENG_NU_891_892-7_L38-B32_Renault_3
Luggage compartment
T AIlgATE
opening
Press button 1 or 2 and lift the tailgate.
2
closing
Pull down the tailgate using handle 4
inside the tailgate (depending on the
vehicle) to assist you.
1
3
4
opening manually from
inside the vehicle
If it is impossible to unlock the tailgate,
it can be done from inside.
– access the luggage compartment by
folding forward the seatback(s) of
the rear bench seat,
– insert a pencil or similar object in
cavity 3 and slide the unit as shown
in the illustration,
– push the tailgate to open it.
Page 158 of 241

bonnet................................................... (up to the end of the DU)
maintenance: mechanical ...................................... (up to the end of the DU)
4.2
ENG_UD23759_3
Capot moteur (L38 - X38 - Renault)
ENG_NU_891_892-7_L38-B32_Renault_4
Jaune NoirNoir texte
Bonnet
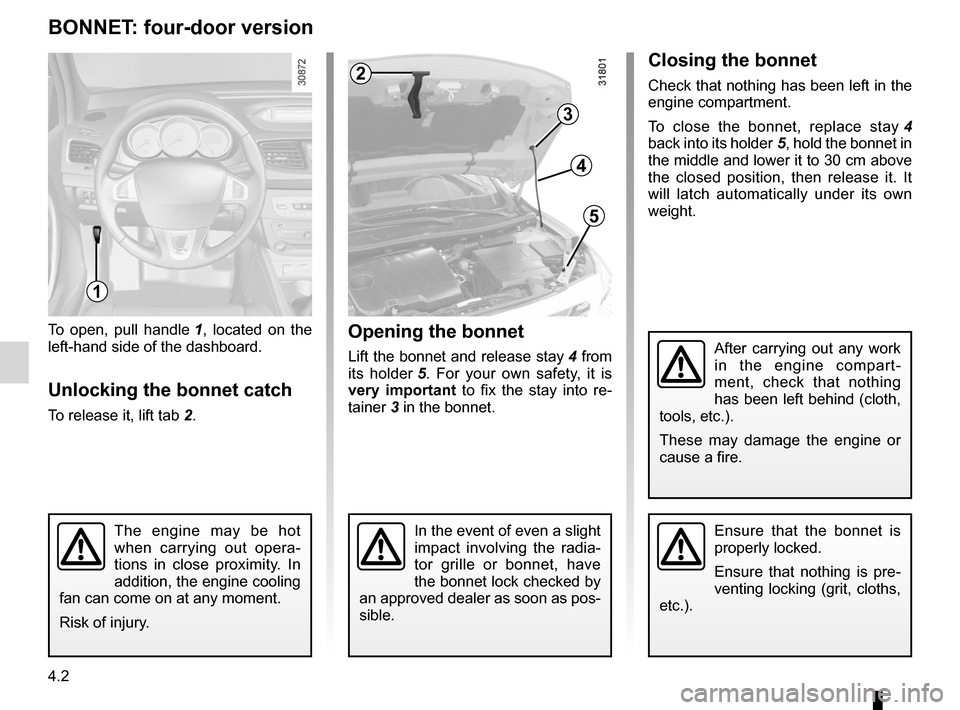
Opening the bonnet
Lift the bonnet and release stay 4 from
its holder 5 . For your own safety, it is
very important to fix the stay into re -
tainer 3 in the bonnet.
To open, pull handle
1 , located on the
left-hand side of the dashboard.
Unlocking the bonnet catch
To release it, lift tab 2.
BOnnet: four-door version
1
2Closing the bonnet
Check that nothing has been left in the
engine compartment.
To close the bonnet, replace stay 4
back into its holder 5, hold the bonnet in
the middle and lower it to 30 cm above
the closed position, then release it. It
will latch automatically under its own
weight.
Ensure that the bonnet is
properly locked.
Ensure that nothing is pre -
venting locking (grit, cloths,
etc.).The engine may be hot
when carrying out opera -
tions in close proximity. In
addition, the engine cooling
fan can come on at any moment.
Risk of injury.In the event of even a slight
impact involving the radia -
tor grille or bonnet, have
the bonnet lock checked by
an approved dealer as soon as pos-
sible.
3
4
5
After carrying out any work
in the engine compart -
ment, check that nothing
has been left behind (cloth,
tools, etc.).
These may damage the engine or
cause a fire.
Page 159 of 241

JauneNoirNoir texte
4.3
ENG_UD23759_3
Capot moteur (L38 - X38 - Renault)
ENG_NU_891_892-7_L38-B32_Renault_4
Opening the bonnet
Lift the bonnet; you will need to guide it
as it is held by a strut.
To open, pull handle
1 , located on the
left-hand side of the dashboard.
Unlocking the bonnet catch
To release it, lift tab 2.
BOnnet: five-door version
2Closing the bonnet
Check that nothing has been left in the
engine compartment.
To close the bonnet again, hold the
bonnet in the middle and lower it to
30 cm above the closed position, then
release it. It will latch automatically
under its own weight.
Ensure that the bonnet is
properly locked.
Ensure that nothing is pre -
venting locking (grit, cloths,
etc.).
The engine may be hot
when carrying out opera -
tions in close proximity. In
addition, the engine cooling
fan can come on at any moment.
Risk of injury.In the event of even a slight
impact involving the radia -
tor grille or bonnet, have
the bonnet lock checked by
an approved dealer as soon as pos-
sible.
Do not press down on the
bonnet: there is a risk that
the bonnet may accidentally
close.
1
After carrying out any work
in the engine compart -
ment, check that nothing
has been left behind (cloth,
tools, etc.).
These may damage the engine or
cause a fire.
Page 168 of 241

battery................................................... (up to the end of the DU)
4.12
ENG_UD13687_1
Batterie (L38 - X38 - Renault)
ENG_NU_891_892-7_L38-B32_Renault_4
The battery 1 does not require any
maintenance.label A
Observe the indications on the battery:
– 2 naked flames and smoking forbid -
den;
– 3 eye protection required;
– 4 keep away from children;
– 5 explosive materials;
– 6 refer to the handbook;
– 7 corrosive materials.
Battery
The battery is a specific
type , please ensure it is
replaced with the same
type. Consult an approved
dealer.
Handle the battery with care
as it contains sulphuric acid,
which must not come into
contact with eyes or skin. If
it does, wash the affected area with
plenty of cold water. If necessary,
consult a doctor.
Ensure that naked flames, red hot
objects and sparks do not come into
contact with the battery as there is a
risk of explosion.
BA tteR y
Depending on the vehicle, a system
continuously checks the battery charge
status. If the level drops, the message
“Battery low start engine ” is displayed
on the instrument panel. In this case,
start the engine. Then the message
“ Battery charging ” appears on the in -
strument panel for the duration of the
charging time.
The charge status of your battery can
decrease especially if you use your ve-
hicle:
– for short journeys;
– for driving in town;
– when the temperature drops;
– after extended use of consumers
(radio etc.) with the engine switched
off.
Replacing the battery
As this operation is complex, we advise
you to contact an approved Dealer.
1
The engine may be hot
during operations in close
proximity. In addition, the
engine cooling fan may
start at any moment.
Risk of injury.
A234
567
Page 175 of 241

JauneNoirNoir texte
5.3
ENG_UD21743_3
Crevaison (L38 - X38 - X32 - B32 - Renault)
ENG_NU_891_892-7_L38-B32_Renault_5
t o store the wheel in the cage
– Make sure the wheel is correctly po-
sitioned in the cage, valve facing
down.
– Reposition the cage using handle 5
and retighten the nut using wheel -
brace 3 to refit the assembly.
– Make sure it is correctly locked.emergency spare wheel, five-
door version
This is stored in cage 6 under the floor
at the rear of the vehicle.
to access emergency spare wheel 4
– Open the tailgate;
– Undo the nut using wheelbrace 3
from the tool kit in the luggage com-
partment (refer to the information on
the “Tool kit” in Section 5);
– Detach the cage using handle 5;
– Release the emergency spare
wheel.
4
5
3
6
1
2
emergency spare wheel,
four-door version
This is located in the luggage compart-
ment. To access it:
– open the tailgate;
– lift the luggage compartment carpet
using tab 1 and attach it to hook 2;
– depending on the vehicle, remove
the blanking cover;
– unscrew the central mounting;
– remove the emergency spare wheel.
Puncture, emergency sP are wheel (2/2)
Page 179 of 241

tool kit ................................................... (up to the end of the DU)
jack ....................................................... (up to the end of the DU)
puncture ................................................ (up to the end of the DU)
wheelbrace ........................................... (up to the end of the DU)
emergency spare wheel ....................... (up to the end of the DU)
wheelbrace ........................................... (up to the end of the DU)
5.7
ENG_UD23778_4
Bloc-outils (L38 - X38 - Renault)
ENG_NU_891_892-7_L38-B32_Renault_5
Tool kit (jack, wheelbrace, etc.)
t OOl KIt (1/2)
Four-door version
The tool kit is located under the lug -
gage compartment carpet.
Lift the luggage compartment carpet
using tab 5 and attach it to hook 4.
Depending on the vehicle, remove the
blanking cover to access the tool kit.
Five-door version
The tool kit is located in the luggage
compartment.
To access the tool kit, remove cover 1
by pulling handle 2.
2
1
3
To release the tools, pull back strap 3.
After use, reposition the strap to hold
the tools in place.
5
4
Do not leave the tools unsecured inside the vehicle as they may come
loose under braking. After use, check that all the tools are correctly
clipped into the tool kit, then position it correctly in its housing: there is a
risk of injury.
If wheel bolts are supplied in the tool kit, only use these bolts for the emergency
spare wheel: refer to the label affixed to the emergency spare wheel.
Page 184 of 241

tyre pressure.......................................................... (current page)
5.12
ENG_UD21376_2
Pneumatiques (L38 - X38 - Renault)
ENG_NU_891_892-7_L38-B32_Renault_5
Jaune NoirNoir texte
tyre pressuresAdhere to the tyre pressures (including
the emergency spare wheel). The tyre
pressures should be checked at least
once a month and additionally before
any long journey (refer to the label af -
fixed to the edge of the driver’s door). Pressures should be checked when the
tyres are cold; ignore higher pressures
which may be reached in hot weather
or following a fast journey.
If tyre pressures cannot be checked
when the tyres are
cold, the normal
pressures must be increased by 0.2 to
0.3 bar (or 3 PsI).
never deflate a hot tyre.
special note
Depending on the vehicle, there may
be an adapter which needs to be posi-
tioned on the valve before air is added.Fitting new tyres
emergency spare wheel
Refer to the information on the
“Emergency spare wheel” and in -
structions on “Changing a wheel” in
Section 5.
tyres (2/3)
Incorrect tyre pressures
lead to abnormal tyre wear
and unusually hot running.
These are factors which
may seriously affect safety and lead
to:
– poor road holding,
– risk of bursting or tread separa -
tion.
The pressure depends on the load
and the speed of use. Adjust the
pressure according to the condi -
tions of use (refer to the label affixed
to the edge of the driver’s door).
Please be aware that a
poorly tightened or miss -
ing valve cap can make the
tyres less airtight and lead
to pressure loss.
Always use valve caps identical to
those fitted originally and tighten
them fully.
For safety reasons, this op-
eration must be carried out
by a specialist.
Fitting different tyres may
change your vehicle as follows:
– It may mean that your vehicle no
longer conforms to current regu-
lations;
– It may change the way it handles
when cornering;
– It may cause the steering to be
heavy;
– It may affect the use of snow
chains.