Page 120 of 276
118
Under the bonnet
DIESEL ENGINES
8 -
Power steering reservoir.
9 -
Removable towing eye.
10 -
Priming pump ( a
: 1.6 litre HDi;
b
: 2 litre HDi).
11 -
Engine oil filling funnel (2 litre HDi).
UNDER THE BONNET
1 -
Screen/headlamp wash reservoir.
2 -
Fusebox.
3 -
Coolant header tank.
4 -
Brake and clutch fluid reservoir.
5 -
Air filter.
6 -
Engine oil dipstick.
7 -
Engine oil filler cap.
7.1 -
Engine oil filler cap.
If your vehicle is fitted with this oil filler
tube, proceed as follows:
A -
Remove the oil filler cap.
B -
Remove the filler tube from its location.
C -
Place the filler tube in the filler opening
as shown on the illustration.
D -
Turn it a 1/4 of a turn to the left to
lock it then top up the oil.
To refit, proceed in the reverse order
without forgetting to retighten the cap A
correctly.
Page 121 of 276
11 9
Under the bonnet
CHECK
S
6
PETROL ENGINE
4.
Brake and clutch fluid reservoir.
5.
Air filter.
6.
Engine oil dipstick.
1.
Screen/headlamp wash reservoir.
2.
Fusebox.
3.
Coolant header tank.
7.
Engine oil filler cap.
8.
Power steering reservoir.
9.
Removable towing eye.
Page 122 of 276

120
Levels
LEVELS
To maintain the reliability of engines and
emission control systems, the use of
additives in engine oil is prohibited.
Changing the brake fluid
The brake fluid must be changed at
the intervals stated, according to the
manufacturer's servicing schedule.
Use fluids recommended by the
manufacturer, which fulfil DOT4 standards.
The level must be between the MIN and
MAX marks on the reservoir.
If fluid has to be added frequently, this
indicates a fault which must be checked
by a PEUGEOT dealer or a qualified
workshop as soon as possible. These regular maintenance operations
will keep your vehicle in good running
order. Consult a PEUGEOT dealer or the
servicing booklet enclosed in the handbook
pack.
If you have to remove/refit the engine
style cover, handle it with care to avoid
damaging the fixing clips.
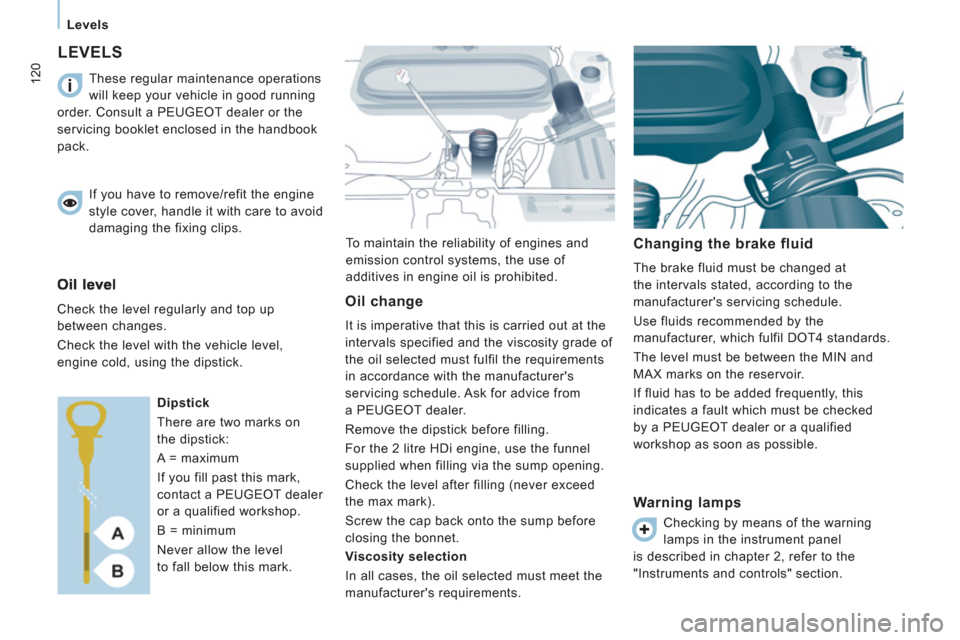
Check the level regularly and top up
between changes.
Check the level with the vehicle level,
engine cold, using the dipstick.
Dipstick
There are two marks on
the dipstick:
A = maximum
If you fill past this mark,
contact a PEUGEOT dealer
or a qualified workshop.
B = minimum
Never allow the level
to fall below this mark. Oil change
It is imperative that this is carried out at the
intervals specified and the viscosity grade of
the oil selected must fulfil the requirements
in accordance with the manufacturer's
servicing schedule. Ask for advice from
a PEUGEOT dealer.
Remove the dipstick before filling.
For the 2 litre HDi engine, use the funnel
supplied when filling via the sump opening.
Check the level after filling (never exceed
the max mark).
Screw the cap back onto the sump before
closing the bonnet.
Viscosity selection
In all cases, the oil selected must meet the
manufacturer's requirements.
Warning lamps
Checking by means of the warning
lamps in the instrument panel
is described in chapter 2, refer to the
"Instruments and controls" section.
Page 124 of 276

Checks
CHECKS
Battery
At the start of winter, have your battery
checked by a PEUGEOT dealer or a
qualified workshop.
Brake pads
Brake pad wear depends on the style of
driving, in particular for vehicles which are
used in town, over short distances. It may
be necessary to check the thickness of the
pads, even between services.
Unless there is a leak in the system, a drop
in the brake fluid level indicates that the
brake pads are worn.
Brake disc/drum wear
For any information on checking the brake
disc/drum wear, contact a PEUGEOT dealer
or a qualified workshop.
Parking brake
Where the parking brake travel is too great
or there is a reduction in the performance
of the system, the parking brake should be
adjusted, even between services.
Have the system checked by a PEUGEOT
dealer or a qualified workshop.
Oil filter
Change the filter regularly, in accordance
with the servicing schedule.
Carbon filter and passenger compartment filter
The carbon fi lter permits continuous and
effective fi ltering of dust.
If the passenger compartment fi lter becomes
clogged, this may reduce the performance
of the air conditioning system and generate
unpleasant odours.
We recommend the use of a combined
passenger compartment fi lter. By means of
its second special active fi lter, it contributes
to the purifi cation of the air breathed by the
occupants and the cleanness of the passenger
compartment (reduction of allergic symptoms,
unpleasant odours and greasy deposits).
Refer to the servicing booklet to fi nd out the
replacement interval for these components.
Depending on the environment (dusty
atmosphere...) and the use of the vehicle
(urban driving...), change them twice as often
if necessary.
This filter actively contributes
to the preservation of air quality
by trapping unburnt polluting
particles. It is controlled
completely and automatically by the engine
management system.
This warning lamp comes on if there is a risk
of blockage of the filter.
This alert signals the start of saturation of
the particle emissions filter (exceptionally
prolonged driving in urban conditions:
reduced speed, traffic jams…).
If this alert persists, contact a PEUGEOT
dealer or a qualified workshop.
On acceleration after the vehicle has been
running for a prolonged period at very low
speed or at idle, you may, in exceptional
circumstances, notice the emission of water
vapour at the exhaust. This water vapour
does not have any adverse effect on vehicle
handling or the environment.
To regenerate the filter, it is recommended
that as soon as driving conditions permit,
you drive at a speed of at least 36 mph
(60 km/h) for at least 5 minutes (until the
warning lamp goes off and/or the message
disappears).
Refer to "Under the bonnet" in section 6.
Page 134 of 276

132
Changing a wheel
CHANGING A WHEEL
If your vehicle is equipped with a spare
wheel located underneath the vehicle, follow
these instructions.
1. PARKING THE VEHICLE
- You must ensure that the occupants
get out of the vehicle and wait in a safe
location.
- If possible, park the vehicle on level,
stable and non-slippery ground.
- Apply the parking brake, switch off the
ignition and engage first or reverse gear.
- If available, place a chock under the
wheel diagonally opposite the one to be
changed.
On certain types of ground and/or if heavy
loads are being transported, the vehicle
must be raised in order to disengage
the spare wheel from the carrier. Call a
PEUGEOT dealer or a qualified workshop.
If your vehicle is fitted with suspension
with pneumatic height correction,
please deactivate the system. Refer to the
"Rear suspension" section of chapter 3.
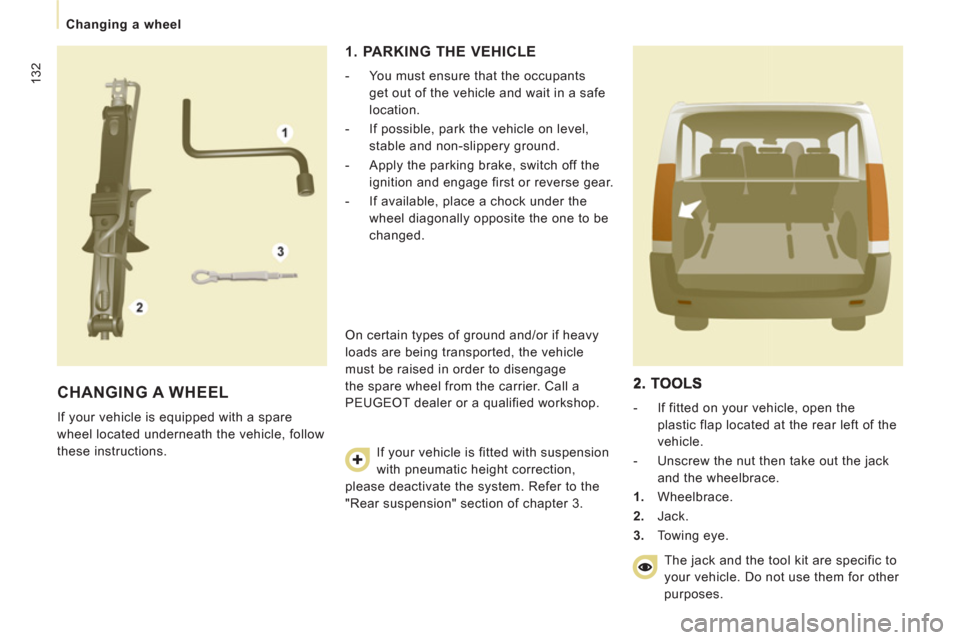
- If fitted on your vehicle, open the
plastic flap located at the rear left of the
vehicle.
- Unscrew the nut then take out the jack
and the wheelbrace.
1.
Wheelbrace.
2.
Jack.
3.
Towing eye.
The jack and the tool kit are specific to
your vehicle. Do not use them for other
purposes.
Page 142 of 276
140
Changing a bulb
REAR LAMPS
For more information on bulbs, refer to the
"Types of bulb".
- Identify the faulty bulb then open the
rear doors to 180°. Refer to the "Access"
section of chapter 2.
- Remove the two fixing nuts.
Pull the lens unit from the outside.
- Holding the lamp unit, disconnect the
electrical connector.
- Move aside the 8 tabs then extract the
bulb holder.
- Remove the failed bulb by pressing it
lightly while turning it anticlockwise.
- Change the bulb.
1.
Brake
lamps
/
sidelamps
Type B
, P21/5W - 21/5W
2.
Direction indicators
Type B
, PY21W - 21W (amber)
3.
Reversing
lamps
Type B
, P21W - 21W
4.
Foglamps
Type B
, P21W - 21W When refitting, take care to correctly
reposition:
- the 8 tabs,
- the two white lugs in the two rubber
holes to maintain the sealing of the lamp
unit,
- the supply wire to avoid trapping it.
Page 143 of 276
Changing a bulb
QUICK HEL
P
7
THIRD BRAKE LAMP
Type A
, W5W - 5W
Type B
, P21W - 21W
NUMBER PLATE LAMPS
Type A
, W5W - 5W
With tailgate
- Move aside the plastic lens using a
screwdriver, on the point indicated by
the arrow.
- Change the bulb.
- Replace the plastic lens and press on it.
With hinged doors
- Unclip the interior trim.
- Disconnect the connector by moving
aside its tab.
- Remove the plastic cover.
- Turn the bulb holder a quarter turn
anticlockwise.
- Change the bulb.
Lamp located on the outside (hinged
doors)
- Unscrew the two screws using a Torx
TM
20 screwdriver.
- Remove the lamp.
- Change the bulb.
Lamp located on the inside (tailgate)
- Unscrew the two screws using a Torx
TM
20 screwdriver.
- Remove the plastic cover.
- Remove the bulb holder moving aside
the two tabs.
- Remove the failedbulb by pressing it
lightly while turning it anticlockwise.
- Change the bulb.
Page 147 of 276
145
Changing a fuse
QUICK HEL
P
7
FUSES UNDER THE BONNET
- After opening the bonnet, slide aside the
screenwash reservoir support to make
access easier.
- Unclip and tilt the box to access the
fuses.
Fuses
A (amps)
Allocation
1
20
Engine control unit, Fuel supply and air supply systems,
Fan assembly
2
15
Horn
3
10
Front and rear screenwash pump
4
20
Headlamp wash pump
5
15
Fuel supply system
6
10
Power steering, Secondary brake pedal switch
7
10
Braking system (ABS/ESP)
8
20
Starter motor control
9
10
Main brake pedal switch
10
30
Fuel supply and air supply systems, Emissions control
systems
11
40
Front ventilation
12
30
Windscreen wipers
13
40
Built-in systems interface
14
30
Free